German counter-attack, 25 September 1917
| ||||||||||||||||||||||||||||
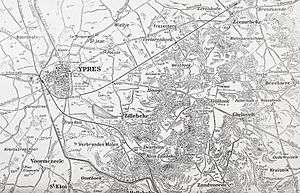

The German counter-attack of 25 September 1917 took place during the Third Battle of Ypres (31 July – 10 November) on the Western Front during the First World War. On the British X Corps (Lieutenant-General Thomas Morland) front on the south-east side of the Gheluvelt Plateau, two regiments of the German 50th Reserve Division attacked on a 1,800-yard (1,600 m) front, either side of the Reutelbeek. The Gegenangriff (organised counter-attack) was supported by aircraft and 44 field and 20 heavy batteries of artillery, four times the usual amount of artillery for a division. The advance was due to commence at 5:15 a.m. but the shells fell short onto the German assembly area and the German infantry had to fall back until the barrage began to creep forward at 5:30 a.m.
The German infantry managed to advance for about 100 yards (91 m) near the Menin road on the southern flank and 600 yards (550 m) on the northern flank beyond the Reutelbeek, close to Black Watch Corner at the south-west edge of Polygon Wood. The attack was supported by artillery-observation aircraft, ground-attack aircraft and a box-barrage fired behind the British front-line, which isolated the British defenders from reinforcements and cut off the supply of ammunition. Return-fire from the 33rd Division (Major-General Reginald Pinney) and the 15th Australian Brigade of the 5th Australian Division (Major-General Talbot Hobbs) along the southern edge of Polygon wood, forced the attackers under cover. The Wilhelm Stellung on the plateau had fallen to the British during the Battle of the Menin Road Ridge on 20 September and German parties sheltered in some of its pillboxes near Black Watch Corner. German attempts to reinforce the attacking troops failed, due to British artillery observers isolating the advanced German troops with artillery barrages.
General Herbert Plumer, the commander of the Second Army, ordered the attack scheduled for 26 September to go ahead but modified the objectives of the 33rd Division. The 98th Brigade was to advance and cover the right flank of the 5th Australian Division and the 100th Brigade was to re-capture the lost ground further south. The Australian advance the next day began with uncertainty as to the security of the right flank; the attack of the depleted 98th Brigade was delayed and only managed to reach Black Watch Corner, 1,000 yards (910 m) short of its objectives. Reinforcements moved forward into the 5th Australian Division area to the north and attacked south-westwards at noon, at the same time as a frontal attack from Black Watch Corner without artillery support, because troops were known to be holding out in the area captured by the Germans the day before. The attack succeeded by 2:00 p.m. against massed machine-gun fire and later in the afternoon, the 100th Brigade re-took the lost ground north of the Menin road. Casualties in the 33rd Division were so great that it was relieved on 27 September by the 23rd Division, which had only been out of the line since the night of 24/25 September.
Background
Strategic developments
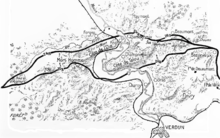
The failure of the Kerensky Offensive in Russia in July had hastened the disintegration of the Russian army, the possibility of an Russian armistice and a huge reinforcement of the German Western Front. From 15 August to 25 August the Battle of Hill 70 was fought by the Canadian Corps and forestalled the transfer of divisions to flanders and on 20 August, the French attacked at Verdun and in four days captured much of the ground lost to the Germans in 1916 and captured 9,500 prisoners, thirty guns, 100 trench mortars and 242 machine-guns.[1][2] The French attack at Verdun inflicted a defeat on the German 5th Army similar in extent to the defeat of the 4th Army in the Battle of Messines in June. The Germans were not able to mount big counter-attacks because their Eingreif divisions had been transferred to Flanders.[3] French preparations continued for an offensive on the Chemin des Dames at La Mamaison and British Third Army preparations continued for a surprise attack with a mass of tanks on the Flesquières Salient near Cambrai. France was running short of men and at the end of September, the French Minister of War had been told that another defeat could provoke more mutinies, which would be terminal. British GHQ in France feared the possibility that the French might be forced into a separate peace.[4]
Tactical developments
The General Headquarters staff of the British Expeditionary Force (BEF) quickly studied the results of the attack of 31 July and on 7 August, sent questions to the army headquarters about the new conditions produced by German defence-in-depth. The 4th Army had spread strong points and pillboxes in the areas between its defensive lines and made rapid counter-attacks with local reserves and Eingreif divisions (specialist counter-attack divisions), against Allied penetrations.[5][lower-alpha 1] Plumer issued a preliminary order on 1 September, which defined the Second Army area of operations as Broodseinde and the area southwards. The plan was based on the use of much more medium and heavy artillery, which had been brought to the Gheluvelt Plateau from VIII Corps, on the right of the Second Army and by removing more guns from the Third Army and Fourth Army, which were further south in Artois and Picardy.[6]
The increased amount of heavy artillery was to be used to destroy German concrete shelters and machine-gun nests, which were more numerous in the German battle zones, than the outpost zones which had been captured in July and August and to engage in more counter-battery fire.[7] Few German concrete pill-boxes and machine gun nests had been destroyed during earlier preparatory bombardments and attempts at precision bombardment before attacks had also failed. The 112 × heavy and 210 × field guns and howitzers in the Second Army on 31 July, were increased to 575 × heavy and medium and 720 × field guns and howitzers for the battle, which was equivalent to one artillery piece for every 5 feet (1.5 m) of the attack front, more than double the density at the Battle of Pilckem Ridge.[8]
Plumer's tactical refinements sought to defeat the German defence, by making a shallower penetration and then fighting the principal battle against German Eingreif divisions. By further reorganising the infantry reserves, Plumer ensured that the depth of the attacking divisions roughly corresponded to the depth of local German counter-attack reserves and the Eingreif divisions. More infantry was provided for the later stages of the advance, to defeat German counter-attacks, by advancing no more than 1,500 yards (1,400 m) and then consolidating their positions, preferably on reverse-slopes.[9] When the Germans counter-attacked, they would encounter a British defence-in-depth protected by artillery and suffer many casualties to little effect, rather than the small and disorganised groups of British infantry that the Germans had driven back on 31 July, 10 and 16 August.[10] After the big defeat at the Battle of the Menin Road Ridge on 20 September, the 4th Army changed the way that regiments and battalions were arrayed in their defensive positions.[11]
During August, each German front-line division had kept two regiments in the front position, with all six of their battalions and the third regiment was held further back in reserve. The front battalions had needed to be relieved much more frequently than expected, due to constant British bombardments and the wet weather. Periods in the line were exhausting and battalions had been sent where needed, dispersing units and disorganising their command structures. Regiments in reserve had not been able to conduct a Gegenstoss (immediate counter-attack), which had left the battalions furthest forward unsupported, until Eingreif divisions arrived from the rearmost parts of the defences, some hours later. By 26 September, all three regiments of each line-holding division had been deployed the front line, each holding an area 1,000 yards (910 m) wide and 3,000 yards (2,700 m) deep, with one battalion in the front line, one in support and the third in close reserve.[11]
The three battalions of each regiment were to move forward, successively to engage British battalions, which leap-frogged through those of the previous stage of an attack. The Eingreif divisions were to deliver a Gegenangriff (organised counter-attack with artillery and air support) later in the day, before the British could consolidate captured ground.[12] The change was intended to remedy the neutralisation of the front division reserves, which had occurred on 20 September because of the massed bombardments and barrages of the British artillery; the reserve battalion in each regimental sector, would be able to counter-attack before the Eingreif divisions arrived. On 22 September, new tactical requirements were laid down, that more artillery bombardments were to be fired between British attacks, half of the artillery to conduct counter-battery fire against British artillery and the other half to bombard infantry positions. More infantry raids were to be conducted, to induce the British to reinforce the front line and make a denser target for the German artillery. Improvements in artillery observation in the battle zone were also ordered, to increase the accuracy of German artillery-fire as the British attacked.[13]
Prelude
German offensive preparations
On 23 September, Crown Prince Rupprecht wrote in his diary that the higher ground at Zonnebeke and Gheluvelt was vulnerable to another British attack and that it was vital that the German counter-attack system did not fail again. Next day, Rupprecht wrote that he hoped that another British attack would be delayed, as the 4th Army had insufficient reserves for the whole of the active front east of Ypres.[14] Rupprecht ordered a Gegenangriff (organised counter-attack) against the British flank between the Menin Road and Polygon Wood, which was longer since the attack on 20 September. Group Wytschaete was to attack with the 50th Reserve Division, which had relieved the Bavarian Ersatz Division. The commander of Reserve Infantry Regiment 229 (RIR 229) warned that the attack would fail, unless it was most carefully prepared and supported by an attack by Group Ypres opposite Polygon Wood but the suggestion was over-ruled. The counter-attack was postponed by one day and command was transferred to Major Litzmann, the commander of Reserve Infantry Regiment 230 (RIR 230).[15]
German plan of attack
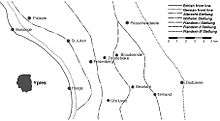
On 25 September, German troops were to conduct a Gegenangriff on the Fifth Army front opposite the 20th (Light) Division in XIV Corps and a bigger attack against the X Corps front, in the centre of the Second Army, south of the I Anzac Corps in Polygon Wood.[16][17] The 50th Reserve Division had been the Eingreif division for Group Dixmude from 10 August – 19 September and was moved south to the Menin area as a reserve. The division then relieved the Bavarian Ersatz Division on 21 September, for an attack by a battalion in each of the three regimental sectors, on a 1,800-yard (1,600 m) front, from the Menin road north to Polygon Wood on the Gheluvelt plateau. The attack was to begin at 5:15 a.m. to recapture the Wilhelm Stellung opposite Group Wytschaete, about 500 yards (460 m) to the west from the Menin road northwards to the Reutel road south of Polygon Wood. It was hoped that the attack would impose a delay on the British, while fresh divisions were moved to the Flanders front, to re-establish the defensive system which had been overrun during the attack on 20 September.[18][19] The III Battalion, RIR 229 was to attack north of the Reutelbeek and III Battalion, RIR 230 (Colonel Litzmann), was to attack from the Reutelbeek north to Polygon Wood and troops from the 4th Army Storm Battalion, were to attack in the area of RIR 231, on the Menin road.[15]
British offensive preparations
| Date | Rain mm |
Temp (°F) |
Outlook |
|---|---|---|---|
| 20 | 0.0 | 66 | dull |
| 21 | 0.0 | 62 | cloud |
| 22 | 0.0 | 63 | clear |
| 23 | 0.0 | 65 | clear |
| 24 | 0.0 | 74 | 50% cloud |
| 25 | 0.0 | 75 | misty |
| 26 | 0.5 | 68 | misty |
| 27 | 0.0 | 67 | dull |
On 21 September, Haig instructed the Fifth and Second armies to make the next step across the Gheluvelt Plateau, on a front of 8,500 yards (7,800 m). The I Anzac Corps was to conduct the main advance of about 1,200 yards (1,100 m), to complete the occupation of Polygon Wood and take the south end of Zonnebeke village.[21] The huge volume of shell-fire from both sides had cut up the ground and destroyed roads. On 20 September, construction of new road and light railway circuits to carry artillery and ammunition forward was begun behind the new front line and finished in four days of fine weather. Heavier equipment bogged in churned mud and had to be brought forward by wagons along the new roads and tracks, rather than being moved cross-country and many of the new routes could be seen by German artillery observers on Passchendaele ridge. Bombardment and counter-battery fire began immediately, with practice barrages fired daily as a minimum.[21] Artillery from VIII Corps and IX Corps to the south, fired bombardments to simulate preparations for an attack on Zandvoorde and Warneton. [22]
The Second Army altered its corps frontages soon after the attack of 20 September, to concentrate each attacking division on a 1,000 yards (910 m) front. The frontages of VIII and IX corps were moved northwards, for X Corps to take over 600 yards (550 m) of front up to the southern edge of Polygon Wood, which kept the frontages of the two Australian divisions of I Anzac Corps to 1,000 yards (910 m) each. The 33rd Division (Major-General Reginald Pinney) replaced the 23rd Division (Major-General James Melville Babington) beyond the Menin Road on the night of 24/25 September and the 5th Australian Division (Major-General Talbot Hobbs) and 4th Australian Division (Major-General Ewen Sinclair-Maclagan), replaced the 1st Australian Division (Major-General Harold Bridgwood Walker) and the 2nd Australian Division in Polygon Wood.[23]
Battle
25 September
50th Reserve Division

The attacking battalions of the 50th Reserve Division assembled during the night of 24 September with few casualties, covered by parties of the line-holding battalions which had moved into no-man's-land. The exceptionally large amount of supporting field and heavy artillery began a bombardment at 5:15 a.m. and the German infantry immediately fired red flares, signalling that the bombardment was falling short onto them, especially the III Battalion, RIR 230, south of the Reutelbeek. The troops retired until the bombardment began to creep forward at 5:30 a.m., then advanced behind it. German artillery-observation aircraft flew at low altitude and fired white flares, to show the position of the German infantry to the artillery. On the right flank, the 4th Company of I Battalion, RIR 229, advanced against the 58th Australian Battalion, to form a defensive flank linking with the southern flank of RIR 49 of the 3rd Reserve Division in Group Ypres to the north. Major Hethey, the Kampftruppenkommandeur (KTK, front battalion commander) of the area north of the Reutelbeek, had kept the 9th Company of the III Battalion, RIR 229 further back behind the northern flank as a tactical reserve. German contact-patrol aircrew established the position of the German line and reported this within ten minutes to Group Wytschaete headquarters.[24]
Hethey came forward and made Jerk House, a re-captured pillbox, the KTK headquarters and ordered up the 9th Company to reinforce the centre. At 10:00 a.m., the attack resumed but two companies of II Battalion, RIR 229 were not needed, as by 11:00 a.m., objective had been reached. South of the Reutelbeek, the III Battalion, RIR 230 had advanced into muddy ground against the area held by the 4th King’s and no ground was gained. The Storm Battalion got forward along the Menin road and was then repulsed by a local counter-attack; prisoners taken by the German troops said that a British attack was due the next day.[25] On the right flank, Hethey organised the consolidation of the new positions during the night as the infantry companies had become mingled and all the commanders of the III Battalion and two in the I Battalion, had been wounded. The I Battalion (Captain Fischer) with the 4th, 3rd, 5th, and 6th companies and attached storm troops, took over on the right near Polygon Wood. Hethey with the III Battalion, a company of the II Battalion, RIR 229 and half of II Battalion, RIR 230, held the left flank in the Reutelbeek valley, the 1st, 7th and 8th companies of RIR 229 being held back in Cameron Covert as a reserve. The III Battalion, Fusilier Regiment 90, the most advanced battalion of the fresh 17th Division, acted as an Eingreif unit in Flandern I Stellung.[26]
33rd Division
At 5:15 a.m. on 25 September, just as the 33rd Division completed the relief of the 23rd Division, a huge German bombardment began on the divisional front. The shell-fire reached so far back that road transport was made impossible and the sound of the bombardment and vibrations in the ground were felt at Boulogne.[27] SOS rockets were fired all along the 33rd Division front and British artillery and machine-guns replied at once. German infantry attacked up the Menin road from Gheluvelt, supported by flame-thrower teams, who fired burning oil 100 yards (91 m) forwards and upwards into trees which had dried out in the sunny weather and caught fire immediately. The forward positions of the 1st Queen's (Royal West Surrey) (1st Queen's), on the right flank of the 100th Brigade were overrun and the 2nd Worcester in reserve at Inverness Copse lost half its strength in the bombardment. The 1/9th Highland Light Infantry (1/9th HLI) advanced quickly and filled a gap on the flank of the 1st Queen's and the remnants of the 2nd Worcester dug in as the 4th Battalion King's Liverpool (4th King's) of the 98th Brigade extended its right flank. The 4th King's regained touch with the 2nd Worcester after it had sidestepped southwards, to keep in contact with the 1st HLI behind the 1st Queen's and to add to the small-arms fire being directed at the attackers.[27]
On the left of the 98th Brigade, the 2nd Argyll and Sutherland Highlanders (2nd Argyll) and the 1st Middlesex were forced back and a company of each battalion was cut off by German troops by-passing their flanks. The 207th (Independent) Machine-gun Company had been placed behind the front line, with 16 Vickers machine-guns in groups, which watched as German officers led their troops forward over slight rise. When the second line of German infantry was visible on the forward slope as far down as their knees and too far forward to retreat, the guns opened fire. German aircrews flying low over the battlefield soon saw the machine-guns, called for artillery-fire and began to strafe them, causing many casualties, until the guns were withdrawn a short distance. During the day, the intensity of British artillery-fire diminished, due to the huge amount of German counter-battery fire cutting off the guns from their ammunition supply. Communication with the front line was cut, except for a few lucky message-runners who managed the three-hour journey from Brigade headquarters at the Tor Tops pillbox. The smoke and dust raised by the German and British bombardments blocked the view and the troops who moved forward as reinforcements disappeared from view, many never to return.[28]
5th Australian Division

On 25 September, dawn broke fine but hazy, as preparations for the big attack due next day continued behind the Second Army front line. Practice barrages had been scheduled for 6:30 a.m. by all the artillery of the Second Army for an hour and then an 18-minute bombardment was due at 8:30 a.m. from the I Anzac Corps artillery. German artillery opened fire at 4:30 a.m. and an hour later, SOS rockets were fired in the 33rd Division sector on the left flank of X Corps and by the 5th Australian Division on the right flank of the I Anzac Corps. The quantity of German shell-fire was much greater than normal and at 7:15 a.m., a messenger pigeon returned to the 33rd Division headquarters, with news that the front line in the southern sector on the Menin road had been captured.[29][lower-alpha 2] German infantry had pushed back the 1st Middlesex and got machine-guns onto the Reutelbeek road at the boundary between X Corps and the I Anzac Corps at the Reutelbeek and Polygon Wood. Further south, an attack against the 4th King's of the 100th Brigade had been repulsed.[29]
German aircraft bombed the area behind the 5th Australian Division and hit the advanced divisional ammunition dump, which blew up, scattering bullets and hand grenades and destroying several lorries on the Menin road. The 58th Battalion of the 15th Australian Brigade on the right flank, requested reinforcements but the only troops available were those preparing for the attack on 26 September, so a company of the 60th Battalion was sent up.[31] On the right flank, the 33rd Division sector was also under such bombardment that communication had become impossible. The commander of the 98th Brigade also called on troops intended for the attack next day, to co-operate with the 15th Australian Brigade to the north. At 9:40 a.m., two companies the 2nd Argyll and Sutherland Highlanders were sent forward to join the 1st Middlesex counter-attack.[32]
At the beginning of the German attack, the 58th Australian Battalion, in the south-western edge of Polygon Wood, saw the German infantry 500 yards (460 m) away, advancing in small "worm" columns.[15] The I Anzac Corps barrage came down within 15 seconds of the SOS call but it fell between the foremost German troops and the supporting units. The Australian infantry engaged the Germans with small-arms fire as they advanced from Cameron House and sheltered behind the remnants of hedges along the Reutel road. The 1st Middlesex on the right flank retreated and at 5:55 a.m., the attackers tried to rush the Australian right flank. The Germans were repulsed three times, although a German party held on in a shell-crater, from which they threw grenades into the right-flank post, until silenced by a rifle-grenade. Most of the surviving German infantry went under cover about 100 yards (91 m) from the Australians. At 6:10 a.m., a soldier of the 1st Middlesex reported to the Australians, that the Germans had got into the 1st Middlesex front line close on the right, by when the Germans had placed a line of machine-guns along the Reutel road. The Australians swung their right flank further to the right, parallel to the road. Germans were then seen infiltrating towards the 1st Middlesex support line and more reinforcements were requested.[33]
The German barrage was at its greatest intensity but from 9:00 a.m., more troops went forward through the curtain of shell-fire and extended the Australian right flank. The British practice barrages had been fired on schedule but had fallen behind the German infantry, after which the accuracy of the British artillery reply increased. At 10:00 a.m., German troops were seen working forward from Jerk House towards several pillboxes in the 1st Middlesex area, on a rise 150 yards (140 m) behind the right flank of the 58th Australian Battalion. The Australian Stokes mortar crews ran short of bombs and the battalion was engaged from behind its right flank. From the German rear, a large number of troops advanced in close order and were engaged with small-arms fire.[34]
The 58th Battalion received warning of the 1st Middlesex counter-attack due at 2:00 p.m., with which the 60th Battalion was to co-operate. The 58th Battalion was ordered to hold on and at 12:30 p.m., a company of the 60th Battalion arrived and took post on the right flank. Two platoons of the 2nd Argyll and Sutherland Highlanders also arrived and extended the flank back past Black Watch Corner. No barrage was seen and no infantry attack took place at zero hour but at 2:03 p.m., the Australians attacked anyway, advancing from shell-hole to shell hole, covered by Stokes mortar fire and forced back the Germans. The advance was stopped while touch was sought with the 1st Middlesex and a small party troops was found over to the right. Australian troops far out to the right rear saw two companies of the 2nd Argyll and Sutherland Highlanders advance down the head of the valley, with no protective barrage.[35]
The Scots advanced in two lines, through a huge amount of return-fire and the first line passed Lone House, south-west of Black Watch Corner, cutting off a small party of Germans. Together with a few men of the 1st Middlesex, the Argylls dug in with a second line 100 yards (91 m) behind, about 350 yards (320 m) behind the Australian flank; information about the new positions did not get back to the British and Australian commanders. The main German attack had ended at 11:00 a.m. but German airmen, unopposed by British aircraft, saw the advance of the Australian flank and ground observers watched reserves moving forward through Glencorse Wood under constant bombardment, which caused many British and Australian casualties. The Australian defensive flank was also bombarded and a retirement from there was contemplated, because of the number of German troops visible at Cameron House. After waiting until 5:00 p.m., in case of a British counter-attack, the Australians retired by dribbling back.[36]
The 98th Brigade planned to counter-attack behind a creeping barrage at 2:03 p.m., after a short bombardment and the 15th Australian Brigade was ordered to participate. At 4:55 p.m., Hobbs was told by the 33rd Divisional artillery, that the counter-attack had not taken place and by the 33rd divisional headquarters that the 98th Brigade had been seen advancing at 2:45 p.m. At 5:08 p.m., the 33rd Division reported that the counter-attack had succeeded but information from the 58th Battalion, was that many Germans had been seen assembling at Cameron House, opposite the corps boundary. At 7:30 p.m., the 98th Brigade reported that it had been forced back to the area of Verbeek Farm, about 750 yards (690 m) behind the right flank of the 58th Brigade.[37]
By nightfall, three of the four Australian battalions due for the attack on 26 September, had been committed. The 15th Australian Brigade in the north and the 4th King's of the 98th Brigade south of the gap made by the German counter-attack, had maintained their front line. On the Australian right, the Germans were level with the Australian support line, well behind the alignment on which the attacking troops must assemble. The Germans not been repulsed and the 33rd Division was uncertain where its troops were. Tapes to mark the start-lines for the next day's attack were almost due to be laid but officers of the 58th Battalion, who were to guide the assembling battalions, had been killed or wounded. The divisional dump and two forward dumps, from which the attacking troops were to have drawn their stores and ammunition, had been blown up and it had to be assumed that the Germans now knew of the attack due on 26 September. During the evening, Hobbs warned the 8th Australian Brigade (Brigadier-General Tivey) in reserve, that it might have to carry out the attack or detach two battalions for it.[38]
26 September
The 4th Suffolk and 5th Scottish Rifles replaced the Argylls and 1st Middlesex for the attack on 26 September, with orders to pass through them during the advance. With no knowledge of their positions, a creeping barrage could not be used and tanks were substituted, to advance in front of the infantry. Groups of the isolated battalions were discovered around Lone Farm 400 yards (370 m) south of Black Watch Corner.[39] RIR 230 managed to counter-attack the British near Jut Farm at about 2:00 p.m. and IR 78 of the 19th Reserve Division moved up behind IR 231. The main counter-attack was conducted by the 17th Division, which had been hurried forward from Gheluve to Gheluvelt and was attached to IR 231, to advance through the positions of the 50th Reserve Division, with the 236th Division on its right and capture the Wilhelm Stellung.[40] The I Battalion, IR 75 and II Battalion, IR 75, attacked from the Menin road north to the Reutelbeek against the positions of the 100th Brigade, the first battalion in extended order and the other following in close formation. British artillery-observers directed so much artillery-fire onto the German infantry, that only a few parties reached the front line west of Polderhoek, where they were engaged by small-arms fire and the few Germans who kept going were dispersed by bayonet charges.[41]
As the 5th Australian Division attacked at 5:50 a.m.,, Hethey ordered a counter-attack from Jerk House by two companies of the II Battalion, RIR 230. The counter-attack took thirty prisoners but Hethey was killed at 6:30 a.m. and Lieutenant Glaubitz, then Lieutenant Weigel took over, being killed in turn around 7:00 a.m. Lieutenant Stolting of the machine-gun company was killed at 7:30 a.m., after which the adjutant, Lieutenant Körber, took over the defence and was the last man to get out of Polygon Wood.[26][40] The Germans retired from Jerk House at noon but machine-gun crews farther south gained a good view of the attack at about 11:00 a.m., when mist on the right flank dispersed. Troops of RIR 230 on the Polderhoek spur, saw the British advancing behind a creeping barrage, pushing to the south-east.[42]
At 1,100–2,000 yards (1,000–1,800 m), every machine-gun opened fire, the British artillery being unable fully to suppress them; seven machine-guns of the 1st Company fired more than 20,000 rounds.[42][43] Grenadier Regiment 89 was to attack through the positions held by RIR 229 on the right of the 50th Reserve Division but ran into artillery-fire in the Holle Bosch (Hollow Wood). The regiment was shattered by the Australian defensive barrage as it advanced over Reutel Hill, towards the south end of Polygon Wood. At 6:50 p.m., the Germans made a final counter-attack, from the Tower Hamlets spur in the south-west to Polygon Wood to the north-east. A few Germans got through the defensive barrages and were engaged by small-arms fire, suffering exceptional losses; around 8:30 p.m. the German counter-attacks stopped and a lull lasted for the rest of the night.[44]
Aftermath
Analysis
An intelligence summary of the Second Army assessed the German artillery in support of the Gegenagriff of 25 September, to have been the greatest concentration of artillery on a German divisional sector ever known and was nearly four times the usual quantity for a division. The attacking battalions had assembled during the night of 24/25 September, covered by parties of the line-holding battalions opposite the 33rd Division. The great mass of German artillery began a bombardment at 5:15 a.m. but fell short and German infantry fired red flares to signal to the German artillery that they were falling short, especially on the III Battalion, RIR 230, south of the Reutelbeek. The attacking troops withdrew slightly until 5:30 a.m., when the barrage began to creep forward. Rupprecht was well pleased with the results of the attack on 25 September and went on leave that evening, under the impression that the British would not be able to attack for a few days.[45]
In 1948, J. E. Edmonds, the British official historian, wrote that the "desperate" German counter-attack had failed even to change the British zero hour for the attack on 26 September. Edmonds quoted Der Weltkrieg, the German official history, that on 26 September, counter-attacks by the specialist 17th, 236th and 4th Bavarian Eingreif divisions took 1 1⁄2–2 hours to move 0.62 miles (1 km), that their formations had been broken and their capacity to attack eliminated.[46] The German government presented allegations in November, that the 1st Middlesex had been ordered to shoot any armed German stretcher-bearers taken prisoner. It was alleged that this was against Article Six of the Geneva Convention of 1906, which allowed medical personnel to be armed for self-defence and defence of the wounded in their care; the claim was denied by the British government in its reply.[47]
Casualties
The 33rd Division lost 2,905 casualties and the 5th Australian Division had 3,723 losses from 25–26 September, the 15th Australian Brigade total being 1,203 men.[48][49] Detailed information on German casualties from 25–26 September is limited but the effect of the British attack on 26 September inflicted such casualties on the ground-holding and Eingreif divisions in its path, that all were relieved urgently.[50]
Subsequent operations
On 27 September, the 39th Division on the right flank of the X Corps, defeated three German counter-attacks with artillery fire. On the 33rd Division front, after a report that Cameron House had been captured, a battalion attacked past it and reached the blue line, the original objective for the attack on 25 September. The 98th Brigade to the north attacked towards the 5th Australian Division, against determined German resistance and linked with the Australians in Cameron Covert at 3:50 p.m. A lull followed until 4:30 a.m. on 30 September, when an attack was made by regiments of the fresh 8th Division, the 45th Reserve Division and the 4th Army Sturmbattalion, with flame-throwers and a smoke screen, from the Menin road to the Reutelbeek against the 23rd Division (which had returned from reserve to take over the 33rd Division front). Massed small-arms fire repulsed the attack against the 70th Brigade, despite SOS signals to the artillery being obscured by mist and a smaller attempt at 6:00 a.m., was also defeated.[51]
Notes
- ↑ Bidwell and Graham wrote that since Plumer had described the new German system after the Battle of Messines, this was already known and lay behind the reservations of Major-General J. H. Davidson, the BEF Director of Military Operations, to the Fifth Army plan for the attack of 31 July.[5]
- ↑ Power buzzer leads were broken and pigeons were killed or made unconscious by concussion from bursting shells.[30]
Footnotes
- ↑ Michelin 1919, pp. 23–24.
- ↑ Doughty 2005, pp. 382–282.
- ↑ Edmonds 1991, p. 231.
- ↑ Edmonds 1991, pp. 235–236.
- 1 2 Bidwell & Graham 1984, pp. 127–128.
- ↑ Edmonds 1991, pp. 238, 244.
- ↑ Edmonds 1991, p. 238.
- ↑ Edmonds 1991, p. 239.
- ↑ Malkasian 2002, p. 41.
- ↑ Edmonds 1991, p. 247.
- 1 2 Rogers 2011, p. 168.
- ↑ Rogers 2011, p. 170.
- ↑ Edmonds 1991, p. 295.
- ↑ Bean 1941, p. 803.
- 1 2 3 Bean 1941, p. 804.
- ↑ Moorhouse 2003, pp. 174–175.
- ↑ Bean 1941, pp. 799–809.
- ↑ Sheldon 2007, p. 167.
- ↑ Edmonds 1991, p. 283.
- ↑ McCarthy 1995, pp. 69–82.
- 1 2 Edmonds 1991, p. 280.
- ↑ Bean 1941, pp. 791–796.
- ↑ Edmonds 1991, pp. 282–283.
- ↑ Bean 1941, pp. 804–805.
- ↑ Bean 1941, pp. 806–807.
- 1 2 Bean 1941, p. 816.
- 1 2 Seton Hutchinson 1921, p. 67.
- ↑ Seton Hutchinson 1921, p. 68.
- 1 2 Bean 1941, pp. 799–800.
- ↑ Ellis 1920, p. 240.
- ↑ Bean 1941, pp. 800–801.
- ↑ Bean 1941, p. 801.
- ↑ Bean 1941, p. 805.
- ↑ Bean 1941, p. 806.
- ↑ Bean 1941, p. 807.
- ↑ Bean 1941, p. 808.
- ↑ Bean 1941, pp. 802–803.
- ↑ Bean 1941, p. 809.
- ↑ Dunne 1938, pp. 392, 394.
- 1 2 Sheldon 2007, p. 169.
- ↑ Edmonds 1991, p. 291.
- 1 2 Bean 1941, p. 821.
- ↑ Edmonds 1991, p. 287.
- ↑ Edmonds 1991, pp. 291–292.
- ↑ Bean 1941, pp. 803–804.
- ↑ Edmonds 1991, p. 284.
- ↑ Seton Hutchinson 1921, pp. 74–75.
- ↑ Edmonds 1991, p. 293.
- ↑ Bean 1941, p. 831.
- ↑ Sheldon 2007, pp. 176, 183.
- ↑ Edmonds 1991, p. 301.
References
- Bean, C. E. W. (1941) [1933]. The A. I. F. in France 1917. Official History of Australia in the War of 1914–1918. IV (11th ed.). Sydney: Halstead Press. ISBN 978-0-7022-1710-4. Retrieved 23 August 2015.
- Bidwell, S.; Graham, D. (2004) [1984]. Fire-Power: British Army Weapons and Theories of War 1904–1945. Barnsley: Pen & Sword. ISBN 978-1-84415-216-2.
- Doughty, R. A. (2005). Pyrrhic Victory: French Strategy and Operations in the Great War. Cambridge, MA: The Belknap Press of Harvard University. ISBN 978-0-674-01880-8.
- Dunne, J. C. (1989) [1938]. The War The Infantry Knew: 1914–1919: A Chronicle of Service in France and Belgium (Cardinal ed.). London: P. S. King and Son. ISBN 978-0-7474-0372-2.
- Edmonds, J. E. (1991) [1948]. Military Operations France and Belgium 1917: 7 June – 10 November. Messines and Third Ypres (Passchendaele). History of the Great War Based on Official Documents by Direction of the Historical Section of the Committee of Imperial Defence. II (Imperial War Museum and Battery Press ed.). London: HMSO. ISBN 978-0-89839-166-4.
- Ellis, A. D. (1920). The Story of the Fifth Australian Division, Being an Authoritative Account of the Division's Doings in Egypt, France and Belgium (PDF). London: Hodder and Stoughton. OCLC 12016875. Retrieved 23 August 2015.
- Malkasian, C. (2002). A History of Modern Wars of Attrition. Westport: Praeger. ISBN 978-0-275-97379-7.
- McCarthy, C. (1995). The Third Ypres: Passchendaele, the Day-By-Day Account. London: Arms & Armour Press. ISBN 978-1-85409-217-5.
- Moorhouse, B. (2003). Forged By Fire: The Battle Tactics and Soldiers of a World War One Battalion, The 7th Somerset Light Infantry. Kent: Spellmount. ISBN 978-1-86227-191-3.
- Rogers, D., ed. (2010). Landrecies to Cambrai: Case Studies of German Offensive and Defensive Operations on the Western Front 1914–17. Solihull: Helion. ISBN 978-1-90603-376-7.
- Seton Hutchinson, G. (2005) [1921]. The Thirty-Third Division in France and Flanders 1915–1919 (Naval & Military Press ed.). London: Waterlow & Sons. ISBN 978-1-84342-995-1.
- Sheldon, J. (2007). The German Army at Passchendaele. London: Pen and Sword. ISBN 978-1-84415-564-4.
- Verdun and the Battles for its Possession (PDF). Clermont Ferrand: Michelin and Cie. 1919. OCLC 654957066. Retrieved 23 August 2015.
Further reading
- Freeman, J. (2011). A Planned Massacre?: British Intelligence Analysis and the German Army at the Battle of Broodseinde, 4 October 1917 (PhD). Birmingham: Birmingham University. OCLC 767827490. Retrieved 24 August 2015.
- Simpson, A. (2001). The Operational Role of British Corps Command on the Western Front 1914–18 (PhD). London: London University. OCLC 557496951. Retrieved 13 November 2016.
- Wynne, G. C. (1976) [1939]. If Germany Attacks: The Battle in Depth in the West (Greenwood Press, NY ed.). London: Faber & Faber. ISBN 978-0-8371-5029-1.