German counter-attacks, 30 September – 4 October 1917
| ||||||||||||||||||||||||||||||||

German counter-attacks, 30 September – 4 October 1917 were made during the Third Battle of Ypres in Flanders, during the First World War. Hasty counter-attacks (Gegenstosse) by the German 4th Army during the Battle of the Menin Road Ridge on 20 September Battle of Polygon Wood on 26 September had been costly failures. A review of the situation on 29 September was held at Roulers by Erich Ludendorff the Generalquartiermeister (Quartermaster-General of the German Army, equivalent to the British Chief of Staff) with the commanders of Heeresgruppe Kronprinz Rupprecht von Bayern (Army Group Rupprecht of Bavaria) and the 4th Army staffs.
Organised counter-attacks (Gegenangriffe) after 24–48 hours were to replace the hasty counter-attacks (Gegenstosse) made during British attacks, to benefit from greater knowledge of the situation in the front line, air reconnaissance and artillery support. It was hoped that by delaying counter-attacks until they could properly be supported, the shorter British advances and rapid consolidation of captured ground could be overcome. From 30 September to 4 October, the 4th Army made several methodical counter-attacks (Gegenangriffe) but these re-captured little ground. The attack delayed from 3 to 4 October, after the costly failure of the Gegenangriff on 1 October, coincided with the big Second Army attack on Broodseinde Ridge and was destroyed. Local attempts to counter-attack during the afternoon met a similar fate.
On 7 October, the 4th Army changed its defensive policy again and more emphasis was placed on reducing British barrage fire with counter-battery bombardments. Front line garrisons in a new advanced defence zone, were dispersed in sentry posts and machine-gun nests. As soon as the British attacked, the outpost troops were to rush back to the main defensive line, which would be protected by a standing barrage, delaying the attackers, while the Eingreif divisions advanced through the British barrages and conducted Gegenstoss counter-attacks as soon as possible. If the British had dug in, the Gegenstoss was to be cancelled and a Gegenangriff substituted later.
Background
Strategic developments
The failure of the Kerensky Offensive in Russia in July had hastened the disintegration of the Russian army, the possibility of an Russian armistice and a huge reinforcement of the German Western Front. From 15 August to 25 August the Battle of Hill 70 was fought by the Canadian Corps and forestalled the transfer of divisions to Flanders and on 20 August, the French attacked at Verdun and in four days captured much of the ground lost to the Germans in 1916 and captured 9,500 prisoners, thirty guns, 100 trench mortars and 242 machine-guns.[1][2] The French attack at Verdun inflicted a defeat on the German 5th Army similar in extent to the defeat of the 4th Army in the Battle of Messines in June. The Germans were not able to mount big counter-attacks because their Eingreif divisions had been transferred to Flanders.[3] French preparations continued for an offensive on the Chemin des Dames at La Mamaison and British Third Army preparations continued for a surprise attack with a mass of tanks on the Flesquières Salient near Cambrai.[4]
Tactical developments
The period of dry weather and clear skies which began in early September had greatly increased the effectiveness of British air observation and artillery fire. German Gegenstosse (immediate counter-attacks) had failed and when Eingreif divisions had arrived, they found that the British had established a defence in depth on reverse slopes, protected by standing barrages. Specialist air reconnaissances were made to observe German troop movements and the Royal Flying Corps (RFC) had improved its contact patrolling and ground-attack operations. German artillery-fire was haphazard, due to uncertainty over the position of German infantry, just when the British could rely on massed artillery, accurately directed by observers in the air and on the ground.[5] The German counter-attacks had become assaults on reinforced field positions, due to the short British infantry advances, greater artillery firepower and tactical emphasis on defeating German Gegenstosse (immediate counter-attacks). Following the costly defeats at the Battle of the Menin Road Ridge on 20 September and the Battle of Polygon Wood on 26 September, the Germans made more changes to the defensive organisation of the 4th Army and altered their counter-attack tactics.[6]
Prelude
German defensive preparations
On 28 September, two days after the defeat of the Battle of Polygon Wood, Oberstleutnant Albrecht von Thaer, the chief of staff of Gruppe Wijtschate, made a diary note that it had been an awful experience; he did not know what to do against the British.[7] Erich Ludendorff the Generalquartiermeister (Quartermaster-General of the German Army, equivalent to the British Chief of Staff) conferred on 29 September with Generalfeldmarschall (field marshal) Crown Prince Rupprecht the commander and Generalleutnant (lieutenant-General) Hermann von Kuhl the chief of staff, of Heeresgruppe Kronprinz Rupprecht von Bayern (Army Group Rupprecht of Bavaria), the 4th Army commander General Sixt von Armin and the chief of staff Generalmajor (Major-General) Fritz von Loßberg,
The fighting of the Third Battle of Flanders exhibited the same characteristics as the second battle and the fighting before Verdun....Our defensive tactics had to be modified in some way... but it was incredibly difficult to find the correct solution.— Ludendorff (Memoirs)[8]
In many cases, the counter-attacks hardly reached the front line then held. Heavy casualties were suffered and the whole thing was a failure, as our enemy contented himself with an objective already gained.
and the staffs of the 4th Army gruppen agreed that mobile defence was to be replaced by a policy of fighting for every piece of ground. Armin thought that even if counter-attacks failed to recapture ground, the British would keep more troops in the front line and that German infantry casualties were no worse in counter-attacks than under British barrages.[10] On 30 September, the 4th Army issued an operation order for more bombardments between British attacks by field artillery and at least half of the heavy artillery ammunition was to be used for observed fire on infantry positions in captured pill-boxes, command posts, machine-gun nests, on duck board tracks and field railways. Gas bombardments were to be increased on the British front line and artillery emplacements, winds permitting. Pillboxes were to be recaptured, defensive positions improved and the British infantry were to be harassed by patrols and diversionary bombardments. The British were to be compelled by spoiling attacks to reinforce their forward positions and to counter-attack where they could be engaged by the German artillery.[11]
Forward garrisons of the ground holding divisions were to be reinforced and all machine-guns, including those of the support and reserve battalions of the front line regiments, were sent into the forward zone, to make a cordon of four to eight guns every 250 yards (230 m).[12] The Stoss regiments of the Eingreif divisions were moved up to the Artillerieschutzstellung (artillery protective line) behind the forward battle zone, ready to counter-attacks while the British were consolidating. The rest of the Eingreif division was to be held back for a Gegenangriff (methodical counter-attack) 24–48 hours later.[13] Between British attacks, the Eingreif divisions were to make more spoiling attacks.[14] On 27 September in the X Corps area south-east of Polygon Wood, three German attacks on the 39th Division front were repulsed by artillery fire. On the 3rd Division front astride the Ypres–Roulers railway, the Germans made a determined attack on Bostin Farm, eventually to be forced back; a lull in German Gegenangriffe followed until 30 September.[15]
British offensive preparations

The British tactical refinements had sought to undermine the German defence-in-depth, by limiting objectives to a shallower penetration and then fighting the principal battle against Eingreif divisions as they counter-attacked. By further reorganising the infantry reserves, Plumer had ensured that the depth of the attacking divisions corresponded closer to the depth of the local German counter-attack reserves and their Eingreif divisions, providing more support for the advance and consolidation against German counter-attacks. Divisions attacked on narrower fronts and troops advanced no more than 1,500 yards (1,400 m) into the German defence zone, before digging in. The German counter-attackers found a reciprocal defence-in-depth, protected by a mass of artillery. The tempo of attacks achieved by the British also added to the German difficulty in replacing tired divisions through the transport bottlenecks behind the 4th Army front.[16]
No formal artillery preparation was to be conducted before 4 October, except for the normal heavy artillery counter-battery fire and destructive fire on German strong-points. To mislead the Germans as to the date and time of the infantry attack, when a hurricane bombardment was to be fired at zero hour, practice barrages were begun on 27 September and increased to two barrages a day from 1 October.[17] In a summary of 1 October, British military intelligence predicted the German defensive changes made after the defeat of 26 September, forecasting a big German counter-attack to recapture the area around Zonnebeke.[18] The British considered cancelling their attack when heavy rain began again on 2 October, turning parts of the ground into a morass but decided to go ahead.[19] The X Corps took over from the I Anzac Corps in the area north of the Menin road, the 23rd Division (Major-General J. M. Babington) relieved the 33rd Division on the night of 27/28 September from the Menin road north to Cameron Covert. German artillery began to fire on the divisional area at dusk and a German party was seen on the right flank was dispersed by British artillery.[20]
A spur into Cameron Covert was taken over from Australian troops and patrols during the night found little sign of German troops. Advanced posts were dug during the night and work continued on field defences, using the thick white mist that rose before dawn for concealment. The German artillery continued to bombard the area during 29 September and during the day, German aircraft flew over the divisional artillery and the rear areas. In the evening, German shelling increased around Black Watch Corner on the south side of Polygon Wood. German troops were seen assembling and engaged by artillery but were not prevented from attacking. The British infantry waited then opened rapid fire with their small arms and repulsed the attackers. During the night, rear areas were bombed by German aircraft and the divisional artillery was severely bombarded with mustard gas.[20] During the night of 30 September/1 October, the 23rd Division reorganised, with the left flank of the 69th Brigade around Cameron Covert, in touch with the 110th Brigade on the right of the 21st Division to the north.[21]
German plans of attack
1 October
| Date | Rain mm |
Temp (°F) |
Outlook |
|---|---|---|---|
| 27 | 0.0 | 67 | overcast |
| 28 | 0.0 | 67 | cloudy |
| 29 | 0.0 | 65 | clear |
| 30 | 0.0 | 67 | clear |
| 1 | 0.0 | 69 | clear |
| 2 | 2.7 | 76 | showery |
| 3 | 1.2 | 64 | overcast |
| 4 | 4.6 | 60 | overcast |
The ground between Polygon Wood and the Menin road contained the Polygonbeek, between Reutel and Cameron Covert and the Reutelbeek, which drained the south-eastern corner of the Gheluvelt Plateau. The beds of the streams had been smashed by shell-fire and their courses had become swampy and in wet weather formed a slough of mud about .5 mi (0.80 km) wide between Reutel to the north and Cameron Covert Polderhoek Spur to the south. A ravine between the Polygonbeek and Jetty Warren was muddy but passable in most places.[23] The fresh 45th Reserve Division, the Eingreif division of Gruppe Ypern contributed Reserve Infantry Regiment 210 (RIR 210) and the 8th Division of Gruppe Wijtshate supplied Infantry Regiment 93 (IR 93). The 4th Army Sturmbataillon provided twelve sections to attack the pillboxes and several minenwerfer companies were attached, to form a special force under General Arthur von Gabain, the 17th Division commander.[24]
4 October
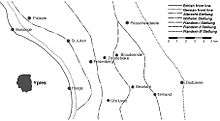
The 4th Guard Division (General von Finckenstein) had been rushed up to relieve the 3rd Reserve Division at Zonnebeke, after the disaster of 26 September. If the division counter-attacked over the ridge, it would be skylined and destroyed by British small-arms and artillery fire. To hold the ridge, the Guards needed to be able to assemble further west on Tokio Spur. Unternehmen Hohensturm (Operation Storm the Heights) was planned by Gruppe Ypres to recapture the Tokio Spur from Zonnebeke south to Molenaarelsthoek at the eastern edge of Polygon Wood on 3 October.[10] The Gegenangriff was to be conducted by RIR 212 of the 45th Reserve Division, the Eingreif division of Gruppe Ypern, reinforced by eight sections of the 4th Army Sturmbataillon and 16 heavy and 16 light minenwerfer. RIR 212 were to attack through the three regimental sectors of the 4th Guard Division, Guard Grenadier Regiment 5 (GGR 5), Foot Guard Regiment 5 (FGR 5) and Reserve Infantry Regiment 93 (RIR 93), which would stand by in case of a British attack. The infantry of both divisions on the attack front was unified under Lieutenant-Colonel Ernst von Radowitz (FGR 5) and divided into two commands: in the GGR 5 sector at Zonnebeke, I Battalion, RIR 212 came under the GGR 5 commander Major Freiherr von Schleinitz and to the south, II and III battalions RIR 212, FGR 5 and the two northernmost companies of RIR 93 were subordinated to Lieutenant-Colonel Rave the commander of RIR 212.[25]
The Gegenangriff (methodical counter-attack) on 3 October was to be made by Reserve Infantry Regiment 212 (RIR 212) on a front of 2,000 yd (1,800 m) through the lines of the 4th Guard Division, to recapture vantage points lost on 26 September, particularly those on Tokio Spur. After the costly failure of the Gegenangriff at Polygon Wood on 1 October, the attack was put back 24 hours to dawn (6:10 a.m.) on 4 October, after rehearsals from 2–3 October, watched by the divisional and corps commanders.[26] On the southern flank the width of the attack was reduced and half of III Battalion, RIR 212 was made a second wave behind the II Battalion in the centre; a contact patrol aircraft was arranged to fly over the area at 7:30 a.m.[25] In the 4th Guard Division, the troops were assembled on or in front of Broodseinde Ridge, the rest of the support battalions on the rear slope and reserve battalions in the Artillerieschutzstellung (artillery protection line) at the bottom. Since 1 October, the 45th Reserve Division, an Eingreif division, had been alarmed almost nightly and hurried forward to an assembly position in front of Moorslede, only to be sent back to its billets during the morning. The 20th Division was opposite the II Anzac Corps to the north of Polygon Wood and on 2 and 3 October, the 4th Bavarian Division (another Eingreif division) had been brought up to Passchendaele. On the night of 3/4 October, the German commanders had doubts but but decided to proceed with the Gegenangriff, warning the artillery to be ready to commence defensive bombardments.[27]
Battle
30 September
At 4:00 a.m. on 30 September a thick mist covered the ground and at 4:30 a.m. German artillery began a bombardment on the front of the 70th Brigade (Brigadier-General H. Gordon) between the Menin road and the Reutelbeek on the right flank of the 23rd Division. German mortars fired on the brigade support lines and a cloud of smoke mixed with the morning mist, obscuring the view until about 5:00 a.m. At 5:15 a.m., German troops of the 8th Division and the 45th Reserve Division emerged from the mist on an 800 yd (730 m) front.[28][lower-alpha 1] The attack was supported by flame-throwers and German infantry threw smoke- and hand-grenades into the trenches held by the 8th Battalion King's Own Yorkshire Light Infantry (8th KOYLI) and the 11th Battalion Sherwood Foresters. The British replied with small-arms fire and bombs, forcing the Germans to retreat in confusion but post was lost south of the Menin road and retaken by an immediate counter-attack. SOS rockets sent up in the mist were not seen by the British artillery which remained silent and a runner took two hours to get back to the brigade HQ in Sanctuary Wood.[30] The Germans attacked and were repulsed again at 6:00 a.m. but German artillery-fire continued during the day. The 70th Brigade took two prisoners from RIR 78 and counted about 80 German corpses, for few British losses.[28][lower-alpha 2]
1 October
At 5:00 a.m. a German hurricane bombardment began on a 1,500 yd (1,400 m) front from the Reutelbeek north to Polygon Wood and back to a depth of 1,000 yd (910 m), with barrages on the north bank of the Reutelbeek and on a line south of Black Watch Corner; by coincidence a Second Army practice barrage began at 5:15 a.m. Communication with the British front line was lost and RIR 210 attacked in three waves at 5:30 a.m.[32] On the 23rd Division front, south of Cameron Covert, two determined German attacks were repulsed but the bombardment continued and during the morning spread to the 70th Brigade on the right, much of it from the south-east, falling in enfilade along the British defences. The spur into Cameron Covert blocked the view from the south but small-arms fire could be heard all day. At 7:00 p.m. the German artillery began to concentrate on the 70th Brigade front and German troops were seen massing opposite, north of and on the Menin road. The German attack was defeated by small-arms fire and the rapid response of the British artillery to SOS rockets. The battalion on the left of the 69th Brigade retreated from Cameron Covert, when the right hand battalion of the 110th Brigade, 21st Division to the north, were forced back and later retreated another 50 yd (46 m). A counter-attack coincided with another German attack and was repulsed, the British retiring for another 150 yd (140 m), before contact was regained with the 110th Brigade to the north. Another attack failed and the German infantry dug in behind some old German barbed wire.[33]
As night fell the Germans attacked again at Cameron Covert but made no progress. By the time the German attacks stopped, the line of the 69th Brigade had been pushed back west of Cameron Covert, to a line north from Cameron House to the 110th Brigade.[34] On the 21st Division front, the battalion on the right of the 110th Brigade, north of Cameron Covert, was pushed back about 150 yd (140 m).[15] On the 7th Division front on the left of the X Corps area, along the north end of the east fringe of Polygon Wood.[35] The 22nd Brigade had a battalion in Jetty Trench and one to the north in Jubilee Trench. Neither battalion had been able to improve the defences by 1 October but mud limited the effect of the German bombardment by smothering the shells before they exploded but they still caused many casualties. German infantry attacked in waves against the right of the brigade and despite intense small-arms fire, the first wave reached Jetty Trench before being shot down. The following waves were then engaged and forced back, followed by British troops counter-attacking on the right flank and taking several prisoners. The Germans attacked all day and communication with the rear was lost but SOS rockets were still visible and after dark another three SOS barrages were called forth, which repulsed German attacks.[36] The troops of RIR 210 had managed to advance 140 yd (130 m) on the right and fewer than 80 yd (73 m) in the centre.[24]
4 October
Unternehmen Hohensturm

At 5:25 a.m. the German bombardment began and ten minutes later, the trench mortars and artillery of the 4th Guard Division concentrated on the attack front and the divisions on the flanks opened fire. The three battalions of RIR 212 had assembled at midnight on the eastern slope of Broodseinde Ridge and had been guided to the front line, ready to move forward and hug the barrage. Some of the first German shells fell on I Battalion, RIR 212 in the I Battalion, GGR 5 sector at Zonnebeke, causing many casualties and the troops fored yellow cluster flares to warn the artillery. At 6:00 a.m. the German bombardment lifted, the last shells being fuzed to explode underground so shell splinters would be smothered to make it safer for the infantry to close up. The barrage was to creep forward 200 yd (180 m) beyond the British front line, then to move further to the rear. When the British artillery opened fire ten minutes later, the German gunners were uncertain if it was for an attack or retaliation. Soon after the first waves of RIR 212 had leap-frogged through the troops of the 4th Guard Division, they reappeared shouting "The English are coming!".[37]
At about 5:20 a.m. a yellow flare rather than the usual white one rose over Broodseinde Ridge, followed by a few more and then lots of flares spreading gradually along the flanks. After a few minutes a German barrage began and increased in extent and depth back to Glencorse Wood.[38] The German barrage fell on the troops of the I Anzac Corps, hitting the 1st Australian Division and the 2nd Australian Division at Zonnebeke and Molenaarelsthoek. The most advanced troops escaped the worst and troops further back edged forward. The 3rd Australian Division and the 7th Division on the flanks were not bombarded as extensively and as dawn broke about 14 percent of the attacking infantry of the I Anzac Corps had become casualties. It was too late for the Australians to fire a SOS rocket because the guns were not allowed to respond for the last ten minutes before an attack.[39]
On the X Corps front, opposite the 19th Reserve Division and the 17th Division in close reserve as the Eingreif division, the 5th Division attacked Polderhoek Spur on the right flank,took some ground towards Gheluvelt, captured Polderhoek Chateau and several pillboxes but were forced from the chateau as dark fell. The 21st Division and four tanks crossed the swamp of the Polygonebeek and routed the German defenders, the division gaining observation to the south-east over the Reutelbeek valley, which protected the main attack on Broodseinde Ridge. The right hand brigade retreated slightly to dead ground to avoid massed machine-gun fire.[40] The 7th Division on the left of X Corps reached its objectives at the eastern edge of the Gheluvelt Plateau against the left of RIR 93 and reserve troops of IR 93 and IR 94. The British found many dead German infantry in camouflaged shell-holes and the rest retreating rapidly down the eastern slope, except for 600 men who were taken prisoner. The advance fell short of the final objective but gave a view across the Heulebeek depression to the Keiberg Spur and towards Dadizeele.[41]
As the I Anzac Corps divisions began their 800 yd (730 m) advance towards Flandern I Stellung on Broodseinde Ridge, men were seen rising from shell-holes and more shell-craters were found where German troops were concealed. Most of the Germans were overrun or retreated through the British barrage, then the Australians attacked pillboxes one-by-one and captured the village of Zonnebeke north of the ridge.[42] When the British barrage began on Broodseinde Ridge, the Keiberg Spur and Waterdamhoek, some of the German forward headquarters only realised that they were under attack when British and Australian troops appeared among them.[43]
German counter-attacks
As the Australians began the second phase of the British attack, RIR 93 was conducting a Gegenstoss to regain the In de Ster plateau on the southern flank, only to be driven further back. Against the 1st Australian Division to the north, II Battalion, FGR 5 and III Battalion, RIR 211 advanced under machine-gun fire from In de Ster through retreating German troops and could only close up to hedges and woods near the new Australian positions. In the sector of GGR 5 to the north, II Battalion, GGR 5 had got some scattered companies in front of Daisy Wood but German infantry retreating down the slopes to the south led to a fear that the battalion might be cut off. Part of the reserve battalion of FGR 5 and part of II Battalion, RIR 211 were sent out as a flank guard. Australians advancing to the north started another panic and the II Battalion, GGR 5 was ordered to fall back to Daisy Wood, the rest of the II Battalion, RIR 211 was brought up and a call for reinforcements was sent to the Kapellenhof (Eddy Farm) on the Keiberg Spur.[44]
RIR 210 of the 45th Reserve Division, was still recovering from the 1 October Gegenangriff but its battalions were sent to reinforce the 4th Guard Reserve Division. Part of a battalion got through to GGR 5 in the afternoon but it was so exhausted that it was sent back to the artillery protection line to join the rest of the regiment. Bavarian Infantry Regiment 5 (BIR 5), part of the 4th Bavarian Division, was ordered up between Passchendaele and Moorslede, as Eingreif troops for the 20th Division north of Broodseinde. At 11:25, BIR 5 was sent to Kapellenhof (Eddy Farm), the only easy passage through the wire of Flandern II Stellung, then the I and III battalions were sent to Broodseinde instead. Both battalions were caught by machine-gun fire and took cover in Daisy Wood with the rest of GGR 5.[45]
The rest of the 4th Bavarian Division was to counter-attack astride and north of the railway. At noon, BIR 9 attacked from the north-east against Broodseinde at 12:30 p.m., the II Battalion, BIR 9 advanced south of the railway. On the Keiberg Spur it was bombarded by artillery and machine-gun fire and only scattered parties managed to reach Daisy Wood and the area further south. North of the railway, the I Battalion advance began later at 1:45 p.m. and was delayed by the wire at Flandern II Stellung, engaged with small-arms fire at the Ypres–Roulers railway cutting and then from the right flank, which drove the survivors south to Daisy Wood. The III Battalion advanced from Passchendaele Ridge on the right flank but Australian machine-gun fire from the crest forced it to swerve right into a dip east of Gravenstafel Spur. At 3:00 p.m. the II Battalion, BRIR 5 was ordered to attack from Eddy Farm towards the Broodseinde cross roads and also ended up in Daisy Wood, still under severe bombardment by British artillery. When the advance resumed, a German barrage fell short on the battalion, ending the counter-attack.[46]
Aftermath
Analysis
After the attack of 26 September, the British had used prisoner interrogation, information gleaned from the battlefield and ground observation to judge the state of the 4th Army. The concentration of the German heavy artillery into the Tenbrielen, Kruiseecke, Becelaere and Keiberg groups directed towards Menin Road Ridge, Tower Hamlets Ridge, Polygon Wood and Broodseinde Ridge was reported on 29 September by I Anzac Corps flash spotters; RFC reconnaissance flights confirmed the changes but took from 1–2 October, because Germans hid the redeployment with smoke screens.[47] By 29 September, the 4th Army had recovered from its defeat on 26 September and in the Second Army intelligence summary for 16–30 September, Lieutenant-Colonel Charles Mitchell, the Second Army GSO1 Intelligence, wrote that Gegenstoss counter-attacks would continue despite their recent failures. The Germans would not continue to sacrifice fresh reserves and instead, to limit British advances more reliance would be made on artillery. Mitchell forecast that methodical counter-attacks (Gegenangriffe) would occur when the situation at the front had become clearer, one or two days after a British attack.[48]
From 26 September – 3 October, the Germans attacked and counter-attacked at least 24 times.[49] Despite careful preparation, the Gegenangriffe were costly failures and made no difference to British preparations for the attack due on 4 October. German losses in the 1 October Gegenangriff, intended to prepare the way for the bigger attack on 3 October were so great that the attacking units had to be relieved, which forced the 4th Army to postpone the Gegenangriff for 24 hours.[50][51] The disaster inflicted by the British attack on 4 October had not been planned, the decision to attack two days early having been made on 26 September, because of the speed of the relief of V Corps.[52]
In 2011, Freeman wrote that even though
... perfect intelligence in a war must of necessity be out-of-date and therefore cease to be perfect....We deal not with the true but with the likely. Speed is therefore the essence of the matter.— E. T. Williams, 1945[53]
the Second Army intelligence officers had accurately predicted another Gegenangriff before 4 October, based on analysis of German reliefs, artillery arrangements and air activity but had not anticipated the German postponement. Had the British not attacked on 4 October, Unternehmen Hohensturm would have gained a measure of surprise, the British not being certain of German intentions until the evening of 4 October.[54]
The fighting in early October had been very costly for the 4th Army and units were used piecemeal to fill gaps.[55] After the defeat of 4 October, Thaer had a heated dispute with Loßberg, who had ordered exhausted divisions to counter-attack and Loßberg said that he could not relieve such divisions.[56] On 7 October, the 4th Army reversed the new policy, more emphasis was placed on reducing British barrage fire with counter-battery bombardments. Front line garrisons were dispersed in an advanced defence zone of sentry posts and machine-gun nests. As soon as the British attacked, the outpost troops were to rush back to the main defensive line, which would be protected by a standing barrage, delaying the attackers until the Eingreif divisions could advance through the British barrages and conduct Gegenstoss counter-attacks as soon as possible. If the British had managed to dig in, the Gegenstoss was to be cancelled and a Gegenangriff substituted later.[57]
Casualties
On 1 October, the 7th Division had 235 casualties.[36] On 4 October, German losses in the area of Unternehmen Hohensturm west of Broodseinde Ridge, were 2,883 men of the 45th Reserve Division and 2,786 casualties in the 4th Guard Reserve Division. In RIR 212, Oberstleutnant Rave, 13 officers and 328 men were killed and 1,050 officers and men were reported wounded, missing or ill, some companies having suffered 95 percent casualties.[58]
Notes
- ↑ In 2011, Freeman wrote that the German assembly was reported at 1:30 a.m. and patrols checked this, leading to a British bombardment being ordered for 4:45 a.m. and at 8:00 a.m. the German attacks were stopped by a massed artillery bombardment.[29]
- ↑ Three prisoners were taken and revealed that the attack was by RIR 92 and RIR 78 from the 19th Reserve Division. The attack against X Corps had been intended to straighten the German front line and British military intelligence judged that the confusion in the German lines after the big defeat on 26 September had abated.[31]
Footnotes
- ↑ Michelin 1919, pp. 23–24.
- ↑ Doughty 2005, pp. 382–282.
- ↑ Edmonds 1991, p. 231.
- ↑ Edmonds 1991, pp. 235–236.
- ↑ Edmonds 1991, pp. 294–295.
- ↑ Sheldon 2007, p. 184.
- ↑ Hagenlücke 1997, p. 53.
- ↑ Sheldon 2007, p. 189.
- ↑ Bean 1941, pp. 857–858.
- 1 2 Bean 1941, p. 846.
- ↑ Sheldon 2007, pp. 184–186.
- ↑ Wynne 1976, pp. 307–308.
- ↑ Wynne 1976, p. 307.
- ↑ Sheldon 2007, pp. 190–191.
- 1 2 Edmonds 1991, p. 302.
- ↑ Edmonds 1991, p. 296.
- ↑ Bean 1941, p. 839.
- ↑ Edmonds 1991, p. 318.
- ↑ Freeman 2011, p. 70.
- 1 2 Sandilands 2003, pp. 196–198.
- ↑ Sandilands 2003, p. 200.
- ↑ McCarthy 1995, pp. 82–97.
- ↑ Snowden 2001, pp. 78–79.
- 1 2 Bean 1941, pp. 837–838.
- 1 2 Bean 1941, p. 847.
- ↑ Edmonds 1991, pp. 303–304.
- ↑ Bean 1941, p. 858.
- 1 2 Sandilands 2003, pp. 198–199.
- ↑ Freeman 2011, p. 52.
- ↑ Edmonds 1991, pp. 301, 302.
- ↑ Freeman 2011, p. 53.
- ↑ Bean 1941, p. 837.
- ↑ Sandilands 2003, pp. 200–201.
- ↑ Sandilands 2003, pp. 201–204.
- ↑ Atkinson 2009, p. 408.
- 1 2 Atkinson 2009, pp. 410–412.
- ↑ Bean 1941, pp. 847–848.
- ↑ Bean 1941, p. 842.
- ↑ Bean 1941, pp. 843–844.
- ↑ Edmonds 1991, pp. 313–314.
- ↑ Edmonds 1991, pp. 312–313.
- ↑ Edmonds 1991, pp. 304–307.
- ↑ Bean 1941, pp. 858–859.
- ↑ Bean 1941, p. 872.
- ↑ Bean 1941, pp. 873–874.
- ↑ Bean 1941, p. 874.
- ↑ Freeman 2011, pp. 70–71.
- ↑ Freeman 2011, p. 60.
- ↑ Terraine 1977, p. 278.
- ↑ Edmonds 1991, pp. 302–303.
- ↑ Atkinson 2009, p. 412.
- ↑ Freeman 2011, pp. 71–72.
- ↑ Ferris 1992, p. 1.
- ↑ Freeman 2011, pp. 55, 70–71.
- ↑ Sheldon 2007, p. 207.
- ↑ Werth 1997, p. 327.
- ↑ Wynne 1976, pp. 308–309.
- ↑ Sheldon 2007, p. 196.
References
Books
- Atkinson, C. T. (2009) [1927]. The Seventh Division 1914–1918 (Naval & Military Press ed.). London: John Murray. ISBN 978-1-84342-119-1.
- Bean, C. E. W. (1941) [1933]. The Australian Imperial Force in France, 1917. Official History of Australia in the War of 1914–1918. IV (online ed.). Canberra: Australian War Memorial. ISBN 978-0-7022-1710-4. Retrieved 27 September 2014.
- Doughty, R. A. (2005). Pyrrhic Victory: French Strategy and Operations in the Great War. Cambridge, MA: The Belknap Press of Harvard University. ISBN 978-0-674-01880-8.
- Edmonds, J. E. (1991) [1948]. Military Operations France and Belgium 1917: 7 June – 10 November. Messines and Third Ypres (Passchendaele). History of the Great War Based on Official Documents by Direction of the Historical Section of the Committee of Imperial Defence. II (Imperial War Museum & Battery Press ed.). London: HMSO. ISBN 978-0-89839-166-4.
- Ferris, J., ed. (1992). The British Army and Signals Intelligence during the First World War. Publications of the Army Records Society. VIII. Stroud: Alan Sutton for Army Records Society. ISBN 978-0-7509-0247-2.
- Hagenlücke, H. (1997). "Ch 4: The German High Command". In Liddle, P. H. Passchendaele in Perspective: The Third Battle of Ypres. London: Pen & Sword. pp. 45–58. ISBN 978-0-85052-588-5.
- McCarthy, C. (1995). The Third Ypres: Passchendaele, the Day-By-Day Account. London: Arms & Armour Press. ISBN 978-1-85409-217-5.
- Sandilands, H. R. (2003) [1925]. The 23rd Division 1914–1919 (Naval & Military Press ed.). Edinburgh: Wm. Blackwood. ISBN 978-1-84342-641-7.
- Sheldon, J. (2007). The German Army at Passchendaele. London: Pen and Sword. ISBN 978-1-84415-564-4.
- Verdun and the Battles for its Possession (PDF). Clermont Ferrand: Michelin and Cie. 1919. OCLC 654957066. Retrieved 23 August 2015.
- Terraine, J. (1977). The Road to Passchendaele: The Flanders Offensive 1917, A Study in Inevitability. London: Leo Cooper. ISBN 978-1-84415-564-4.
- Werth, G. (1997). "Ch 20: Flanders 1917 and the German Soldier". In Liddle, P. H. Passchendaele in Perspective: The Third Battle of Ypres. London: Pen & Sword. pp. 324–332. ISBN 978-0-85052-588-5.
- Wynne, G. C. (1976) [1939]. If Germany Attacks: The Battle in Depth in the West (Greenwood Press, NY ed.). London: Faber & Faber. ISBN 978-0-8371-5029-1.
Theses
- Freeman, J. (2011). A Planned Massacre?: British Intelligence Analysis and the German Army at the Battle of Broodseinde, 4 October 1917 (PhD). Birmingham: Birmingham University. OCLC 767827490. Retrieved 13 November 2016.
- Snowden, K. L. (2001). British 21st Infantry Division on the Western Front 1914–1918: A Case Study in Tactical Evolution (PDF) (PhD). Department of Modern History School of Historical Studies: Birmingham University. OCLC 690664905. Retrieved 14 November 2016.
Further reading
- Beach, J. M. (2004). British Intelligence and the German Army 1914–1918 (PhD). London: London University. OCLC 500051492. uk.bl.ethos.416459. Retrieved 13 November 2016.
- Die Kriegführung im Sommer und Herbst 1917. Die Ereignisse außerhalb der Westfront bis November 1918. Der Weltkrieg 1914 bis 1918: Militärischen Operationen zu Lande. XIII (Die digitale landesbibliotek Oberösterreich ed.). Berlin: Mittler. 2012 [1942]. OCLC 257129831. Retrieved 14 November 2016.
- Hussey, A. H.; Inman, D. S. (1921). The Fifth Division in the Great War (online ed.). London: Nisbet. OCLC 493316031. Retrieved 14 November 2016.
- Simpson, A. (2001). The Operational Role of British Corps Command on the Western Front 1914–18 (PhD). London: London University. OCLC 557496951. Retrieved 13 November 2016.