Operation Crusader
| ||||||||||||||||||||||||||||||

Operation Crusader was a military operation by the British Eighth Army between 18 November–30 December 1941 during the Second World War. The operation relieved the 1941 Siege of Tobruk. The Eighth Army's initial plan to destroy the Axis armoured force before advancing its infantry came apart when, after a number of inconclusive engagements, the British 7th Armoured Division were heavily defeated by the Afrika Korps at Sidi Rezegh.
Lieutenant General Erwin Rommel's subsequent advance of his armoured divisions to the Axis fortress positions on the Egyptian border failed to find the main body of the Allied infantry, which had bypassed the fortresses and headed for Tobruk. Rommel had to withdraw his armoured units to support the fighting at Tobruk. Despite achieving some tactical successes at Tobruk, the need to preserve his remaining forces prompted Rommel to withdraw his army to the defensive line at Gazala, west of Tobruk and then all the way back to El Agheila. It was the first victory over the German ground forces by British-led forces in the Second World War.[10]
Background
Eighth Army

Following the costly failure of Operation Battleaxe, General Archibald Wavell was relieved as Commander-in-Chief Middle East Command and replaced by General Claude Auchinleck. The Western Desert Force was reorganised and renamed the Eighth Army under the command of Lieutenant-General Alan Cunningham replaced by Lieutenant-General Neil Ritchie. The Eighth Army comprised two Corps: XXX Corps under Lieutenant-General Willoughby Norrie and XIII Corps under Lieutenant-General Reade Godwin-Austen.
XXX Corps was made up of 7th Armoured Division (commanded by Major-General William Gott), the understrength South African 1st Infantry Division with two brigades of the Sudan Defence Force (newly arrived from the East African Campaign and commanded by Major-General George Brink) and the independent 22nd Guards Brigade. XIII Corps comprised 4th Indian Infantry Division (commanded by Major-General Frank Messervy), the newly arrived 2nd New Zealand Division (commanded by Major-General Bernard Freyberg) and the 1st Army Tank Brigade.
The Eighth Army also included the Tobruk garrison with the 32nd Army Tank Brigade, and the Australian 9th Division which (in late 1941), was in the process of being replaced by the British 70th Infantry Division and the Polish Carpathian Brigade (Commanded by Major-General Stanisław Kopański). The Australian Major-General Leslie Morshead had been succeeded as Allied commander at Tobruk by the British Major-General Ronald Scobie. However, by November, the Australian 20th Brigade remained in Tobruk, under Brigadier John Murray.

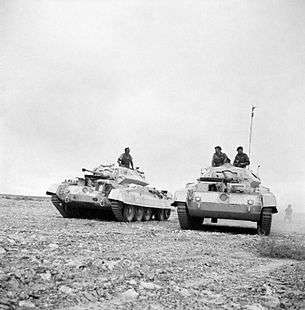
In reserve, the Eighth Army had the South African 2nd Infantry Division, making a total equivalent of about 7 divisions with 770 tanks (including many of the new Crusader Cruiser tanks, after which the operation was named, and new American M3 Stuart light tanks). Air support was provided by up to 724 combat aeroplanes of the Commonwealth air forces in the Middle East and Malta, with direct support under the command of Air HQ Western Desert.[11]
Panzergroup Africa
Opposing them were the German and Italian soldiers of Panzergroup Africa under General Erwin Rommel, with the Afrika Korps under Lieutenant General Ludwig Cruwell comprising the 15th Panzer Division, 21st Panzer Division (total of 260 tanks ), the Division z.b.V Afrika which had been formed in Africa as a composite formation, and was renamed the 90th Light Africa Division in late November, and the Italian 55th Infantry Division Savona.[12]
Directly under the Italian High Command (General Ettore Bastico), remained Italian XX Corps and XXI Corps.
The Italian XX Corps under Lieutenant General Gastone Gambara with 132nd Armoured Division Ariete with 146 medium tanks M13/40 and 101st Motorised Division Trieste.
The Italian XXI Army Corps under Lieutenant General Enea Navarini with 17th Infantry Division Pavia, 102nd Motorised Division Trento,[13] 27th Infantry Division Brescia and 25th Infantry Division Bologna.
The Axis forces had built a defensive line of strong points along the escarpment running from near the sea at Bardia and Sollum and further along the border wire to Fort Capuzzo. Elements of the 21st Panzer and the Savona divisions manned these defences whilst Rommel kept the rest of his forces grouped near or around the Tobruk perimeter where a planned attack on 14 November had been put back to 24 November due to supply difficulties.[14] Axis initial air support consisted of about 120 German and 200 Italian serviceable aeroplanes but these could be reinforced quickly by transfer of units from Greece and Italy.
Prelude
Axis supply
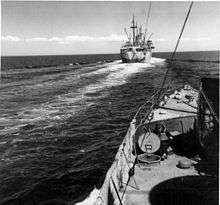
A German motorised division needed 360 tonnes (350 long tons) per day and moving the supplies 480 kilometres (300 mi) took 1,170 2.0-tonne (2-long-ton) lorries.[15] With seven Axis divisions, air and naval units, 71,000 tonnes (70,000 long tons) of supplies per month were needed. (Vichy agreed to the use of Bizerta but no supplies moved through the port until late 1942.) From February–May 1941, a surplus of 46,000 tonnes (45,000 long tons) was delivered; attacks from Malta had some effect but in May, the worst month for ship losses, 91 percent of supplies arrived. Lack of transport in Libya left German supplies in Tripoli and the Italians had only 7,000 lorries for deliveries to 225,000 men. A record amount of supplies arrived in June but at the front, shortages worsened.[16]
There were fewer Axis attacks on Malta from June and sinkings increased from 19% in July, to 25% in September, when Benghazi was bombed and ships diverted to Tripoli; air supply in October made little difference. Deliveries averaged 73,000 tonnes (72,000 long tons) per month from July–October but the consumption of 30–50 percent of fuel deliveries by road transport and a truck unserviceability rate of 35 percent reduced deliveries to the front. In November a five-ship convoy was sunk during Operation Crusader and ground attacks on road convoys stopped journeys in daylight. Lack of deliveries and the Eighth Army offensive forced a retreat to El Agheila from 4 December, crowding the Via Balbia, where British ambushes destroyed about half of the remaining Axis transport.[17]
Convoys to Tripoli resumed and sinkings increased but by 16 December, the supply situation had eased, except for the fuel shortage and in December, the Luftwaffe was restricted to one sortie per day. The Vichy French sold 3,700 tonnes (3,600 long tons) of fuel, U-boats were ordered into the Mediterranean and air reinforcements sent from Russia in December. The Italian navy used warships to carry fuel to Derna and Benghazi, then made a maximum effort from 16–17 December. Four battleships, three light cruisers and 20 destroyers escorted four ships to Libya. The use of an armada for 20,000 tonnes (20,000 long tons) of cargo ships depleted the navy fuel reserve and only one more battleship convoy was possible. Bizerta in Tunisia was canvassed as an entrepôt but this was in range of RAF aircraft from Malta and was another 800 kilometres (500 mi) west of Tripoli.[18]
Eighth Army plan
The plan was to engage the Afrika Korps with the 7th Armoured Division while the South African Division covered their left flank. Meanwhile, on their right, XIII Corps, supported by 4th Armoured Brigade (detached from 7th Armoured Division), would make a clockwise flanking advance west of Sidi Omar and hold position threatening the rear of the line of Axis defensive strongpoints, which ran east from Sidi Omar to the coast at Halfaya. Central to the plan was the destruction of the Axis armour by 7th Armoured Division to allow the relatively lightly armoured XIII Corps to advance north to Bardia on the coast whilst XXX Corps continued north-west to Tobruk and link with a break-out by 70th Division. There was also a deception plan to persuade the Axis that the main Allied attack would not be ready until early December and would be a sweeping outflanking move through Jarabub, an oasis on the edge of the Great Sand Sea, more than 150 miles (240 km) to the south of the real point of attack. This proved successful to the extent that Rommel, refusing to believe that an attack was imminent, was not in Africa when it came.[19]
Battle
18 November

Before dawn on 18 November, Eighth Army launched a surprise attack, advancing west from its base at Mersa Matruh and crossing the Libyan border near Fort Maddalena, some 50 miles (80 km) south of Sidi Omar, and then pushing to the north-west. Eighth Army were relying on the Desert Air Force to provide them with two clear days without serious air opposition but torrential rain and storms the night before the offensive resulted in the cancellation of all the air-raids planned to interdict the Axis airfields and destroy their aircraft on the ground.[20] However, initially all went well for the Allies. 7th Armoured division's 7th Armoured Brigade advanced north-west towards Tobruk with 22nd Armoured Brigade to their left. XIII Corps and New Zealand Division made its flanking advance with 4th Armoured Brigade on its left and 4th Indian Division's 7th Infantry Brigade on its right flank at Sidi Omar. On the first day no resistance was encountered as Eighth Army closed on the enemy positions.
On the morning of 19 November, at the First Battle of Bir el Gubi, the advance of the 22nd Armoured Brigade was blunted by the Ariete Division which continued to take a major toll of British armour in the opening phase of the battle.[21] In the centre of the division, 7th Armoured Brigade and the 7th Support Group raced forward almost to within sight of Tobruk and took Sidi Rezegh airfield, while on the right flank 4th Armoured Brigade came into contact that evening with a force of 60 tanks supported by 88 mm gun batteries and anti-tank units from 21st Panzer Division (which had been moving south from Gambut) and became heavily engaged.[22][23]
On 20 November, 22nd Armoured Brigade fought a second engagement with the Ariete Division and 7th Armoured repulsed an infantry counter-attack by the 90th Light and Bologna Divisions at Sidi Rezegh. 4th Armoured fought a second engagement with 21st Panzer pitting their Stuart tanks' greater speed against the enemy's heavier guns.
Eighth Army were fortunate at this time that 15th Panzer Division had been ordered to Sidi Azeiz, where there was no British armour to engage. However, 4th Armoured soon started to receive intelligence that the two German Panzer divisions were linking up. In his original battle plan Cunningham had hoped for this so that he would be able to bring his own larger tank force to bear and defeat the Afrika Korps armour. By attaching 4th Armoured Brigade to XIII Corps, allowing 22nd Armoured Brigade to be sidetracked fighting the Ariete Division and letting 7th Armoured Brigade forge towards Tobruk, his armoured force was by this time hopelessly dispersed. 22nd Armoured Brigade were therefore disengaged from the Ariete and ordered to move east and support 4th Armoured Brigade (while infantry and artillery elements of 1st South African Division were to hold the Ariete) and 4th Armoured were released from their role of defending XIII Corps' flank.[24]
In the afternoon of 20 November, 4th Armoured were engaged with 15th Panzer Division (21st Panzer having temporarily withdrawn for lack of fuel and ammunition). It was too late in the day for a decisive action but 4th Armoured nevertheless lost some 40 tanks and by this time were down to less than two-thirds their original strength of 164 tanks. 22nd Armoured arrived at dusk, too late to have an impact, and during the night of 20 November, Rommel pulled all his tanks north-west for an attack on Sidi Rezegh.[24]
Tobruk

Eighth Army plans for 21 November were for 70 Division to break out from Tobruk and cut off the Germans to the southeast. The 7th Armoured would advance from Sidi Rezegh to link with them and roll up the Axis positions around Tobruk. The New Zealand Division (XIII Corps) would exploit the decline of the 21st and 15th Panzer and advance 30 miles (48 km) northeast to the Sidi Azeiz area, overlooking Bardia. The 70th Division attack surprised the Axis, Rommel having underestimated the size and armoured strength of the garrison. On the evening of 20 November, Scobie ordered a break-out on 21 November by the 70th Division (2nd/King’s Own, 2nd BlackWatch, 2nd/Queen’s and 4th RTR with Matilda tanks).[25] The Polish Carpathian Brigade was to mount a diversion just before dawn to pin the Pavia Division. During the operation, one-hundred guns were to bombard the Bologna, Brescia and Pavia positions on the Tobruk perimeter with 40,000 rounds.[26]
Fighting was intense as the three pronged attack, consisting of the 2nd King's Own on the right flank, the 2nd Battalion, Black Watch as the central force and the 2nd Queen's Own on the left flank, advanced to capture a series of prepared strongpoints leading to Ed Duda.[27] Initially, the Italians were stunned by the massive fire and a company of the Pavia was overrun in the predawn darkness, but resistance in the Bologna gradually stiffened.[28][note 12]
By mid afternoon elements of 70th Division had advanced some 3.5 miles (5.6 km) towards Ed Duda on the main supply road when they paused as it became clear that 7th Armoured would not link up.[30] The central attack by the Black Watch involved a murderous charge under heavy machine gun fire, attacking and taking various strongpoints, until they reached strongpoint Tiger. The Black Watch lost an estimated 200 men and their commanding officer.[27][note 13] The British renewed their advance but the attack petered out when the infantry involved were unable to capture the Bologna defences around the Tugun strongpoint.[note 14]
That day, 21 November, another fierce action was fought with high casualties by elements of the German 155th Rifle Regiment, Artillery Group Bottcher, 5th Panzer Regiment and the British 4th, 7th and 22nd Armoured Brigades for possession of Sidi Rezegh and the surrounding height in the hands of Italian infantry and anti-tank gunners of the Bologna. On 22 November General Scobie ordered the position to be consolidated and the corridor widened in the hope that Eighth Army would link up. The 2nd York and Lancaster Regiment, with tank support, took strongpoint Tiger leaving a 7,000-yard (6,400 m) gap between the corridor and Ed Duda, but efforts to clear the ‘Tugun’ and ‘Dalby Square’ strong points were repelled. In the fighting on the 22nd, the ‘Tugun’ defenders brought down devastating fire, reducing the strength in one attacking British company to just thirty-three all ranks.[28]

On 23 November, the 70th Division in Tobruk attacked the 25th Bologna in an attempt to reach the area of Sidi Rezegh, but elements of the Pavia soon arrived and broke up the British attack.[note 15] On 26 November, Scobie ordered a successful attack on the Ed Duda ridge, and in the early morning hours of 27 November the Tobruk garrison linked up with a small force of New Zealanders.[27]
7th Armoured had planned its attack northward to Tobruk to start at 08.30 on 21 November. However, at 07.45 patrols reported the arrival from the south-east of a mass of enemy armour, some 200 tanks in all. 7th Armoured Brigade, together with a battery of field artillery turned to meet this threat leaving the four companies of infantry and the artillery of the Support Group to carry through the attack to the north in anticipation of being reinforced by 5th South African Infantry Brigade which had been detached from the 1st South African Division at Bir el Gubi facing the Ariete Division and was heading north to join them.[34]
Without armoured support the northward attack by the Support Group failed and by the end of the day, 7th Armoured Brigade had lost all but 28 of its 160 tanks and were relying by that time mainly on the artillery of the Support Group to hold the enemy at arm's length. The South African brigade meanwhile were dug in southeast of Bir el Haiad but had the German armour between them and Sidi Rezegh. However, by the evening of 21 November, 4th Armoured was 8 miles (13 km) south east of Sidi Rezegh and 22nd Armoured Brigade were in contact with the German armour at Bir el Haiad, some 12 miles (19 km) south-west of Sidi Rezegh.[35]
Sidi Rezegh

Overnight Rommel once again split his forces with 21st Panzer taking up a defensive position alongside the Afrika Division between Sidi Rezegh and Tobruk and 15th Panzer moving 15 miles (24 km) west to Gasr el Arid to prepare for a battle of manoeuvre which General Ludwig Crüwell believed would favour the Afrika Korps. This presented a clear opportunity for a breakthrough to Tobruk with the whole of 7th Armoured Division concentrated and facing only the weakened 21st Panzer. However, XXX Corps commander Norrie, aware that 7th Armoured division was down to 200 tanks decided on caution.[36]
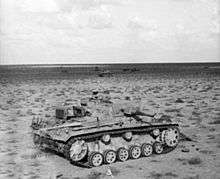
Instead, in the early afternoon Rommel attacked Sidi Rezegh with 21st Panzer and captured the airfield. Fighting was desperate and gallant: for his actions during these two days of fighting Brigadier Jock Campbell, commanding 7th Support Group, was awarded the Victoria Cross. However, 21st Panzer, despite being considerably weaker in armour, proved superior in its combined arms tactics, pushing 7th Armoured Division back with a further 50 tanks lost (mainly from 22nd Brigade).[36] The fighting at Sidi Rezegh continued through 22 November, with South African Division's 5th Brigade by that time engaged to the south of the airfield. An attempt to recapture it failed and the Axis counter-offensive began to gain momentum. 7th Armoured Brigade withdrew with all but four of their 150 tanks out of commission or destroyed.[37] In four days the Eighth Army had lost 530 tanks against Axis losses of about 100.[38]

The most memorable action during the North African campaign of the 3rd Field Regiment, (Transvaal Horse Artillery) was during the battle of Sidi Rezegh on 23 November 1941. The South Africans were surrounded on all sides by German armour and artillery, subjected to a continuous barrage. They tried to take cover in shallow slit trenches. In many places the South African soldiers could only dig down to around 9 inches [23 cm] deep due to the solid limestone underneath their positions.[39] The Transvaal Horse Artillery engaged German tanks from the 15th and 21st Panzer divisions, the gunners firing over open sights as they were overrun. This continued until many of the officers were dead and the gunners had run out of ammunition.
Many of the gun crews were captured. As darkness fell, those that could escaped back to Allied lines under cover of darkness.[40] The artillerymen of the 3rd Field Regiment managed to save 5 of their 24 guns from the battlefield. They later recovered a further 7 guns.[41] After the battle of Sidi Rezegh, Acting Lieutenant General Sir Charles Willoughby Moke Norrie stated that the South African's "sacrifice resulted in the turning point of the battle, giving the Allies the upper hand in North Africa at that time."[42][43]
Frontier
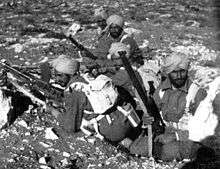
On the XIII Corps front on 22 November, the 5th New Zealand Brigade advanced north-east to capture Fort Capuzzo on the main Sollum–Bardia road.[44] The Brigade attacked Bir Ghirba, south of Fort Capuzzo and the headquarters of the Savona Division but was repulsed. To the south, the 7th Indian Brigade captured Sidi Omar and most of the Libyan Omar strong points, the two westernmost strong points of the Axis border defences. Losses in its supporting tank units caused a delay in attacks on the other strong points until replacements arrived.[45] One of the New Zealand military unit’s historians described the fighting days as the 7th Indian Brigade’s most difficult, with the men of the 4/16th Punjab Battalion having "fought all morning to overcome resistance" and the German 12th Oasis Company having "formed the backbone of the defence of the whole position".[46][note 16]
On 23 November, the 5th New Zealand Brigade continued its advance south-east, down the main road from Fort Capuzzo towards Sollum and cut off of the Axis positions from Sidi Omar to Sollum and Halfaya from Bardia and its supply route. The 6th New Zealand Brigade Group on the left flank at Bir el Hariga, had been ordered north-west along the Trigh Capuzzo (Capuzzo–El Adem) to reinforce 7th Armoured Division at Sidi Rezegh.[48] The brigade arrived at Bir el Chleta, some 15 miles (24 km) east of Sidi Rezagh, at first light on 23 November, where they stumbled on the Afrika Korps headquarters and captured most of its staff (Crüwell was absent); no supplies reached either panzer division that day.[49] Later in the day the 4th New Zealand Brigade Group was sent north of the 6th New Zealand Brigade to apply pressure on Tobruk and the 5th New Zealand Brigade covered Bardia and the Sollum–Halfaya positions.
Rommel's dash to the wire

On 23 November Rommel gathered his two panzer divisions in an attack with the Ariete Armoured Division to cut off and destroy the rest of XXX Corps. In the pocket were the remains of 7th Armoured Division, 5th South African Infantry Brigade and elements of the recently arrived 6th NZ Brigade.[50] By the end of the day 5th SA Brigade was destroyed and what remained of the defending force broke out of the pocket, heading south towards Bir el Gubi.[50] Comando Supremo in Rome agreed to put the Italian XX Mobile Corps, including the Ariete Armoured and the Trieste Motorised Divisions, under Rommel's command.[51] By 23 November, the Ariete, Trieste, and Savona had knocked out about 200 British tanks and a similar number of vehicles were disabled or destroyed.
British losses from 19–23 November were around 350 tanks destroyed and 150 severely damaged.[52]
The Afrika Korps was down to 40 tanks ready to be committed and Rommel ordered the relief of the frontier garrisons.[53] On 24 November the Afrika Korps and Ariete division headed for Sidi Omar, causing chaos and scattering the mainly rear echelon support units in their path, splitting XXX Corps and almost cutting off XIII Corps. Rommel hoped to relieve the siege of Bardia and pose a large enough threat to the British rear echelon to complete the defeat of Operation Crusader.[note 17] On 25 November, 15th Panzer set off north-east for Sidi Azeiz and found the area empty and were constantly attacked by the Desert Air Force. South of the border the 5th Panzer Regiment of the 21st Panzer attacked the 7th Indian Brigade at Sidi Omar and were repulsed by the 1st Field Regt RA, firing over open sights at a range of 500 metres (547 yd); a second attack left the 5th Panzer Regiment with few operational tanks.[55] The rest of 21st Panzer had headed north-east, south of the border, to Halfaya.
By the evening of 25 November, 15th Panzer were west of Sidi Azeiz (where 5th NZ Brigade was headquartered) and down to 53 tanks, practically the entire remaining tank strength of the Afrika Korps.[56] The Axis column had only a tenuous link to its supply dumps on the coast between Bardia and Tobruk and supply convoys had to find a way past the 4th and 6th NZ Brigade Groups. On 26 November, 15th Panzer, bypassing Sidi Azeiz headed for Bardia to resupply, arriving around midday. Meanwhile, the remains of 21st Panzer attacked northwest from Halfaya towards Capuzzo and Bardia and the Ariete Division who were approaching Bir Ghirba (15 miles (24 km) northeast of Sidi Omar) from the west, were ordered towards Fort Capuzzo to clear any opposition and link with 21st Panzer.[57] They were to be supported by 15th Panzer's depleted 115th Infantry Regiment which was ordered to advance with some artillery southeast from Bardia towards Fort Capuzzo.[58]
The two battalions of 5th NZ Brigade positioned between Fort Capuzzo and Sollum Barracks were engaged by the converging elements of 15th and 21st Panzer at dusk on 26 November. During the night 115th Regiment got to within 800 yards (732 m) of Capuzzo but was disengaged to switch its attack towards Upper Sollum to meet 21st Panzer coming from the south. In the early hours of 27 November Rommel met with the commanders of 15th and 21st Panzer at Bardia. It was necessary for the Afrika Korps to return to the Tobruk front where the 70th and New Zealand Divisions had gained the initiative. On 25 November, in the 102nd Trento Infantry Division sector, the 2nd Battalion Queens Royal Regiment attacked the ‘Bondi’ strongpoint but was repelled.[59] The ‘Tugun’ defenders, down to half their strength, exhausted and low on ammunition, food, and water, surrendered on the evening of 25 November, after having defeated a British attack the previous night.[60]
While Group Böttcher contained the British tank attacks in the Bologna sector, a battalion of Bersaglieri from the Trieste Division counter-attacked the British break-out from Tobruk.[note 18]
Rommel ordered the 21st Panzer back to Tobruk and the 15th Panzer was to attack forces thought to be besieging the border positions between Fort Capuzzo and Sidi Omar. 15th Panzer would first have to capture Sidi Azeiz to provide space for this ambitious manoeuvre. Neumann-Silkow, however, felt the plan had little chance of success and resolved to advance to Sidi Azeiz (where he believed there was a major British supply dump), before heading to Tobruk.[62] Defending the 5th Brigade HQ at Sidi Azeiz was a company of the 22nd Infantry Battalion and the armoured cars of the divisional cavalry plus some field artillery, anti-tank, anti-aircraft and machine gun units. The New Zealanders were overrun early on 27 November. Rommel was present to congratulate Brigadier James Hargest on the determined conduct of his men's defence. Some 700 prisoners were taken although the armoured cars escaped.[63]
The 21st Panzer, while heading west to Tobruk from Bardia, ran into 5th NZ Brigade 22nd battalion at Bir el Menastir and after an exchange lasting most of the day had been forced to detour south via Sidi Azeiz, delaying their return to Tobruk by a day.[64] By early afternoon it became clear to Eighth Army HQ through radio intercepts that both Afrika Korps divisions were heading west to Tobruk, with the Ariete Division on their left.[65] The audacious manoeuvre by Afrika Korps had failed (coming within 4 miles (6.4 km) of the main supply base of the Eighth Army).[66]
The dash of the Afrika Korps to the south removed a severe threat to the New Zealand Division left flank (the New Zealanders had not known of the threat because news of 7th Armoured Division losses had not reached XIII Corps and German tank losses had been wildly overestimated). The New Zealand Division engaged elements of the Afrika, Trieste, Bologna and Pavia divisions, advancing west to re-take Sidi Rezegh airfield and the overlooking positions to the north leading to Tobruk.[67] The 70th Division offensive was resumed on 26 November and next day elements had linked with the advancing New Zealanders of 4th NZ Brigade at Ed Duda on the Tobruk by-pass road; 6th NZ Brigade cleared the Sidi Rezegh escarpment in a mutually-costly engagement.[68]
27 November
At midday on 27 November, 15th Panzer reached Bir el Chleta and came into head-on contact with the reorganised 22nd Armoured Brigade (now a composite regiment of under 50 tanks). By mid afternoon 22nd Armoured were under pressure but holding and 4th Armoured Brigade, with 70 tanks, had arrived on the 15th Panzer's left flank having dashed over 20 miles (32 km) northeast cross country and was causing confusion in the panzer division's rear echelons. The panzer division was also suffering heavy casualties from bombing.[65] As night fell the British tanks disengaged to replenish but inexplicably moved south to do this, leaving the route west open for 15th Panzer. Once again the New Zealand Division, engaged in heavy fighting on the southeast end of the tenuous corridor into Tobruk, would be under direct threat from the Afrika Korps.[69]
Cunningham sacked

By 27 November, things were therefore once more looking better for Eighth Army: XXX Corps had more or less got itself reorganised after the chaos of the breakthrough and the New Zealand Division had linked up with the Tobruk garrison. Auchinleck had spent three days during the period of the breakthrough at Cunningham's headquarters. Cunningham had wanted to halt the offensive and withdraw but Auchinleck had handed Cunningham written orders on 25 November which included the sentence "...There is only one order, Attack and Pursue"[70] On returning to Cairo on 26 November, after conferring with his superiors, Auchinleck relieved Cunningham and appointed to command Eighth Army his deputy Chief of Staff, Major-General Neil Ritchie, whom he now promoted to acting lieutenant-general.
Tobruk corridor
From 26–27 November, in a determined attack, the 70th Division killed or winkled out the defenders of several Italian concrete pill boxes before reaching Ed Duda. On 27 November, the 6th New Zealand Brigade fought a fierce battle with a battalion of the 9th Bersaglieri Regiment, who having dug themselves in among the Prophet’s Tomb, used their machine guns very effectively. The New Zealand brigade managed to link up with the 32nd Tank Brigade at Ed Duda and the 6th and 32nd brigades secured a small bridgehead on the Tobruk front but this was to last for five days. By 28 November, the Bologna had regrouped largely in the Bu Amud and Belhamed areas and the division was now stretched out along 8 miles (13 km) from the Via Balbia to the Bypass Road, fighting in several places. The Reuters correspondent with the Tobruk garrison wrote on 28 November that:
The division holding the perimeter continues to fight with utmost bravery and determination. They are stubbornly holding small isolated defence pits, surrounded with barbed wire.— Reuters[71]
On the night of 27/28 November, Rommel had discussed with Crüwell plans for the next day, indicating that his priority was to cut the Tobruk corridor and destroy the enemy forces fighting there. Crüwell wanted to eliminate the threat of the 7th Armoured Division tanks to the south and felt this needed attention first. 15th Panzer spent most of 28 November once more engaged with 4th and 22nd Armoured and dealing with supply problems. Despite being outnumbered by two to one in tanks and at times immobile because of lack of fuel, 15th Panzer succeeded in pushing the British tank force southwards, while moving westwards.[72]

Fierce fighting continued through 28 November around the Tobruk corridor with the battle ebbing and flowing. It had not been possible to create a firm communications link between the 70th and the New Zealand divisions, making co-ordination between the two somewhat difficult. When two Italian motorised battalions of Bersaglieri together with supporting tanks, anti-tank guns and artillery moved towards Sidi Rezegh, they overran a New Zealand field hospital. The Bersaglieri captured 1,000 patients and 700 medical staff.[73] They also freed some 200 Germans being held captive in the enclosure on the grounds of the hospital.[74] The New Zealand Official History mentions the capture of 1,000 patients and implies that they were captured by Germans:
The cooks were preparing the evening meal in the grouped MDSs on 28 November when over the eastern ridge of the wadi appeared German tracked troop-carrying vehicles, from which sprang men in slate-grey uniforms and kneeboots, armed with tommy guns, rifles, and machine guns. ‘They're Jerries!’ echoed many as the German infantrymen ran down into the wadi and, as if to show that they did not intend to be trifled with, fired a few bullets into the sand.[75]
At 1800 hours the Australian 2/13th Battalion moved to reinforce Ed Duda, where some platoons took severe casualties from intense shelling.[76]
On the night of 28 November Rommel rejected Crüwell's plan for a direct advance towards Tobruk (having had no success with head-on attacks on Tobruk during all the months of the siege). He decided on a circling movement to attack Ed Duda from the south-west and carry on through to cut off the enemy forces outside the Tobruk perimeter and destroy them.[77]
On the morning of 29 November, 15th Panzer set off west travelling south of Sidi Rezegh. The remnants of 21st Panzer were supposed to be moving up on their right to form a pincer but were in disarray when von Ravenstein failed to return from a reconnaissance that morning, having been captured. In the afternoon, to the east of Sidi Rezegh, the 21st Battalion of New Zealanders was overrun on the much contested Point 175 by elements of the Ariete Division.[78] The New Zealanders were caught wrong-footed, having mistaken the attackers for reinforcements from the 1st South African Brigade which had been due to arrive from the southwest to reinforce XIII Corps.[79]

According to Lieutenant-Colonel Howard Kippenberger who later rose to command the New Zealand 2nd Division
About 5.30 pm damned Italian Motorized Division (Ariete) turned up. They passed with five tanks leading, twenty following, and a huge column of transport and guns, and rolled straight over our infantry on Pt. 175.[80]
The 24th and 26th Battalions met a similar fate at Sidi Rezegh on 30 November and on 1 December a German armoured attack on Belhamed practically destroyed the 20th Battalion.[81] The New Zealanders suffered heavily in the attacks: 879 dead, 1,699 wounded, 2,042 captured.[82]
Meanwhile, the leading elements of 15th Panzer reached Ed Duda but made little progress before nightfall, against determined defences. However, a counter-attack by 4th Royal Tank Regiment supported by Australian infantry recaptured the lost positions and the German units fell back 1,000 yards (914 m) to form a new position.[83] During 29 November the two British Armoured Brigades were strangely passive. 1st SA Brigade were to all intents and purposes tied to the armoured brigades, unable to move in open ground without them because of the threat from the panzer divisions. On the evening of 29 November, 1st SA Brigade was placed under command of 2nd New Zealand Division and ordered to advance north to recapture Point 175. Meanwhile, radio intercepts had given Eighth Army to believe that 21st Panzer and Ariete were in trouble and Lieutenant-General Ritchie ordered 7th Armoured Division to "stick to them like hell".[84]
Eight British Matilda tanks provided the preliminary bombardment for a counter-attack by two companies of the 2/13th Australian Infantry Battalion on the night of 29/30 November. In a bayonet charge against German positions, the 2/13th lost two killed and five wounded, but took 167 prisoners.[76][85] Following the resistance at Ed Duda Rommel decided to withdraw 15th Panzer to Bir Bu Creimisa, 5 miles (8 km) to the south, and relaunch his attack northeast from there on 30 November aiming between Sidi Rezegh and Belhamed while leaving Ed Duda outside his encircling pocket. By mid afternoon the New Zealand 6th Brigade was being heavily pressed on the western end of the Sidi Rezegh position. The weakened 24th Battalion was overrun as were two companies of 26th Battalion although on the eastern flank of the position 25th Battalion repelled an attack from the Ariete moving from Point 175.[86]

At 06:15 on 1 December 15 Panzer renewed their attack towards Belhamed, supported by a massive artillery effort and once again the New Zealand Division came under intense pressure. During the morning, 7th Armoured Division were ordered to advance to provide direct assistance. 4th Armoured Brigade arrived at Belhamed and may have had the opportunity for a decisive intervention since they outnumbered the 40 or so 15th Panzer Division tanks attacking the position but they believed their orders were to cover the withdrawal of the remains of 6th NZ Brigade, which precluded an offensive operation.[87]
The remains of 2nd NZ Division were now concentrated near Zaafran, five miles east of Belhamed and slightly further north-east of Sidi Rezegh. During the morning of 1 December, Freyberg, commanding 2nd New Zealand Division, saw a signal from Eighth Army indicating that the South African Brigade were now to be under command of 7th Armoured Division. He drew the inference that Army HQ had given up hope of holding the Tobruk corridor and signalled mid-morning that without the South Africans his position would be untenable and that he was planning a withdrawal. Orders were issued by Freyberg to be ready to move east at 17.30. 15th Panzer, which had been resupplying, renewed its attack at 16.30 and the Trieste cut the tenuous link established with Tobruk.[88] The New Zealanders became involved in a desperate fighting withdrawal from its western positions. Nevertheless, the division, showing admirable discipline, was formed up by 17.30 and having paused an hour for the tanks and artillery to join them from the west, set off at 18.45. They reached the XXX Corps lines with little further interruption and in the early hours the 3,500 men and 700 vehicles which had emerged were heading back to Egypt.[89]
Sollum

Once again Rommel became concerned with the cut off units in the border strongpoints and on 2 December, believing that he had won the battle at Tobruk,[90] sent the Geissler Advance Guard and the Knabe Advanced Guard battalion groups to open the routes to Bardia and to Capuzzo and thence Sollum. On 3 December the Geissler Advance Guard were heavily defeated by elements of 5th NZ Brigade on the Bardia road near Menastir. To the south the Knabe force at the same time fared slightly better on the main track to Capuzzo (Trigh Capuzzo), coming up against 'Goldforce' (based on the Central India Horse reconnaissance regiment) and retiring after an artillery exchange.[91]
Rommel insisted once again on trying to relieve the frontier forts. All Afrika Korps tanks were undergoing overhaul, so he ordered the rest of 15th Panzer and the Italian Mobile Corps eastwards on 4 December which caused considerable alarm at Eighth Army HQ. However, Rommel soon realised he could not deal with the situation at Tobruk and also send a strong force east and the Ariete went no further than Gasr el Arid.
Ed Duda
On 4 December Rommel launched a renewed attack on Ed Duda which was repulsed by 70th Division's 14th Infantry Brigade. When it was clear that the attack would fail Rommel resolved to withdraw from the eastern perimeter of Tobruk to allow him to concentrate his strength against the growing threat from XXX Corps to the south.
Bir el Gubi
Following the withdrawal of 2nd NZ Division Ritchie had reorganised his rear echelon units to release to the front line 4th Indian Infantry Division's 5th and 11th Brigades as well as 22nd Guards Brigade. By 4 December 11 Indian Brigade was heavily engaged in action against a strongpoint near Bir el Gubi, some 25 miles south of Ed Duda. The 1st and 2nd Battalions of the Italian 136th "Giovani Fascisti" Regiment from this hilltop position successfully fought off repeated attacks by the British armour and Indian infantry units during the first week of December. One British historian reports:[92]
Although Norrie had an overwhelming superiority in every arm in the area of Bir Gubi, the failure to concentrate them and co-ordinate the action of all arms in detail had allowed one Italian battalion group to frustrate the action of his whole corps and inflict heavy casualties on one brigade.
Once again the Allied infantry were exposed to a possible armoured attack as Army HQ had ordered Norrie to send 4th Armoured Brigade east to cover against the developing threat to Bardia and Sollum.[93]
On 4 December, the Pavia and Trento Divisions launched counterattacks against the 70th Division in an attempt to contain them within the Tobruk perimeter, and reportedly recaptured the ‘Plonk and ‘Doc’ strong points.[94]
On 5 December 11 Indian Brigade continued its attritional attack against point 174. As dusk approached the Afrika Korps and "Ariete" armoured division intervened to relieve the Young Fascist garrison at point 174 and cause mayhem in 11th Indian Brigade. Crüwell was unaware that 4th Armoured Brigade, now with 126 tanks, was over 20 miles (32 km) away and he withdrew to the west. The Indian Brigade was broken and had to be withdrawn to refit and arrangements made to bring 22nd Guards Brigade into their place.[95]
Crüwell still had the opportunity to strike a heavy blow on 6 December as 4th Armoured Brigade made no move to close up to 22nd Guards Brigade. However, he hesitated until too late in the day and was unable to strike a conclusive blow before dark. By 7 December 4 Armoured Brigade had closed up and the opportunity lost. Worse, 15th Panzer's skilful commander, Neumann-Silkow was mortally wounded late on the 6th.[96]
Gazala line
On 7 December 4 Armoured Brigade engaged 15th Panzer, disabling 11 more tanks. Rommel had been told on 5 December by the Italian Comando Supremo that supply could not improve until the end of the month when the airborne supply from Sicily would start. Realising that success was now unlikely at Bir el Gubi, he decided to narrow his front and shorten his lines of communication by abandoning the Tobruk front and withdrawing to the positions at Gazala, 10 miles (16 km) to his rear, which had been in preparation by Italian rear echelon units and which he had occupied by 8 December.[97] He placed Italian X Corps at the coastal end of the line and Italian XXI Corps inland. The weakened Italian Mobile Corps anchored the southern end of the line at Alem Hamza while the Afrika Korps were placed behind the southern flank ready to counterattack.[98]
On 6 December, Rommel ordered his divisions to retreat westwards, leaving the Savona to hold out as long as possible in the Sollum, Halfaya and Bardia area. They continued to fight for another month and a half. That night, the 70th Division captured the German-held ‘Walter’ and ‘Freddie’ strong points without any resistance; however, one Pavia battalion made a stand on Point 157, inflicting heavy casualties on the 2nd Durham Light Infantry with its dug-in infantry before being overcome after midnight.[99] Despite the German 90th Light Division pulling out of the Tobruk sector on 4 December,[100] the Bologna Division held out until the night of 8–9 December when trucks were finally assigned to give them some support. In a final action on the part of the British 70th Division, the Polish Carpathian Brigade attacked elements of the Brescia, covering the Axis retreat and captured the White Knoll position.[101] The Tobruk defenders were finally relieved as a result after a nineteen-day battle.
In the hope of getting better co-ordination between his infantry and armour, Ritchie transferred 7th Armoured Division to XIII Corps and directed XXX Corps HQ to take South African 2nd Division under command and conduct a siege of the border fortresses. He also sent forward to XIII Corps the 4th Indian Infantry Division and 5th NZ Infantry Brigade.[98] The Eighth Army launched its attack on the Gazala line on 13 December. 5th NZ Brigade attacked along an eight-mile front from the coast while 5th Indian Infantry Brigade made a flanking attack at Alem Hamza. Although the Trieste Division successfully held Alem Hamza, 1st battalion The Buffs from 5th Indian Infantry succeeded in taking point 204, some miles west of Alem Hamza. They were thus left in a vulnerable salient and 7th Indian Infantry Brigade to their left were ordered to send northwards 4th battalion 11th Sikh Regiment, supported by guns from 25th Field Regiment and 12 Valentine tanks from 8th Royal Tank Regiment, to ease their position.[102] This force found itself confronted by the Afrika Korps fielding 39 tanks together with 300 lorries of infantry and guns.[102] Once again the 7th Armoured Division were not in place to intervene and it was left to the force's artillery and supporting tanks to face the threat. Taking heavy casualties, they nevertheless managed to knock out fifteen German tanks and stall the counterattack.[103]
Godwin-Austen ordered Gott to get the British armour to a position where it could engage the Afrika Korps, unaware that Gott and his senior commanders were no longer confident they could defeat the enemy directly, despite their superiority in numbers, because of the Germans' superior tactics and anti-tank artillery, favoured making a wide detour to attack the enemy's soft-skinned elements and lines of supply to immobilise them.[104]
On 14 December the Polish Independent Brigade was brought forward to join the New Zealanders and prepare a new attack for the early hours of 15 December. The attack went in at 03.00, taking the defenders by surprise. The two brigades made good progress but narrowly failed to breach the line.[105]
Meanwhile, on 14 December, to the south, there was little activity from the Afrika Korps and 7th Indian Infantry Brigade were limited to patrolling through a shortage of ammunition as supply problems multiplied.[106] At Alem Hamza 5th Indian Brigade renewed their attack but made no progress against determined defence and at Point 204 5th Indian Brigade's battalion of the Royal East Kent Regiment ("The Buffs"), supported by ten I tanks, an armoured car squadron of the Central India Horse, a company of Bombay Sappers and Miners and the artillery of 31st Field Regiment and elements of 73rd Anti-Tank Regiment and some anti-aircraft guns,[107] were attacked by ten or twelve tanks, the remnants of the Ariete Armoured Division, which they beat off.
On 15 December, the Brescia and Pavia, with Trento in close support, repelled a strong Polish-New Zealand attack, thus freeing the German 15th Panzer Division which had returned to the Gazala Line, to be used elsewhere. Author Richard Humble wrote:
The Poles and New Zealanders made good initial progress, but the Italians rallied well, and by noon it was clear to [General Alfred] Godwin-Austen that his two brigades lacked the weight to achieve a breakthrough on the right flank. It was the same story in the centre, where the Italians of ‘Trieste’ continued to repulse 5th Indian Brigade’s attack on Point 208. By mid-afternoon the III Corps attack had been fought to a halt all along the line."[108]

Rommel considered Point 204 a key position and so great a part of the available neighbouring armoured and infantry units were committed to attack it on 15 December and in fierce and determined fighting, the attacking force, the Ariete and the 15th Panzer Division, with the 8th Bersaglieri Regiment and the 115th Lorried Infantry Regiment, overran The Buffs and its supporting elements during the afternoon. The Buffs lost over 1,000 men killed or captured with only 71 men and a battery of field artillery escaping.[109] Fortunately for the rest of 5th Indian Brigade it was by then too late in the day for the attacking force to collect itself and advance further to intervene at Alem Hamza.[110] The attackers too had suffered heavily in the engagement: the German commander was heard on a radio intercept to report the inability of his force to exploit his success because of losses sustained.[109] By 15 December Afrika Korps were down to eight working tanks, although the Ariete still had some 30. Rommel, who had greater respect for the capabilities of 7th Armoured at this time than either Crüwell (or apparently even Gott), became very concerned about a perceived flanking move to the south by the British armour. Despite the vehement objections of the Italian generals as well as Crüwell, he ordered an evacuation of the Gazala line on the night of the 15th.[111]
By the afternoon of 15 December, 4th Armoured, having looped round to the south, was at Bir Halegh el Eleba, some 30 miles (48 km) northwest of Alem Hamza and ideally placed both to strike at the rear of the Afrika Korps and advance north to cut Panzer Group Afrika's main lines of communication along the coast, which Godwin-Austen was urging them to do. However, early on 16 December only a small detachment was sent north (which caused serious confusion among Panzer Group Afrika's rear echelon but was not decisive) while the rest of the brigade headed south to meet its petrol supplies. In the afternoon 15th Panzer moving west were able to pass by 4th Armoured's rear and block any return move to the north. While the mere presence of the British armour had tipped Rommel's hand to withdraw from Gazala, the opportunity to gain a decisive victory had been missed.[112]
Aftermath

Auchinleck's determination and Ritchie's aggression had removed the Axis threat to Egypt and the Suez Canal for the time being. Over the following ten days Rommel's forces withdrew to a line between Ajedabia and El Haseia, maintaining his lines of communication and avoiding being cut off and surrounded as the Italians had been the previous year. As his lines of supply shortened and supplies to El Agheila improved he was able to rebuild his tank force while correspondingly the Eighth Army lines of supply became more and more stretched. On 27 December he was able in a three-day tank battle at El Haseia to inflict heavy damage on the 22nd Armoured Brigade forcing the leading echelons of Eighth Army to withdraw. This allowed the Axis forces to fall back to a tactically more desirable defensive line at El Agheila during the first two weeks of January without having to deal with pressure from the enemy.[113]
However, Rommel had failed to relieve the isolated German-Italian strongholds on the Libya–Egypt border and the 7,000 strong garrison at Bardia surrendered on 2 January 1942 after an attack by 2nd South African Division.[114] Sollum fell to the South Africans on 12 January after a small fiercely fought engagement. This completed the surrounding of the heavily fortified Halfaya position (which included the escarpment, the plateau above it and the surrounding ravines) and cut it off from the sea and any potential seaborne supply. The 5,000 defenders, mainly 55th Savona Infantry Division's troops, were already desperately short of food and water and after this had to rely on meagre supplies from air drops. The carefully prepared positions allowed the defenders to hold out obstinately against the heavy artillery and aerial bombardment with relatively few casualties, but hunger and thirst forced a capitulation on 17 January.[115] Of the commander of the Italian division, General Fedele de Giorgis, Rommel reported, "Superb leadership was shown by the Italian General de Giorgis, who commanded this German-Italian force in its two months’ struggle."[116]
On 21 January Rommel launched from El Agheila a surprise counter-attack. Although the action had originally been a "reconnaissance in force", finding the Eighth Army forward elements to be dispersed and tired, in his typical manner he took advantage of the situation and drove Eighth Army back to Gazala where they took up defensive positions along Rommel's old line. Here a stalemate set in as both sides regrouped, rebuilt and reorganised.
While it may have proved a limited success, Operation Crusader showed Rommel's Afrika Korps could be beaten and is a fine illustration of the dynamic, back and forth fighting which characterised the North African Campaign. Geoffrey Cox wrote that Sidi Rezegh was the "forgotten battle" of the Desert War. Crusader was "won by a hair’s breadth" by the newly designated Eighth Army, but had we lost it, we would have had to fight the battle of Alamein six months or a year earlier, without the decisive weapon of the Sherman tank. [117]
See also
- List of World War II Battles
- North African Campaign timeline
- List of World War II North Africa Airfields
Notes
- ↑ XXX Corps had 477 tanks available, XIII Corps 135 tanks available and the Tobruk garrison a further 126. 339 of their tanks were various cruiser models, with 210 of them being the latest A15 Crusader. 201 of the total number of tanks were Infantry tanks, the vast majority being Matilda II's. 173 of the total were M3 Stuarts and the remaining 25 were other various light tanks.[3]
- ↑ 650 planes (550 serviceable) were based within Egypt and the remaining 74 (66 serviceable) were based in Malta.[4]
- ↑ 65,000 German soldiers and 54,000 Italian.[2]
- ↑ 70x Panzer II, 139x Panzer III, 35x Panzer IV L/24 and 146 Fiat M13/40.[3]
- ↑ 260 German (15x Panzer I, 40x Panzer II, 150 Panzer III, 55x Panzer IV L/24) and 154 Italian tanks.[5]
- ↑ There was a potential axis servicable reserve of 750 aircraft based within Tripolitania, Sicily, Sardinia, Greece and Crete but excluding transport aircraft, aircraft based within mainland Italy or part of the Italian Navy.[4]
- ↑ 2,900 killed, 7,300 wounded and 7,500 missing. Casualties have been rounded by source due to underlying flaws with primary source data but cover all the serious fighting of November, December and the first half of January.[2]
- ↑ Liddell Hart states that while British tank losses during the operation were heavy, large numbers of tanks were able to be recovered and repaired as a result of Rommel's retreat leaving only 278 tanks permanently lost.[7]
- ↑ 14,600 German casualties broken down as follows: 1,100 killed, 3,400 wounded and 10,100 missing. 23,700 Italian casualties broken down as follows: 1,200 killed, 2,700 wounded and 19,800 missing. Casualties have been rounded by source due to underlying flaws with primary source data but cover all the serious fighting of November, December and the first half of January.[2]
- ↑ Editorial comment made by Liddell Hart, he states this figure includes both German and Italian tank losses.[9]
- ↑ "From 18 November to 20 January the Germans in Libya lost, according to their own records, at least 232 aircraft from all causes, and the Italians at least 100. The totals must in fact must have been higher, for on the airfields and landing-grounds from Gambut to Benina no fewer than 228 German and as many Italian aircraft were found abandoned in various states of disrepair..."[8]
- ↑ "Although the attack was only supposed to be a feint, the Polish Brigade (1 Pulk Artylerii), attacked as if it was the main thrust ... The Poles slaughtered the Italians defending the sector. It was the Poles' first taste of victory on a large scale since the war had begun almost two years earlier."[29]
- ↑ In summing up the experience of the 2nd Battalion the Black Watch in the attack, the Official History of New Zealand in the Second World War 1939–45 wrote that: "The superlative élan of the Black Watch in the attack had been equalled by the remarkable persistence of the defence in the face of formidable tank-and-infantry pressure."[31]
- ↑ Acknowledged in the Official History of New Zealand in the Second World War 1939–45, The more elaborate attack on Tugun went in at 3 pm and gained perhaps half the position, together with 256 Italians and many light field guns; but the Italians in the western half could not be dislodged and the base of the break-out area remained on this account uncomfortably narrow.[32]
- ↑ A German post-war report recorded "After a sudden artillery concentration the garrison of Fortress Tobruk, supported by sixty tanks, made an attack on the direction of Bel Hamid at noon, intending at long last unite with the main offence group. The Italian siege front around the fortress tried to offer a defence in the confusion but was forced to relinquish numerous strong points in the encirclement front about Bir Bu Assaten to superior enemy forces. The Pavia was committed for a counterattack and managed to seal off the enemy breakthrough."[33]
- ↑ Another version of the fighting is given in Information Bulletin Number 11, US War Department. This says: All Italians captured between 22 November and 23 November in the Omars belonged to the Savona Division and were reported to be tougher on the whole and better disciplined than the Italians of the Trento Division captured in December 1940 and June 1941. The prisoners were a well-clothed, well-disciplined group, who had put up a good fight and knew it. The 6 German and 52 Italian officers, as well as the 37 German technicians, were very bitter about their capture and would not speak.[47]
- ↑ His decision was based on the fact that the 7th Armoured Division had been defeated, but he ignored intelligence reports of British supply dumps lying in his path on the border and this was to cost him the battle. As Oberstleutnant Fritz Bayerlein, the chief of staff of the Afrika Korps said after the war, "If we had known about those dumps we could have won the battle."[54]
- ↑ Afterwards Oberstleutnant Bayerlein wrote that:
On 25 November heavy fighting flared up again at Tobruk, where our holding force was caught between pincers, one coming from the south-east and the other from the fortress itself. By mustering all their strength, the Boettcher Group succeeded in beating off most of these attacks, and the only enemy penetration was brought to a standstill by an Italian counterattack.[61]
Citations
- ↑ Jaroslav Hrbek and Vít Smetana: Draze zaplacená svoboda I, Paseka Praha 2009 p. 117 (czech)
- 1 2 3 4 Playfair, p. 97.
- 1 2 Playfair, p. 30.
- 1 2 3 Playfair, p. 15.
- ↑ Rommel, p. 156 (Chapter written by Fritz Bayerlein).
- ↑ Playfair, p. 100
- ↑ Rommel, p. 178 (editorial comment by Liddell Hart).
- 1 2 Playfair, p. 99
- ↑ Rommel, p. 178 (editorial comment made by Liddell-Hart)
- ↑ Taylor 1974, p. 86
- ↑ 650 aircraft (550 serviceable) were based within Egypt and the remaining 74 (66 serviceable) were based in Malta.[4]
- ↑ Most italian infantry division in North Africa were classed as "Motor-Transportable", i.e. they had enough motor vehicles to carry all artillery and services, but not the infantry, that could be motorized only by attaching Corps- and Army-level motor assets. As this assets were always fully engaged in supply duties, the italian infantry divisions fought as purely "leg-mobile" units for all the North Africa campaign.
- ↑ While officially a fully motorized unit, the Trento had been forced to give up most of its trucks for supply duties, and fought for all the North Africa campaign as a "leg-mobile" unit, with its 7th Bersaglieri Regiment almost permanently detached as a Corps-level motorized reserve asset.
- ↑ Clifford, p. 123
- ↑ Creveld, 1977, pp. 182–185
- ↑ Creveld, 1977, pp. 185–187
- ↑ Creveld, 1977, pp. 189–190
- ↑ Creveld, 1977, pp. 190–192
- ↑ Hunt (1990), pp. 72–73
- ↑ Clifford, p. 127
- ↑ French, p.219
- ↑ Toppe, Vol. II, p.A-8-3
- ↑ Clifford, pp. 130–133
- 1 2 Murphy 1961, pp. 88–90.
- ↑ World War: Tobruk, After 33 Weeks
- ↑ Clifford, p. 161
- 1 2 3 Maughan, pp. 439–442
- 1 2 Greene & Massignani, pp. 116, 121, 126 & 122
- ↑ Koskodan, p. ?
- ↑ Murphy 1961, pp. 91–93.
- ↑ Murphy 1961, p. 93.
- ↑ Murphy 1961, p. 94.
- ↑ Toppe, Vol. II, Annexe 8 p. A-8-6
- ↑ Murphy 1961, p. 96.
- ↑ Murphy 1961, p. 98.
- 1 2 Murphy 1961, pp. 103–105.
- ↑ Clifford, pp. 142–144
- ↑ Murphy 1961, p. 108.
- ↑ Matthews, p.?
- ↑ Glass, p.?
- ↑ Hurst, C.O. history of the Transvaal horse artillery Website of the Transvaal Horse Artillery.
- ↑ Horn, K. P.46.
- ↑ Bentz, p.?
- ↑ Murphy 1961, p. 119.
- ↑ Murphy 1961, pp. 124–127.
- ↑ Murphy 1961, p. 214.
- ↑ U.S. Military Intelligence Service (15 April 1942). "Information Bulletin No. 11, U.S. War Department". The Battle of the Omars. Lonesentry.com. p. 41. Retrieved 2008-04-14.
- ↑ Murphy 1961, pp. 136–137.
- ↑ Murphy 1961, p. 151.
- 1 2 Toppe, Vol. II, pp.A-8-7 to A-8-8
- ↑ Murphy 1961, p. 203.
- ↑ The Rise of the Wehrmacht, in 2 volumes, Samuel W. Mitcham, p.550, Praeger 2008
- ↑ Toppe, Vol. II, p.A-8-9
- ↑ Millen, Julia (1997). Salute to Service: A History of the Royal New Zealand Corps of Transport and Its Predecessors, 1860-1996. Victoria University Press. p. 216.
- ↑ Murphy 1961, p. 299.
- ↑ Murphy 1961, p. 304.
- ↑ Murphy 1961, pp. 315–332.
- ↑ Murphy 1961, p. 325.
- ↑ Lyman (2009), p. 269
- ↑ Lyman (2009), p. 268
- ↑ Rommel, pp. 167-168
- ↑ Murphy 1961, pp. 330–331.
- ↑ Murphy 1961, pp. 336–340.
- ↑ Murphy 1961, p. 342.
- 1 2 Murphy 1961, p. 354.
- ↑ Clifford, pp. 149–150
- ↑ Rommel, p. ?
- ↑ Murphy 1961, pp. 286–297.
- ↑ Murphy 1961, p. 355.
- ↑ Clifford, p.157
- ↑ The Indian Express, 2 December 1941
- ↑ Murphy 1961, p. 367.
- ↑ "I Bersaglieri in Africa Settentrionale website" (in Italian). 2003. Retrieved 8 April 2008.
- ↑
- Greene, Jack; Massignani, Alessandro (1999) [1994]. Rommel's North Africa Campaign: September 1940 – November 1942. Cambridge, MA: Da Capo. pp. 121–122. ISBN 978-1-58097-018-1.
- ↑ McKinney (1952), p.168
- 1 2 Peter Cox, 2015, Desert War: The Battle of Sidi Rezegh, Wollombi, NSW, Exisle Publishing, pp. 156–7.
- ↑ Murphy 1961, p. 390.
- ↑ Kiwi veterans' website: The Western Desert Accessed 29 December 2007
- ↑ Murphy 1961, pp. 400–402.
- ↑ Kippenberger (1949), p. 101
- ↑ Mason (1954), p.105
- ↑ Thomson, John (2000). Warrior Nation: New Zealanders at the Front, 1900–2000. Hazard Press. p. 187.
- ↑ Murphy 1961, p. 406.
- ↑ Murphy 1961, p. 411.
- ↑ Maughan, pp. 475–8.
- ↑ Murphy 1961, pp. 418–422.
- ↑ Murphy 1961, pp. 452.
- ↑ Chant, Christopher (2013). The Encyclopedia of Codenames of World War II. Routledge. p. 37.
- ↑ Murphy 1961, pp. 458–464.
- ↑ See translation of Order of the Day published by Panzergruppe on 2 December 41 on the CRUSADER Project
- ↑ Murphy 1961, pp. 476–478.
- ↑ Gooch, p. 100
- ↑ Murphy 1961, pp. 479–480.
- ↑ The New York Times, 5 December 1941; J. L Ready, p. 313
- ↑ Murphy 1961, p. 479.
- ↑ Murphy 1961, p. 483.
- ↑ Murphy 1961, p. 484.
- 1 2 Murphy 1961, p. 490.
- ↑ Maughan, p. 509
- ↑ Mitcham, Samuel W. (2008). The rise of the Wehrmacht: the German armed forces and World War II. Volume 1, 1941-43. Praeger. p. 552.
- ↑ Koskodan, p. ?
- 1 2 Mackenzie (1951), p.166
- ↑ Murphy 1961, p. 495.
- ↑ Murphy 1961, p. 496.
- ↑ Murphy 1961, p. 497.
- ↑ Mackenzie (1951), p.167
- ↑ Mackenzie (1951), p. 168
- ↑ Humble, Richard (1987). Crusader: Eighth Army’s Forgotten Victory, November 1941 – January 1942. London: Leo Cooper. p. 187. ISBN 978-0-85052-284-6.
- 1 2 Mackenzie (1951), p. 169
- ↑ Murphy 1961, pp. 499–500.
- ↑ Murphy 1961, p. 501.
- ↑ Murphy 1961, pp. 502–504.
- ↑ Toppe, Vol. II, p. A-8-15.
- ↑ U.S. War Department, WWII (25 July 1942). "The British Capture of Bardia (December 1941 - January 1942): A Successful Infantry-Tank Attack". Lone Sentry. Washington, DC: Military Intelligence Service, Information Bulletin No. 21. p. MID 461. Retrieved 27 December 2014.
- ↑ Clifford, pp. 219–21.
- ↑ Greene & Massignani, p. ?
- ↑ Cox 1987, p. 196f.
References
- Bentz, G. (2012). From El Wak to Sidi Rezegh: The Union Defence Force’s First Experience of Battle in East and North Africa, 1940–1941. Scientia Militaria: South African Journal of Military Studies. 40. South Africa: Stellenbosch University. pp. 177–199. OCLC 851625548.
- Clifford, Alexander (1943). Three Against Rommel: The Campaigns of Wavell, Auchinleck and Alexander. London: George G. Harrap. OCLC 10426023.
- Cox, Geoffrey (1987). A Tale of Two Battles: Crete & Sidi Rezegh. London: William Kimber. ISBN 0-7183-0642-2.
- Ford, Ken (2010). Operation Crusader 1941. Oxford: Osprey. ISBN 1-84603-500-7.
- French, David (2000). Raising Churchill's Army: The British Army and the War against Germany 1939–1945. Oxford: Oxford University Press. ISBN 0-19-820641-0.
- Glass, C. (2009). "Sidi Rezegh: Reminiscences of the late Gunner Cyril Herbert Glass, 143458, 3rd Field Regiment (Transvaal Horse Artillery)". Military History Journal. The South African Military History Society / Die Suid-Afrikaanse Krygshistoriese Vereniging. 14 (5). ISSN 0026-4016.
- Gooch, John, ed. (1990). Decisive Campaigns of the Second World War. London: Frank Cass. ISBN 978-0-7146-3369-5.
- Greene, Jack; Massignani, Alessandro (1999) [1994]. Rommel's North Africa campaign: September 1940 – November 1942. Cambridge, MA: Da Capo. ISBN 978-1-58097-018-1.
- Horn, K. (2012). South African Prisoner-of-War Experience during and after World War II: 1939 – c.1950. (PhD (unpublished)). no ISBN. Faculty of Arts and Social Sciences Stellenbosch University.
- Hunt, Sir David (1990) [1966]. A Don at War. Abingdon, UK: Frank Cass. ISBN 0-7146-3383-6.
- Kippenberger, Howard (2007) [1949]. Infantry Brigadier. New Zealand Texts Collection (online ed.). Wellington, NZ: New Zealand Electronic Text Centre. OCLC 276433219.
- Koskodan, Kenneth K. (2011). No Greater Ally: The Untold Story of Poland's Forces in World War II. Oxford: Osprey. ISBN 1-84908-479-3.
- Lyman, Robert (2009). The Longest Siege: Tobruk, The Battle That Saved North Africa. Pan Australia. ISBN 0-23071-024-7.
- Mackenzie, Compton (1951). Eastern Epic. London: Chatto & Windus. OCLC 1412578.
- Mason, Captain Walter Wynn (1954). "4: The Second Libyan Campaign and After (November 1941 – June 1942)". In Kippenberger, Howard. Prisoners of War. The Official History of New Zealand in the Second World War 1939–1945. Historical Publications Branch, Wellington. OCLC 4372202. Retrieved 6 April 2008.
- Matthews, D. (1997). "With the 5th South African Infantry Brigade at Sidi Rezegh". Military History Journal. The South African Military History Society / Die Suid-Afrikaanse Krygshistoriese Vereniging. 10 (6). ISSN 0026-4016.
- Maughan, Barton (1966). "10 Ed Duda". Tobruk and El Alamein (PDF). Australia in the War of 1939–1945, Series 1 – Army. III (1st ed.). Canberra: Australian War Memorial. OCLC 186193977. Retrieved 26 December 2015.
- Murphy, W. E. (1961). Fairbrother, Monty C., ed. The Relief of Tobruk. The Official History of New Zealand in the Second World War 1939–1945 (New Zealand Electronic Text Collection ed.). Wellington, NZ: War History Branch, Department of Internal Affairs. Retrieved 30 July 2015.
- Playfair, Major-General I. S. O.; with Flynn RN, Captain F. C.; Molony, Brigadier C. J. C. & Gleave, Group Captain T. P. (2004) [1st. pub. HMSO 1960]. Butler, J. R. M., ed. The Mediterranean and Middle East: British Fortunes Reach their Lowest Ebb (September 1941 to September 1942). History of the Second World War United Kingdom Military Series. III. Naval & Military Press. ISBN 1-84574-067-X.
- Rommel, Erwin (1953). Liddell-Hart, Basil, ed. The Rommel Papers. De Capo Press. ISBN 0-30680-157-4.
- Sadkovich, James. J. (1991). "Of Myths ad Men: Rommel and the Italians in North Africa". The International History Review. XIII: 284–313. doi:10.1080/07075332.1991.9640582. JSTOR 40106368.
- Spayd, P. A. (2003). Bayerlein: from Afrikakorps to Panzer Lehr: The Life of Rommel's chief-of-staff Generalleutnant Fritz Bayerlein. Atglen, PA: Schiffer Military History. ISBN 978-0-7643-1866-5.
- Taylor, A. J. P. (1974). Mayer, S. L., ed. A History of World War Two. London: Octopus Books. ISBN 0-7064-0399-1.
- Toppe, Generalmajor Alfred (1990) [~1947]. German Experiences in Desert Warfare During World War II (PDF). II (The Black Vault ed.). Washington: Historical Division, European Command: US Marine Corps. FMFRP 12-96-II. Retrieved 1 December 2007.
Further reading
- Dando, N. (2014). The Impact of Terrain on British Operations and Doctrine in North Africa 1940–1943 (PhD). Plymouth University. OCLC 885436735. Retrieved 25 March 2015.
External links
| Wikimedia Commons has media related to Operation Crusader. |
- The 2nd Battalion The Blackwatch At Tobruk
- BBC – WW2 People's War – Operation Crusader
- Operation Crusader and Rommel's Dash To The Wire
- The Crusader Project
- Animated Map of Operation Crusader
- Operation Crusader animated battle map by Mark Cannon