The Hardest Day
| The Hardest Day | |||||||
|---|---|---|---|---|---|---|---|
| Part of the Battle of Britain | |||||||
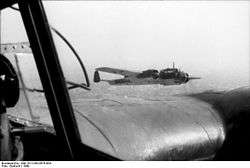
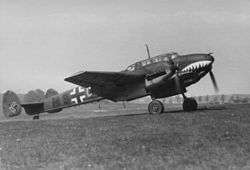
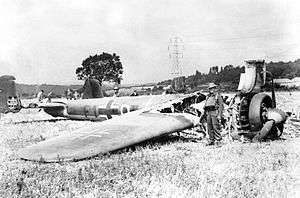 A Dornier Do 17 of 9 Staffel (Squadron), Kampfgeschwader 76 (Bomber Wing 76). The bomber was shot down by Hawker Hurricane fighter aircraft of No. 111 Squadron RAF. It crash landed near to RAF Biggin Hill, 18 August 1940. | |||||||
| |||||||
| Belligerents | |||||||
|
|
| ||||||
| Commanders and leaders | |||||||
|
|
| ||||||
| Casualties and losses | |||||||
|
27[2]–34 fighters destroyed[3] 39 fighters damaged[3] 29 aircraft destroyed (ground)[3] including only eight fighters[4] 23 aircraft damaged (ground)[3] 10 killed[5] 8 lightly wounded[5] 11 severely wounded[5] |
69[3]–71[2] aircraft destroyed 31 aircraft damaged[3] 94 killed[6] 40 captured[6] 25 wounded[6] | ||||||
The Hardest Day[3] is a name given to a Second World War air battle fought during the Battle of Britain on 18 August 1940 between the Nazi German Luftwaffe and British Royal Air Force (RAF).
By June 1940, the Allies had been defeated in Western Europe and Scandinavia. Britain rejected overtures for a negotiated peace. Consequently, Adolf Hitler issued the German armed forces (Wehrmacht) Directive No. 16 ordering the invasion of the United Kingdom.[7]
The invasion of the United Kingdom was codenamed Operation Sea Lion (Unternehmen Seelöwe). However, before this could be carried out, air supremacy or air superiority was required. The Luftwaffe had to destroy the RAF in order to prevent it from attacking the invasion fleet or providing protection for any attempt by the Royal Navy's Home Fleet to intercept a landing by sea. Hitler ordered the Luftwaffe's commander-in-chief, Reichsmarschall Hermann Göring and the Oberkommando der Luftwaffe (High Command of the Air Force) to prepare for this task.
The primary target was RAF Fighter Command. In July 1940, the Luftwaffe began military operations to destroy the RAF. Throughout July and early August, the Germans targeted convoys in the English Channel and occasionally RAF airfields. On 13 August, a major German effort, known as Adlertag (Eagle Day), was made against RAF airfields, but failed. The failure did not deter the Germans from persisting with air raids against the RAF or its infrastructure.
On 18 August 1940, the Luftwaffe made an all-out effort to destroy Fighter Command. The air battles that took place on this day were amongst the largest aerial engagements in history at that time. Both sides suffered heavy losses. In the air, the British shot down twice as many Luftwaffe aircraft as they lost.[3] However, many RAF aircraft were destroyed on the ground, equalling the total losses of both sides. Further large and costly aerial battles took place after the 18 August, but both sides lost more aircraft combined on this day than at any other point during the campaign, including the 15 September, the Battle of Britain Day, generally considered the climax of the fighting. For this reason, the air battles of the 18 August 1940 became known as "The Hardest Day" in Britain.
Background
The Luftwaffe was detailed to destroy Fighter Command before the planned invasion of Britain could take place. The OKL hoped that the destruction of the British fighter force would force the British to come to terms by air power alone and the very risky Operation Sea Lion would not be needed. The enormous numerical superiority of British naval forces over their German opponents made a crossing of the Channel very dangerous, even with air superiority. Furthermore, the aircraft losses of the spring campaign had weakened the Luftwaffe before the Battle of Britain, and it could not begin its campaign against Fighter Command immediately. It was forced to wait until it had reached acceptable levels before a main assault against the RAF could be made in August 1940.[8]
Until the Luftwaffe was ready to begin operations over the mainland, the first phase of the German air offensive targeted British shipping in the Channel. The raids rarely involved attacks against RAF airfields inland, but encouraged RAF units to engage in battle by attacking British Channel convoys. These operations lasted from 10 July to 8 August 1940.[9] The attacks against shipping were not very successful, and only 24,500 GRT was sunk. Mine laying from aircraft had proved more profitable, sinking 38,000 tons.[10] The impact on Fighter Command was minimal. It had lost 74 fighter pilots killed or missing and 48 wounded in July, but British strength rose to 1,429 by 3 August, leaving it only short of 124 pilots.[11] Still, the attacks succeeded in forcing the British to abandon the Channel convoy route and to redirect shipping to ports in north-eastern Britain. With this achieved the Luftwaffe began the second phase of its air offensive, attacking RAF airfields and supporting structures in Britain.[12]
The first major raid inland and against RAF airfields came on 12 August, and the Luftwaffe quickly escalated its offensive.[13] The Germans did not achieve a degree of success commensurate with their exertions on this date. Nevertheless, in the belief they were having considerable effect on Fighter Command, they prepared to launch their all-out assault on the RAF the following day.[14] By 13 August, German air strength had reached acceptable levels. After bringing its serviceable rates up, the Luftwaffe carried out heavy attacks under the codename Adlertag (or Eagle Day), with 71 per cent of its bomber force, 85 per cent of its Messerschmitt Bf 109 fighter units, and 83 per cent of its Messerschmitt Bf 110 heavy fighter/fighter-bomber units operational.[15] The day went badly for the Germans, who failed to impair Fighter Command and its bases or command and control system. This was due in large part to poor intelligence, which failed to identify Fighter Command airfields and distinguish them from those of Bomber and Coastal Commands.[16] Still, the Germans pursued their strategy against Fighter Command on 15 August, suffering 76 losses.[17] Undeterred, they prepared to make another large-scale attack on RAF bases on 18 August. The month of August witnessed an escalation in air combat, as the Germans made a concentrated effort against Fighter Command.[18]
Luftwaffe plan
German intelligence suggested that the RAF was down to just 300 serviceable fighters on 17 August 1940, taking into consideration German pilots' claims and their estimates of British production capabilities. In fact, there were 855 machines serviceable, with another 289 at storage units and 84 at training units. These resources were included in a total of 1,438 fighters, twice as many as at the beginning of July 1940. Expecting weakening opposition, the Luftwaffe prepared for a major action against RAF Sector Stations on 18 August.[19]
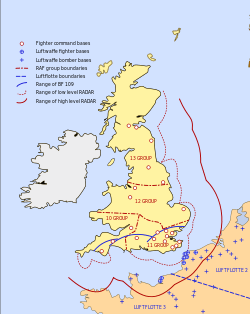
The Luftwaffe's plan of attack was simple. German bombers were to strike at the RAF airfields in the south-east corner of England. The most important airfields in this region, under the command of AOC (Air Officer Commanding) Keith Park and his No. 11 Group RAF, were the Sector Stations at RAF Kenley, Biggin Hill, Hornchurch, North Weald, Northolt, Tangmere and Debden. The first five were on the periphery of Greater London. Tangmere was in the south near the coast at Chichester, while Debden was in the north near Saffron Walden. Each of these airfields housed two to three squadrons and had its own sector operations room. From there, its fighters were directed from its satellite airfields into combat. There were six satellite airfields at Westhampnett, Croydon, Gravesend, Manston, Rochford and RAF Martlesham Heath; Manston and Martlesham Heath each housed two squadrons, the remainder each housed one. Finally, there was RAF Hawkinge, just inland from Folkestone. Not all of these airfields were targeted on 18 August.[20]
Despite the failure of Adlertag and considerable loss rates on 15, 16 and 17 August, Kesselring convinced Göring that the only sound strategy was to continue to send heavily escorted bombers to destroy British airfields. Kesselring also advocated the use of Jagdgeschwader (fighter wings) in free-chase tactics. Messerschmitt Bf 109 single-engine fighters were to be sent out in advance of the main raids to force the British fighters into large-scale air battles which, in theory, would destroy RAF aircraft in combat and deplete the British defences. However, this time, Kesselring changed his operational methods. In consultation with Hugo Sperrle, commanding Luftflotte 3 (Air Fleet 3), he chose not to scatter his effort against a large amount of targets. Instead, he narrowed down the targets to a short list in order to concentrate his strength and striking power. Sector stations RAF Kenley, North Weald, Hornchurch and Biggin Hill were chosen as the prime targets.[21][22]
|
|||||||||||||||||||||
RAF defences
Initial strategy and tactics
Up to the late Spring of 1940, Fighter Command had been preparing to meet a possible air attack on the British Isles coming only from due east, from Germany itself; prior to the German victory in Western Europe. The possibility that France might fall and Britain would continue to fight on had not been considered. An air attack from Germany meant the Luftwaffe's bombers would operate beyond the range of their fighters and be vulnerable to attack. If twin-engine fighters, such as the Messerschmitt Bf 110s were used, they would be fighting at the limits of their range.[34]
It was also doubted that fast fighter aircraft could engage in dogfights. The g-force effect on the human body also seemed to suggest the prospect of air-to-air combat between fighters was impractical anyway. The threat they saw related only to the return-fire of the bomber's gunners. Before the war the effectiveness of return, or cross-fire, from bombers had been exaggerated by the Air Staff and Air Ministry.[34]
This short-sighted belief had a detrimental impact on the tactical effectiveness of RAF Fighter Command until the summer, 1940. With German bombers perceived as the only prey, AOC Fighter Command Hugh Dowding and his planners devised a system and tactics which used unwieldy and tight fighter formations to bring the RAF fighters into combat with bombers, followed by set-piece tactics for the engagement. Because the bomber's return fire was considered so dangerous, fighter pilots were trained to open fire at long range, 300 to 400 yards, then break away without closing to short-range. These tactics, practised so thoroughly over the years, proved totally useless to the battle situation facing them over Britain in 1940.[35]
The tactics were unsuitable for fighter-versus-fighter combat. Packed in tight formation, the RAF pilots were more concerned with keeping their position and not colliding with each other than they were keeping watch for the enemy. It made them vulnerable to surprise attacks by Bf 109s and Bf 110s. Even if the British fighters reached the bombers without interception, the chaos of modern aerial combat made it impossible to concentrate attacks with large, rigid formations. Pilots were also forced into paying far too much respect to the bomber's defensive capabilities. Attacks were broken off far too early and caused little damage to bombers. These tactical failures were evident during the battles in Belgium and France. Moreover, rushed training with pilots who were barely able to use the old tactical methods meant that airmen could not cope with much needed radical changes.[35]
The V formation was developed in June, which made a greater emphasis on each pilot looking for the enemy, search capability and avoiding being taken by surprise. Still, it was inferior to German fighter tactics.[36]
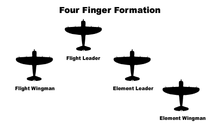
German fighter tactics were more flexible. In the Spanish Civil War, Werner Mölders developed a new system of fighter tactics. The primary deployment was to use large numbers of Bf 109s on free-hunting missions, or sweeps, over the battle area. Instead of flying the standard V formation, used by many air forces, the Germans paired their fighters into Rotte. It consisted of two fighters; a pilot and his wingman 200 yards abreast. Flying this way meant each could cover the others blind spots. If an enemy made an attack, the other could move in behind it to protect the other Rotte member. The Rotte could be expanded into a Schwarm (Swarm or Flight). The formation was eventually given the name "Finger-four". It offered maximum protection and all members of a Schwarm were on the lookout for threats and targets.[37]
C3: Command, communication and control
At the operational level the British fighter defences proved to be far more sophisticated. The RAF defences were not just based on the combat power of Fighter Command. Just as important as the "teeth" of the defence was the "eyes and ears" - its nervous system which carried intelligence and information between them to position the "teeth" to strike.[38]
By the summer, 1940, the Chain Home radar stations along the English and Scottish coasts was able to track incoming aircraft from continental Europe at all but the lowest altitudes. The best detection altitude was 20,000 feet. Aircraft at this height could be detected over 100 miles away. To assess their identity, IFF (Identification Friend or Foe) could, by means of a distinctive blip on radar screens, distinguish German and British aircraft.[39]
The radar technology was not flawless. It struggled to gauge heights of incoming formations above 25,000 feet and could not measure their numerical strength. It could also take several minutes to assess the line of advance for aircraft on a zigzag course. Moreover, the radar looked out to sea and was unable to track aircraft overland. That was the job of the Royal Observer Corps. Tens of thousands of volunteers, the length and breadth of Britain tracked the German formations over land. They were connected to Sector airfields by landline and could communicate intelligence in real time.[39]
The detection and interception of incoming raids was as follows:[40]
- Radar detects the enemy aircraft
- Radar plots are dispatched by landline to the filter room at Fighter Command Headquarters, Stanmore Park
- At the filter room enemy plots were compared with known plots of RAF fighters to assess identity to corroborate IFF
- Unidentified or hostile plots were dispatched by landline to fighter group or Sector operations rooms for plotting on situation maps
- No. 11 Groups operations room at RAF Uxbridge kept a record of the status of each unidentified or hostile raid, and the state of RAF Squadrons; whether they were refuelling, landing, in combat or scrambling
- Fighter controllers at the Sector operations rooms would choose which formations to engage and exactly what and how many Squadrons to scramble and issue the relevant orders to satellite controllers
- Fighter controllers at satellite fields would then bring their Squadrons into the field as directed by Sector controllers
- Squadrons would be loosely deployed across the south east to prevent the enemy slipping through
- Squadron Leaders are then responsible for the combat engagement
Anti-aircraft defences
Conventional defensive weapons included the anti-aircraft artillery piece. The three main types were the 4.5-inch, 3.7-inch and 3-inch guns. The first two were modern, and effective over 8000 metres (26,000 feet). The last was a First World War weapon effective only to 4,250 metres (14,000 feet). Usually batteries were sited in fours, with a range-finder and predictor which measured the speeds and heights of enemy aircraft while taking into account the time shell took to reach their intended targets, thus calculating when to detonate the fuse in the shell.[41] As with most artillery weapons firing at aircraft, the higher the shell travelled the less effective it became. A shell fired to 1,500 metres (5,000 feet) would only be half as effective at 3,000 metres (10,000 feet) and a quarter as accurate at 4,500 metres (15,000 feet). The German bombers usually tried to fly around heavy concentrations of anti-aircraft guns, and if forced to fly through them, chose to fly at heights of around 4,500 metres (15,000 feet).[42]
Most of the heavy artillery defences were located around London and the Thames Estuary. Others were concentrated around Dover, Folkestone, Harwich, Ipswich, Portsmouth and Southampton docks.[42]
For low-level defence, the Bofors 40 mm was used. This cannon had a rate of fire of 120 rounds a minute. The 2-pound (0.9 kg) shells were capable of blowing a hole in an aircraft big enough for a man to fit through. However, there were only a few available and they were in short supply at RAF Kenley and Biggin Hill. To make up the difference 3 inch guns, firing over open sights from 1918 were used. They could fire only 15 rounds per minute.[43]
One unusual defensive weapon was in use at Kenley on 18 August; the parachute-and-cable. Located on the north side of the airfield at 18 metre (60 foot) intervals, these were fired vertically by a rocket in salvoes of nine or more. As enemy aircraft came in at low-altitude, the parachute deployed and held a 145-metre (480 foot) long steel cable from an altitude of 180 metres (600 feet). If struck by an aircraft, a second parachute deployed and tangled the device around the victim. If the cable was picked up on the wing, there was a good chance that the aircraft would go down out of control. This device had not been used before 18 August 1940.[44] Also available were Barrage balloons with cutting cables capable of tearing off bombers' wings.[44]
Lunchtime engagement
German build-up
The morning weather was clear and sunny, making ideal flying conditions. At his headquarters in Brussels, Albert Kesselring commanding Luftflotte 2 (Air Fleet 2) directed the geschwader (wings) under his command to carry out attacks on Biggin Hill and Kenley. KG 1 was to send 60 Heinkel He 111s from its base in Amiens to conduct a high-level attack on Biggin Hill. KG 76, based in airfields to the north of Paris, was to attack RAF Kenley. The kampfgeschwader (bomber wing) had 48 Dornier Do 17s and Junkers Ju 88s. The force attacking Kenley was smaller numerically than the one hitting Biggin Hill and the Ju 88 and Do 17 carried only two-thirds the bomb-load of a He 111. The planners reasoned that a more accurate low-level strike carried out by a staffel from KG 76 would compensate for the weaker firepower of KG 76s main formations. Fighter escort was provided by Jagdgeschwader 3 (JG 3), Jagdgeschwader 26 (JG 26), Jagdgeschwader 51 (JG 51), Jagdgeschwader 52 (JG 52), Jagdgeschwader 54 (JG 54) and Zerstörergeschwader 26 (ZG 26). The Jagdgeschwader would carry out free-hunting and close escort from bases in the Pas-de-Calais.[45]
Both of the targeted airfields contained sector operations rooms from which the British fighters were directed into action. These airfields were selected by the Luftwaffe because they were the largest ones known to be operating RAF fighters. The German intelligence had no knowledge of the sector operations rooms there. The rooms were above ground and had little protection. If these buildings were to be hit, it would be a serious blow to the control system in the region.[45]
At their airfield at Cormeilles-en-Vexin, 9 Staffel (Squadron) KG 76 were briefed by their commander Hauptmann (Captain) Joachim Roth. The Staffel was to conduct a low-level attack against Kenley with Roth flying as a navigator in the lead aircraft. The unit had specialised in low-level attacks in France with great success. The nine Do 17s were to head across the Channel and make landfall at Beachy Head. From there they were to follow the Brighton-London rail line north-east to the target area. The crews were ordered to concentrate their attacks against buildings and hangars on the southern end of the airfield.[46]
The Dorniers were to carry twenty 110-lb bombs each fitted with a fuse that would allow for function if released from 50 feet or higher; the type of bomb previously used by the Staffel had to release from twice this height, making the unit's Do 17s correspondingly more vulnerable to ground fire.[46]
The attack was to be part of a coordinated pincer movement against the airfields. Ju 88s from II./KG 76 were to dive-bomb buildings and hangars from high-altitude first. Five minutes later, 27 Do 17s from I. and II./KG 76 would level-bomb from high altitude to crater the runways and landing grounds while knocking out its defences. 9 Staffel KG 76, the specialist low-level strike unit, would go in and finish off any buildings still standing.[46][47] It was a bold and imaginative plan. If it worked, it would wreck Kenley from end-to-end. The high-flying bombers would have full fighter escort but the low-flying bombers would have to use stealth to avoid interception to and from the target area. The operation began at 09:00 but was postponed because of heavy haze reducing visibility up to 4,000 feet.[48]
In the intervening time, a few skirmishes took place between RAF fighters and German reconnaissance aircraft. A Lehrgeschwader 2 (LG 2) Bf 110 was shot down in the morning.[49] At 11:00 KG 1's formations took off and the main formations headed out to sea. The form-up was more difficult for KG 76 and its Do 17s and Ju 88s. Their bases in and around Calais were covered in 8/10ths cloud cover with a base of 6,500 feet which reached to 10,000 feet. As the bombers climbed through the haze the formation soon lost cohesion. Valuable time was lost as they reformed. Unfortunately the Do 17s of I. and III./KG 76 had overtaken the III./KG 76 Ju 88s which should have been ahead of them by five minutes. These delay had serious consequences for 9 Staffel KG 76.[50]
Meanwhile, Gerhard Schöpfel, leading III./JG 26 and Bf 109s from JG 3, 40 in total, were already crossing the Dover straights to sweep the skies clear of the main raid. Some 25 miles behind him were the 27 Do 17s of I. and III./KG 76 escorted by 20 Bf 110s that were to strike Kenley. Close by the Dorniers were the Ju 88s of III./KG 76 escorted by Bf 109s from JG 51. This formation should have been 15 miles in front. Some 15 miles to the rear of the Ju88s, KG 1's He 111s were bound for Biggin Hill, escorted by 40 Bf 109s from JG 54. The formations were moving at around three miles per minute, at 12,000 feet.[50] Around 50 miles to the south-west, the nine Do 17s of 9 Staffel were at wave-top height, halfway between Dieppe, Seine-Maritime and Beachy Head, intent on sneaking under British radar beams unobserved. Altogether, the raiding force contained 108 bombers and 150 fighters.[51][52]
British scramble
The British followed the main raids and were aware of all the approaching aircraft, save for the low-altitude 9 Staffel. The radar station near Dover began reporting a build-up over the Pas-de-Calais area. This activity increased until 12:45 when six separate concentrations were reported. The plotters estimated the strength of the force as 350 aircraft, one-third more than the actual size.[51]
At RAF Uxbridge, AOC No. 11 Group RAF Keith Park and his controllers directed No. 501 Squadron RAF and its 12 Hawker Hurricanes, already in the air, to Canterbury at 20,000 feet. They had been on their way back to RAF Gravesend having spent most of the morning on patrol operating from RAF Hawkinge near Folkestone. Within minutes eight more Squadrons were dispatched to meet them; two from Kenley, two from Biggin Hill and one each from North Weald, Martlesham, Heath, Manston and Rochford.[51]
Within a short time the fighters assigned to engage were all airborne. Five Squadrons; No. 17, No. 54, No. 56, No. 65, and 501 with 17 Supermarine Spitfires and 36 Hurricanes were moving to patrol the Canterbury-Margate line to block any attack on the Thames Estuary ports or the airfields to the north of it. Four Squadrons; No. 32, No. 64, No. 601, and No. 615, with 23 Spitfires and 27 Hurricanes went into position above Kenley and Biggin Hill. A total of 97 RAF fighters were to meet the attack.[53]
Park did not send all of his forces aloft, and he held a reserve. Three Squadrons at RAF Tangmere were kept and made ready to meet more attacks from the south. Six more were in reserve to meet a possible follow-up to the coming raid.[54]
9 Staffel KG 76 attacks Kenley
As the advance led by Gerhard Schöpfel made their way past the coast it spotted the vic-formation of RAF fighters. They were Hurricanes of 501 Squadron which were conducting wide spirals to gain height. Schöpfel bounced them and shot down four in two minutes killing one pilot and wounding three others. As he departed other members of his Geschwader (Wing) dived on the Squadron and an inconclusive dogfight ensued. Schöpfel's victims were Donald McKay and Pilot Officers J.W Bland, Kenneth Lee and F. Kozlowski. Bland was the only one killed.[55][56]
Both the Do 17s and Ju 88s of the III./KG 76 encountered flak as they crossed Dover. The Do 17s were escorted by ZG 26 while III./JG 51 led by Hannes Trautloft escorted the Ju 88s. The German bombers had flown east of Canterbury and thereby avoided the main concentration of fighters on the Canterbury-Margate line. At 13:01 they passed over Ashford and had a clear 65 km (40 mile) run before they reached Biggin Hill and its four defending squadrons.[57]
As 9 Staffel crossed the coast they were fired at by Royal Navy patrol boats. The machine gun fire was ineffective. However, the Royal Observer Corps Post K3, situated on top of Beach Head, spotted the Dorniers. They immediately telephoned a warning to Observer Group Headquarters at Horsham and fighter sector stations in the area, including RAF Kenley. Wing Commander Thomas Prickman, the station commander at Kenley, noticed the low-flying Dornier plot appear on his situation map. They appeared to be heading away towards the west, and was unsure of their target. His controllers were organising Nos. 64 and 615 Squadrons to meet the high-altitude raid. Roth headed past Lewes until he picked up the rail line, Brighton-London. He then turned north-west.[58]
With the Observer Corps passing a steady stream of reports regarding approaching German formations they soon realised a coordinated attack was underway. The two Squadrons approaching the high-altitude attack could not be diverted and no fighters had been asked to engage the 9 Staffel. The only Squadron on the ground in the area was No. 111 Squadron RAF that had 12 Hurricanes at RAF Croydon. Although usually the responsibility of Park, the controllers took the matter into their own hands and ordered all aircraft into the air. Even those that were not in combat condition were flown north-east, to avoid them being caught on the ground.[59]
No. 111 Squadron managed to get into position above Kenley at 3,000 feet. With luck they could intercept 9 Staffel. Biggin Hill soon took the same precaution of ordering all fighters into the air by order of Group Captain Richard Grice. At 13:10 the German bombers were within 40 miles of the BBC high-power transmitter at Hatfield, Hertfordshire. In accordance with policy, it was shut down to deny the Germans the opportunity to use it as direction-finding beacon and the BBC Home Service was kicked off air in the process. Using the railway lines, Roth, in the lead Do 17, homed in on Kenley from the south. They were now just six miles away.[60]
Joachim Roth's low-level navigation had been extremely accurate. He had navigated his unit to within two minutes flying time from the target without interception, over unfamiliar enemy territory, on time and exactly on the planned route. But as the Dorniers neared the airfield they noticed that there was no smoke, or signs of damage. They expected to be polishing off a damaged fighter station. As the Germans burst over the airfield the air was suddenly filled with tracer rounds as the Dornier's gunners engaged the Bofors and British AAA defences.[61]
Some of No. 111 Squadron dived onto the Dorniers, but one Hurricane was shot down, either by the Dorniers or British ground fire. Pilot Flight Lieutenant Stanley Connors was killed. The rest pulled up and away to avoid friendly fire. They flew to the northern edge of the airfield to catch the raiders as they emerged. Two Hurricanes from No. 615 were taking off under the attack.[62]
Within minutes all the Dorniers had been hit.[63] Feldwebel Johannes Petersen's Do 17 was flying higher than the others. It was hit, and caught fire, but carried on. Günter Unger lined up his Do 17 in order to attack a hangar and released his 20 110-lb bombs before his starboard engine was knocked out. Unteroffizier (Junior Officer or NCO) Schumacher watched as three hangars were destroyed by Unger’s bombs.[62] Unger’s Dornier was then was hit by something. It bled black smoke and lost speed.[64] Unger was engaged by No. 111s Harry Newton. Newton was shot down by accurate return fire and bailed out.[63] However, Newton fired a burst of machine gun fire at the Dornier in frustration before leaving the Hurricane. He damaged the Dornier, but Unger flew on.[65] Oberleutnant (First Lieutenant) Hermann Magin was lining up a hangar when he was hit and slumped over. The quick reactions of the navigator, 28-year-old Wilhelm-Friedrich Illg, saved the crew. He took control and climbed out of the defensive fire before ordering the crew to abandon the aircraft.[66]
As the bombers worked over the airfield, Aircraftman D. Roberts waited for them on the northern boundary with his Parachute-and-cable launchers. Three Do 17s were heading towards him, climbing slowly. When they were in range he fired the cables. Nine rockets flew upwards. Wilhelm Raab saw the rockets go up. Although he did not understand what they were, he banked the Do 17 to avoid the lines of smoke that may or may not have concealed something. Because the Dornier banked, one of the cables that hit his bomber slid off the wing before the lower parachute had time to deploy. Pilot Petersen's Dornier was not that lucky. Already on fire it ran into the cable which dragged it out of the sky. The Do 17 crashed killing all five crewmen.[66] Oberleutnant Rudolf Lamberty (carrying Joachim Roth) also managed to avoid a collision, but before he could do so fire hit his Dornier destroying the fuel tanks. The bomber caught fire and he was barely able to keep control.[67] Eventually it crash-landed at Leaves Green in Kent after being shot down by No. 111 Squadron Hurricanes.[63] Roth was killed, but Lamberty survived with burns.[68]
Of the bombers that evaded the defences and No. 111 Squadron, two ditched into the sea and two more crash-landed in France.[63] The German crew was picked up by Kriegsmarine ships. Out of the nine Do 17s, four were lost, two damaged in crash landings and all were at least damaged. Wilhelm-Friedrich Illg was awarded the Knight's Cross of the Iron Cross for helping the wounded pilot Hermann Magin guide his Do 17 back home. Magin died of wounds soon after.[68]
For their efforts, 9 Staffel destroyed at least three hangars, hit several other buildings and destroyed eight Hurricanes on the ground.[63] According to other sources, 10 hangars were destroyed, six damaged, the operations room put out of action, and many buildings were destroyed. It would have been worse had the bombs been released higher. A lot of bombs landed horizontally and did not explode on impact.[69][70] To achieve this level of damage, KG 76 dropped nine tons of bombs. At the end of the day just one hangar was left operational at Kenley. The low-level raid put the airfield out of commission for two hours. In combat, two Hurricanes were shot down by the Dornier's return fire. In return 9 Staffel lost four Do 17s, three slightly damaged and two seriously damaged.[71] Low-level attacks were abandoned after The Hardest Day.[72]
KG 1 and KG 76 hit Kenley, Biggin Hill and West Malling
Nos. 610, 615 and 32 Squadrons were guarding the air space near Biggin Hill. Operating at about 25,000 feet they were waiting for the high-altitude force to reach the area. Unfortunately, the German escort fighters had climbed much higher and they were taken by surprise. JG 3's Bf 109s had been flying extended cover for the 12 Ju 88s and 27 Do 17s of KG 76. They spotted No. 615 below them and bounced the RAF fighters. Oberleutnant Lothar Keller and Leutnants Helmut Meckel and Helmut Landry each destroyed a Hurricane.[73] While 615 had taken grievous losses, it had served an important purpose by keeping the escorting German fighters busy. While they engaged JG 3, Squadron Leader Michael Crossley led No. 32 Squadron against I. and III./KG 76 bombers without having to worry about enemy fighter aircraft.[74]
ZG 26's Bf 110s were flying near the formation, and tried to offer JG 3 support by intercepting Crossley's fighters but failed. Crossley led a head-on attack and downed one Do 17 while his squadron damaged several others. So close had the RAF fighters pressed home their attacks that the bombers had to move and jink to avoid their fire. It put the bomb-aimers off their aim. The Dorniers were already too close to their targets and the pilots could not realign before the formation was over and passed the aiming point. Having been thwarted from bombing their official targets they aimed for rail tracks to the north and east of the airfield. Some of the unit targeted RAF Croydon, three miles north-west of Biggin Hill. Others turned around without releasing their bombs. The crews that bombed the rail lines found they were a difficult target to hit at 15,000 feet. Some released their bombs at intervals in the hope of hitting their targets, however some bombs fell on residential property.[75]
Crossley attempted a second pass on the bombers soon after. This time, the Bf 110s succeeded in getting in between the bombers and 32 Squadron. One Bf 110 was damaged while their gunners shot down and wounded Flight Lieutenant 'Humph' Russell. Seconds later, No. 64 Squadron's eight Spitfires turned up, led by Squadron Leader Donald MacDonell. They dived on the Dorniers from high-altitude. Some of the Squadron, including Squadron Leader MacDonell, attacked the Bf 110s, believing them to be Dorniers. MacDonell damaged a Bf 110 flown by Ruediger. Proske crash-landed and was taken prisoner. Several confusing dogfights broke out and lasted for some time.[76]
The Ju 88s arrived over the target at Kenley to find a smoke pall hanging over the target. It was impossible to begin dive-bombing attacks under those conditions. Given the amount of damage to Kenley, it also seemed unnecessary to the bomber crews. As they were deciding what action to take, they were attacked. The Bf 109s led by Hannes Trautloft had a difficult job of defending the Ju 88s. After passing Biggin Hill on their way to RAF West Malling British AAA fire began targeting the formation. One Ju 88 was hit, and Trautloft gave it special protection. As he manoeuvred himself into position, the formation was jumped by Spitfires and Hurricanes. One Ju 88 was lost to 32 Squadron's Pilot Officer Bolesław Własnowolski. As they attack began, the Ju 88s turned to West Malling, and began dive-bombing attacks as an alternate target.[77]
KG 1, meanwhile, had a clear run to its target. The battles with KG 76 had drawn in four of the five RAF Squadrons. Still, the British sent No. 615 Squadron and its 15 Spitfires to deal with KG 1. They were confronted with a large number of Bf 109s from JG 54, escorting the He 111s. The German fighters successfully defended their charges and the RAF fighters could not break through to the bombers, which were flying in stepped-up waves from 12 to 15,000 feet. Most of the German bomber crews noted the absence of fighter opposition and speculated that the RAF might be at the end of its tether. Most of the personnel at Biggin Hill had time to take cover before the bombers arrived.[78] KG 1 lost only one He 111 and one another damaged but failed to damage Biggin Hill. It is likely the losses sustained by KG 1 were inflicted by Spitfires from No. 65 Squadron RAF which stumbled across of their He 111s while 615 and JG 54 were locked in combat.[79]
Thus far, the German fighters had performed well, but now it came to the most difficult part of the operation: withdrawing under attack. The German fighters were low on fuel and could only do so much to protect the bombers. Damaged stragglers lagged behind the main bomber streams and were easy prey for RAF fighters if they could be found. The four German raiding formations were all heading in different directions by 13:30: 9 Staffel were well clear to the south, heading back over Beachy Head; KG 1 were completing their bomb run while the Spitfires of 610 were being held at arms length by JG 54 Bf 109s; the Ju 88s of KG 76 had attacked West Malling and their escorts were battling Nos. 32, 64, 501 and 615 Squadrons. The Dorniers were heading home under attack by elements of 32, 64 and 615 Squadrons. However, further to the east, Nos. 1, 17, 54, 56 and 266 Squadrons totalling 23 Spitfires and 36 Hurricanes were moving in to meet the main formations during their withdrawal.[80]
RAF controllers faced difficulties of their own. Thickening haze made it impossible for the Observer Corps to plot the route of German formations. A concentrated force of RAF fighters, should it be able to engage the main formations, might be able to inflict serious damage. However, the haze might enable the Germans to slip by and leave the concentrated force of RAF fighters near Canterbury striking at thin air. Instead of adopting an "all or nothing" approach, Park ordered the fighters to spread out and engage singly if needed.[81]
Park's plan paid dividends. Bf 110s from ZG 26 were soon discovered by No. 56 Squadron and quickly found themselves under attack.[82] In the short and sharp engagement, ZG 26 lost five Bf 110s and another damaged to No. 56 Squadron.[83] Worse was follow when No. 54 and 501 engaged the Messerschmitts. ZG 26 lost a further two shot down and two damaged to No. 54 Squadron.[84] None of the RAF Squadrons reported any losses in these engagements.[85] The Geschwader lost other machines to No. 151 and No. 46 Squadrons who arrived to join the battle. According to one source, the total losses of ZG 26 amounted to 12 destroyed and seven damaged throughout the entire day.[83] Another source gives a list of 15 Bf 110s written off; 13 destroyed, two written off and six damaged on 18 August 1940.[86] Whatever the actual losses, The Hardest Day marked the start of a decline in Bf 110 operations. Production was not keeping pace with losses, and there simply were not enough aircraft to go around.[87][88]
No. 266 Squadron was the last unit to trade shots with German formations. During the battles five Bf 109s were destroyed; two from JG 26 and three from JG 3. A further three Bf 109s were 60, 70 and 80 percent damaged. Four German pilots were killed, one wounded, one captured and one missing. One made it back to base where the crippled fighter crash-landed. One JG 3 and one JG 26 Bf 109s fell to Spitfires of 266 Squadron. Three fell to Spitfires of No. 54 Squadron.[89] Bomber losses amounted to eight destroyed and ten damaged; including five Do 17s and two Ju 88s destroyed from KG 76 and one KG 1 He 111 lost.[83]
The British suffered casualties as well. No. 17 Squadron lost one Hurricane and one pilot killed. No. 32 Squadron suffered the loss of one Hurricane destroyed; No. 65 Squadron lost one Hurricane shot down and one pilot missing. No. 111 Squadron lost one Hurricane destroyed on the ground and one damaged on the ground and three shot down in aerial combat, but all pilots survived. No. 501 Squadron suffered heavy losses amounting to five Hurricanes destroyed, two pilots killed, one seriously wounded. No. 601 lost two Hurricanes and both pilots killed while No. 602 Squadron lost three Spitfires and one damaged with one pilot wounded. No. 615 Squadron also took crippling casualties. It lost three Hurricanes with one pilot killed and another wounded. However, a further six of their Hurricanes were destroyed in the Kenley raid by 9 Staffel./KG 76.[90] The casualties of 615 have been challenged by another source which indicates 615 Squadron lost only three on the ground at Kenley (P3158, P3487, R4186).[91]
The main battle was over, but more combats took place as Kesselring sent in even more Bf 109s to support the withdrawing bombers. Jagdgeschwader 2 (JG 2) and Jagdgeschwader 27 (JG 27) engaged RAF fighters near the Isle of Wight as the bombers left British air space. II./JG 2 lost one Bf 109 destroyed and another damaged in battle with Hurricanes from No. 601 Squadron, suffering one pilot missing and the other wounded. JG 27 lost six Bf 109s (three each from I. and II./JG 27) in action against No. 85 Squadron RAF. Three pilots were killed, two were posted missing presumed dead and the other was picked up in the Channel by a Heinkel He 59 air-sea rescue aircraft.[92]
Large-scale Ju 87 operations
German build up

Hugo Sperrle's Luftflotte 3 ordered his dive bomber units to begin operations against the radar stations and airfields on the southern coast of Britain. The targets on the afternoon of 18 August were RAF Ford, RAF Thorney Island and Gosport, all belonging to the Fleet Air Arm or Coastal Command. Included in the target selection was the radar station at Poling, West Sussex, near Littlehampton.[93]
Reconnaissance by Junkers Ju 86 aircraft had identified the airfields as fighter bases. The high altitude and poor resolution of the photographs meant the aircraft on the ground could not be identified properly and the Germans mistakenly believed them to be fighter fields. In fact, none of the airfields belonged to Fighter Command. Gosport housed a torpedo development unit, Thorney Island housed No. 59 Squadron RAF and No. 235 Squadron RAF with Bristol Blenheim's assigned to RAF Coastal Command. Ford was a naval air station and housed No. 829 Squadron Fleet Air Arm which was working up with Fairey Albacore aircraft at the time. These targets were given to Sturzkampfgeschwader 77 (StG 77 or Dive Bombing Wing 77). The Geschwader committed 109 Junkers Ju 87 Stuka dive-bombers to the raid. It was the largest concentration of Ju 87s to operate over Britain to date.[33]
I./StG 77 were to strike at Thorney Island with 28 Ju 87s; 28 II./StG 77 were assigned to Ford; and 31 III./StG 77 Ju 87s were to destroy Poling radar station. A fourth unit, Sturzkampfgeschwader 3 (StG 3 or Dive Bombing Wing 3), sent 22 Ju 87s to attack Gosport. The dive-bombers were supported by 157 Bf 109s; 70 from JG 27; 32 from JG 53 acting as close escort; and 55 from JG 2 which was to sweep the Portsmouth area in advance of the main raid independently. The Ju 87s were based around Caen, too far away for the attacks. So in the morning the Stukas were moved into closer airfields around Cherbourg, right on the Channel coast. There, fuel tanks were filled, bombs loaded, and crews given a final briefing.[33]
At 13:29 the first Ju 87s took off. By 13:45 all were in formation and beginning the 85-mile trip. Major Helmut Bode led III./StG 77 to Poling. He knew nothing of the technicalities of his target. Behind him was Hauptmann Alfons Orthofer's II./StG 77 bound for Ford. After them, Hauptmann Herbert Meisel's III Gruppe was heading on the left of the formation for Thorney Island. Hauptmann Walter Seigel's I./StG 3 headed for Gosport on the extreme left. Each Ju 87 was loaded with 550-lb bombs under the main fuselage and four 11-lb bombs and two under each wing. The Bf 109s would not take off for some time. The long trip and low speed of the Ju 87s meant there was plenty of time to catch up without burning fuel keeping close contact with the Stukas.[94]
British scramble
At 13:59, Poling radar station picked up the German formations and reported them as 80 strong. Smaller forces ranging from 9 to 20-plus represented the German fighters moving up behind it. The British estimated the Luftwaffe attack force to be 150 aircraft strong. It was an underestimation by half. No. 10 Group RAF and No. 11 Group alerted their units from their operations rooms at Uxbridge and Box in Wiltshire. No. 10 and 11 Groups dispatched more Squadrons to support the already airborne 11 Hurricanes from No. 601 Squadron. 10 Group dispatched one Squadron each from RAF Middle Wallop, RAF Exeter and RAF Warmwell, and one each from No. 11's RAF Tangmere and RAF Westhampnett. The RAF order of battle included; nine Hurricanes of No. 43 Squadron RAF, led by Squadron Leader Frank Reginald Carey patrolling Thorney Island; No. 602 Squadron RAF protected Westhampnett with 12 Spitfires; No. 152 Squadron RAF and 11 Spitfires patrolled Portsmouth air space; No. 234 Squadron RAF with 11 Spitfires over the Isles of Wight to engage the attackers; No. 213 Squadron RAF with 12 Hurricanes which were to move 80 miles eastward from Exeterand patrol St. Catherine's Point. Finally, No. 609 Squadron RAF and 12 Spitfires remained in reserve around Middle Wallop to meet any unexpected German moves.[95]
Having lost all of its Bristol Blenheim night fighters in the raid of 16 August, Tangmere dispatched two Hurricanes from the Fighter Interception Unit (FIU) fitted with FIU airborne radar to test the device in action. RAF Coastal Command also joined in, and committed No. 235 Squadron RAF and its Bristol Blenheim's. The defence was reliant on the 68 Spitfires and Hurricanes. The numerical standing meant a ratio of one RAF fighter to every four German fighters and bombers, or in other words, one British aircraft to every two German fighters. Even had the fighter controllers realised the strength of the raid, there was little that could be done. Other fighters were refuelling and rearming after the attacks on Kenley and Biggin Hill and would not be available.[96]
During the British scramble, Bf 109s from JG 52 which were part of a pre-raid sweep, chanced upon RAF fighters out in the open at RAF Manston. Twelve Bf 109s from 2 Staffel II./JG 52, led by Hauptmann Wolfgang Ewald attacked while the British fighters were refuelling. After two passes, the Germans claimed 10 fighters and three Blenheims destroyed. In fact, just two No. 266 Squadron RAF Spitfires were destroyed with another six Hurricanes damaged but repairable. A single Hurricane was also destroyed.[97]
Ju 87s attack unopposed
As the Ju 87s reached the coast, the respective groups split off and headed for their assigned targets. By this time, some 15 miles off the Isle of Wight, the Bf 109s had caught up and were now zigzagging around the dive-bombers. Bode led III./StG 77 to attack from the North West, dead into wind in order to bomb accurately. Usually the Ju 87s attacked in line astern, but Bode chose to attack in groups of three to split the anti-aircraft fire. To keep the enemy's heads down, he fired his machine guns in an 80-degree dive. He soon left an altitude of 13,000 feet, releasing his bombs and pulling out at 2,275 feet. The rest of his unit followed.[98]
Poling took severe punishment from very accurate bombing. Since Ventnor radar station had been knocked out already, this attack demonstrated that an attack on Fighter Command's command, communication and control system was possible. Emergency equipment had been installed on the site in case of a breakdown, but the information and reading of the radar was significantly less reliable. In fact, Poling was so badly damaged it was out of action for the rest of August. Fortunately, the CH chain had a mobile radar station at the Isle of Wight to fill in for it. Another was due to be set up near Poling anyway, so the chain remained unaffected. The damage done to Kenley and Poling were no more than inconveniences to Park and Dowding.[99] Only one WAAF member, Avis Parsons, was studying the plots at Poling up until the attack. She was awarded the Military Medal for her actions on 5 September 1940.[100]
As Bode was in action at Poling, Alfons Orthofer's unit attacked Ford. There were only six Lewis machine guns manned at Ford and the Ju 87s were able to attack with complete confidence. Bombs rained down on huts, hangars, building and amongst aircraft drawn up together for maintenance. Early on bombs struck the field's oil tanks and storage compounds causing an enormous blaze which contributed to the crippling damage on the airfield. Gosport also came under attack soon after. Siegel's Ju 87s, with no air opposition, swooped onto their targets causing large-scale damage.[101]
As the Ju 87s began their attack, Spitfires from No. 234 Squadron engaged the 25-strong Bf 109 escort commanded by Hauptmann Karl-Wolfgang Redlich. I./JG 27s commander, Gruppenkommandeur (Group Commander) Eduard Neumann heard the battle developing, but communications were poor and he decided to let Redlich, one of his most experienced Staffelkapitän (Squadron Leaders) fight alone. In the resulting combat, three Bf 109s were shot down.[101]
Disaster for StG 77
While three of the four Ju 87 groups reached and bombed their targets without interception, the 28 Stukas of I./StG 77 were attacked by No. 43 and 601 Squadron sporting a force of 18 Hurricanes. The escorting Bf 109s from II./JG 27 were flying too far away and could not stop the Hurricanes making an attack before the Ju 87s made their dives. Three Ju 87s were shot down in exchange for a damaged Hurricane, hit by return fire. The Bf 109s soon came under attack themselves and could not assist the dive-bombers effectively. Still, some Ju 87s made attacks. While they were doing so, some of the German crews saw No. 235 Blenheims taking off to defend their base. Some hangars were hit by the Ju 87s and much damage done. As the Bf 109 escorts turned to meet the two engaging RAF Squadrons, around 300 aircraft filled a patch of sky 25 miles long, from Gosport to Bognor Regis. No. 152, 235 Squadrons engaged the Germans over Thorney Island. No. 602 engaged the Ju 87s that attacked Ford but III./JG 27 bounced No. 602 Squadron, claiming four Spitfires destroyed. Spitfires from No. 234 and Hurricanes from 213 Squadron each destroyed one Bf 109.[102]
The running air battles had cost the Ju 87 units heavily. The lack of protection for I./StG 77 had cost it 10 Ju 87s with one damaged beyond repair.[103] Total manpower losses for the unit amounted to 17 killed or mortally wounded, six wounded and five captured out of 56 men.[104] II./StG 77 lost three Ju 87s to fighter attack and one damaged beyond repair, five crewmen dead and one captured.[103] III./StG 77 also lost two Ju 87s and two damaged with four men killed.[105] StG 77s casualties amounted to 26 killed, six taken prisoner, and six wounded.[106] The battles brought the number of Ju 87s lost thus far in the campaign to 59 with a further 33 damaged. The price was too high and with the exception of sporadic attacks on convoys later in the year, the Ju 87 played no further part in the Battle of Britain.[107] Among the dead was Gruppenkommandeur Hauptmann Herbert Meisel.[108]
The Bf 109s of JG 27 lost six fighters. Two pilots were saved.[109] Another source gives eight Bf 109s destroyed.[105] JG 27 claimed 14 victories, but it is likely this was an exaggeration. Only seven were allowed to stand by the Luftwaffe.[109] RAF casualties in the air battles amounted to five fighters destroyed and four damaged. No. 43 Squadron suffered one damaged Hurricane; 152 Squadron two damaged Spitfires; No. 601 Squadron lost two Hurricanes; No. 602 Squadron lost three Spitfires and one damaged.[110]
Aftermath
The damage done to Ford was great. The local fire brigades helped put out the numerous fires and clear up the dead in and around the station. Mostly foam was used as the main water pipe had burst. Other fire units used water from static water tanks and a ditch which had filled from the fractured pipe. Ford had received less warning than the other targets and suffered heavier casualties: 28 killed and 75 wounded. Some 14 aircraft were destroyed: five Blackburn Sharks, five Fairey Swordfish, and two Fairey Albacore. A further 26 aircraft were damaged but repairable. As well as petrol and oil installations, two hangars, the motor transport hangar, two stores buildings, the ratings' and petty officers' canteens and numerous accommodation buildings were destroyed.[111]
At Gosport, five aircraft were lost and five damaged. Several buildings were wrecked and two hangars damaged. But there were no casualties. The Ju 87 attack had been accurate, and no bombs fell outside the military compounds. In the Gosport area, 10 barrage balloons were shot down and two damaged.[112]
The attacks of No. 43 and 601 Squadron disrupted the raid against Thorney Island and damage was not concentrated. Two hangars and two buildings were wrecked. Three aircraft were destroyed: a Blenheim, an Avro Anson and a Magister. One Vickers Wellington was also damaged. The only casualties were five civilian workers, injured when a 110-lb bomb landed on their shelter.[112]
The loss of long-range radar station at Poling caused few problems. The Chain Home Low radar there was working and could see almost as far out to sea. Along the surrounding coastline, for 70 miles, another six radar stations gave interlocking stations which provided cover, so there was no hole in the system. Within a few days, mobile units were moved into wooded areas nearby to provide cover until Poling was repaired.[113]
Weather intervention
RAF over France
After the second attack there followed several hours of quiet as Nos. 10 and 11 Groups and Luftflotte 2 and 3 recovered. On both sides of the Channel, unit commanders now phoned round to establish whether missing crews and aircraft had landed safely elsewhere.[114]
Meanwhile, two Bristol Blenheims of No. 114 Squadron RAF made an attack on Frecamp and Dieppe, dropping bombs from high altitude. The Germans recorded no damage at Frecamp, and the attack on Dieppe seems to have gone unnoticed. As the bombers headed home, they passed two Spitfires of the Photographic Reconnaissance Unit (PRU). These high-speed aircraft had were stripped of non-essential weight such as armament and radios and were fitted with cameras and extra fuel tanks. They photographed ports and airfields and then returned.[115]
Fresh German operations
By 17:00, the Luftwaffe was ready to strike again. Radar stations were now plotting more German formations off the Kent coast and over the Pas-de-Calais area. Having attacked Biggin Hill and Kenley, Luftflotte 2 was now going after the Sector Station RAF North Weald and RAF Hornchurch. Some 58 Do 17s of KG 2 were sent to bomb Hornchurch and 51 He 111s of KG 53 were directed to attack North Weald. The two raiding formations were to pass over the coast at the same time; so the He 111s attacking North Weald, with further to go, left 15 minutes earlier. The He 111s were to cross over at Foulness, the Dorniers at Deal. Fighter escort was provided by 140 Bf 109s and Bf 110s from JG 3, JG 26, JG 51, JG 54 and ZG 26.[116]
The British correctly estimated the German strength as 250 aircraft. To meet the threat the Fighter Controllers at 11 Group's Uxbridge centre scrambled 13 Squadrons; No. 12 Group at Watnall passed on ordered to four more. Soon, a combined total of 47 Spitfires and 97 Hurricanes were in the air. Ten of the RAF fighters in the air (nine Spitfires from No. 19 Squadron and one Hurricane from No. 151 Squadron) were armed with 20 mm cannon.[116]
No. 11 Group moved No. 32, 54, 56, and 501 Squadrons, totalling 11 Spitfires and 33 Hurricanes, to the Margate-Canterbury line to engage the enemy formations first. The remaining units were to climb to altitude and wait over or near the threatened fighter airfields, until a clearer picture emerged of enemy intentions.[116]
KG 53 raid
KG 53 approached North Weald from the east between Maldon, Essex and Rochford. No. 56 Squadron's 12 Hurricanes engaged the bombers, while No. 54 Squadron’s 11 Spitfires engaged the escorting Bf 109s and Bf 110s. In the engagement, at least one Bf 110 was shot down.[117] The line of advance was now clear to the British ground controllers. Five Squadrons: No. 46, 85, 151, 257, and 310 with 61 Hurricanes, were scrambled to intercept the bombers in front of, or over the target.[118] By 17:00 the airfield was covered in 5/10ths stratocumulus at 5,000 feet. Within thirty minutes the cloud base fell to just 3,500 feet. The German formation leaders soon realised that there was no hope of hitting a target from 12,000 feet, particularly when they could not see it. At 17:40, KG 53 turned away and headed for base. They had lost a single bomber to 56 Squadron. Things were about to change. As they turned around, 28 Hurricanes from Nos. 46, 85, and 151 Squadron prepared for a head-on attack. Meanwhile, 12 Hurricanes from 256 Squadron closed on the Germans from behind.[119]
No. 151's Pilot Officer Richard Milne shot down Gruppenkommandeur of II./KG 53, Major Reinhold Tamm. The He 111 blew up, killing all aboard. The escorting Bf 109s counter-attacked, shooting down two No. 151 Squadron Hurricanes, killing one pilot and wounding the other. No. 257 Squadron also engaged and lost one pilot killed in a crash landing after combat with Bf 110s. No. 46 Squadron—the only 12 Group unit to take part—also engaged. Shortly hence, the 13 Hurricanes from No. 85 Squadron, led by Peter Townsend, struck at the bombers but was blocked by ZG 26 Bf 110s. Bf 109s was also present and inconclusive engagements began. It was likely the Bf 109s belonged to III./JG 51 providing top cover. There were intense combats around the bombers. No. 1 Squadron's leader, David Pemperton, accounted for one JG 3 Bf 109.[120] No. 85 Squadron accounted for one He 111, but lost a Hurricane to the Bf 110s, the pilot, Pilot Officer Paddy Hemmingway, bailed out into the Channel and survived.[121] Another pilot, Flight Lieutenant Dick Lee, a veteran of the Battle of France and a flying ace with nine victories was reported missing in action. He was last seen chasing three Bf 109s out to sea. His body was never found.[122] Among the few British squadrons left in the fight (owing to fuel and ammunition running low) was No. 54 Squadron. Its commander, Colin Falkland Gray, destroyed a Bf 110.[123][124]
As KG 53 retreated out to sea, the German bombers dumped their bombs. Around 32 German bombs fell on the town of Shoeburyness. Two houses were destroyed and 20 damaged. One bomb landed on an Anderson Air Raid Shelter, killing a man and his wife. Another landed on the railway signal box, killing the signalman. Several bombs fell on a War Department gunnery range, causing no damage. Some 200 German bombs fell on the mud flats and sandbanks off Shoeburyness. Many were delayed-action bombs, and went off at irregular intervals.[125]
KG 53 had lost only four He 111s destroyed and one damaged. Its personnel losses amounted to 12 dead, two wounded and four prisoners of war. A further five were rescued by British ships, bringing the total number captured to nine.[126] The low losses of the group in the face of fighter attacks were down to the determination of ZG 26. It cost the unit seven Bf 110s and a further six damaged.[83]
KG 2 raid
Squadron Leader Michael Crossley was back in action with No. 32 Squadron. With No. 501, Crossley's units attempted to engage KG 2 while over Herne Bay. The 15-strong Hurricanes were blocked by escorting Bf 109s. No. 501 came under attack from II./JG 51. One was shot down and its pilot, George E.B. Stoney was killed. His victor was Hauptmann Josef Foezoe, an Austrian pilot. No. 501 quickly counter-attacked, destroying two Bf 109s. One of them was flown by Horst Tietzen, an ace with 20 victories and the fourth highest claimant in the Luftwaffe at that time. The other victim was Hans-Otto Lessing. Both German pilots were killed.[127] Another Bf 109 fell to Peter Brothers. The Bf 109s 22-year-old pilot, Gerhard Mueller was killed.[128] Meanwhile, Crossley, Karol Pniak and Alan Ackford shared in the destruction of another Bf 109. The pilot, Walter Blume was severely injured and taken prisoner. Within a short time, the Germans turned the tables, and three Hurricanes (Crossley, Pilot Officer de Grunne and Pilot Officer Pearce) were shot down. All three survived, though Pearce and de Grunne suffered burns. But while the RAF fighters were kept busy by the escort, the Dorniers continued without interception.[129]
As the Dorniers passed Sheerness, the anti-aircraft defences opened fire to protect the naval yard at Chatham, Kent. Along the south bank of the Thames Estuary 15 gun positions fired six 4.5in of 3.7in heavy shells. The German bombers opened up a little, to spread out. The cloud over the target ruined the German bomb run, and some bombers began the return trip with their loads still on board. While crossing the coast over Deal, Kent, three attacked the Royal Marines barracks there. They continued back across the Channel, having made no contact with enemy fighters.[130]
Night raids
German
At 18:18 night began to fall. The Luftwaffe sent bombers from KG 1, 2, 3, 27 and 53 to bomb targets at Sheffield, Leeds, Hull, Colchester, Canvey Island, Manningtree and Sealand. British records mentioned damage only at Sealand. Most bombs were scattered over rural districts. In one incident, a KG 27 He 111, shortly before midnight, attacked the flying and training school at Windrush, in Gloucestershire, where night flying was in progress. The bomber, piloted by Alfred Dreher, crashed into an Avro Anson piloted by Sergeant Bruce Hancock. Both aircraft crashed, killing all five men involved.[131]
British
While the Luftwaffe was attacking Britain, 36 Bristol Blenheims from RAF Bomber Command took off in ones and twos to attack a score of German airfields in the Netherlands and France. Its sole success was at Vlissingen, Netherlands, where it damaged two Jagdgeschwader 54 (JG 54) Bf 109s. At the same time four Armstrong Whitworth Whitleys were attacking the Fiat works in Turin, Italy and 20 more were heading for the aluminium works at Rheinfelden in southern Germany. The 18 August 1940 ended before either force reached its target.[131]
Aftermath
Overclaiming and Propaganda
Overclaiming of aerial victories was not uncommon, and both sides claimed more aircraft shot down than was the case. For the 18 August action, British propaganda claimed 144 German aircraft destroyed, which was over twice the actual figure. In response, the Germans claimed they had only lost 36, a figure which has since been proven to be half the actual figure (69 to 71). The German propaganda elements claimed to have destroyed 147 British aircraft, which was over twice the actual figure. Again, the British admitted to losing only 23, when the actual figure was around 68.[132] Other sources between them insist the RAF's losses were 27[2]–34 fighters destroyed,[3] and 29 aircraft destroyed on the ground,[3] including only eight fighters.[4]
German fighter pilot Siegfried Bethke said that German aircraft that crashed into the Channel were not counted in the official figures and that one aircraft in his unit that was damaged by 88 hits was broken up and taken back to Germany and not added to the loss record.[18]
Sorties and losses
During the 18 August 1940, Luftwaffe units flew a total of 970 sorties over Britain: some 495 by medium bombers, 460 by fighters and 15 by reconnaissance units. Of this total, about 170 of the bomber sorties were flown on the night of 17/18 August; the remainder were flown during the daylight hours on the 18 August. Less than half of the available (or serviceable) aircraft on the Luftflotte 2 and Luftflotte 3 order of battle were involved in the action that day, so it was clear that the Luftwaffe was not greatly extended in providing forces for the offensive. Luftflotte 5 did not take any part in the fighting, although its reconnaissance aircraft were active over England and Scotland.[6]
Altogether, the Luftwaffe lost between 69 and 71 aircraft destroyed or damaged beyond repair as a result of its operations over Britain on 18 August 1940. Of this total, 59 were lost to certain or probable action by fighters while two fell to ground fire, four to a combination of both and one collided with a British training aircraft. The remaining three crashed in German-held territory owing to technical failures. Altogether, the losses represented seven per cent of the force committed. Around 29 aircraft crashed in England. Personnel losses were 94 German crews killed, 40 captured and 25 returned with wounds. Some 27 to 31 German aircraft returned with damage.[6]
The gross underestimation of Fighter Command's strength issued to Luftwaffe units meant the British reaction was much stronger than expected. During the 24-hour period, Fighter Command flew 927 sorties, slightly fewer than the Germans. Only 41 of these sorties were flown by night, 28 on 17/18 August and 13 on 18/19 August. The remaining 886 sorties were flown by day, a number almost exactly equal to the 861 serviceable Spitfire, Hurricane, Defiant and Gladiator day fighters available to squadrons.[6]
The average operational sortie rate of one per serviceable fighter was not spread evenly throughout the command, however. Nos 12 and 13 Groups in the Midlands and north of Britain, with a third of the serviceable fighters between them, put up 129 (or only 15 per cent) of the day sorties, and of these only three made contact with the enemy. No. 11 Group put up one-third of the serviceable fighters in 600 sorties, or more than two-thirds of the total; on average. Each of the serviceable Spitfires and Hurricanes flew 1.7 operational sorties. No. 43 squadron flew the most sorties: 63 operations including five each from the 13 serviceable at the beginning of the day.[133]
Only 403 (45 percent) of the total number of sorties flown by Fighter Command were directed at the three major German raids. A further 56 (or just over 6 per cent) were standing patrols to protect shipping off the coast. Most of the remaining 427 sorties (nearly 50 per cent) were made to engage the reconnaissance aircraft. Usually several half-squadrons were committed. This was not excessive. But by sending more units to counter the flights, German aircraft were forced to fly higher and were denied the opportunity to drop to low altitude to take higher resolution photographs. This contributed to a lack of German intelligence which often failed to distinguish fighter, bomber and naval airfields from each other. Much of the time their strength was directed at non-fighter airfields on this date.[133]
Of the 403 sorties put up by Fighter Command to meet the major German attacks, 320 of those made contact with the enemy, meaning 80 percent of the fighters sent to intercept the bombers did so. The percentage would have been higher, had the bombers on the afternoon raid not turned around short of their targets.[133]
Between 27 and 34 RAF fighters were destroyed. A specialist source of the battle indicated the figure to be 31 destroyed or beyond repair. Of these, 25 fell to German fighters, two to return fire from the bombers. One was shot down by British ground fire in error and the loss of the remainder cannot be established. Some 26 of the fighters lost were Hurricanes, and five were Spitfires. Personnel losses for the RAF amounted to 10 British fighter pilots killed on the day, and another who died of wounds. Around 19 pilots were wounded, 11 so seriously that they did not take part in the rest of the battle.[5]
Losses on the ground amounted to eight fighters (two Spitfires). Around 28 aircraft of other types were destroyed on the ground. The total destroyed or damaged beyond repair amounted to 68 aircraft, although 17 of these were trainers or non-operational types.[5]
Göring, Mölders and Galland
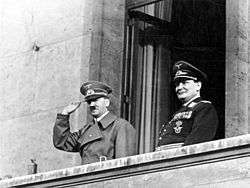
Göring spent The Hardest Day at Karinhall with two of his top fighter pilots, Werner Mölders and Adolf Galland. He was decorating them with the Combined Pilots-Observation Badge in Gold with Diamonds after they had achieved much success in recent weeks. However, Göring took the opportunity to berate them over bomber losses and in particular, what he saw, as a lack of aggression in the Jagdwaffe. This did not go down well with the two men. Göring moved to quickly reconcile with them by ordering their promotion to Geschwaderkommodore (Wing Commander) in command of their respective Geschwader (Wings). Göring felt a younger generation of combat leaders would help motivate the force. They were dismissed.[134]
On the 19 August, Göring read the reports on the losses of the 18 August, and unhappy with the extent of the losses, recalled both pilots. Hitler's Directive 17 had ordered the Luftwaffe to achieve air superiority, but remain strong enough for when, or rather if, Sea Lion was launched. Moreover, Göring recognised that the Luftwaffe was his power base. A failure would be bad, but a severe weakening of the Luftwaffe would be far worse. He emphasised to his commanders the need to preserve the Luftwaffe's strength.[135] Essentially, the core theme of the conference was fighter protection. The fighter leaders advocated sweeps to clear the skies in advance of attacks. Other commanders present thought a combination of sweeps and close escort would be more effective in reducing losses. Göring agreed and listed a number of forms that the sweeps may take. The most important tactical change he made was instituting a wholesale purge of older Geschwaderkommodore in favour of younger men. From now on, leaders were to be drawn from the ranks, given responsibility based on skill and experience rather than rank, while allowing them to have a free rein in tactical engagements (a form of aerial Auftragstaktik).[134]
Göring also placed emphasis on correct rendezvous with the bombers, which had been lacking in recent operations (see Adlertag). The longer-range bombers were ordered directly to fighter airfields to pick up their escorts on the way to the target. He determined that as many fighters as possible should remain on sweeps while a smaller number maintained close contact with the bombers. For now, this would be the main tactical arrangement of fighter-bomber cooperation.[134]
Outcome
German target selection was sound on The Hardest Day. There were four means open to the Luftwaffe for destroying Fighter Command; bombing airfields; destroying the command, control system and radar stations; and attacking aircraft factories producing fighter aircraft.[136]
Luftflotte 2 was well used in this way. Operations against Kenley, Biggin Hill, North Weald and Hornchurch had the potential to destroy 11 Group's major sector stations and impair its defences. It would also draw the defending fighters into battle. The attempt to attack Kenley, however, failed and 9 Staffel KG 76 paid a high price. The weather prevented any chance of the raids on Hornchurch and North Weald being successful. On the other hand, Luftflotte 3 had poor intelligence, and its raids on the radar stations were ineffective. Radar elimination would enable the Luftwaffe to destroy the command and control system of Fighter Command, but despite the severe damage done to the Poling station, the existence of other stations nearby gave the system plenty of cover. The airfields the Air Fleet attacked at Ford, Gosport and Thorney Island had nothing to do with the main battle as they belonged to Coastal Command and the FAA. Sperrle and his command remained unaware of their errors in intelligence.[136]
The tactical handling of Luftflotte 3 was not good either. The escorting fighters of StG 77 were stretched too far across a 30-mile front. By chance half of the defending fighters went into action against one of the attacking Ju 87 groups with disastrous results for the group concerned. The German fighters, which outnumbered the RAF units by 2:1, were unable to protect the Stuka units. Had the targets been closer together, the concentration of fighters would have allowed the Germans to destroy more RAF fighters in the air, while protecting their charges.[136]
Considering the weight of attack against airfields, hardly any fighters were destroyed on the ground. Figures indicated just two Spitfires and six Hurricanes were lost in this manner. The main reason for this was the high state of readiness of RAF units during daylight. The command depended on radar and the Observer Corps warning them in advance, giving them plenty of time to get airborne. The successful strafing attack by Bf 109s of JG 52 on Manston depended on a combination of circumstances and chance which did not occur often during the battle.[137]
The attacks on airfields, on this day and throughout the battle, did not cause any real danger to RAF Fighter Command. Biggin Hill was never out of service during the Battle of Britain, and Kenley was out of action for only two hours on 18 August. German medium bombers, usually sent in waves of 50, could carry between 60 and 85 tons of bombs. But this was not enough to destroy an airfield. If the airfield's hangars and buildings were destroyed, work on aircraft could be done in the open in summer periods. Should the craters become too troublesome, RAF units could move to another field, not necessarily an airfield, and operate fighters of it, provided it was 700 yards long and 100 yards wide to allow for operations. The vulnerable operations buildings on some airfields were hidden underground. One flaw was the vulnerability of operations rooms. At Kenley and Biggin the sector operations buildings were above ground, but they were difficult to hit even had the Luftwaffe known their location. Vital communications (telephone cables) were buried underground, making them vulnerable only to an accidental direct hit.[138]
Attacking and destroying the radar chain was also difficult. The stations were indeed vulnerable to dive bombers and low flying aircraft, however the British had mobile units which could be moved around to cover any gaps. Rapid repair services were also quick. Rarely were radar stations out of action for more than a few days.[139]
A last option was to attack fighter factories, which was not attempted on 18 August. Only the Spitfire factory at Southampton and the Hawker factory in Surrey were within range of escorted bombers. Without the Bf 109s, the bombers would suffer heavy casualties attempting to attack factories further north in daylight. Still, the attacks on the southern factories would require large concentrations of bombers and fighters which would be powerful enough to destroy them without sustaining heavy losses.[140]
Overall, each side suffered more losses on this date than on any other day during the Battle of Britain. In terms of the outcome, the battle does not appear to have been strategically favourable to either side. The loss rates were in the British favour, but the both air forces had sustained a level of attrition they could not support for long. Historian Alfred Price:
The laurels for the day’s action went to the defenders. The aim of the Luftwaffe was to wear down the Fighter Command without suffering excessive losses in the process, and in this it had failed. It cost the attackers five aircrew killed, wounded, or taken prisoner, for each British pilot casualty. In terms of aircraft, it had cost the Luftwaffe five bombers and fighters for every three Spitfires and Hurricanes destroyed in the air or on the ground. If the battle continued at this rate the Luftwaffe would wreck Fighter Command, but it would come close to wrecking itself in the process.[1]
Notes
- Notes
- ↑ The laurels for the day’s action went to the defenders. The aim of the Luftwaffe was to wear down the Fighter Command without suffering excessive losses in the process, and in this it had failed. It cost the attackers five aircrew killed, wounded, or taken prisoner, for each British pilot casualty. In terms of aircraft, it had cost the Luftwaffe five bombers and fighters for every three Spitfires and Hurricanes destroyed in the air or on the ground. If the battle continued at this rate the Luftwaffe would wreck Fighter Command, but it would come close to wrecking itself in the process.[1]
- Citations
- 1 2 Price 2010, p. 229.
- 1 2 3 Addison and Crang 2000, p. 59.
- 1 2 3 4 5 6 7 8 9 10 Bungay 2000, p. 231.
- 1 2 Franks 1997, pp. 59–60.
- 1 2 3 4 5 Price 2010, p. 228.
- 1 2 3 4 5 6 Price 2010, p. 226.
- ↑ Trevor-Roper 2004, pp. 74–79.
- ↑ Murray 1983, p. 44.
- ↑ James 2000, p. 17.
- ↑ James 2000, p. 43.
- ↑ James 2000, p. 45.
- ↑ Hooton 2010, p. 77.
- ↑ James 2000, pp. 63–64, 70.
- ↑ James 2000, p. 71.
- ↑ Murray 1983, p. 51.
- ↑ Holland 2007, pp. 453, 454.
- ↑ Ray 2009, p. 73.
- 1 2 Holland 2007, p. 478.
- ↑ Bungay 2000, p. 224.
- ↑ Price 2010, pp. 47–48.
- ↑ Hough and Richards 2007, pp. 202-203 and Bungay 2000, p. 224.
- ↑ James and Cox 2000, p. 130.
- ↑ de Zeng et al Vol 1 2007, p. 14.
- ↑ de Zeng et al Vol 1 2007, p. 171.
- ↑ de Zeng et al Vol 1 2007, pp. 179.
- ↑ de Zeng et al Vol 1 2007, pp. 184.
- ↑ de Zeng et al Vol 2 2007, p. 228.
- ↑ de Zeng et al Vol 2 2007, p. 233.
- ↑ de Zeng et al Vol 2 2007, p. 237.
- ↑ Mason 1969, p. 278.
- ↑ Price 2010, p. 205.
- ↑ Price 2010, p. 55. and de Zeng et al Vol 2 2007, p. 104.
- 1 2 3 Price 2010, p. 170.
- 1 2 Price 2010, p. 43.
- 1 2 Price 2010, p. 44.
- ↑ Price 2010, p. 45.
- ↑ Corum 1997, p. 207.
- ↑ Price 2010, p. 37.
- 1 2 Price 2010, p. 38.
- ↑ Price 2010, pp. 38–40.
- ↑ Price 2010, p. 52.
- 1 2 Price 2010, p. 53.
- ↑ Price 2010, p. 50.
- 1 2 Price 2010, p. 51.
- 1 2 Price 2010, p. 61.
- 1 2 3 Price 2010, p. 62.
- ↑ Parker 2000, p. 225.
- ↑ Price 2010, pp. 62–63.
- ↑ Mackay 2000, p. 54.
- 1 2 Price 2010, p. 65.
- 1 2 3 Price 2010, p. 66.
- ↑ Parker 2000, p. 224.
- ↑ Price 2010, p. 67.
- ↑ Price 2010, p. 68.
- ↑ Franks 1997, pp. 59–60 and Price 2010, pp. 68–69.
- ↑ Collier 1980, p. 109.
- ↑ Price 2010, pp. 69–70.
- ↑ Price 2010, pp. 72–73.
- ↑ Price 2010, pp. 74–75.
- ↑ Price 2010, p. 75.
- ↑ Price 2010, p. 78.
- 1 2 Price 2010, p. 79.
- 1 2 3 4 5 Goss 2005, p. 66.
- ↑ Price 2010, p. 80.
- ↑ Price 2010, p. 101.
- 1 2 Price 2010, p. 82.
- ↑ Price 2010, p. 84.
- 1 2 Bungay 2000, p. 226.
- ↑ Collier 1980, p. 112.
- ↑ Parker 2000, p. 227.
- ↑ Bungay 2000, p. 227.
- ↑ Parker 2000, p. 226.
- ↑ Prien and Stemmer 2002, p. 74.
- ↑ Price 2010, pp. 85–87.
- ↑ Price 2010, pp. 89, 91.
- ↑ Price 2010, pp. 95, 106–107.
- ↑ Price 2010, pp. 96, 104.
- ↑ Price 2010, pp. 102–103.
- ↑ Bungay 2000, p. 228 and Price 2010, pp. 104–105.
- ↑ Price 2010, pp. 104–105.
- ↑ Price 2010, p. 108.
- ↑ Price 2010, pp. 108–109.
- 1 2 3 4 Mason 1969, pp. 282–283.
- ↑ Mason 1969, p. 283.
- ↑ Mason 1969, pp. 281–282.
- ↑ Mackay 2000, pp. 54–55.
- ↑ Weal 1999, p. 50.
- ↑ Breffort and Jouineau 2009, pp. 22–23.
- ↑ Mason 1969, p. 283–284.
- ↑ Mason 1969, pp. 280–281.
- ↑ Franks 1998, p. 60.
- ↑ Mason 1969, pp. 283–284.
- ↑ Collier 1980, p. 110.
- ↑ Price 2010, p. 171.
- ↑ Price 2010, pp. 172–173.
- ↑ Price 2010, p. 173.
- ↑ Weal 2004, p. 30.
- ↑ Price 2010, pp. 175–177.
- ↑ Hough and Richards 2007, p. 215.
- ↑ Parker 2000, p. 231.
- 1 2 Price 2010, pp. 179–180.
- ↑ Price 2010, pp. 180–192.
- 1 2 Price 2010, p. 200.
- ↑ Weal 1997, p. 81.
- 1 2 Price 2010, p. 201.
- ↑ Bungay 2000, p. 229.
- ↑ Ward 2004, pp. 108–109.
- ↑ Hough and Richards 2007, p. 216.
- 1 2 Weal 2003, p. 33.
- ↑ Mason 1969, pp. 280–282.
- ↑ Price 2010, p. 197.
- 1 2 Price 2010, p. 198.
- ↑ Price 2010, pp. 201–202
- ↑ Price 2010, p. 203.
- ↑ Price 2010, pp. 203–204.
- 1 2 3 Price 2010, p. 206.
- ↑ Price 2010, p. 210.
- ↑ Price 2010, pp. 210–211.
- ↑ Price 2010, p. 214.
- ↑ Price 2010, pp. 215–217.
- ↑ Price 2010, pp. 220, 222.
- ↑ Price 2010, p. 220.
- ↑ Price 2010, p. 222.
- ↑ Mackay 2000, p. 56.
- ↑ Price 2010, p. 223.
- ↑ Price 2010, pp. 276–277.
- ↑ Price 2010, p. 211.
- ↑ Price 2010, pp. 211-213.
- ↑ Price 2010, p. 213.
- ↑ Price 2010, pp. 214, 220.
- 1 2 Price 2010, p. 225.
- ↑ Price 2010, p. 236.
- 1 2 3 Price 2010, p. 227.
- 1 2 3 Bungay 2000, p. 233.
- ↑ Bungay 2000, p. 232.
- 1 2 3 Price 2010, p. 230.
- ↑ Price 2010, p. 231.
- ↑ Price 2010, pp. 238-239.
- ↑ Price 2010, p. 239.
- ↑ Price 2010, pp. 239-240.
References
- Addison, Paul and Jeremy Crang. The Burning Blue: A New History of the Battle of Britain. London: Pimlico, 2000. ISBN 0-7126-6475-0.
- Bergström, Christer (2007), Barbarossa - The Air Battle: July–December 1941, London: Chervron/Ian Allen. ISBN 978-1-85780-270-2.
- Bishop, Ian. Battle of Britain: A Day-to-day Chronicle, 10 July-31 October 1940. Quercus Publishing, London. 2009. ISBN 978-1-84916-989-9
- Bungay, Stephen. The Most Dangerous Enemy: A History of the Battle of Britain. London: Aurum Press, 2000. ISBN 1-85410-721-6 (hardcover), 2002, ISBN 1-85410-801-8 (paperback)
- Breffort, Dominique and Jouineau, Andre. Messerschmitt Me 110: From 1939 to 1945, Messerschmitt's twin-engined fighters Bf 110, Me 210 and 410. Histoire and Collections, Paris. 2009. ISBN 978-2-35250-144-2
- Collier, Richard. Eagle Day: The Battle of Britain, 6 August - 15 September 1940. J.M Dent and Sons Ltd. 1980. ISBN 0-460-04370-6
- Cooper, Mathew (1981), The German Air Force 1933-1945: An Anatomy of Failure. New York: Jane's Publishing Incorporated. ISBN 0-531-03733-9
- Corum, James. The Luftwaffe: Creating the Operational Air War, 1918-1940. Kansas University Press. 1997. ISBN 978-0-7006-0836-2
- Dierich, Wolfgang. Kampfgeschwader "Edelweiss": The history of a German bomber unit, 1935-45. Allan; London. 1975. ISBN 978-0-7110-0601-0
- de Zeng, Henry L., Doug G. Stankey and Eddie J. Creek. Bomber Units of the Luftwaffe 1933-1945: A Reference Source, Volume 1. Hersham, Surrey, UK: Ian Allen Publishing, 2007. ISBN 978-1-85780-279-5.
- de Zeng, Henry L., Doug G. Stankey and Eddie J. Creek. Bomber Units of the Luftwaffe 1933-1945: A Reference Source, Volume 2. Hersham, Surrey, UK: Ian Allen Publishing, 2007. ISBN 978-1-903223-87-1.
- Franks, Norman. Royal Air Force Fighter Command Losses in the Second World War: Volume 1, Operational Losses, Aircraft and Aircrew, 1939-1941. Midland Publishing. 1997. ISBN 1-85780-055-9
- Goss, Chris. Dornier 17: In Focus. Surrey, UK: Red Kite Books, 2005. ISBN 0-9546201-4-3.
- Goss, Chris. The Luftwaffe Bombers' Battle of Britain. Crecy Publishing. 2000, ISBN 0-947554-82-3
- Hall and Quinlan (2000). KG55. Red Kite. ISBN 0-9538061-0-3.
- Hough, Richard and Denis Richards. The Battle of Britain :Pen & Sword. 2007. ISBN 1-84415-657-5
- Hooton, E.R.. Phoenix Triumphant: The Rise and Rise of the Luftwaffe. Arms & Armour Press. 1994. ISBN 1-86019-964-X
- Hooton, E.R.. Eagle in Flames: The Fall of the Luftwaffe. Arms & Armour Press. 1997. ISBN 1-86019-995-X
- Hooton, E.R.. Hooton, E.R. The Luftwaffe: A Study in Air Power, 1933-1945. Classic Publications, London. 2010. ISBN 978-1-906537-18-0
- James, T.C.G and Cox, Sebastian. The Battle of Britain. Frank Cass, London. 2000. ISBN 0-7146-8149-0
- Korda, Michael. With Wings Like Eagles: A History of the Battle of Britain. Harper Books, London. 2009. ISBN 978-0-06-112535-5
- Mackay, Ron. Messerschmitt Bf 110. Wiltshire, UK: The Crowood Press, 2000. ISBN 1-86126-313-9
- Mason, Francis. Battle Over Britain. McWhirter Twins Ltd, London. 1969. ISBN 978-0-901928-00-9
- Murray, Willamson. Strategy for Defeat. The Luftwaffe 1935-1945. Princeton, New Jersey: University Press of the Pacific, 2002. ISBN 0-89875-797-5.
- Price, Alfred. Battle of Britain Day: 15 September 1940. Greenhill books. London. 1999. ISBN 978-1-85367-375-7
- Prien, Jochen & Stemmer, Gerhard. Jagdgeschwader 3 "Undet" in World War II. Atlgen, Germany: Schiffer Military History, 2002. ISBN 0-7643-1681-8
- Overy, Richard. "Hitler and Air Strategy". Journal of Contemporary History 15 (3): 405-421. 1980
- Parker, Mathew. Battle of Britain, July - October 1940. Headline, London, 2001. ISBN 978-0-7472-3452-4
- Ray, John. The Battle of Britain: Dowding and the First Victory, 1940. London:Cassel Military Paperbacks, 2009. ISBN 978-1-4072-2131-1
- Terraine, John. The Right of the Line: The Royal Air Force in the European War, 1939-1945. London: Sceptre Publishing, 1985. ISBN 0-340-41919-9
- Treadwell, Terry C. Messerschmitt Bf 110(Classic World War II Aviation). Bristol, Avon, UK: Cerberus Publishing Ltd., 2005. ISBN 1-84145-107-X.
- Trevor-Roper, Hugh. Hitler's War Directives; 1939-1945. Birlinn Ltd. 2004. ISBN 1-84341-014-1
- Ward, John. Hitler's Stuka Squadrons: The Ju 87 at war, 1936–1945. London: Eagles of War, 2004. ISBN 1-86227-246-8.
- Weal, John. Messerschmitt Bf 110 Zerstörer Aces World War Two. London: Osprey, 1999. ISBN 1-85532-753-8.
- Weal, John. Jagdgeschwader 27 'Afrika'. Oxford: Osprey. 2003. ISBN 1-84176-538-4.
- Weal, John. Jagdgeschwader 52: The Experten. Aviation Elite Units, Osprey Publishing Limited, 2004. ISBN 1-84176-786-7
- Wood, Derek and Derek Dempster. The Narrow Margin: The Battle of Britain and the Rise of Air Power. London: Tri-Service Press, third revised edition, 1990. ISBN 1-85488-027-6.