Swindle (chess)


In chess, a swindle is a ruse by which a player in a losing position tricks his opponent, and thereby achieves a win or draw instead of the expected loss.[1][2][3][4][5] It may also refer more generally to obtaining a win or draw from a clearly losing position.[6] I. A. Horowitz and Fred Reinfeld distinguish among "traps", "pitfalls", and "swindles". In their terminology, a "trap" refers to a situation where a player goes wrong through his own efforts. In a "pitfall", the beneficiary of the pitfall plays an active role, creating a situation where a plausible move by the opponent will turn out badly. A "swindle" is a pitfall adopted by a player who has a clearly lost game.[7] Horowitz and Reinfeld observe that swindles, "though ignored in virtually all chess books", "play an enormously important role in over-the-board chess, and decide the fate of countless games".[8]
Although "swindling" in general usage is synonymous with cheating or fraud, in chess the term does not imply that the swindler has done anything unethical or unsportsmanlike.[9][10] There is nonetheless a faint stigma attached to swindles, since players feel that one who has outplayed one's opponent for almost the entire game "is 'morally' entitled to victory"[11] and a swindle is thus regarded as "rob[bing] the opponent of a well-earned victory".[12] However, the best swindles can be quite artistic, and some are widely known.
There are ways that a player can maximize the chances of pulling off a swindle, including being objective, playing actively and exploiting time pressure. Although swindles can be effected in many different ways, themes such as stalemate, perpetual check, and surprise mating attacks are often seen.
The ability to swindle one's way out of a lost position is a useful skill for any chess player and according to Graham Burgess "a major facet of practical chess", [5][13] but Frank Marshall may be the only player who has become well known as a frequent swindler.[14] Marshall was proud of his reputation for swindles,[15] and in 1914 wrote a book entitled Marshall's Chess "Swindles".[16][17][18]
Noted swindles
White's position looks hopeless
|
Position after 52...b1=Q
| ||||||||||||||||||||||||||||||||||||||||||||||||||||||||||||||||||||||||||||||||||||||||
Frank Marshall, a gifted tactician[19] who was one of the world's strongest players in the early 20th century,[20] has been called "the most renowned of swindlers".[21] To Marshall, the term swindle "meant a particularly imaginative method of rescuing a difficult, if not lost, position."[17] The phrase "Marshall swindle" was coined because Marshall "was famed for extricating himself from hopeless positions by such means".[1]
Perhaps the most celebrated of his many "Marshall swindles" occurred in Marshall–Marco, Monte Carlo 1904.[22] Marshall wrote of the position in the left-most diagram, "White's position has become desperate, as the hostile [b-pawn] must queen."[23] White could play 45.Rxc7+, but Black would simply respond 45...Kb8, winning.[23] Many players would resign here, but Marshall saw an opportunity for "a last 'swindle'".[23] He continued 45.c6! Now Black could have played 45...bxc6!, but disdained it because White could then play 46.Rxc7+ Kb8 47.Rb7+! Kxb7 48.Nc5+, winning Black's rook and stopping Black's pawn from advancing.
Black should have played this line, however, because he still wins after 48...Ka7 49.Nxa4 Bd4! (trapping the knight) 50.Kf3 Ka6 51.Ke4 Ka5 52.Kxd4 Kxa4 53.Kc3 Ka3 and Black's pawn queens after all.[24] Instead, Marco played 45...Be5?, mistakenly thinking that this would put an end to Marshall's tricks. The game continued 46.cxb7+ Kb8 (46...Kxb7? 47.Nc5+ wins the rook) 47.Nc5! Ra2+ 48.Kh3 b2 49.Re7! Ka7 Not 49...b1=Q?? 50.Re8+ Ka7 51.Ra8+ Kb6 52.b8=Q+, winning Black's newly created queen. 50.Re8! c6! 51.Ra8+ Kb6 52.Rxa2! b1=Q (right-most diagram).
White's resources finally seem to be at an end, but now Marshall revealed his deeply hidden point: 53.b8=Q+! Bxb8 54.Rb2+! Qxb2 55.Na4+ Kb5 56.Nxb2. Marshall has caught Black's pawn after all, and is now a pawn up in a position where it is Black who is fighting for a draw.[25][26] Fred Reinfeld and Irving Chernev commented, "Marshall's manner of extricating himself from his difficulties is reminiscent of an end-game by Rinck or Troitsky!"[27] Marshall won the game[28] after a further mistake by Black.[note 1][note 2]
Position after 47.h4!
|
After 50.Rxg7+!
| ||||||||||||||||||||||||||||||||||||||||||||||||||||||||||||||||||||||||||||||||||||||||
The well-known swindle seen in Evans–Reshevsky, U.S. Championship 1963–64,[29] has been dubbed the "Swindle of the Century".[30] Evans wrote, "Black is a Knight ahead and can win as he pleases. Instead of resigning, White offered a little prayer" with 47.h4![31] (See left-most position.) The game continued 47...Re2+ 48.Kh1 Qxg3?? Black wins with 48...Qg6! 49.Rf8 Qe6! 50.Rh8+ Kg6, and now Black remains a piece ahead after 51.Qxe6 Nxe6, or forces mate after 51.gxf4 Re1+ and 52...Qa2+.[32][33] Evans concluded the game with 49.Qg8+! Kxg8 50.Rxg7+! (right-most diagram) ½–½ The players agreed to a draw, since capturing the rook produces stalemate, but otherwise the rook stays on the seventh rank and checks Black's king ad infinitum.[32] This swindle enabled Evans to finish outright second in the tournament at 7½/11 (behind Bobby Fischer's historic 11–0 sweep), while Reshevsky was relegated to a tie for fourth–fifth place with 6½/11.[34]
Position after 48...g6
|
Position after 61.Nf5!!
| ||||||||||||||||||||||||||||||||||||||||||||||||||||||||||||||||||||||||||||||||||||||||
The British grandmaster Tony Miles was also an accomplished swindler. (See also Bouaziz–Miles below.) He provided a stunning example of using active play to save a lost position in Miles–Short, London 1980.[35] In the left-most position, Miles (White) is two pawns down and has no way of saving his pinned knight. Many players would resign here, but Miles played on and succeeded in perpetrating "a monstrous swindle."[36] Miles played 49.b6!, a "last desperate fling."[37] Hartston and Reuben write that now "49...Rxe3 or 49...Qxb6 add to Black's gains with no problems."[37] 49...axb6?! 50.Qa4! A surprising resource; now 50...Bxe3? 51.Qa1+! Bd4 52.Rxd4 Qb4+ 53.Kc2 "leaves Black in sudden difficulties."[37] 50...Rf8 51.Nc2 Bg7 52.Qb3 Bc6 53.Rd1 Qe5 54.a7 Ba4? 54...e3! followed by ...Be4 would still win quickly.[37] 55.Qa3 Rc8 56.Ne3 Qa5 57.Rc1! h5 Giving his king a flight square, and avoiding 57...Qxa7 58.Bb5! Rxc1+ 59.Qxc1 threatening both 60.Qc8+ and 60.Qa3.[38] 58.Bd5! Rxc1+? Miles writes that after 58...Rd8 "White still has plenty of problems."[39] 59.Qxc1 Qxa7 60.Qc8+ Kh7 61.Nf5!! (See right-most diagram.) Down four pawns, White offers a piece sacrifice. White now threatens 62.Qg8#, and 61...gxf5 62.Qxf5+ Kh6 63.Qf4+ draws by perpetual check, since 63...Kg6?? 64.Bxe4 is mate.[39] 61...Be8! The only way to continue the game. Now 62.Qxe8? Qa1+ 63.Kc2 Qc3+ 64.Kd1 Qd3+ and 65...Qxd5 wins for Black.[40] 62.Nxg7! Qd7 63.Qxe8 Qxd5 64.Ne6 Qb3+ 65.Kc1 Qc3+ 66.Kd1 Qf6 Black still hopes to mobilize his pawns and play for the win. However, Miles now forces a draw with another piece sacrifice. 67.Ng5+! Qxg5 Otherwise 68.Nxe4 draws easily.[39] 68.Qf7+ Kh8 69.Qf8+ Kh7 ½–½ White draws by perpetual check.
Practical considerations
International Master (IM) Simon Webb in his book Chess for Tigers identified five "secrets of swindling":[41]
- (1) Be objective. The first prerequisite to a swindle is to be objective enough to realize early on when you have a lost position and start playing for a swindle while your position still has resources. If you wait until your position worsens and becomes hopeless, it will be too late.[42]
- (2) Do not be afraid of losing. "Once you've accepted that your position is lost, you should be in a position of psychological strength." The worst that can happen is that you'll lose the game. The pressure is on your opponent to win a "won game", and it is your opponent who will be embarrassed if unable to do so.[43]
- (3) Play actively. In a losing position, you cannot passively wait for your opponent to squeeze you to death. To stand a chance of pulling off a successful swindle, it is important to get the initiative, and this may involve sacrificing a pawn or two, or even the exchange, to activate your pieces.[44]
Grandmaster (GM) John Nunn adds a caveat: when in a bad position, one must decide between two strategies, which he calls "grim defence" and "create confusion."[45] "Grim defence" involves finding some way to hang on, often by liquidating to an ending. "Create confusion" entails trying to "gain the initiative, even at material cost, hoping to stir up complications and cause the opponent to go wrong."[45] Nunn cautions that, "If you decide to go for 'create confusion' then you should press the panic button sufficiently early to give yourself a reasonable chance of success. However, you should be sure that your position is really bad enough to warrant such drastic measures. In my experience, it is far more common to panic too early than too late."[45]
- (4) Use the process of elimination. If you have a choice of several possible moves, and you see simple forced wins against all but one of those moves, you should play the one remaining move, and do so quickly. Again, the onus is on your opponent to find a way to win.[46] GM Parimarjan Negi observes, "the key is not to lose instantly." [47]
Negi also notes that the prospective swindler should "keep enough options on the board so your opponent has a chance to see ghosts and lose his bearings. The closer he gets to winning, the less he wants to work - exploit that state of mind!" [48]
- (5) "Star quality." Webb uses this term to refer to the prospective swindler's manner at the chessboard. He explains, "if you're on the defensive, try to look completely dejected and uninterested, in the hope that your opponent will get careless; but once you start getting your pieces into action and complicating the position, look as confident as possible in an effort to frighten him." Further, when you set a trap, try to look normal, or even to appear nervous if you're sure that you can do so without arousing your opponent's suspicions.[49]
Such play-acting can be carried to extremes. GM Nikolai Krogius writes that Najdorf, in his game against Gligorić at the 1952 Helsinki Olympiad,[50] "left a pawn en prise in time trouble, and then desperately clutched his head and reached out as if wanting to take the pawn back. ... Gligorić took the pawn, and soon thereafter lost the game. It transpired that Najdorf had staged the whole pantomime to blunt his opponent's watchfulness. This can hardly be called ethical."[51]
- (6) Time trouble is another consideration noted by various authors, including Webb himself. This has two aspects; the more obvious is exploiting the opponent's time pressure to perpetrate a swindle. Ali Mortazavi observes that "when the clock is ticking and time is pressing, a player's intuition is most likely to let him down, and this is where the swindler will get his opportunity."[52] He writes, "It is of the utmost importance that the swindler conducts himself in the appropriate fashion when his opponent is in time trouble."[53] This includes calmly reflecting rather than rushing one's moves.[54] GM Pal Benko notes that it is unpleasant for the player in time trouble to have to wait at the board, without daring even to get up to get a drink of water; this also makes the player in time trouble impatient, interferes with his concentration, and may cause him to mix up his planned responses.[55] Mortazavi also advocates that, in general, one should avoid playing the most obvious moves (one-move traps, obvious pawn breaks, checks, etc.), since the player in time trouble will likely have analyzed and have responses ready for them.[56]
However, both Benko and Webb advocate what Webb calls the "barrage technique": analyze a forced sequence of moves, then play them quickly.[57][58] Webb explains, "For example, if you have an obvious exchange of pieces available, don't play it immediately, but first decide on your next move, and then play them both at once. ... The aim is to catch your opponent with a move he hasn't considered. He will probably have considered most sensible moves in the position on the board, but since he doesn't know what your first move is going to be, he can't prepare replies to your second or third moves. The effect of an unexpected second move bashed out instantaneously can be shattering, even if it isn't particularly good."[59] (Both Benko and Webb emphasize that a player who has a winning position should not play quickly in his opponent's time pressure.[57][60] Likewise, GM Luděk Pachman remarks, "It is best to continue with one's sound strategic plan, and if one has the better position, it is completely illogical to fish in the murky waters of the opponent's time trouble."[61])
The second aspect of time trouble is that the player in time trouble may use it to facilitate a swindle. An example of this is Chigorin–Schlechter, cited below, where Schlechter's time trouble led Chigorin to believe that 44...Qc7+! was a time pressure-induced blunder rather than a trap. Mortazavi notes that although players in time trouble "rarely play the best moves, their opponents can also suffer from the excitement of the moment and play abysmally."[62] Krogius notes that a player who is unhappy with the course of the game sometimes "enters time trouble with the idea of exploiting it as a form of psychological warfare. This ... is often successful: the opponent, hoping to gain a quick victory during the other side's time trouble, becomes excited and loses the necessary critical approach. ... The result is a loss of detachment in controlling one's emotions which leads to serious errors, and thus the intentional use of time trouble is often justified.[63] However, Krogius warns that one should deliberately get into time trouble only after a detailed assessment of a number of considerations, such as the complexity of the position, the opponent's character, and the likelihood of errors on his part.[64]
Position after 27...Ne5!
|
Position after 30.Nf5!
| ||||||||||||||||||||||||||||||||||||||||||||||||||||||||||||||||||||||||||||||||||||||||
Pachman once deliberately let an hour run off his clock in order to use his own time trouble to lure his opponent into a swindle. In Pachman–Doda, Havana 1965, Pachman had earlier sacrificed an exchange for attacking chances. In the left-most position, Pachman had just played 27.Re1–e3?, to which his opponent responded with 27...Nd7–e5!. After that move, Pachman writes, "I was suddenly aware that my position was in ruins.[65] Black threatens to win a second exchange with 28...Ng4; since 28.fxe5 fxe5, threatening both 29...Rxf2 and 29...exd4, is hopeless for White, White must allow the knight to penetrate to d3, where it will threaten White's b and f pawns, leaving Black with a crushing position.[61] Pachman considered resigning immediately, but saw an opportunity for a possible swindle. Since Black could easily sidestep the swindle, leaving him with a winning position, it was essential for Black to think that the move introducing the swindle was a time-trouble induced blunder.[66] Pachman, who had over an hour for the next 13 moves, accordingly let his time go down to three minutes, "the absolute minimum required in case my opponent should err."[66] Pachman then played 28.Qd2, Doda responded 28...Nd3, and Pachman played 29.Nd1 immediately, "in my artificially created time trouble!"[66] Doda now could have kept a winning position with (for example) 29...Bg4.[66] Instead, he glanced at Pachman's clock, thought no more than 30 seconds, and played 29...Nxf4?, falling into Pachman's swindle.[66] Pachman played 30.Nf5!, initiating a strong attack (see right-most diagram).[66] Pachman writes, "The rest of the game followed at lightning speed, with my opponent in no way short of time but clearly depressed by the piece sacrifice."[66] The game concluded 30...gxf5 31.Rg3+ Kh8 32.Qxf4 Rb3? (better was 32...Qxe4 33.Qd2 f4 34.Rf3 and 35.Rxf4, with a strong attack) 33.Nc3 Rxb2 34.exf5 a5 35.Ne4 Re2 36.Nxf6 Rxf6? (after the better 36...Re5 37.Ng4 Rxf5 38.Nh6! Rf8 39.Rg5! wins) 37.Qg5 Re1+ 38.Kh2 1–0[67]
| a | b | c | d | e | f | g | h | ||
| 8 |  | 8 | |||||||
| 7 | 7 | ||||||||
| 6 | 6 | ||||||||
| 5 | 5 | ||||||||
| 4 | 4 | ||||||||
| 3 | 3 | ||||||||
| 2 | 2 | ||||||||
| 1 | 1 | ||||||||
| a | b | c | d | e | f | g | h | ||
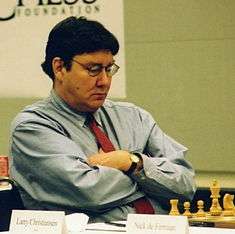
Similarly, if you have a lost position and can manage to induce your opponent to play quickly, you maximize the chances of a swindle. As Benko explains, "if you have a lost position, you may as well try speed chess—you can only lose a game once. Maybe your opponent will get rattled and blow his advantage."[57] GM Larry Christiansen successfully used this strategy in Burden–Christiansen, Las Vegas 1992 (diagram at left).[68] Down a queen for a knight and pawn against an opponent rated about 2200[69] (master-level), he managed to outplay his opponent and win! National Master Todd Barwick explains, "Christiansen hung his queen (!) in the early middle game and had a hopelessly lost position. He then moved quickly, hoping to get Jim [Burden] caught up in a faster paced game where the probability of Jim making a mistake was increased. The idea worked as the game actually speeded up to a blitz pace where Jim ended up blundering away a game he would have never lost had he taken his time."[70]
The game continued: 26...Ng4 27.Kb1 Nh6 28.Bc4 Ng4 29.Qd3 Rd8 30.d7 e4 31.Qd6 Be5 32.Qe7 32.Qxb6! Rxd7 (or 32...Bf6 33.h3) 33.Qe6! Rd8 34.h3 wins a piece. Bf6 33.Qe8+ Kg7 34.Qf7+ Kh6 35.h3 Ne3 36.Qxf6 36.Be6! Rxd7 37.Qe6 37.Rf4! (threatening Rh4#) Nxg2 38.Rxf5 (intending Qf8+ is crushing) Rd4 38.Re1 Nxg2 Christiansen evidently felt that this gave better swindling chances than 38...Nxc4 39.c3 Nd2+ 40.Kc2 Rd8 (or 40...Nb3 41.Rd1!) 41.Qxb6. 39.Rg1 Nf4 40.Qg8 e3 41.Qf8+ Kh5 42.h4 42.Qg7! h6 43.Be2+! mates quickly. Rxc4 43.Qf6 White mates with 43.Rg5+! Kxh4 44.Qh6+ Nh5 45.Rg1! Rg4 46.Rh1+ Kg3 47.Qxe3+ Kg2 48.Rg1+ Kh2 49.Qf2+ Kh3 50.Rh1#. 43.Qf7! or 43.Qg8! is also crushing, threatening both Qxh7# and Black's rook. Kh6 44.Qg5+ 44.Qf8+ allows White to transpose to the above lines, but even better is 44.Rg5! (threatening Qf8#) Ne6 (44...Nh5 allows 45.Rxg6+! hxg6 46.Qh8# or 45.Rxh5+! Kxh5 46.Qg5#). 45.Rxg6+! Kh5 46.Rg5+! Kxh4 47.Qh6#. Kg7 45.Qe7+ 45.Rd1! (threatening Rd7+) Rd4 46.Rxd4 cxd4 47.Qxf4 wins easily. Kh6 46.Qxe3? 46.Qg5+! Kg7 47.Rd1! transposes to the above line. Re4 47.Qf2 Nh3 48.Qd2+ Kh5 49.Re1 Rxe1+ 50.Qxe1 f4 51.Qe7 h6 52.Qf6? 52.Qf7! Kxh4 53.Qxg6 h5 54.Kc1 f3 55.Kd2 and now (a) 55...f2 56.Qg2 zugzwang; (b) 55...Nf4 56.Qf5! and if 56...Kg3 57.Qg5+ wins the knight; (c) 55...Ng5 56.Qf5 wins. g5 53.hxg5 hxg5 54.Qxb6 f3 55.Qxc5 Kg4 56.Qe3 Kg3 57.c4 Kg2 58.c5 f2 59.Qe4+ Kh2 60.Qf3 g4! 61.Qe2? White could draw with 61.Qxg4 f1=Q+ 62.Kc2 Qf2+ 63.Kb1 Qf1+ 64.Kc2 Qb5 (64...Nf2 65.Qf4+ Kg2 66.Qg5+ Kf3 67.Qf6+ Ke3 68.Qh6+ Kd4 69.Qd6+ Ke4 70.Qg6+ Kd5 71.Qd6+ Ke4 72.Qg6+ Kf4 73.Qd6+ Ke4 draws by repetition of moves) 65.Qb4. g3 62.c6 g2 63.Qe5+ Kh1 64.c7 g1=Q+ 65.Kc2 f1=Q 66.Kc3 Qc1+ 67.Kb4 Qb6+ 68.Kxa4 Qcc6+ 0–1[71]
Recurrent themes
Swindles can occur in myriad different ways, but as illustrated below certain themes are often seen.
Stalemate
One classic way of saving a draw in a losing position is by stalemate. Almost every master has at some point spoiled a won game by falling into a stalemate trap.[72] The defender often achieves the stalemate by sacrificing all of his or her remaining mobile pieces, with check, in such a way that they must be captured, leaving the defender with only a king (and sometimes also pawns and/or pieces) with no legal moves.
| a | b | c | d | e | f | g | h | ||
| 8 | | 8 | |||||||
| 7 | 7 | ||||||||
| 6 | 6 | ||||||||
| 5 | 5 | ||||||||
| 4 | 4 | ||||||||
| 3 | 3 | ||||||||
| 2 | 2 | ||||||||
| 1 | 1 | ||||||||
| a | b | c | d | e | f | g | h | ||
| a | b | c | d | e | f | g | h | ||
| 8 | | 8 | |||||||
| 7 | 7 | ||||||||
| 6 | 6 | ||||||||
| 5 | 5 | ||||||||
| 4 | 4 | ||||||||
| 3 | 3 | ||||||||
| 2 | 2 | ||||||||
| 1 | 1 | ||||||||
| a | b | c | d | e | f | g | h | ||
Another well-known Marshall swindle is Marshall–MacClure, New York 1923 (diagram at above left).[73] Marshall, a rook down, played 1.Rh6! Rxh6 2.h8=Q+! Rxh8 3.b5! A very unusual position has arisen: now Black is up two rooks and on move, but the only way to avoid stalemate is 3...Rd7 4.cxd7 (threatening 5.d8=Q+, forcing stalemate) c5?? 5.bxc6 Kb8 6.Kxb6, when White even wins. Decades later, someone pointed out an alternative draw with 1.Rg6! fxg6 2.h8=Q+ Rxh8 3.b5 or 1...Re8 2.Rg8 Rb8 3.b5.[74]
In Chigorin–Schlechter, Ostend 1905,[75] (diagram at above right), a game between two of the leading players of the day, an unusual combination of stalemate and zugzwang enabled the great Schlechter to rescue a desperate position. Schlechter, in extreme time trouble, played 44...Qc7+! Chigorin, thinking Schlechter had blundered, responded 45.Qb6+??, seemingly forcing the trade of queens. Schlechter's 45...Ka8!! forced an immediate draw: 46.Qxc7 is stalemate, and 46.Ka6 Qc8+! 47.Ka5 allows a draw with either 47...Qc7! (zugzwang), when White cannot make progress, or 47...Qc3+! 48.Ka6 Qc8+! with a perpetual check.
The world champion falls into a stalemate trap.
|
Position after 56.Qxe5: stalemate!
| ||||||||||||||||||||||||||||||||||||||||||||||||||||||||||||||||||||||||||||||||||||||||
In Kasparov–McDonald, simultaneous exhibition, Great Britain 1986,[76] (left-most diagram), the world champion had a winning advantage, which he could have converted with 54.Qd6+ Kg7 55.c6![77] Instead, he played 54.Bxe4??, allowing 54...Rxg3+! 55.Kxg3 Qe5+! ½–½, since the forced 56.Qxe5 gives stalemate (right-most diagram). Note that 55.Kh4!? (instead of 55.Kxg3), with the strong threat of 56.Qh7#, would have been met by 55...Rg4+! 56.Kxg4 (forced) Qd7+! 57.Qxd7 with a different stalemate.
Position after 60.Ne5+
|
Position after 61...Ng4!
| ||||||||||||||||||||||||||||||||||||||||||||||||||||||||||||||||||||||||||||||||||||||||
Grischuk–Judit Polgár, Biel 2007,[78][79][80] is a more complicated example of a successful endgame swindle based on a stalemate defense. In the left-most diagram, Polgar is two pawns down with a lost position. On the natural 60...Kf5, blocking White's more forward pawn, White can play 61.Kf3 followed by slowly advancing his pawns. Instead, Polgar played 60...Kh3! hoping to induce the attractive-looking 61.Kf3, when White is ready to play g4 and roll his pawns forward with Black's king out of play at h3. Grischuk fell into Polgar's trap, playing 61.Kf3? 61.f5! wins.[81][82] Polgar responded 61...Ng4! (right-most diagram). Now 62.Nxg4 would give stalemate. Worse, White is in zugzwang, having no useful moves, e.g. 62.f5 Nxe5+; 62.Ke2 Kxg3; or 62.Ke4 Nf6+! 63.Kf5 Kxg3 64.Kxf6 Kxf4 with a draw by insufficient material. The game continued 62.Nd3 Nh2+ 63.Ke4 Ng4 Since White has no way to save the g-pawn other than repeating the position with 64.Kf3 Nh2+, Black keeps her knight actively placed rather than immediately capturing the pawn. 64.Ne5 Nf6+! 65.Kf3 Ng4! Repeating the position that occurred after 61...Ng4! This time White tried 66. Nc4, but also without success: 66...Nh2+ 67.Ke4 Nf1 68.Ne3 Nxg3+ 69.Ke5 Kh2 70.Kd6 Nh5 71.f5 Ng7 72.f6 ½–½ 72...Ne8+ followed by 73...Nxf6 leaves White unable to mate with his lone knight.
For further examples of swindles based on stalemate, see Stalemate; Desperado (chess); Congdon–Delmar, New York 1880;[83] Post–Nimzowitsch, Barmen Masters 1905;[84] Schlechter–Wolf, Nuremberg 1906;[85] Znosko-Borovsky-Salwe, Ostend B 1907;[86] Walter–Nagy, Győr 1924;[87] Janowski–Grünfeld, Marienbad 1925;[88] Heinicke-Rellstab, German Championship 1939;[89] Bernstein–Smyslov, Groningen 1946;[90] Horowitz–Pavey, U.S. Championship 1951;[91] Fichtl–F. Blatny, Czechoslovakia 1956;[92] Portisch–Lengyel, Málaga 1964;[93] Matulović–Suttles, Palma de Mallorca Interzonal 1970;[94] Fuller–Basin, Michigan Open 1992;[95] Boyd–Glimbrant, Alicante 1992;[96] and Pein–de Firmian, Bermuda 1995.[97]
Weak back rank
White's position is desperate
|
Position after 32.b5!!
| ||||||||||||||||||||||||||||||||||||||||||||||||||||||||||||||||||||||||||||||||||||||||
Grandmaster Andrew Soltis considers St. Amant's swindle in St. Amant–Staunton, 9th match game, 1843 the greatest ever perpetrated in match history.[98] In the position diagrammed at far left, White appears to be losing a piece. His queen is under attack, and if 32.Qe4 (to save his bishop on d3), Black plays 32...Ng5 33.Qg2 (for example) Rxd3 and wins. St. Amant produced 32.b5!!, which Staunton called, "A desperate but masterly resource."[99] G.H. Diggle referred to it, equally accurately, as "a move looking so irrelevant that everyone must have thought for a moment that it was merely a petulant way of resigning".[100] Although it should not have saved the game, the move in fact has three points: (1) it attacks Black's bishop; (2) after 32...Rxd4 33.exd4 (threatening a back-rank mate and discovering an attack on Black's queen), it prevents the bishop from guarding the e8 square; and (3) after 32...Rxd4 33.exd4, it prevents the queen from defending e8 with 33...Qc6. Black nonetheless could have won with either (a) 32...Bd1! (threatening 33...Bxe2+) 33.Rxd1 Rxd4 34.exd4 Qh5 35.Be3 Qf3+ 36.Ke1 Re8 37.Kd2 Nf2 (Ossip Bernstein) or (b) 32...Rxd4 33.exd4 g5! 34.fxg6 Qh5!, when Black avoids being mated and himself threatens 35...Qf3+ and mate next move.[100][101] Instead, Staunton played 32...Qh5? immediately. After St. Amant's 33.g4!, he should have played 33...Qh4 34.Qxa4 Rxd3. But shattered by the realization that he had thrown away a win, Staunton blundered again with 33...Rxd4?? 34.exd4! f6 35.gxh5 and Black resigned.[101] The two winning lines for Black are sufficiently difficult that Staunton, annotating the game 16 years later in his Chess Player's Companion, gave neither of them, instead recommending a line leading to a probable draw by perpetual check.[99]
This stunning reversal had a major impact on the match. Staunton had won seven and drawn one of the first eight games, and believed that St. Amant would have resigned the match if he had lost. Instead, St. Amant was able to continue the match for three more weeks, winning another five games, before finally succumbing.[100]
Black, a pawn up with a won game, becomes careless.
|
White is down a queen for a rook, but his passed pawn, in conjunction with Black's weak back rank, is decisive.
| ||||||||||||||||||||||||||||||||||||||||||||||||||||||||||||||||||||||||||||||||||||||||
Mating threats along the opponent's back rank often enable one to swindle. An example is seen in Rhine–Nagle, U.S. Masters 1997 (left-most position).[102][103] Black, a pawn up with White's king in danger, decides that it is time to finish White off, forgetting that even a losing position may have defensive resources. Black continued 26...Rg5 27.Rhg1 Ra2?? A powerful-looking move, threatening mate in two, but it actually loses by force. Black could have kept a winning position with (for example) 27...Qf4+ 28.g3 Qf2+ 29.Rg2 Qf7, or 28.Kh1? Rg3 29.Qd1 Raa3 (threatening Rxh3+) 30.Qf1 Qh4 (renewing the threat) 31.Kh2 g6! (31...Ra2 32.Qf5! is weaker) and now Black is winning after 32.Ra1 Qxb4; 32.Rb2 Rgd3; or 32.Rc1? Ra2! (threatening mate on h3) 33.Kh1 Raxg2! 28.d6+ Kh8 The only reasonable move. White wins after 28...Qf7 29.dxc7! Ra8 30.Rgd1! Qxb3 31.Rd8+ Kf7 32.Rxb3 or 28...Kf8 29.Rbf1! Rxg2+ 30.Rxg2 Qxf1 31.Qxa2. 29.Qxa2!! Qxa2 30.dxc7! (right-most diagram) Turning the tables: Black, although ahead a queen for a rook, is suddenly helpless against White's passed pawn on the seventh rank. 30...Qc2 30...Qa8 31.Rbd1 Rf5 32.Rd8+ Rf8 33.Rgd1, and 30...Qg8 31.Rgd1 Rf5 32.Rd8 Rf8 33.Rbd1, also win for White. 31.Ra1! The threat of a back-rank mate decides the game. 31.Rbc1? Rxg2+! 32.Rxg2 Qxc1 33.Ra2! Qf4+ 34.Kg2 Qg5+ would allow Black to draw by perpetual check. 31...h6 If 31...Qxc7, 32.Ra8+ and mate next move. The game concluded: 32.Ra8+ Kh7 33.c8=Q Qe4 34.Qg8+ Kg6 35.Rf8 1–0.[104]
White has a decisive material advantage.
|
Position after 30.Rg5
| ||||||||||||||||||||||||||||||||||||||||||||||||||||||||||||||||||||||||||||||||||||||||
In de Firmian–Shirazi, U.S. Championship 1986,[105] (left-most diagram), GM de Firmian is ahead three pawns, normally an easily winning material advantage at this level. IM Shirazi played 27...Qg6! attacking White's rook and inviting White to take another pawn. GM Robert Byrne, annotating the game in the New York Times, noted that de Firmian could have consolidated his great material advantage with 28.Rb2! Re8 29.Bd2! (29.Be3? Rxe3! 30.fxe3 Qg3! forces White to take perpetual check with 31.Qe8+ Kh7 32.Qh5+ Kg8 33.Qe8+).[10] Instead, he took the bait with 28.Rxb5?? Rxf2 Now Black threatens 29...Rf1#, and White loses his queen after either 29.Kg1 Bh2+! or 29.Be3 Rf1+ 30.Bg1 Rxg1+! 31.Kxg1 Bh2+. White tried 29.Qa8+ Rf8 30.Rg5 (right-most diagram), but now 30...Qe4!, the "marvelous Marshall masher",[105] ended the game, since 31.Qxe4 allows 31...Rf1#.
Position after 27.Qxa8
|
Position after 31.Qxa7
| ||||||||||||||||||||||||||||||||||||||||||||||||||||||||||||||||||||||||||||||||||||||||
In Zukertort–Steinitz, London 1883,[106] the future world champion, playing Black, had a difficult, possibly lost, game an exchange down, with his centralized king subject to attack by White's queen and two rooks. He played 27...Qd4+! (driving White's king to the corner) 28.Kh1 Rxf4! White cannot capture the rook because of the back-rank mate with Qd1. He could maintain a large advantage with 29.Rg1!, when 29...Qxb2 would be met by 30.Rh8 Nf6 31.Re1+ Ne4 (or 31...Re4 32.Re8!+ Nxe8 33.Rxe4+ and 34.Qxe8) 32.g3 Qc3 33.Rxe4+ Rxe4 34.Qe8+ Kf6 35.Qxe4 and wins.[107][108] However, 28...Rf4 also seems to present White with an opportunity to win back a pawn or expose Black's king with 29.Re1+ and now (a) 29...Ne5 allows 30.Qxb7+; (b) 29...Re4 allows 30.Rxe4+ Qxe4 31.Qxa7 Qe1+ 32.Qg1; and (c) 29...Kf6? allows 30.Qh8+, forcing 30...Kf5 or 30...Kg5. Lured by this possibility, White played 29.Re1+? Re4 30.Rxe4+??[109] 30...Qxe4 31.Qxa7 (right-most diagram). However, Steinitz slammed the door shut with 31...b6! when the only way White could have stopped the back-rank mate was by giving up his rook (e.g. 32.Re3 Qxe3 33.h3), leaving him a knight down. Zukertort resigned.
Perpetual check
| a | b | c | d | e | f | g | h | ||
| 8 | | 8 | |||||||
| 7 | 7 | ||||||||
| 6 | 6 | ||||||||
| 5 | 5 | ||||||||
| 4 | 4 | ||||||||
| 3 | 3 | ||||||||
| 2 | 2 | ||||||||
| 1 | 1 | ||||||||
| a | b | c | d | e | f | g | h | ||
Draw by perpetual check is another oft-seen way of swindling a draw from a lost position. The position at left is from Ivanchuk–Moiseenko, Russian Team Championship, Sochi 2005.[110] Black is down two pawns against the world's sixth highest-rated player.[111] Worse, Ivanchuk's pieces dominate the board. IM Malcolm Pein notes that after almost any sensible move, for example 30.Qc2, Black would be completely lost.[112] White would then threaten 31.Rd6 pinning the knight to the queen, and neither 30...Nf6 31.Bxf6 gxf6 32.Qxh7# nor 30...Nc5 31.Ree7 is an adequate response. 30.Qc2 would also guard against a possible ...Qd1+, the significance of which becomes apparent after seeing the game continuation.
Moiseenko met Ivanchuk's 30.Rb7?? with 30...Nf8!! This not only threatens 31...Nxe6, but also enables Black to meet 31.Rxb8 with 31...Qd1+ 32.Kh2 Qh5+ 33.Kg1 Qd1+, drawing by perpetual check. The perpetual check is based on White's weak back rank combined with his slightly compromised king position (no h-pawn). Note how pieces that are well placed for attacking purposes may be misplaced for defensive purposes. White's rook on e6 was well placed when White had the initiative, but is of no use in stopping the threatened perpetual check. (Similarly, in Rhine–Nagle, Black's rook on g5 was an excellent attacking piece, but was poorly placed to defend Black's black rank or stop White's passed c-pawn.)
White tried 31.Rh6, but could not avoid the perpetual: 31...Rxb7 32.Qxb7 Qd1+ 33.Kh2 Rh5+ 34.Rxh5 34.Kg3!? (hoping for 34...Rxh6?? 35.Qxg7#) is met by 34...Rg5+! and White must repeat moves with 35.Kh2! Rh5+, since 35.Kh3?? Qh1#; 35.Kh4?? Qg4#; and 35.Kf4?? Qg4# all get mated. 34...Qxh5+ 35.Kg3 Qg5+ 36.Kf3 Qf5+ ½–½ since White cannot escape the perpetual check.
| a | b | c | d | e | f | g | h | ||
| 8 | | 8 | |||||||
| 7 | 7 | ||||||||
| 6 | 6 | ||||||||
| 5 | 5 | ||||||||
| 4 | 4 | ||||||||
| 3 | 3 | ||||||||
| 2 | 2 | ||||||||
| 1 | 1 | ||||||||
| a | b | c | d | e | f | g | h | ||
Sometimes perpetual check can even save the draw in a very simplified ending. In Keres–Eliskases, Noordwijk 1938,[113] (diagram at right), Black seems to be in desperate straits: he can win either of White's pawns, but then the other will queen, leaving White with a theoretical win in the queen versus rook ending. However, the players agreed to a draw after 56...Rb6+! 57. Kc1 Rh6! Because of continuous checks and mate threats from Black's rook, White will never have time to queen either pawn. For instance, 58.Kd1 Kd3 59.Ke1 Ke3 60.Kf1 Kf3 61.Kg1 Rg6+! 62.Kh2 Rh6+! 63.Kg1 Rg6+ 64.Kf1 Rh6! 65.Ke1 Ke3 66.Kd1 Kd3 67.Kc1 Kc3 68.Kb1 and now Black even has a choice of draws: (a) 68...Rb6+ 69.Ka2 Ra6+! or (b) 68...Rh1+ 69.Ka2 Rh2+ 70.Ka3 Rh1! 71.Ka4 Kc4 72.Ka5 Kc5 73.Ka4 (forced) Kc4 etc.
Surprise mating attack
Karpov (White) is dead lost against Csom.
|
Position after 50.Nf5!! – the swindler strikes!
|
.jpg) Anatoly Karpov | ||||||||||||||||||||||||||||||||||||||||||||||||||||||||||||||||||||||||||||||||||||||||
A surprise mating attack is another way to swindle a win or draw from a lost position. In Karpov–Csom, Bad Lauterberg 1977,[114] (left-most diagram), GM Csom has thoroughly outplayed the reigning world champion, and is a knight and pawn ahead with a completely winning position. Karpov's last move, 49.Rd1–d7, looks to be a last gasp before resigning. Csom played the solid-looking 49...Nf8??, saving the attacked knight and attacking White's rook. But after Karpov's 50.Nf5!! (right-most diagram), Csom resigned. GM John Emms explains, "Black is mated in all variations; for example: 50...exf5 51.Qh2+ Kg8 52.Qg3+ and Qg7# follows; 50...Nxd7 51.Qh2+ Kg8 52.Qg3+ Kh8 53.Qg7#; 50...Nf4 51.Rh7+ Nxh7 52.Qg7#."[115] Emms considers 50.Nf5!! one of "The Most Amazing Chess Moves of All Time,",[116] while Tim Krabbé calls it one of the "Most Fantastic Moves Ever Played."[117] Instead of 49...Nf8??, Csom could have won with 49...Ng5! Now 50.Nf5!? would be met by 50...exf5 51.Qh2+ Kg8 52.Qh6 Re1+ 53.Kh2 (53.Kf2 Qf3#) 53...Rh1+! 54.Kxh1 Nf4+ 55.Rd5 Nxd5 and wins. If instead 50.Nh5!? Rg8 51.Nxf6 (or 51.Rg7 Nh4) Nh4! threatening 52...Qg2# (note that White cannot force mate with 52.Rh7+, since 52...Nxh7 gives discovered check by the rook).
"A position it seemed impossible to lose"
|
Position after 39...Nf3+!!
| ||||||||||||||||||||||||||||||||||||||||||||||||||||||||||||||||||||||||||||||||||||||||
Karpov perpetrated another such swindle in the 17th game of his 1978 world championship match against Viktor Korchnoi.[118] Bent Larsen wrote in his book on the match that Korchnoi "lost a position it seemed impossible to lose."[119] Korchnoi has had a large advantage for most of the game, which Karpov has been desperately trying to draw. From the left-most position, Yasser Seirawan recommends 34.Re7 followed by Rd1+, when Korchnoi "still could have hoped to keep Black's forces from coordinating."[120] Instead, Korchnoi played 34.Rf4+?!, which Karpov met with the surprising 34...Ne4!, giving up his last pawn. Now Seirawan notes that after 35.Rxh7 Nd2!, Black would intend ...Rxa4 and ...Ke3 to harass White's king, and White's rook on f4 would be awkwardly placed for defense.[121] Instead, Korchnoi played 35.Rd7+ Ke3 36.Rf3+ Ke2 37.Rxh7 Ncd2! A diabolical move, actually encouraging Korchnoi to hold onto his a-pawn. 38.Ra3?! Seirawan suggests that Korchnoi could have safely forced a drawn position with 38.Rhf7 Rxa4 39.h3 Nxf3+ 40.Rxf3.[122] 38...Rc6! Now Seirawan recommends 39.g3! Nf3+ 40.Rxf3 (rather than 40.Kg2 Ne1+ 41.Kh1 Rb1) 40...Kxf3 41.Rf7+, again with a drawn position.[123] Instead Korchnoi, in time trouble, played the natural 39.Ra1?? Nf3+!! 0–1 (right-most diagram) A horrific end: Black mates with 40.Kh1 Nf2# or 40.gxf3 Rg6+ 41.Kh1 Nf2#. This game was critical to the outcome of the match, since Karpov won by the narrowest possible margin: 6 wins to 5, with 21 draws.[124][125]
Position after 40.c5. Black is dead lost.
|
Position after 44...Rh1! – White fails to appreciate the dangers in the position.
| ||||||||||||||||||||||||||||||||||||||||||||||||||||||||||||||||||||||||||||||||||||||||
Miles' game against the Tunisian IM Slim Bouaziz from the 1979 Riga Interzonal[126] (see left-most diagram), is a fine example of using a surprise mating attack to swindle a win from a lost position. The game shows a subtle psychological build-up to a swindle by the swindler, and deadly overconfidence by the "swindlee." Bouaziz has completely outplayed Miles, and is on the verge of a major upset. Bouaziz is up a rook for a bishop and has a simple plan: queening his c-pawn. White's king is a little drafty, but seems to be well-defended by White's queen and pawns clustered around it. The game continued 40...Rh1 Shuffling about aimlessly with his rook, or so it seems. Now 41.Rxh5! really would have left Black with a hopeless position, but White did not see the need. 41.c6 h4! Of course, the pawn is immune (42.Qxh4?? Qg1#). White sees that on 42.c7, he has to worry about 42...Rxh3!? 43.Kxh3 Qh1+ 44.Qh2 Qxf3+. He could still win with 45.Kxh4 Be7+ 46.g5 Qe4+ 47.Kg3! Qe3+ 48.Kg2! Qe4+ 49.Kf1! Qf3+ 50.Rf2!, but understandably prefers to avoid such complications. 42.Rcd2! Now White can meet 42...Rxh3? with 43.Rd1! Rg3+ 44.Qxg3 and wins. The game was adjourned here.[127] After adjournment, play continued: 42...Rc1 43.Rc2 Qb1! Now 44.Rxc1 Qxc1 would leave White hard-pressed to both save his c-pawn and protect his king against a possible perpetual check. 44.Rdd2! Rh1! (see right-most diagram) Here, David Hooper and Kenneth Whyld write, "This move has the ingredients of a good swindle: there is hardly an effective alternative; the rook has visited h1 before, ineffectively; and the move comes some time after Black's game became 'hopelessly lost'."[128] 45.c7?? As Hooper and Whyld note, 45.g5!, giving White's king a flight square, would still have won easily. GM Lev Polugaevsky and Igor Damsky point out another win: 45.Rd8 Rxh3 (45...Rc1 46.Rxf8+ Kxf8 47.Qc5+ and 48.Rxc1) 46.Kxh3 Qh1+ 47.Qh2 Qxf3+ 48.Kxh4 Qf6+ 49.g5 Qxd8 50.Rd2.[129] 45...Rxh3!! White suddenly is in deep trouble, with Black threatening 46...Qh1#. Had White appreciated the danger, he could still have drawn with 46.Qf1! Rg3+ 47.Kf2 Rxf3+ 48.Kxf3 Qxf1+ 49.Ke4 and with White's pawn so far advanced, Black has no better than a draw by perpetual check.[127] Not realizing the seriousness of his predicament, White played 46.Kxh3?? Qh1+ 47.Qh2 Qxf3+ 48.Kxh4 Be7+ 49.g5 49.Kh5 g6+ 50.Kh6 Qe3+ forces mate. 49...Bxg5+! 0–1 Too late, Bouaziz saw 50.Kxg5 f6+ 51.Kh4 g5#! (or 51.Kg6 Qg4#!).[130]
White has a lost game.
|
Position after 3.Qh6+!!
| ||||||||||||||||||||||||||||||||||||||||||||||||||||||||||||||||||||||||||||||||||||||||
In Schloesser–Amateur (left-most diagram), a game between two amateurs, material is approximately even, but White has a lost game because his a-pawns are indefensible and will soon fall, e.g. 1.Bb4 Ne6 followed by ...c5.[131] Schloesser "therefore set about devising one of the most far-reaching swindles in the history of chess."[132] He began with the enigmatic 1.Kf1!! Now Black should have played 1...Nd5! with a winning game. Instead, the game continued 1...Rxa3?? 2.Bb4!! Rxa2 White's moves seem nonsensical, but now he reveals the subtle point. 3.Qh6+!! (right-most diagram) Now if 3...Kf7, 4.Qxh7+ mates in two more moves. The game concluded 3...Kxh6 4.Bf8+ Kh5 5.g4+ Kh4 6.Be7+ g5 7.Bxg5+ Kh3 8.Nf2+ The point of 1.Kf1!! is finally revealed: to prevent Black from playing Kg2 here. 8...Kxh2 9.Bf4#![133]
David Bronstein, in his immortal losing game, valiantly but unsuccessfully tried to swindle Bogdan Śliwa with a surprise mating attack.
Bishops of opposite colors
| a | b | c | d | e | f | g | h | ||
| 8 | | 8 | |||||||
| 7 | 7 | ||||||||
| 6 | 6 | ||||||||
| 5 | 5 | ||||||||
| 4 | 4 | ||||||||
| 3 | 3 | ||||||||
| 2 | 2 | ||||||||
| 1 | 1 | ||||||||
| a | b | c | d | e | f | g | h | ||
Sometimes a player who is behind in material can escape into an endgame with bishops of opposite colors, i.e. where one player has a bishop that moves on white squares and the other player a bishop that moves on black squares. In such endings, the superior side is often unable to win with two or even three extra pawns. An example of a swindle based on securing bishops of opposite colors is seen in the diagram on the right. Grandmaster Mark Taimanov, playing White, has a winning position because his bishop pair is very strong, his king is more active, and Black's pawns are weak. White could win with 1.Bc2! Be8 2.Bxb8 Kxb8 3.Ke5 followed by Kf6, winning Black's g-pawn and the game, or 1...Na6 2.Bd6.[134] Taimanov saw this line, but thought that the order in which he played Bc2 and Bxb8 did not matter. He played 1.Bxb8?, expecting to transpose into the above line after 1...Kxb8 2.Bc2 Be8 3.Ke5. Bronstein surprised him with 1...c5+!! 2.Kxc5 Bxa4, resulting in a dead-drawn bishops of opposite colors ending. After White moves his en prise bishop, Black can play 3...Kb7 followed by 4...Bc2; then Black can keep his king on b7 forever, blocking White's pawn, and shift his bishop along the b1–f5 diagonal to defend his own pawn.
| a | b | c | d | e | f | g | h | ||
| 8 | | 8 | |||||||
| 7 | 7 | ||||||||
| 6 | 6 | ||||||||
| 5 | 5 | ||||||||
| 4 | 4 | ||||||||
| 3 | 3 | ||||||||
| 2 | 2 | ||||||||
| 1 | 1 | ||||||||
| a | b | c | d | e | f | g | h | ||
The Dutch grandmaster Jan Hein Donner swindled future World Champion Bobby Fischer in similar fashion at the second Piatigorsky Cup tournament (had Fischer won, he would have tied with Boris Spassky for first place). In the position at right Black, a pawn behind, has just played 29...Qf5, attacking White's rook and hoping for the obvious 30.Bd3? which seems at first glance to win a second pawn, e.g. 30...Qd7 31.Rxc8+ Qxc8 32.Bxa6. Fischer indeed played this, but Donner responded with 30...Rxc2! 31.Bxf5 Rc1, when the "exchange of queens leads to a dead draw" in a pawn-down bishops of opposite colors ending.[135] (Instead, Fischer could have increased his advantage with 30.Qb1! threatening a decisive gain of material with 31.Bxf7+! Kxf7 (or 31...Qxf7 32.Rxc8+) 32.Qb7+ (or even 32.Rc7+ Rxc7 33.Qxf5). 30...Rxc4? would lose material to 31.Qb8+.[136] Fischer agreed to a draw after 32.Qxc1 Bxc1 33.Kf1 Kf8 34.Ke2 h6.[137]
Material insufficiency
Sometimes a player who is behind in material may achieve a draw by exchanging off, or sacrificing for, all of the opponent's pawns, leaving a position (for example, two knights versus lone king) where the superior side still has a material advantage but cannot force checkmate. (Properly speaking, this may or may not be a "swindle", depending on whether the superior side missed a clear win earlier.) The inferior side is also sometimes able to achieve an ending that is theoretically still lost, but where the win is difficult and may be beyond the opponent's abilities—for example, bishop and knight versus lone king;[138] queen versus rook;[139] two knights versus pawn, which is sometimes a win for the knights;[140] or two bishops versus knight.[141][142]
| a | b | c | d | e | f | g | h | ||
| 8 | | 8 | |||||||
| 7 | 7 | ||||||||
| 6 | 6 | ||||||||
| 5 | 5 | ||||||||
| 4 | 4 | ||||||||
| 3 | 3 | ||||||||
| 2 | 2 | ||||||||
| 1 | 1 | ||||||||
| a | b | c | d | e | f | g | h | ||
| a | b | c | d | e | f | g | h | ||
| 8 | | 8 | |||||||
| 7 | 7 | ||||||||
| 6 | 6 | ||||||||
| 5 | 5 | ||||||||
| 4 | 4 | ||||||||
| 3 | 3 | ||||||||
| 2 | 2 | ||||||||
| 1 | 1 | ||||||||
| a | b | c | d | e | f | g | h | ||
| a | b | c | d | e | f | g | h | ||
| 8 | | 8 | |||||||
| 7 | 7 | ||||||||
| 6 | 6 | ||||||||
| 5 | 5 | ||||||||
| 4 | 4 | ||||||||
| 3 | 3 | ||||||||
| 2 | 2 | ||||||||
| 1 | 1 | ||||||||
| a | b | c | d | e | f | g | h | ||
The diagram at above left, a 1623 composition by Gioachino Greco, shows a straightforward example of forcing a draw by material insufficiency. Black, although two pawns down, draws easily with 1...Ra1+ 2.Rf1 Rxf1+ 3. Kxf1 Bh3! Then 4.gxh3 is a standard book draw, since White's bishop is of the "wrong color" from the rook pawns (i.e., it moves on the squares opposite in color to that of the pawns' queening square) and thus can never drive Black's king from the h8 corner. On other moves, Black will play 4...Bxg2!, again leaving White with a rook pawn and the wrong-colored bishop.[143][144] Black implemented this idea in actual play in Carlsen–Aarland, Norwegian Championship final 2002.[145] From the middle diagram above, Aarland played 52...Ba5!! 53.bxa5 Kc6, and the future world champion had to agree to a draw a few moves later.
White drew similarly in Parr–Farrand, England 1971. From the diagram at above right, play continued 1.Rd5 Bf6 2.Rxf5! On 2...gxf5 3.Kf4, White's king will capture Black's f-pawn, then retreat to h1, reaching a bishop and opposite-colored rook pawn draw. Instead, Black tried 2...Ke7 3.Rb5 Ke6, "but he soon had to admit that the draw was inevitable."[146]
| a | b | c | d | e | f | g | h | ||
| 8 | | 8 | |||||||
| 7 | 7 | ||||||||
| 6 | 6 | ||||||||
| 5 | 5 | ||||||||
| 4 | 4 | ||||||||
| 3 | 3 | ||||||||
| 2 | 2 | ||||||||
| 1 | 1 | ||||||||
| a | b | c | d | e | f | g | h | ||
| a | b | c | d | e | f | g | h | ||
| 8 | | 8 | |||||||
| 7 | 7 | ||||||||
| 6 | 6 | ||||||||
| 5 | 5 | ||||||||
| 4 | 4 | ||||||||
| 3 | 3 | ||||||||
| 2 | 2 | ||||||||
| 1 | 1 | ||||||||
| a | b | c | d | e | f | g | h | ||
| a | b | c | d | e | f | g | h | ||
| 8 | | 8 | |||||||
| 7 | 7 | ||||||||
| 6 | 6 | ||||||||
| 5 | 5 | ||||||||
| 4 | 4 | ||||||||
| 3 | 3 | ||||||||
| 2 | 2 | ||||||||
| 1 | 1 | ||||||||
| a | b | c | d | e | f | g | h | ||
Schmidt–Schaefer, Rheinhessen 1997 (diagram at above left), is another straightforward example. Black has connected passed pawns, but if White can sacrifice his knights for them he can reach the drawn two knights versus lone king ending. Thus, 50.Nfe4! threatened to capture both pawns with the knights. 50...dxe4 51.Nxe4 Kd5 52.Nxc5! would also achieve that goal. Black tried 50...d4, but agreed to a draw after 51.Nxc5+ Kd6 52.Nb5+! Kxc5 53.Nxd4![147]
Such cases can be observed as well in games between chess engines. In Bagatur 1.3a 64-bit–Fischerle 0.9.65 64-bit, CCRL 40/40 2015, rather than capturing the bishop (57...Kxg6), Black played 57...Rxg4. Instead of retracting the bishop, White answered 58.h5? After Black’s response 58...Rxg5!, the result was a draw since after 59.fxg5 Kxg5 ½–½, White cannot promote its pawn as it is left with a wrong-color bishop and the black king reaches the h8 square in time. Of course, rather than embodying an instance of swindling proper, the decision of Fischerle to play 57...Rxg4 instead of 57...Kxg6 is based on general considerations regarding the dangerousness of connected passed pawns. In fact, for a chess engine to be able to swindle in a narrower sense, it requires an opponent model that enables it to exploit the relative weaknesses of its particular adversary, enabling asymmetric evaluation to performing speculative play.
The four examples above arguably are not true swindles, but rather the inferior side's exploitation of a defensive resource available in the position. However, Chandler–Susan Polgar, Biel 1987,[148] (diagram at above right), is a bona fide swindle. Polgar has just played 53...Nh6!? (from g8), transparently playing for a rook pawn and wrong-colored bishop draw. GM Chandler obligingly played 54.gxh6+??, expecting 54...Kxh6 55.Kf6! when he will win because Black cannot get her king to h8. Polgar, however, responded 54...Kh8! with the standard draw. White's possession of a second h-pawn is immaterial, and the game concluded 55.Bd5 Kh7 56.Kf7 Kh8! ½–½
| a | b | c | d | e | f | g | h | ||
| 8 | | 8 | |||||||
| 7 | 7 | ||||||||
| 6 | 6 | ||||||||
| 5 | 5 | ||||||||
| 4 | 4 | ||||||||
| 3 | 3 | ||||||||
| 2 | 2 | ||||||||
| 1 | 1 | ||||||||
| a | b | c | d | e | f | g | h | ||
| a | b | c | d | e | f | g | h | ||
| 8 | | 8 | |||||||
| 7 | 7 | ||||||||
| 6 | 6 | ||||||||
| 5 | 5 | ||||||||
| 4 | 4 | ||||||||
| 3 | 3 | ||||||||
| 2 | 2 | ||||||||
| 1 | 1 | ||||||||
| a | b | c | d | e | f | g | h | ||
The position above left, the conclusion of a chess problem by the American master Frederick Rhine,[149] provides a more complicated example of forcing a draw by material insufficiency. White draws with 5.Nxc4+! Nxc4 If 5...Kc6 6.Nxb6 Kxb6 7.Rxb2+, White's rook draws easily against Black's knight and bishop. 6.Rxb6+ Now Black's best try is 6...Kd5! or 6...Ke7!, when the endgame of rook against two knights and a bishop is a well-established theoretical draw.[81][150][151][152] The more natural 6...Nxb6+ leads to a surprising draw after 7.Kd8! (diagram above), when any bishop move stalemates White, and any other move allows 8.Kxe8, when the two knights cannot force checkmate.[153]
Building a fortress
Building a fortress is another method of saving an otherwise lost position. It is often seen in the endgame, for example in endings with bishops of opposite colors (see above).
Black is in trouble, since his a-pawn is indefensible.
|
After 45...Qb6!? 46.Nxb6+? cxb6, White cannot penetrate Black's fortress.
| ||||||||||||||||||||||||||||||||||||||||||||||||||||||||||||||||||||||||||||||||||||||||
In Arshak Petrosian–Hazai, Schilde 1970[154] (left-most position), Black has a difficult endgame, since White can attack and win his a-pawn by force, and he has no counterplay. Realizing how difficult his position was, Black tried the amazing 45...Qb6!? White replied with the obvious 46.Nxb6+?, but this was actually a critical mistake, enabling Black to establish a fortress. White should have carried out his plan of winning Black's a-pawn, for example with 46.Qc1 (threatening 47.Nxb6+ cxb6 48.h4! gxh4 49.Qh1 and Qh3, winning) Qa7 47.Qd2 followed by Kb3, Nc3, Ka4, and Na2–c1–b3.[155] 46...cxb6 Now Black threatens 47...h4, locking down the entire board with his pawns, so White tries to break the position open. 47.h4 gxh4 48.Qd2 h3! 49.gxh3 Otherwise 49...h2 draws. 49...h4! (right-most diagram) Black has established his fortress, and now can draw by moving his king around. The only way White could attempt to breach the fortress would be a queen sacrifice at some point. In the remaining six moves of the game, Black shuffled his king between b7 and a7, where it would be well placed to deal with either a passed b-pawn (following Qxa5) or a passed d-pawn (following Qxe5). Since White had no way to make progress, the players agreed to a draw.[note 3]
Black, an exchange down, has a lost position.
|
White's blunder has enabled Black to establish a drawing fortress.
| ||||||||||||||||||||||||||||||||||||||||||||||||||||||||||||||||||||||||||||||||||||||||
In Ivanov–Dolmatov, Novosibirsk 1976 (left-most diagram), Black, an exchange down in the endgame, seemingly had a hopeless position. In desperation, he tried 1...e3! White replied 2.Rxb4?? Amatzia Avni wrote, "Amazingly, this greedy collecting of further material gains throws away the win. After 2.fxe3 Black would probably resign."[156] There followed 2...e2 3.Re4 Bxf5 4.gxf5 h4!! (right-most diagram). Despite White's extra rook, the position is drawn: his rook must stay on the e-file to stop Black's pawn from queening, while his king is trapped in the corner.[157] 5.Rg4+ can be met by 5...Kf7 (not 5...Kh6?? 6.Rxh4+) 6.Re4 and now 6...h3, or any king move, holds the draw.
Zugzwang
Zugzwang, though most often used by the superior side, is sometimes available as a swindling technique to the inferior side. Chigorin–Schlechter above is one such instance.
| a | b | c | d | e | f | g | h | ||
| 8 | | 8 | |||||||
| 7 | 7 | ||||||||
| 6 | 6 | ||||||||
| 5 | 5 | ||||||||
| 4 | 4 | ||||||||
| 3 | 3 | ||||||||
| 2 | 2 | ||||||||
| 1 | 1 | ||||||||
| a | b | c | d | e | f | g | h | ||
| a | b | c | d | e | f | g | h | ||
| 8 | | 8 | |||||||
| 7 | 7 | ||||||||
| 6 | 6 | ||||||||
| 5 | 5 | ||||||||
| 4 | 4 | ||||||||
| 3 | 3 | ||||||||
| 2 | 2 | ||||||||
| 1 | 1 | ||||||||
| a | b | c | d | e | f | g | h | ||
In the position at left, the natural 1...Kb4 would be a fatal blunder, turning a win into a loss after 2.Kd5!, reaching the noted trébuchet position (diagram at right), where whoever is on move loses, a situation described as "full-point mutual zugzwang."[158] Instead, 1...Kb3! 2.Kd5 Kb4 wins.
| a | b | c | d | e | f | g | h | ||
| 8 | | 8 | |||||||
| 7 | 7 | ||||||||
| 6 | 6 | ||||||||
| 5 | 5 | ||||||||
| 4 | 4 | ||||||||
| 3 | 3 | ||||||||
| 2 | 2 | ||||||||
| 1 | 1 | ||||||||
| a | b | c | d | e | f | g | h | ||
An extraordinary example of using zugzwang to swindle one's way out of a dead lost, complicated endgame occurred in the position at left.[159] On the previous move Black, with an easily winning position, had played 73...d4? and White responded 74.Rd2–d3!!, when Black, a knight up with three dangerous passed pawns, suddenly must fight for a draw. Tim Krabbé explains that the pawns on d4 and e4 are blocked and pinned, the knight is bound to the defense of e4, the rook is bound to the defense of d4, and the pawn on b4 is bound to the defense of the knight. Krabbé analyzes as best for Black 74...b3! 75.Rxd4 Rxd4 76.Rxc3 Rd8 77.Rxb3 Re8 78.Re3 Re5 79.Rc3 (79.Kxf6? Rxa5 82.Kg6 Ra1 83.f6 Rg1+ wins) Re8 80.Re3 Re5 81.Rc3 and the game will end in a draw by repetition of moves. Instead, Black played 74...Nb5? 75.Rxe4 Nd6 76.Re6 Rc6 77.Rxd4 Rxh6+ 78.Kxh6 Nxf5+ 79.Kg6 1–0
Multiple themes
White dominates the whole board.
|
Position after 37...Qxf6!
| ||||||||||||||||||||||||||||||||||||||||||||||||||||||||||||||||||||||||||||||||||||||||
Some swindles combine more than one of these themes. In Beliavsky–Christiansen, Reggio Emilia 1987–88,[160] Christiansen pulled off a masterful swindle, beginning with a knight sacrifice and four offered queen sacrifices in hopes of perpetual check, and ending with a sacrifice of queen and both rooks to achieve stalemate. In the left-most diagrammed position, Black's game is crumbling. White has the initiative over the whole board. He threatens Black's pawn on f7, and if Black defends it with 29...Nh6, 30.Qb6 will win Black's c-pawn and the game (if 30...Qd7, 31.Nxf7!). In desperation, Christiansen counterattacked with the remarkable 29...Nxf2!? 30.Kxf2 Ra3 31.Bxf7+ Kg7 32.Qe6 Ra2+. Here, Byrne noted in the New York Times that after 33.Qxa2 Rxa2+ 34.Bxa2 Ng4+ 35.Kg1 Qa7 36.Bb1 Qa3 37.Bd3 Qb2 38.Rc2 Qd4+, "White will experience difficult technical problems."[161] Instead, the game continued 33.Kg1 R8a3!, hoping for 34.Qxe7? Rxg3+ and the rook gives perpetual check along the third rank. Nor was 34.Kh1 Rxg3! 35.Qxa2 Ng4! appealing for White. Beliavsky preferred 34.Ne8+! Now 34...Nxe8? 35.Qxg6+ mates next move, and there is no perpetual check after 34...Qxe8? 35.Bxe8 Rxg3+ 36.Kh1. Undeterred, Christiansen played 34...Kh6! 35.Nxf6 35.Qxe7 Rxg3+ or 35.Qxf6 Qxf6 still leads to perpetual check. 35...Rxg3+ 36.Kh1 Qxf7! Offering the queen a third time, again hoping for perpetual check after 37.Qxf7? Rh3+ or 37.Ng8+? Qxg8! 37.Rd7! White offers his own queen sacrifice: if 36...Qxe6, 37.Rh7#! Another clear win was 37.Ng4+! hxg4 (37...Kg7 38.Qxe5+ is even worse) 38.Qxf7 Rh3+ 39.Kg1 Rg3+ 40.Kf1! Rf3+ 41.Qxf3, leaving White a rook up. 37...Qxf6! (see right-most diagram) Black's last gasp, offering the queen yet a fourth time. 38.Qxf6?? White thinks that he can finally take the queen safely, since now there is no perpetual. White wins after 38.Rh7+! Kxh7 39.Qxf6 Rh3+ 40.Kg1 Rg3+ 41.Kf1 Rh3 41.Qe7+ Kh6 (41...Kg8? 42.Qe8+ Kh7 43.Qd7+ wins the rook) 42.Qg5+ Kh7 43.Kg1 Raa3 44.Kg2. 38...Rh2+! ½–½ After 39.Kxh2 Rg2+! 40.Kh3 Rg3+! 41.Kh2 Rg2+! 42.Kh1 Rg1+!, Black draws by perpetual check or stalemate. Noam Elkies observes that this is an "even more impressive stalemate swindle" than the Evans–Reshevsky "Swindle of the Century".[162]
See also
- Back rank checkmate
- Blunder (chess)
- Desperado (chess)
- Draw (chess)
- Fortress (chess)
- Opposite-colored bishops endgame
- Perpetual check
- Stalemate
- Zugzwang
References
Notes
- ↑ According to Marshall, Black could have drawn with 65...Ke6 (instead of 65...Ke4?) 66.h5 Kf7 67.Kf5 Kg8 "and the game is a draw, as the Knight cannot leave the vicinity of the Black Pawn." Marshall 1960, p. 61.
- ↑ Soltis agrees with Marshall's aforementioned analysis. Soltis 1994, p. 51
- ↑ The game concluded 50.Kb3 Kb7 51.Ka4 Ka7 52.Qg2 Kb7 53.Qb2 Ka7 54.Qc2 Kb7 55.Qc3 Ka7 ½–½ A. Petrosian–Hazai, Schilde 1970
Citations
- 1 2 Brace 1977, p. 276.
- ↑ Byrne 1959, p. 199.
- ↑ Horowitz & Reinfeld 1954, p. 12.
- ↑ Korn 1966, p. 4.
- 1 2 Burgess 1997, p. 489.
- ↑ See, e.g., Ali Mortazavi, The Fine Art of Swindling, Cadogan Books, 1996, p. 44. ISBN 1-85744-105-2 (referring to Em. Lasker–Ed. Lasker, New York 1924, as a "celebrated swindle").
- ↑ Horowitz & Reinfeld, p. 12.
- ↑ Horowitz & Reinfeld, p. 13.
- ↑ Horowitz & Reinfeld, p. 7.
- 1 2 Robert Byrne, (4 January 1987). "Chess; The Marshall Swindle". New York Times. Retrieved 4 December 2011.
- ↑ Horowitz & Reinfeld, p. 127.
- ↑ Larry Evans and Burt Hochberg, in Larry Evans, Svetozar Gligorić, Vlastimil Hort, Paul Keres, Bent Larsen, Tigran Petrosian, and Lajos Portisch, How to Open a Chess Game, RHM Press, 1974, p. xv. ISBN 0-89058-003-0.
- ↑ "[E]very exceptional player has been skilled in holding weak positions by means of all sorts of ruses and tricks". Roswin Finkenzeller, Wilhelm Ziehr, and Emil M. Bührer, Chess: A Celebration of 2,000 Years, Little, Brown and Company, 1990, p. 46. ISBN 1-55970-107-2.
- ↑ Grandmaster Andrew Soltis wrote that Marshall "was perhaps best known for tactical 'swindles' in lost positions." Harry Golombek (editor-in-chief), Golombek's Encyclopedia of Chess, Crown Publishers, 1977, p. 193. ISBN 0-19-217540-8. "[T]he combinations he enjoyed most were not the aftermath of solidly played games leading to their just reward, but games in which he had much the worst of the position and, by virtue of a spectacular move or sacrificial concept, 'swindled' his opponent out of a seemingly sure victory. ... So often did a 'Marshall swindle' occur that the term became part of the chess lexicon." Anthony Saidy and Norman Lessing, The World of Chess, Random House, 1974, pp. 152–53. ISBN 0-394-48777-X.
- ↑ David Hooper and Kenneth Whyld, The Oxford Companion to Chess, Oxford University Press, 1984, p. 205. ISBN 0-19-217540-8.
- ↑ Frank James Marshall, Marshall's Chess "Swindles", American Chess Bulletin, 1914.
- 1 2 Soltis 1994, p. 168.
- ↑ Nathan Divinsky, The Batsford Chess Encyclopedia, B.T. Batsford Ltd, 1990, p. 125. ISBN 0-7134-6214-0.
- ↑ Horowitz & Reinfeld 1954, p. 39.
- ↑ Marshall lost a 1907 match for the world championship to reigning world champion Emanuel Lasker. Chessmetrics ranks Marshall the number 2 player in the world as of August 1913.
- ↑ David Vincent Hooper and Kenneth Whyld, The Oxford Companion to Chess, Oxford University Press, 1984, p. 337. ISBN 0-19-217540-8
- ↑ "Frank Marshall, The King of Traps". Chessbase.com. Retrieved 4 December 2011.
- 1 2 3 Marshall 2013, p. 61.
- ↑ Horowitz & Reinfeld 1954, p. 138.
- ↑ Horowitz & Reinfeld 1954, p. 141.
- ↑ Soltis 1994, p. 50.
- ↑ Fred Reinfeld and Irving Chernev, Chess Strategy and Tactics, David McKay, 1946, p. 36.
- ↑ "Marshall–Marco, Monte Carlo 1904". Chessgames.com. 18 November 2005. Retrieved 4 December 2011.
- ↑ "Evans–Reshevsky, U.S. Championship 1963–64". Chessgames.com. Retrieved 4 December 2011.
- ↑ Larry Evans, Chess Catechism, Simon and Schuster, 1970, p. 66. SBN 671-21531-0. It appears that Evans himself was the first to refer to the game as the "Swindle of the Century" in print, in his annotations in American Chess Quarterly magazine, of which he was the Editor-in-Chief. American Chess Quarterly, Vol. 3, No. 3 (Winter, 1964), p. 171. Hans Kmoch referred to the conclusion of the game less grandiosely as "A Hilarious Finish". Hans Kmoch, "United States Championship", Chess Review, March 1964, pp. 76–79, at p. 79. Also available on DVD (p. 89 of "Chess Review 1964" PDF file).
- ↑ Evans, Chess Catechism, at 67.
- 1 2 Kmoch, p. 79 (p. 89 on DVD).
- ↑ Nikolai Krogius, Psychology in Chess, R.H.M. Press, 1976, p. 33. ISBN 0-89058-023-5.
- ↑ Robert G. Wade and Kevin J. O'Connell, Bobby Fischer's Chess Games, Doubleday, 2nd ed. 1973, p. 76. ISBN 0-385-08627-X.
- ↑ "Miles–Short, London 1980". Chessgames.com. Retrieved 4 December 2011.
- ↑ Lawton 2003, p. 138.
- 1 2 3 4 Hartson & Reuben 1981, p. 52.
- ↑ Hartson & Reuben 1981, p. 53.
- 1 2 3 Lawton 2003, p. 250.
- ↑ Hartson & Reuben 1981, p. 54.
- ↑ Webb 2005, p. 69-73.
- ↑ Webb 2005, p. 69.
- ↑ Webb 2005, p. 69-70.
- ↑ Webb 2005, p. 70.
- 1 2 3 Nunn 1998, p. 89.
- ↑ Webb 2005, p. 71.
- ↑ "A swindler just doesn't give up", New in Chess, 2015 No. 3, p. 48, at 50.
- ↑ Negi at 51.
- ↑ Webb 2005, p. 72.
- ↑ "Najdorf–Gligoric, Helsinki Olympiad 1952". Chessgames.com. Retrieved 4 December 2011.
- ↑ Krogius 1976, p. 170-171.
- ↑ Mortazavi 1996, p. 25.
- ↑ Mortazavi 1996, p. 28.
- ↑ Mortazavi 1996, p. 29.
- ↑ Benko & Hochberg 1991, p. 256-257.
- ↑ Mortazavi 1996, p. 31.
- 1 2 3 Benko & Hochberg 1991, p. 257.
- ↑ Webb 2005, p. 114–15".
- ↑ Webb 2005, p. 114–15.
- ↑ Webb 2005, p. 114: Webb thus advocates use of the barrage technique only where one "has a worse, equal, or only slightly better position."
- 1 2 Pachman 1978, p. 164.
- ↑ Mortazavi 1996, p. 34.
- ↑ Krogius 1996, p. 112.
- ↑ Krogius 1996, p. 113.
- ↑ Pachman 1968, p. 164: Pachman's account is also quoted in Amatzia Avni, Surprise in Chess, Cadogan Books, 1998, pp. 83–84. ISBN 1-85744-210-5
- 1 2 3 4 5 6 7 Pachman 1978, p. 165.
- ↑ Pachman 1978, p. 165: (notes based on those by Pachman)
- ↑ "Burden–Christiansen, Las Vegas 1992". Chessgames.com. Retrieved 4 December 2011.
- ↑ "United States Chess Federation rating card for James L. Burden". Uschess.org. 16 October 2003. Retrieved 4 December 2011.
- ↑ "Tournament Tips by NM Todd Barwick". Coloradomasterchess.com. Retrieved 4 December 2011.
- ↑ "Annotations from chessgames.com". chessgames.com. Retrieved 4 December 2011.
- ↑ Ludek Pachman, Attack and Defense in Modern Chess Tactics, David McKay, 1973, p. 20.
- ↑ Nick Pope. "Marshall–MacClure, New York 1923 (No. 15)". Michess.org. Retrieved 4 December 2011.
- ↑ "Tim Krabbé's Open Chess Diary (No. 11)". Xs4all.nl. Retrieved 4 December 2011.
- ↑ "Chigorin–Schlechter, Ostend 1905". Chessgames.com. 15 April 2009. Retrieved 4 December 2011.
- ↑ "Kasparov–McDonald, Great Britain (simultaneous exhibition), 1986". Chessgames.com. 29 May 2010. Retrieved 4 December 2011.
- ↑ Mortazavi 1996, p. 35.
- ↑ "Grischuk–Polgar, Biel 2007". Chessgames.com. 20 February 2008. Retrieved 4 December 2011.
- ↑ "Analysis of Endgame by GM Alexandra Kosteniuk". Chesskillertips.com. Retrieved 4 December 2011.
- ↑ ChessBase Magazine No. 120 (October 2007), Endgame section, game 22 on DVD.
- 1 2 "Shredder Six-Piece Database". Shredderchess.com. Retrieved 4 December 2011.
- ↑ ChessBase Magazine #120.
- ↑ "Congdon–Delmar, New York 1880". Chessgames.com. Retrieved 4 December 2011.
- ↑ "Post–Nimzowitsch, Barmen Masters 1905". Chessgames.com. Retrieved 4 December 2011.
- ↑ "Schlechter–Wolf, Nuremberg 1906". Chessgames.com. 8 August 2006. Retrieved 4 December 2011.
- ↑ "Znosko-Borovsky-Salwe, Ostend B 1907". Chessgames.com. Retrieved 19 July 2014.
- ↑ "Walter–Nagy, Gyor 1924". Chessgames.com. 11 May 2004. Retrieved 4 December 2011.
- ↑ "Janowski–Grünfeld, Marienbad 1925". Chessgames.com. Retrieved 4 December 2011.
- ↑ "Heinicke-Rellstab, German Championship 1939". Chessgames.com. Retrieved 5 September 2014.
- ↑ "Bernstein–Smyslov, Groningen 1946". Chessgames.com. 29 June 2005. Retrieved 4 December 2011.
- ↑ "Horowitz–Pavey, U.S. Championship 1951". Chessgames.com. 13 August 1951. Retrieved 4 December 2011.
- ↑ "Fichtl–F. Blatny, Czechoslovakia 1956". Chessgames.com. Retrieved 4 December 2011.
- ↑ "Portisch–Lengyel, Málaga 1964". Chessgames.com. Retrieved 4 December 2011.
- ↑ "Matulović–Suttles, Palma de Mallorca Interzonal 1970". Chessgames.com. Retrieved 4 December 2011.
- ↑ "Fuller–Basin, Michigan Open 1992". Chessgames.com. 26 October 2009. Retrieved 4 December 2011.
- ↑ "Boyd–Glimbrant, Alicante 1992". Chessgames.com. 25 July 2004. Retrieved 4 December 2011.
- ↑ "Pein–de Firmian, Bermuda 1995". Chessgames.com. Retrieved 4 December 2011.
- ↑ G. H. Diggle, Chess Characters: Reminiscences of a Badmaster, Volume II, Chess Notes, Geneva, 1987, p. 11 (reprinted from Newsflash, British Chess Federation, November 1984), quoting Andrew Soltis, Chess Life, ?, 1984.
- 1 2 Howard Staunton, The Chess-Player's Companion, Henry C. Bohn, 1859, p. 336.
- 1 2 3 Diggle, p. 11.
- 1 2 Raymond Keene and R. N. Coles, Howard Staunton: The English World Champion, British Chess Magazine, 1975, p. 66.
- ↑ 1997 U.S. Masters, Tournament Bulletin No. 3 (8 March 1997), p. 18.
- ↑ "Frederick Rhine vs Sean Nagle Chicago Open (1997)". Chessgames.com. Retrieved 13 January 2016.
- ↑ Analysis by Fritz 8.
- 1 2 "de Firmian–Shirazi, U.S. Championship 1986". Chessgames.com. Retrieved 4 December 2011.
- ↑ "Zukertort–Steinitz, London 1883". Chessgames.com. Retrieved 4 December 2011.
- ↑ J. I. Minchin, Games Played in the London International Chess Tournament, 1883 (game annotated by Zukertort), British Chess Magazine, 1973, p. 15. ASIN B000HX3HE6
- ↑ Andrew Soltis, The Great Chess Tournaments and Their Stories, Chilton Book Company, 1975, p. 38. ISBN 0-8019-6138-6
- ↑ Zukertort notes that he still could have at least drawn with 30.Rg1. Minchin, p. 15.
- ↑ "Ivanchuk–Moiseenko, Sochi 2005". Chessgames.com. Retrieved 4 December 2011.
- ↑ FIDE World Ranking History for Vassily Ivanchuk Archived 13 February 2008 at the Wayback Machine.
- ↑ Malcolm Pein chess column from the Daily Telegraph Archived 30 September 2006 at the Wayback Machine.
- ↑ "Keres–Eliskases, Noordwijk 1938". Chessgames.com. Retrieved 4 December 2011.
- ↑ "Karpov–Csom, Bad Lauterberg 1977". Chessgames.com. Retrieved 4 December 2011.
- ↑ Emms 2000, p. 23.
- ↑ Emms 2000, p. 8, 23.
- ↑ "The 110 Most Fantastic Moves Ever Played". Xs4all.nl. Retrieved 4 December 2011.
- ↑ "Korchnoi–Karpov, World Championship Match 1978". Chessgames.com. Retrieved 4 December 2011.
- ↑ Bent Larsen, Karpov vs. Korchnoi: World Chess Championship, 1978, Unwin Paperbacks, October 1978, p. 90. ISBN 0-04-794008-5
- ↑ Seirawan 1995, p. 90.
- ↑ Seirawan 1995, p. 90-91.
- ↑ Seirawan 1995, p. 91.
- ↑ Seirawan 1995, p. 92.
- ↑ Raymond Keene, The World Chess Championship: Korchnoi v. Karpov, Simon & Schuster, 1978, p. 147. ISBN 0-671-24648-8
- ↑ "World Chess Championship 1978". Mark-weeks.com. Retrieved 4 December 2011.
- ↑ "Bouaziz–Miles, Riga Interzonal 1979". Chessgames.com. 10 July 2004. Retrieved 4 December 2011.
- 1 2 Damsky & Polugayevsky 1988, p. 126.
- ↑ David Vincent Hooper and Kenneth Whyld, The Oxford Companion to Chess, Oxford University Press, 1984, p. 337. ISBN 0-19-217540-8
- ↑ Damsky & Polugayevsky 1988, p. 127.
- ↑ Damsky & Polugayevsky 1988, p. 126-127.
- ↑ Horowitz and Reinfeld 1954, p. 132–33.
- ↑ Horowitz and Reinfeld 1954, p. 133.
- ↑ Notes based on those by Horowitz and Reinfeld, pp. 134–35.
- ↑ Leonid Shamkovich and Eric Schiller, Saving Lost Positions, Macmillan Chess Library, 1988, p. 86. ISBN 0-02-053770-0
- ↑ Isaac Kashdan, Second Piatigorsky Cup (game annotated by Donner), Dover Publications, 1968, p. 50. ISBN 0-486-23572-6
- ↑ Mortazavi 1996, p. 49.
- ↑ "Fischer–Donner, Santa Monica 1966". Chessgames.com. Retrieved 4 December 2011.
- ↑ Ljubojević–J. Polgár, Monaco Amber blind 1994
- ↑ Gelfand–Svidler, FIDE WCh KO 2001
- ↑ Topalov–Karpov, Amber Rapid 2000
- ↑ Petar Popovic–Korchnoi, Sarajevo 1984
- ↑ Timman–Speelman, Linares 1992
- ↑ Yuri Averbakh, Chess Middlegames: Essential Knowledge, Cadogan, 1996, p. 85. ISBN 1-85744-125-7.
- ↑ Professor Hoffmann, The Chess Games of Greco, George Routledge & Sons, 1900, p. 224.
- ↑ "Carlsen-Aarland, Norwegian Championship final 2002". Chessgames.com. Retrieved 5 March 2014.
- ↑ G.C. Van Perlo, Van Perlo's Endgame Tactics: A Comprehensive Guide to the Sunny Side of Chess Endgames, Second Edition, New in Chess, 2006, p. 270, No. 635. ISBN 90-5691-168-6 ISBN 978-90-5691-168-3
- ↑ Analysis from ChessBase 9, Mega 2004 database.
- ↑ "Chandler–S. Polgar, Biel 1987". Chessgames.com. Retrieved 4 December 2011.
- ↑ "United States Chess Federation rating card for Frederick S. Rhine". Uschess.org. Retrieved 4 December 2011.
- ↑ Karsten Müller and Frank Lamprecht, Fundamental Chess Endings, Gambit Publications, 2001, p. 403. ISBN 1-901983-53-6
- ↑ Reuben Fine and Pal Benko, Basic Chess Endings, McKay, 2003, p. 524. ISBN 0-8129-3493-8
- ↑ Howard Staunton, The Chess-Player's Handbook, Henry G. Bohn, 1847, p. 439.
- ↑ Chess Life, May 2006, p. 49 ("Benko's Bafflers" column).
- ↑ "A. Petrosian–Hazai, Schilde 1970". Chessgames.com. Retrieved 4 December 2011.
- ↑ Andrew Soltis, The Art of Defense in Chess, David McKay Co., 1975, p. 250. ISBN 0-679-13043-8
- ↑ Amatzia Avni, Danger in Chess: How to Avoid Making Blunders, Dover Publications, 1994, p. 57. ISBN 0-486-44675-1
- ↑ Lyev Polugayevsky and Igor Damsky, The Art of Defence in Chess, Pergamon Press, 1988, p. 129. ISBN 0-08-032058-9
- ↑ Glenn Flear, Starting Out: Pawn Endings, Everyman Chess, 2004, p. 13. ISBN 1-85744-362-4
- ↑ "Tim Krabbé's Open Chess Diary". Xs4all.nl. Retrieved 4 December 2011.
- ↑ "Beliavsky–Christiansen, Reggio Emilia 1987–88". Chessgames.com. Retrieved 4 December 2011.
- ↑ "Robert Byrne, "Chess; A Marshall Spirit". New York Times. 10 April 1988. Retrieved 4 December 2011.
- ↑ Noam Elkies, Endgame Explorations 1: An Introduction
Bibliography
- Benko, Pal; Hochberg, Burt (1991). Winning with Chess Psychology. David McKay. ISBN 0-8129-1866-5.
- Brace, Edward R. (1977). An Illustrated Dictionary of Chess. McKay. ISBN 0-679-50814-7.
- Burgess, Graham (1997). The Mammoth Book of Chess. Carroll & Graf. ISBN 0-7867-0431-4.
- Byrne, J. Horton (1959). Dictionary of Modern Chess. Philosophical Library.
- Damsky, Igor; Polugaevsky, Lev (1988). The Art of Defence in Chess. Pergamon Press. ISBN 0-08-032058-9.
- Emms, John (2000). The Most Amazing Chess Moves of All Time. Gambit Publications. ISBN 1-901983-29-3.
- Hartston, W. R.; Reuben, S. (1981). London 1980: Phillips & Drew Kings Chess Tournament. ISBN 0-08-024140-9.
- Horowitz, I.A.; Reinfeld, Fred (1954). Chess Traps, Pitfalls and Swindles. Simon and Schuster. ISBN 0-671-21041-6.
- Korn, Walter (1966). The Brilliant Touch in Chess. Dover Publications.
- Krogius,, Nikolai (1976). Psychology in Chess. RHM Press. ISBN 0-89058-023-5.
- Lawton, Geoff (2003). Tony Miles: It's Only Me. Batsford. ISBN 0-7134-8809-3.
- Marshall, Frank J. (2013). Marshall's Best Games of Chess. Read Books. ISBN 9781447472513.
- Mortazavi, Ali (1996). The Fine Art of Swindling. Cadogan Books. ISBN 1-85744-105-2.
- Nunn, John (1998). Secrets of Practical Chess. Gambit Publications. ISBN 1-901983-01-3.
- Pachman, Luděk (1978). Complete Chess Strategy: Play on the Wings. David McKay. ISBN 0-679-13252-X.
- Seirawan, Yasser (1995). Winning Chess Brilliancies. Microsoft Press. ISBN 1-55615-910-2.
- Soltis, Andy (1994). Frank Marshall, United States Chess Champion: A Biography with 220 Games. McFarland & Company. ISBN 0-89950-887-1.
- Webb, Simon (2005). Chess for Tigers (3rd ed.). Batsford. ISBN 978-0-713-48988-0.
- Timmer, Robert (1997), Startling Castling!, Batsford, ISBN 0-713481-37-4
Further reading
- Leonid Shamkovich and Eric Schiller, Saving Lost Positions, Macmillan Chess Library, 1988. ISBN 0-02-053770-0.
- Andrew Soltis, The Art of Defense in Chess, David McKay Co., 1975. ISBN 0-679-13043-8.
- Mihail Marin, Secrets of Chess Defence, Gambit Publications Ltd, 2003. ISBN 1-901983-91-9.
- Jacob Aagaard, Practical Chess Defence, Quality Chess Europe AB, 2006. ISBN 978-91-975244-4-5.
- Paul Keres and Alexander Kotov, The Art of the Middle Game, Penguin Books, 1964, pp. 80–124 ("How to Defend Difficult Positions" chapter).
- Lev Alburt and Larry Parr, Back to the Basics: Saving Lost Positions, Chess Life, October 1994, pp. 30–31.
External links
- Exeter Chess Club, Swindle your way to success
- Lev Khariton, Frank Marshall, The King of Traps
- Jack O'Keefe, Stalemate!