Siege of Kehl (1796–97)
Coordinates: 48°34′N 7°49′E / 48.567°N 7.817°E
| Siege of Kehl | |||||||
|---|---|---|---|---|---|---|---|
| Part of the French Revolutionary Wars | |||||||
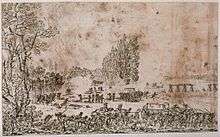
 Habsburg and French troops skirmished for control of the crossing in the weeks before the siege. | |||||||
| |||||||
| Belligerents | |||||||
|
|
| ||||||
| Commanders and leaders | |||||||
|
|
| ||||||
| Strength | |||||||
| 20,000[1] | 40,000[1] | ||||||
| Casualties and losses | |||||||
|
4,000 [1] | 3,800 plus 1,000 captured[1][2] | ||||||
The Siege of Kehl lasted from October 1796 to 9 January 1797. Habsburg and Württemberg regulars numbering 40,000, under the command of Maximilian Anton Karl, Count Baillet de Latour, besieged and captured the French-controlled fortifications at the village of Kehl in the German state of Baden-Durlach. The fortifications at Kehl represented important bridgehead crossing the Rhine to Strasbourg, an Alsatian city, a French Revolutionary stronghold. This battle was part of the Rhine Campaign of 1796, in the French Revolutionary War of the First Coalition.
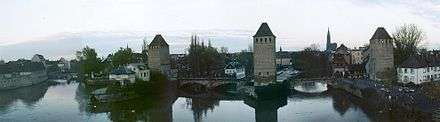
In the 1790s, the Rhine was wild, unpredictable, and difficult to cross, in some places more than four or more times wider than it is in the twenty-first century, even under non-flood conditions. Its channels and tributaries wound through marsh and meadow and created islands of trees and vegetation that were alternate submerged by floods or exposed during the dry seasons. At Kehl and the city of Strasbourg lay a complex of bridges, gates, fortifications and barrage dams. These had been constructed by the fortress architect Sébastien le Prestre de Vauban in the seventeenth century. The crossings had been contested before: in 1678 during the French-Dutch war, in 1703 during the War of the Spanish Succession, in 1733 during the War of the Polish Succession, and earlier in 1796, when the French crossed into the German states on 23–24 June. Critical to French success was the army's ability to cross the Rhine at will. The crossings at Hüningen, near the Swiss city of Basel, and the crossing at Kehl, gave them ready access to most of southwestern Germany; from there, French armies could sweep north, south, or east, depending on their military goal.
Throughout the summer of 1796, the French and the Austrians had chased each other back and forth across the south German states. By October, the Austrian force, under the command of Archduke Charles, had pushed the French back to the Rhine. With the conclusion of the Battle of Schliengen on 24 October, the French army withdrew south and west toward the Rhine. The French commander, Jean-Victor Moreau, offered an armistice that the archduke was inclined to accept. He wanted to secure the Rhine crossings so he could send troops to northern Italy to relieve Dagobert Sigmund von Wurmser at besieged Mantua; an armistice with Moreau would allow him to do that. However, his brother, Francis II, the Holy Roman Emperor, and the civilian military advisers of the Aulic Council categorically refused such an armistice, forcing Charles to order simultaneous sieges at Hüningen and Kehl. These tied his army to the Rhine for most of the winter.[3]
On 18 September 1796, the Austrians temporarily acquired control of the têtes-de-ponts (bridgeheads) joining Kehl and Strasbourg until a strong French counter-attack forced them to retreat. The situation remained in status quo until late October. Immediately after the Battle of Schliengen, while most of Moreau's army retreated south to cross the Rhine at Hüningen, Count Baillet Latour moved north to Kehl to begin the siege. On 22 November, the French defenders at Kehl, under Louis Desaix and the overall commander of the French Army of the Rhine and Moselle, Jean-Victor-Marie Moreau, almost ended the siege when they executed a sortie that nearly captured the Austrian artillery park. In early December, the Austrians expanded the siege, connecting a grand parallel with a series of batteries in a semi-circle around the village and the bridges. By late December, the completed Austrian batteries connected with the captured French fortification called Bonnet de Prêtre; from these positions, the Austrians bombarded the French defenses with enfilade fire. After the defenses were thoroughly riddled by heavy bombardment from the besiegers, the French defenders capitulated and withdrew on 9 January 1797.
Background
Initially, the rulers of Europe viewed the 1789 revolution in France as an event between the French king and his subjects, and not something in which they should interfere. In 1790, Leopold succeeded his brother Joseph as emperor of the Holy Roman Empire and by 1791, the danger surrounding his sister, Marie Antoinette, and her children, alarmed him. In August 1791, in consultation with French émigré nobles and Frederick William II of Prussia, he issued the Declaration of Pilnitz declaring the interest of the monarchs of Europe as one with the interests of Louis and his family. He and his fellow monarchs threatened ambiguous, but serious, consequences if anything should happen to the royal family. The French émigrés continued to agitate for support of a counter-revolution abroad. On 20 April 1792, the French National Convention declared war on Austria. In this War of the First Coalition (1792–98), France ranged itself against most of the European states sharing land or water borders with her, plus Portugal and the Ottoman Empire. Although initially successful in campaigns in 1792 and 1793, the French army lost some effectiveness during the Reign of Terror, as its generals were intimidated and/or executed, and more and more of the officers left France for safer havens.[4]
Campaign of 1796
General campaign
At the end of the Rhine Campaign of 1795, the two sides called a truce.[5] This agreement lasted until 20 May 1796, when the Austrians announced that it would end on 31 May.[6] The Coalition's Army of the Lower Rhine counted 90,000 troops. The 20,000-man right wing under Duke Ferdinand Frederick Augustus of Württemberg, who was replaced by Wilhelm von Wartensleben, stood on the east bank of the Rhine behind the Sieg River, observing the French bridgehead at Düsseldorf. The garrisons of Mainz Fortress and Ehrenbreitstein Fortress counted 10,000 more. The remainder of the Imperial and Coalition army was posted on the west bank behind the Nahe. Dagobert Sigmund von Wurmser led the 80,000-strong Army of the Upper Rhine. Its right wing occupied Kaiserslautern on the west bank while the left wing under Anton Sztáray, Michael von Fröhlich and Louis Joseph, Prince of Condé guarded the Rhine from Mannheim to Switzerland. The original Austrian strategy was to capture Trier and to use their position on the west bank to strike at each of the French armies in turn. However, after news arrived in Vienna of Napoleon Bonaparte's successes, Wurmser was sent to Italy with 25,000 reinforcements. Reconsidering the situation, the Aulic Council gave Archduke Charles command over both Austrian armies and ordered him to hold his ground.[5]
On the French side, the 80,000-man Army of Sambre-et-Meuse held the west bank of the Rhine down to the Nahe and then southwest to Sankt Wendel. On the army's left flank, Jean Baptiste Kléber had 22,000 troops in an entrenched camp at Düsseldorf. The right wing of the Army of Rhin-et-Moselle was positioned behind the Rhine from Hüningen northward, centered along the Queich River near Landau and its left wing extended west toward Saarbrücken.[5] Pierre Marie Barthélemy Ferino led Moreau's right wing at Hüningen, Louis Desaix commanded the center and Laurent Gouvion Saint-Cyr directed the left wing. Ferino's wing consisted of three infantry and cavalry divisions under François Antoine Louis Bourcier and Henri François Delaborde. Desaix's command counted three divisions led by Michel de Beaupuy, Antoine Guillaume Delmas and Charles Antoine Xaintrailles. Saint-Cyr's wing had two divisions commanded by Guillaume Philibert Duhesme, and Alexandre Camille Taponier.[7]
The French grand plan called for two armies to press against the flanks of the northern Coalition armies in the German states while simultaneously a third army approached Vienna through Italy. Specifically, Jean-Baptiste Jourdan's army would push south from Düsseldorf, hopefully drawing troops and attention toward themselves, which would allow Moreau’s army an easier crossing of the Rhine. According to plan, Jourdan’s army feinted toward Mannheim, and Charles quickly reapportioned his troops. Once this occurred, Moreau’s army attacked the bridgehead at Kehl, which was guarded by 7,000 imperial troops—troops recruited that spring from the Swabian circle polities, inexperienced and untrained—which amazingly held the bridgehead for several hours, but then retreated toward Rastatt. Moreau reinforced the bridgehead with his forward guard, and his troops poured into Baden unhindered. In the south, by Basel, Ferino’s column moved speedily across the river and advanced up the Rhine along the Swiss and German shoreline, toward Lake Constance and spread into the southern end of the Black Forest. Anxious that his supply lines would be overextended or his army flanked, Charles began a retreat to the east.[8]
At this point, the jealousies and competition between the French generals came into play. Moreau could have joined up with Jourdan’s army in the north, but did not; he proceeded eastward, pushing Charles into Bavaria, and Jourdan pushed eastward, pushing Wartensleben’s autonomous corps[note 1] into the Ernestine duchies.[9] On either side, the union of two armies—Wartensleben’s with Charles’ or Jourdan’s with Moreau’s—could have crushed the opposition.[10]
Wartensleben and Charles united first, and the tide turned against the French. With 25,000 of his best troops, the archduke crossed to the north bank of the Danube at Regensburg and moved north to join his colleague Wartensleben. There followed a summer of strategic retreats, flanking, and reflanking maneuvers. Once Charles and Wartensleben's forces were reunited, their combined efforts pushed the French slowly to the east. The defeat of Jourdan's army at the battles of Amberg, Würzburg and Altenkirchen allowed Charles to move more troops to the south.[11]
Preliminary action at Kehl: September 1796
While Charles and Moreau jockeyed for position on the eastern slope of the Black Forest, Franz Petrasch engaged the French between at Bruchsal. The troops there, under orders of General Scherb, included the 68th Demi-brigade and two squadrons of the 19th dragoons, had remained behind after the Battle of Ettlingen to observe the garrisons of Mannheim and Philipsburg. Scherb, realizing that his command was too small to withstand a concerted attack by the stronger Austrians, began a withdrawal. An initial attack on the French positioned resulted in favor of the French, who charged the Austrians with bayonet, and pushed Petrasch's troops back. Again, on 5 and 6 September, the Austrians and French spent most of the day skirmishing in advanced posts; this masked the Austrian intention of approaching Kehl and securing the crossing between the village and Strasbourg. By 15 September, part of Scherb's force arrived in Kehl, after having been continually harassed between there and Bruchsal.[12] Once established in Kehl, this small cadre sought to strengthened the fortifications but the lack of cooperation from villagers and local peasants, and the exhaustion of the troops, prevented enhancements from proceeding with any speed.[13]
The Kehl garrison, under command of Balthazar Alexis Henri Schauenburg consisted only of one battalion of the 24th Demi-brigade and some detachments of the 104th. This was too weak to defend a position of such importance, or to develop additional extensive works. General Moreau detached a demi-brigade of infantry and a regiment of cavalry from his army in the Black Forest, with instructions to proceed by forced marches to Kehl, but General Petrasch sent Lt. Colonel Aspré, with two battalions, to occupy Renchen and to insure that Moreau's reinforcements did not augment the garrison at Kehl.[13]
Before the break of dawn on 18 September (03:45), three Austrian columns attacked Kehl. The principal column, comprising the Regiment Ferdinand, crossed the Kinzig river above the French position and proceeded toward the dykes of the Rhine above Kehl. This placed them between Scherb and his force, and Kehl. Using the dykes as protection, and guided by some peasants who had been previously employed in strengthening the works of Kehl, they advanced as far as the horn work on the Upper Rhine and entered a gorge which led them to the outskirts of Kehl.[14] The second column of the Regiment Ferdinand, under command of Major Busch, proceeded via Sundheim toward Kehl, and obtained possession of the village itself, although not the bridge leading to Strasbourg. The third column, which included three companies of Serbians and a division of Hussars, executed a false feint on the left bank of the river. One corps of reserve under command of Colonel Pongratz, approached as far as the French earthworks on the banks of the Rhine to support the columns ahead of him; another, which included a battalion of the 12th Regiment, moved past Neumuhl at 48°34′12″N 7°50′38″E / 48.57000°N 7.84389°E toward Kehl.[15]
Quickly, the Austrians possessed all the earthworks of the town, the village itself, and the fortress; their skirmishers reached one side of the abutment of the old palisade bridge and advanced to the other side, crossing the islands formed by branches of the Kinzig and the Rhine. There, almost within eye-shot of the French sentinels, they halted; there is some confusion about why they stopped, but apparently they mistook the abutment for the bridge itself.[14]
The French executed several attempts to retake the bridges. The 68th, under command of general Sisce, was repulsed three times by the superior Austrian numbers and the murderous fire of case shot from four cannons that lined the principal road. The French cavalry tried to retired into Kehl via the Kinzig bridge, but heavy Austrian fire destroyed most of them. Not until 19:00 did fortune favor the French, when Lt. Colonel Aspré and two hundred men of the Regiment Ferdinand were captured within the fort itself. The next in command, Major Delas, was badly wounded, and there remained no one in overall command of the 38th Regiment. The French general, Schauenburg, who had gone to Strasburg for troops, returned with some reinforcements and met at once an impetuous Austrian attack.[16] At 22:00 the Austrians still held the redoubt and the houses at the edge of the village; the arrival of a fresh battalion of the Regiment Manfredini led to a new attack, but it was repulsed. The Austrians had insufficient reserves to meet the fresh troops from Strasbourg. By 23:00, the French had recovered the fort, Strasbourg, the village of Kehl and all of the French earthen works.[17]
Impact of September action
Despite the limited success of Petrarsch's action, it had a broad impact on the movements of the main armies of Moreau and Archduke Charles. By preventing French access to the Kehl/Strasbourg crossing, Petrasch forced Moreau to move south; any retreat into France must happen via the bridges at Hüningen.[18]
Geography and politics
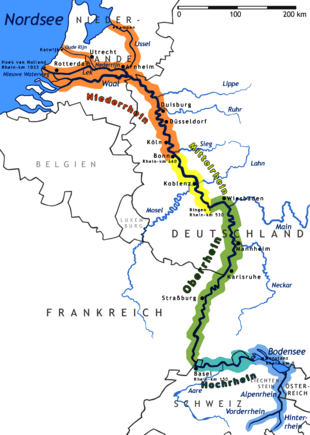
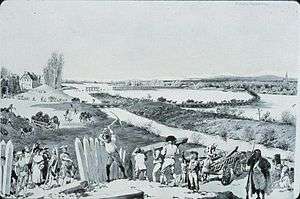
The Rhine River flows west along the border between the German states and the Swiss Cantons. The 80-mile (130 km) stretch between Rheinfall, by Schaffhausen and Basel, the High Rhine (Hochrhein) cuts through steep hillsides over a gravel bed; in such paces as the former rapids at Laufenburg, it moves in torrents.[19] A few miles north and east of Basel, the terrain flattens. The Rhine makes a wide, northerly turn, in what is called the Rhine knee, and enters the so-called Rhine ditch (Rheingraben), part of a rift valley bordered by the Black Forest on the east and Vosges Mountains on the west. In 1796, the plain on both sides of the river, some 19 miles (31 km) wide, was dotted with villages and farms. At both far edges of the flood plain, especially on the eastern side, the old mountains created dark shadows on the horizon. Tributaries cut through the hilly terrain of the Black Forest, creating deep defiles in the mountains. The tributaries then wind in rivulets through the flood plain to the river.[20]
The Rhine River itself looked different in the 1790s than it does in the twenty-first century; the passage from Basel to Iffezheim was "corrected" (straightened) between 1817 and 1875. Between 1927 and 1975, a canal was constructed to control the water level. In 1790, though, the river was wild and unpredictable, in some places more than four or more times wider than the twenty-first century, even under regular (non-flood) conditions. Its channels wound through marsh and meadow and created islands of trees and vegetation that were periodically submerged by floods. It was crossable at Kehl, by Strasbourg, and at Hüningen, by Basel, where systems of viaducts and causeways made access reliable.[21]
Political terrain
| Complications of political boundaries | ||||
|---|---|---|---|---|
|
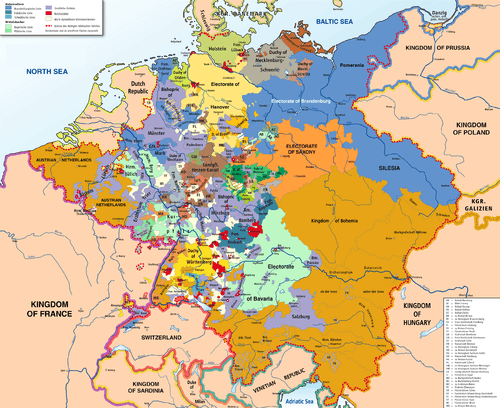
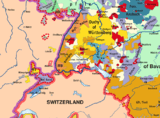
The German-speaking states on the east bank of the Rhine were part of the vast complex of territories in central Europe called the Holy Roman Empire.[22] The considerable number of territories in the Empire included more than 1,000 entities. Their size and influence varied, from the Kleinstaaten ("little states") that covered no more than a few square miles to large and powerful states. Their governance varied: they included free imperial cities, also of different sizes, such as the powerful Augsburg and the minuscule Weil der Stadt; ecclesiastical territories, also of varying sizes and influence, such as the wealthy Abbey of Reichenau and the powerful Archbishopric of Cologne; and such durable dynastic states as Württemberg. When viewed on a map, the Empire resembled a Flickenteppich ("patchwork carpet"). Some states included non-contiguous pieces: both the Habsburg domains and Hohenzollern Prussia also governed territories outside the Empire structures, such as the Habsburg territories in eastern Europe and northern Italy. There were also territories completely surrounded by France that belonged to Württemberg, the Count of Solm, the archbishopric of Trier, and Hesse-Darmstadt. Among the German-speaking states, the Holy Roman Empire's administrative and legal mechanisms provided a venue to resolve disputes between peasants and landlords, between jurisdictions, and within jurisdictions. Through the organization of imperial circles (called Reichskreise), groups of states consolidated resources and promoted regional and organizational interests, including economic cooperation and military protection.[23]
Diplomacy and politics
The fortresses at Hüningen and Kehl were both important bridgeheads across the river; maintaining control of them had been critical in relative ease of the French crossing to the German side of the Rhine in June 1796. At Strasbourg, a once imperial city, and Kehl, the German village across the river from it, the first permanent bridge had been erected in 1338. In 1678, Strasbourg was taken over by France, and the bridge became part of the city's defense system. Louis XIV ordered the construction of the fortress by the famous architect, Sébastien Le Préstre de Vauban (1679–81), resulting in the construction of the star-shaped fortresses and bridgeheads in both locations. The principal fortresses lay on the west side (French side) of the Rhine; the bridgeheads and the smaller fortifications surrounding those lay on the west side; these protected the various bridges, barrages and viaducts connecting the east and west sides of the river.[24]
Consequences
The Austrian failure to hold Kehl and the Strasbourg crossing in September 1796 gave Moreau some measure of security in his actions in the Black Forest and the southern flood plain of the Rhine. If the Austrians had held the crossing, General Petrasch's entire corps could have fallen upon the French army, at that time debouching through the Black Forest defiles and congregating in Freiburg. With sufficient forces, Petrasch also could have advanced as far as Hüningen and carried its tete de point, which had fewer defenders than Kehl. Not only would this embarrass the French who had, up to that point, maintained a steady and secure retreat westward out of southern Germany, it would trap the French army in Germany between Petrasch and the approaching Archduke Charles.[25]
After Schliengen, Moreau had only one avenue of escape, via the smaller crossing at Hüningen, which he used to move his army back to France. The question remained, however, over who would control the crossings. Charles had formulated a plan to circumvent that issue, and to free enough of his troops to send a relief force into northern Italy, where Dagoburt von Wurmser held Mantua against the French. If the French would agree to an armistice, he could take command of the Rhine fortresses; the French would withdraw, and he could send a sizable force to northern Italy to help relieve Mantua. The Siege of Mantua was long and costly, and had tied up a significant portion of both the French and Austrian force. The French Directory was willing to give up Mantua in exchange for the Rhine bridgeheads, which they deemed more important for the defense of France; Henri Jacques Guillaume Clarke, their envoy sent to negotiate between the Austrians and the French in Italy, could not convince Napoleon Bonaparte to allow the Habsburgs to keep Mantua. Napoleon flatly refused the suggestion, maintaining that Mantua was the keystone to the conquest of Habsburg Italy and to maintaining pressure on the Habsburgs in their capital of Vienna.[26]
Charles advised his brother of the French Directory's offer, but it was flatly refused by the Emperor and the civilian military advisers on the Aulic Council. He was instructed to lay siege to the fortresses, to take them, and secure any possible French access to southern Germany via the Rhine. The Aulic Council still believed Austrian forces could relieve Mantua. Consequently, by tying Charles down at the Rhine, besieging the Vauban fortresses at the river, the Council effectively sealed the fate of Wurmser's troops in Mantua. After it became clear that Charles was locked into place at Kehl and Hüningen, Moreau moved 14 demi-brigades to Italy, leaving behind modest forces on the Rhine.[27] Two Austrian columns sent from Vienna failed to reach their beleaguered counterparts in Mantua, which fell on 2 February 1797.[26]
Laying siege

Once the Aulic Council refused Charles's plans, Latour engaged the main French force at Kehl and Charles entrusted to Karl Aloys zu Fürstenberg the command of the siege force at Hüningen.[28] The process of laying siege in the eighteenth century was complicated. Most commonly, armies established positions around a city and waited for the surrender of those inside: if patience failed, they bribed or coerced someone inside to betray the fortification. An attacker, aware of a prolonged siege's great cost in time, money and lives, might offer generous terms to a defender who surrendered quickly. The defending troops would be allowed to march away unharmed, often retaining their weapons. As a siege progressed, however, the defender's position became more precarious. The surrounding army would build earthworks in a line of circumvallation to completely encircle their target, preventing food, water, and other supplies from reaching the besieged city. This was followed by the construction of a line of contravallation, especially if the besieged city had a nearby field army; the line of contravallation protected the besiegers.[29]
Generally, time was on the side of the defenders; most armies could not afford to wait out the prosecution of a siege, especially of a well-fortified, well-provisioned city. Until the invention of gunpowder-based weapons (and the resulting higher-velocity projectiles), the balance of power and logistics definitely favored the defender. With the introduction of large-caliber mortars and howitzers (in modern times), the traditional methods of defense became less effective against a determined siege,[30] although many of the trace italienne fortresses presented a formidable challenge well into the twentieth century.[note 2]
Description of the fortifications
The principal bridge crossing the main part of the river began approximately 400 paces above the point at which the Kinzig river joined the Rhine. On one side of the confluence lay the hamlet of Auenheim; on the other the village of Neumuhl. The fortress stood between the bridge over the Rhine and the Kinzig. It was shaped as a polygon, approximately 400 feet (122 m) in length, and two of its sides faced the Rhine. The main wall was approximately 12 feet (4 m) high. Below two bastions, casemates, or fortified gun emplacements of 83 feet (25 m) long and 16 feet (5 m) wide, provided enfilade coverage. Behind these lay to other polygons, close the river, which held the magazines: these were 22 feet (7 m) high, 4 feet (1 m) long and 27 feet (8 m) wide. All walls were thick enough to repel most cannon fire. The inner spaces included a section of barracks that cold hold up to 1500 men; indeed, in an earlier bombardment in the hostilities in September 1796, the barracks, gun emplacements, and walls had withstood a lengthy Austrian barrage. The fortress had stone and mortar ravelins and each bastion had its own hornwork; the hornwork between the Rhine and the Kinzig was approximately 250 feet (76 m) in length. The hornworks themselves were faced with stone and mortar and had their own ravelines, a covered communication ditch, and an earthen glacis.[31]
The village of Kehl stood on one of the hornworks, built along a single long street. At one end lies the Commandant's Bridge, which crosses the "old water", a subsidiary channel approximately 400 feet (122 m) wide, separated from the main channel of the Rhine. Beside the old water, stood the Kehl church, graveyard, and portions of the hornwork, including an earthen dam that follows the shore of the river. The fortified wall by the churchyard, capped by a breastwork, and had its own moat; the breast work had room for at least four cannons and 150 or 200 troops. This entire installation, called the churchyard redoubt, approximately 100 yards (91 m) wide, dominated the vicinity.[32]
As the Rhine passed the church, it made a sharp curve; this curve and the water where it and the old water rejoin, created a small island known as the Marlener Island. In dry weather, it was more of a peninsula than an island; the exposed ground was called the Kehler Rheinkopf (Kehl's Rhine head, or bald head). The island was thick with bushes and shrubbery. Beside this lay a larger island, known as the Erlenkopf (Erlen head), which supported a battery of artillery (known as Battery 2). The battery was protected only by posts, or palisades, connected to the mainland by a light wood bridge guarded by infantry sentries. The river by the bridge was approximately 200 yards (183 m) wide, and by the exposed islands were about 100 yards (91 m) wide.[33]
In the other direction, between Kehl and the Schutter, which lay downstream, the fortifications were equally secured. The redoubt there held about 8 cannons and 400 men, and covered the street between the hamlet of Auenheim and Kehl.[34]
Conduct of the siege at Kehl
Realizing that the siege was imminent, the French had destroyed most of the village of Kehl on 26 October, as the Battle of Schliengen concluded and Moreau's army withdrew toward Hüningen. Only the ruined walls of the church and post house remained.[35] The French maintained control of the three main islands surrounding the Kehl crossings: Ilse de Estacade, Ilse de Escargots, and Isle de Ehrlin. Their control of these provided vital positions from which the French established their operations. The islands were connected to Kehl and to each other through a series of flying bridges (pontoon bridges); troops could also be moved by boat if necessary.[36]
On 26 October, Baillet de Latour immediately lay the groundwork for a lengthy siege by ordering the construction of extensive earthworks around the bridgehead. This lines of contravallation (the trenches nearest to the French position) included a series of redoubts connected by trenches. Initially, the French considered these to be purely defensive and they were inclined to ignore the industrious Austrian diggers and focus instead on their own fortifications, which were sketchy and relied upon palisades unprotected by dirt; these could not withstand a vigorous attack until strengthened.[37] After several days of strengthening their outer works by 30 October, several artillery pieces were brought up to augment the outer defense. In addition, General Dessaix arrived to command the fortress and augment the garrison with his troops. Subsequently, French reconstruction of the fortress and its defensive lines increased. Several minor sorties against the Austrian lines resulted. On 14 November 1796, Vandamme directed a small group of skirmishers and hussars to attack the most forward of the Austrian posts. This successful sortie took eighty Austrian prisoners.[38] On 21 November, while the Austrians constructed their trenches on the right bank of the Kinzig, the French planned for a considerable sortie against the lines of contravallation between the Kinzig and the Rhine.[39]
Action of 22 November
At daybreak on 22 November, 16,000 infantry and 3000–4000 cavalry moved against the combined Austrian and Württemberg positions between the Kinzig and the Rhine. The French infantry departed from the small island of Erlen, in the Rhine, and from the left of the entrenchment camp. The first column forced the first two Imperial redoubts. Another penetrated the earthen works near the center and carried the village of Sundheim and the two redoubts that ran contiguously to the village. Three other redoubts between the two were not carried, though, and the Austrians sallied out of these fortifications and fell upon the French. This action was the principal assault on the Austrian/Imperial line and apparently took the besiegers by surprise. Latour and the archduke personally moved to the gap the French created, pulling six battalions of armed workmen and all the Austrian troops after them.[40]
The French immediately ran into problems. Infantry intended to support the first wave did not arrive in time. The cavalry could not deploy properly, due to the marshy ground and close quarters. After four hours, the entire French sortie party withdrew, taking 700 prisoners, seven pieces of cannon, and two howitzers. The want of horses prevented them from taking another 15 pieces of cannon, which they spiked. According to French accounts, thick fog favored the Imperial action, because it prevented the French from reconnoitering. Furthermore, as Moreau reported later, the humidity on the ground impeded the march of their columns, although it is unclear how the fog impeded only French visual reconnaissance and march but not the Austrian's. Regardless, fighting was heavy. General Moreau himself was wounded in the head and his aide-de-camp Lélée was badly wounded. General Desaix's horse was killed under him, and he received a contusion in his leg, and General Latour's horse was also shot from under him.[41] This action convinced the French that the Austrian and Imperial forces were too numerous and too well-established for them to shake. The French instead focused their efforts on reinforcing their palisades, strengthening batteries, and developing the redoubts and earthen works.[42]
Expansion of the siege
Much of the Kehl fortification was built on old ruins. In particular, the oldest of the bridges, which had been largely destroyed earlier in the century, This was an ancient bridge of piles that had been largely destroyed earlier in the century, but which the French had been reconstructing. Where the old stakes remained, the French rebuilt the bridge; where the stakes were missing, they filled in gaps with pontoon spans resting on boats. By 28 November, the Austrians had constructed enough parallels and batteries to fire upon the oldest of the bridges crossing the river. The bridge was entirely demolished; the French repaired it; the Austrians demolished it again. It lay so directly in the line of fire of one of the batteries that it was an easy target. The French could not keep it intact three days straight and furthermore, its wreckage threatened a pontoon bridge immediately downstream.[35]
The Austrians continued to expand their works and erect new batteries. On 6 December, the Austrians opened fire simultaneously with their batteries, and maintained a day-long salvo. At four in the afternoon, they attacked a French position defended by 300 men. They succeeded in taking it, but the French recovered it with a counter-attacked, taking some prisoners. At the same time, though, the Austrians attacked another work, called the Bonnet de Prétre, where only 20 men were posted. They secured it and afterward connected it to the network of fortifications.[43] This gave Austrian marksmen close access to the bridges, where they could pick off French defenders with musket fire. It also allowed sappers to tunnel under the bridgehead walls and engineers to establish artillery batteries that could fire at closer range to the walls. They built some new trenches on the left of the Schutter stream, by the entrance to the old village of Kehl. Similarly, the French had made several night sorties on the works of the besiegers. In these forays, they would chase the diggers out of the lines, but the Austrian reserves always recovered the works before the French could capture any cannons or destroy the construction. Consequently, every day, the Austrians expanded their works and erected new batteries.[35]
On 9 December, in the night, the Austrians attacked the French advanced posts at the ruins of the old post house and church of the old village of Kehl. The fighting was bitter and short, but the Austrians finally took the post, to be driven out the next morning. In this subsequent attack, at which Archduke Charles was present, the Austrians lost about three hundred men and an officer. They attacked again on the 10 and 11 December, but could not take the posts. The Austrians also launched fire ships to destroy the pontoon bridge, but these were repulsed and destroyed.[44] The Austrians took the Ehrlinrhin, a large island on which several of the French reserve units had been positioned. General Lecourbe removed one of the flying bridges to cut off all hope of a (French) retreat, grabbed a standard and rallied a battalion to advance against the Austrians, repulsing them as far as their trenches. Lecourbe's quick thinking preserved half of the island for the French.[45]
In the following days, the Austrians incorporated the newly acquired territory into their massive lines and batteries. The opened trenches on the left (south) of the Schutter) at the entrance to the old village of Kehl; within the week, the Austrian batteries connected the ruins at Kehl with the left flank of the contravallation, and linked the entire line to one of the Rhine islands, now exposed by receding water. The lines of contravallation, formed of several redoubts, were joined by entrenchments that entirely encircled Kehl and access to the bridges. These began at a dyke near Auenheim, traversed the route to Rastadt and Offenburg, the course of the Kintzig and the Schutter rivers, encircled the village of Sundheim, and finished at the Bonnet de Prétre. The Austrian troops on the island could cover the left flank and the entire besieging army was covered by considerable entrenchments on the Islands in the Kinzig. By the end of the week, the Austrian and Imperial defenses were connected in a grand parallel and a series of batteries in a semicircle around the village.[46] The Austrians took the ruins of the church and the post house by bringing up artillery and bombarding the positions; this allowed them to complete the lines of contravallation.[47]
According to spies and deserters, the archduke himself had been exhorting and cajoling his troops to lift their spirits, "prepared his troops by harangues and presents," Moreau reported. On 1 January, after a lengthy salvo, 12 Imperial battalions attacked the outer redoubt and the right wing of the French entrenchment, drove the French out, and immediately took possession of the earthen works and six pieces of artillery. French reserves had not been able to traverse the Rhine in sufficient time; boats intended to transport such troops had been damaged by the lengthy cannon fire. The connecting bridges, which had also been damaged, were repaired quickly, but by the time these repairs had been made, the Austrians were deeply entrenched in their new positions and the French could not force them out. Even miners, who had dug under the trenches, were unable to blow up the redoubt.[48]
Surrender
Day-by-day, over time, the Austrians increased pressure on the French, who hampered by the lack of bridges or appropriate transport, could not bring up enough reserves to preserve the lost ground. Boats were stove by fire of the cannon; by the time bridges were repaired and sufficient reserves could be moved, the Austrians were entrenched, and had brought up their artillery. The Austrians continued to advance their earth works, and perfect their batteries.[49]
At 10:00 on 9 January the French general Desaix proposed the evacuation to General Latour and they agreed that the Austrians would enter Kehl the next day, on 10 January (21 Nivôse) at 16:00. The French instantly repaired the bridge, rendered passable by 14:00, which gave them more than 24 hours to evacuate everything of value and to raze everything else. By the time Latour took possession of the fortress, nothing remained of any use: all palisades, ammunition, even the carriages of the bombs and howitzers, had been evacuated. The French ensured that nothing remained behind that could be used by the Austrian/Imperial army; even the fortress itself was but earth and ruins. The siege concluded 115 days after its investment, and following 50 days of open (digging) trenches, the point at which active fighting began.[50]
Aftermath
Austrian losses amounted to 12 percent of total forces engaged, high for an eighteenth-century siege; the losses were due to sorties in which the French were able to inflict heavy damages. Gaston Bodart estimated that of the 40,000 men who participated on the Coalition side, 4,800 were lost.[51] Based on Moreau's Memoirs, John Philippart estimated that the losses were lower: 3,000 troops killed or wounded and 1,000 taken prisoner.[52]
The capitulation at Kehl on 9 January allowed Charles to send additional troops and heavy artillery to Hüningen. On 2 February 1797, as the Austrians prepared to storm the bridgehead, General of Division Georges Joseph Dufour, the French commander who had replaced the deceased Jean Charles Abbatucci, pre-empted what would have been a costly attack, offering to surrender the bridge. On 5 February, Fürstenberg finally took possession. Francis II, the Holy Roman Emperor, appointed him as Colonel and Proprietor of the Infantry Regiment Nr. 36, which bore his name until his death in battle in 1799.[28]
Orders of Battle
French Order of Battle
The French garrison consisted of headquarters and three mixed divisions:[53][54]
.jpg)
Commanding: General Louis Desaix, relieved by Laurent Gouvion Saint-Cyr
- General of Division Jean Baptiste Eblé
- Chef de Brigade Jean Baptiste Lobréau[53] Commander of Artillery
- General of Brigade Anne Marie François Boisgérard, Commander of Engineers
- Chef de Bataillon Dédon, Bridges.
- 1st Division: General of Division Jean-Jacques Ambert
- Brigade: General of Brigade Louis-Nicolas Davout 3rd, 10th, 31st Demi-brigades d'ligne, three battalions each[note 3]
- Brigade: General of Brigade Charles Mathieu Isidore Decaen, 44th, 62nd Demi-brigades d'ligne, three battalions each
- 2nd Division: General of Division Guillaume Philibert Duhesme
- Brigade: General of Brigade Jean Marie Rodolph Eickemayer, 68th, 76th Demi-brigades d'ligne, three battalions each
- Brigade: General of Brigade Claude Lecourbe, 84th Demi-brigade d' ligne, three battalions, 93rd Demi-brigade d'ligne, one battalion
- 3rd Division: General of Division Gilles Joseph Martin Bruneteau (called Saint-Suzanne)
- Brigade: General of Brigade Joseph Hélie Désiré Perruquet de Montrichard, 97th, 100th Demi-brigade, three battalions each
- Brigade: General of Brigade Jean Victor Tharreau, 103rd, 106th, 109th Demi-brigades d'ligne, three battalions each
Total: 40 Battalions
Moreau noted that out of 40 total battalions, 15 battalions were in daily service on the right bank. Six battalions defended the fortification of Kehl itself, three held the entrenchments, three occupied the Ehrlen islands and three held the island of Kinzig. A reserve of six battalions encamped on the left bank of the Rhine. He also rotated battalions through the trenches so none became so exhausted they could not function. He also had additional forces available from the Army of the Rhine and Moselle.[52]
Austrian Order of Battle
The Austrian force included Infantry, three columns, and cavalry:[54][55]
- General Baillet-Latour, General of Artillery, commander of the Siege
- Lieutenant Field Marshal Kollowrath, commander of Artillery
- Colonel Szeredai, Director of Engineers
Infantry
1. Column
2. Column
|
3. Column
Cavalry
|
Notes, citations and references
Notes
- ↑ An autonomous corps, in the Austrian or Imperial armies, was an armed force under command of an experienced field commander. They usually included two divisions, but probably not more than three, and function with high maneuverability and independent action, hence the name "autonomous corps." Some, called the Frei-Corps, or independent corps, were used as light infantry before the official formation of light infantry in the Habsburg Army in 1798. They provided the Army's skirmishing and scouting function; Frei-Corps were usually raised from the provinces. See Philip Haythornthwaite, Austrian Army of the Napoleonic Wars (1): Infantry. Osprey Publishing, 2012, p. 24. Military historians usually maintain that Napoleon solidified the use of the autonomous corps, armies that could function without a great deal of direction, scatter about the countryside, but reform again quickly for battle; this was actually a development that first emerged first in the French and Indian War in the Thirteen British Colonies and later in the American Revolutionary War, and became widely used in the European military as the size of armies grew in the 1790s and during the Napoleonic Wars. See David Gates, The Napoleonic Wars 1803–1815, New York, Random House, 2011, Chapter 6.
- ↑ in the last days of World War II, during the Battle in Berlin, that saw some of the heaviest urban fighting of the war, the Soviets did not attempt to storm the Spandau Citadel (built between 1559 and 1594), but chose to invest it and negotiate its surrender. See Antony Beevor, Berlin: The Downfall 1945. New York, Viking-Penguin Books, 2002, pp.372–375.
- ↑ The French Army designated two kinds of infantry: d'infanterie légère, or light infantry, to provide skirmishing cover for the troops that followed, principally d’infanterie de ligne, which fought in tight formations. Smith, p. 15.
- ↑ Riesch is frequently mis-identified in French sources as Reise.
Citations
- 1 2 3 4 Digby Smith, Napoleonic Wars Data Book, Connecticut, Greenhill Press, 1996, pp. 111, 131.
- ↑ John Philippart, Memoires etc. of General Moreau, London, A.J. Valpy, 1814, p. 279.
- ↑ Phillip Cuccia, Napoleon in Italy: the Sieges of Mantua, 1796–1799, University of Oklahoma Press, 2014, pp. 87–93. Smith. Data Book. pp. 125, 131–133.
- ↑ Timothy Blanning. The French Revolutionary Wars. New York: Oxford University Press, 1996, ISBN 0-340-56911-5, pp. 41–59.
- 1 2 3 Theodore Ayrault Dodge, Warfare in the Age of Napoleon: The Revolutionary Wars Against the First Coalition in Northern Europe and the Italian Campaign, 1789–1797. Leonaur Ltd, 2011. pp. 286–287. See also See also Timothy Blanning, The French Revolutionary Wars, New York: Oxford University Press, 1996, ISBN 0-340-56911-5, pp. 41–59.
- ↑ Ramsay Weston Phipps,The Armies of the First French Republic: Volume II The Armées du Moselle, du Rhin, de Sambre-et-Meuse, de Rhin-et-Moselle Pickle Partners Publishing, 2011 reprint (original publication 1923-1933), p. 278.
- ↑ Digby Smith, Napoleonic Wars Data Book, Connecticut, Greenhill Press, 1996, p. 111.
- ↑ Dodge, p.290. See also (German) Charles, Archduke of Austria. Ausgewӓhlte Schriften weiland seiner Kaiserlichen Hoheit des Erzherzogs Carl von Österreich, Vienna, Braumüller, 1893–94, v. 2, pp. 72, 153–154.
- ↑ Dodge, pp. 292–293.
- ↑ Dodge, pp. 297.
- ↑ J. Rickard,Battle of Emmendingen, History of war.org. 17 February 2009. Accessed 18 November 2014.
- ↑ Philippart, pp. 66–68.
- 1 2 Philippart, p. 69.
- 1 2 Philippart, p. 71.
- ↑ Philippart, p. 72.
- ↑ Philippart, pp. 73–74.
- ↑ Philippart, p. 75.
- ↑ Thomas Graham, 1st Baron Lynedoch. The History of the Campaign of 1796 in Germany and Italy. London, (np), 1797, p. 126.
- ↑ Laufenburg now has dams and barrages to control the flow of water. Thomas P. Knepper, The Rhine, Handbook for Environmental Chemistry Series, Part L. New York, Springer, 2006, ISBN 978-3-540-29393-4, pp. 5–19.
- ↑ Knepper, pp. 19–20.
- ↑ (German) Helmut Volk, "Landschaftsgeschichte und Natürlichkeit der Baumarten in der Rheinaue." Waldschutzgebiete Baden-Württemberg, Band 10, S. 159–167.
- ↑ Joachim Whaley, Germany and the Holy Roman Empire: Volume I: Maximilian I to the Peace of Westphalia, 1493–1648 (2012), pp. 17–20.
- ↑ See, for example, James Allen Vann, The Swabian Kreis: Institutional Growth in the Holy Roman Empire 1648–1715. Vol. LII, Studies Presented to International Commission for the History of Representative and Parliamentary Institutions. Bruxelles, 1975. Mack Walker. German home towns: community, state, and general estate, 1648–1871, Ithaca, Cornell University Press, 1998.
- ↑ Conrad Malte-Brun, Universal Geography, Or, a Description of All the Parts of the World, on a New Plan: Spain, Portugal, France, Norway, Sweden, Denmark, Belgium, and Holland, A. Black, 1831 and Carl von Rotteck, General History of the World, (nl), C. F. Stollmeyer, 1842, p. 210.
- ↑ Philippart, pp. 76–77.
- 1 2 Cuccia, pp. 87–93.
- ↑ Digby Smith, Napoleonic Wars Databook, Greenhill Press, 1996, p. 126.
- 1 2 (German) Jens-Florian Ebert, "Feldmarschall-Leutnant Fürst zu Fürstenberg," Die Österreichischen Generäle 1792–1815. Napoleon Online: Portal zu Epoch. Markus Stein, editor. Mannheim, Germany. 14 February 2010 version. Accessed 28 February 2010.
- ↑ The Oxford Encyclopedia of Medieval Warfare and Military Technology. Siege Warfare. Oxford, Oxford University Press, pp. 266–267.
- ↑ R.R. Sellman. Castles and Fortresses. Methuen, 1954, pp. 44–45
- ↑ (German) Ferdinand Varnbüler von und zu Hemmingen, Beitrag zur Geschichte des Feldzuges vom Jahr 1796, Altona, 1797, pp. 46–48.
- ↑ Varnbüler, pp. 49–52.
- ↑ Varnbüler, pp. 42–55.
- ↑ Varnbüler, pp. 45–58.
- 1 2 3 Philippart, p. 114.
- ↑ Philippart, pp. 105, 108, 111–125.
- ↑ Philippart, pp. 102–103.
- ↑ Philippart, p. 103.
- ↑ Philippart, p. 104.
- ↑ Philippart, pp. 104–105.
- ↑ Philippart, p. 106.
- ↑ Philippart, pp. 107–113.
- ↑ Philippart, p. 105, 118.
- ↑ Philippart, p. 118.
- ↑ Philippart, p. 122.
- ↑ Philippart, p. 115.
- ↑ Philippart, p. 119.
- ↑ Philippart, pp. 118–121.
- ↑ Philippart, p. 121.
- ↑ Philippart, p. 127.
- ↑ Gaston Bodart, Losses of Life in Modern Wars, Austria-Hungary. London, Clarendon Press, 1916, p. 40.
- 1 2 Philippart, p. 279.
- 1 2 (French) A. Lievyns, Jean Maurice Verdot, Pierre Bégat,Fastes de la Légion-d'honneur: biographie de tous les décorés accompagnée de l'histoire législative et réglementaire de l'ordre, Bureau de l'administration, 1844, p. 353.
- 1 2 Smith, pp. 111, 131.
- ↑ Philippart, p. 283.
- 1 2 Smith, p. 131.
- ↑ According to Smith only the 1st Bn of the 3rd Regiment was present. Smith, p. 131.
References
- Alison, Archibald. History of Europe from the commencement of the French revolution to the restoration of the Bourbons, Volume 3. Edinburgh: W. Blackwood, 1847.
- Blanning, Timothy. The French Revolutionary Wars. New York, Oxford University Press, 1996. ISBN 978-0340569115
- Beevor, Antony. Berlin: The Downfall 1945. New York, Viking-Penguin Books, 2002. ISBN 0-670-88695-5
- Bodart, Gaston. Losses of Life in Modern Wars, Austria-Hungary. London, Clarendon Press, 1916. OCLC 1458451
- Cuccia, Phillip. Napoleon in Italy: the sieges of Mantua, 1796–1799, Tulsa, University of Oklahoma Press, 2014.ISBN 978-0806144450
- (German) Ebert, Jens-Florian. "Feldmarschall-Leutnant Fürst zu Fürstenberg," Die Österreichischen Generäle 1792–1815. Napoleon Online: Portal zu Epoch. Markus Stein, editor. Mannheim, Germany. 14 February 2010 version. Accessed 28 February 2010.
- Graham, Thomas, 1st Baron Lynedoch. The History of the Campaign of 1796 in Germany and Italy. London, (np), 1797.
- Knepper, Thomas P. The Rhine. Handbook for Environmental Chemistry Series, Part L. New York, Springer, 2006. ISBN 978-3540293934.
- (French) Lievyns, A., Jean Maurice Verdot, Pierre Bégat, Fastes de la Légion-d'honneur: biographie de tous les décorés accompagnée de l'histoire législative et réglementaire de l'ordre, Bureau de l'administration, 1844.
- Malte-Brun, Conrad. Universal Geography, Or, a Description of All the Parts of the World, on a New Plan: Spain, Portugal, France, Norway, Sweden, Denmark, Belgium, and Holland.. (nl), A. Black, 1831. OCLC 1171138
- Philippart, John. Memoires etc. of General Moreau. London, A. J. Valpy, 1814. OCLC 8721194.
- Rickard, J. Siege of Huningue, 26 October 1796 – 19 February 1797. History of war.org. 17 February 2009. Accessed 1 November 2014.
- Rickard, J. Battle of Emmendingen, History of war.org. 17 February 2009. Accessed 18 November 2014.
- Rogers, Clifford, et al. The Oxford Encyclopedia of Medieval Warfare and Military Technology. Oxford, Oxford University Press, 2010. ISBN 978-0195334036.
- Rotteck, Carl von. General History of the World, np: C. F. Stollmeyer, 1842. OCLC 653511
- Sellman, R. R. Castles and Fortresses. York (UK), Methuen, 1954. OCLC 12261230
- Smith, Digby. Napoleonic Wars Data Book, NY, Greenhill Press, 1996. ISBN 978-1853672767
- Vann, James Allen. The Swabian Kreis: Institutional Growth in the Holy Roman Empire 1648–1715. Vol. LII, Studies Presented to International Commission for the History of Representative and Parliamentary Institutions. Bruxelles, Les Éditions de la Librairie Encyclopédique, 1975. OCLC 2276157
- (German) Varnbüler, Ferdinand,von und zu Hemmingen, Beitrag zur Geschichte des Feldzuges vom Jahr 1796, Altona, 1797.
- (German) Volk, Helmut. "Landschaftsgeschichte und Natürlichkeit der Baumarten in der Rheinaue." Waldschutzgebiete Baden-Württemberg, Band 10, pp. 159–167.
- Walker, Mack. German home towns: community, state, and general estate, 1648–1871. Ithaca, Cornell University Press, 1998. ISBN 0801406706