Price's Raid
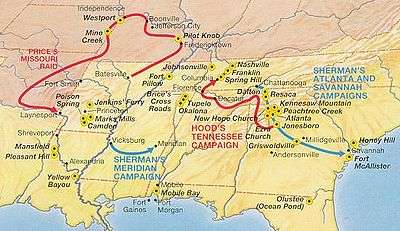
Price's Missouri Expedition, also known as Price's Raid, was an 1864 Confederate cavalry raid through the states of Missouri and Kansas during the Trans-Mississippi Theater of the American Civil War. While Confederate Major General Sterling Price enjoyed some successes during this campaign, he was decisively defeated at the Battle of Westport by Maj. Gen. Samuel R. Curtis and again defeated by the cavalry under Maj. Gen. Alfred Pleasonton at the Battle of Mine Creek, and driven back into Arkansas. Price's expedition proved to be the final significant Southern operation west of the Mississippi River. Its failure contributed to Abraham Lincoln's reelection, and cemented Federal control over the hotly contested border state of Missouri.
Background
After three years of bloody and inconclusive fighting, Confederate authorities were becoming desperate as the U.S. presidential election approached in the fall of 1864. Although the fortunes of war had largely favored the South prior to 1863, events were now starting to favor the Union. Ulysses S. Grant had Robert E. Lee pinned down in the Siege of Petersburg; Jubal A. Early had been driven back from the outskirts of Washington, D.C., while Philip Sheridan was now pursuing him in the Shenandoah Valley; and William T. Sherman had captured Atlanta. With foreign recognition for the Confederacy not forthcoming, Southerners realized that President Abraham Lincoln's reelection would be disastrous for their cause.
Earlier that summer, the Confederacy ordered Lt. Gen. Edmund Kirby Smith, commander in the Trans-Mississippi theater, to send a corps under Richard Taylor across the Mississippi River to assist in the defense of Atlanta and Mobile. Such a crossing, by ferries or pontoon bridge, was deemed impossible because of Union gunboat patrols on the river, and Taylor was assigned to other duties.[1]
Inspired by preparations to divert Union attention from Taylor's crossing, Smith came up with another plan. He would re-capture Missouri for the Confederacy, hoping it would help turn Northern opinion against Lincoln. He ordered Missouri-native Sterling Price to invade Missouri, advancing on St. Louis. Price was to capture St. Louis and its warehouses with military supplies. If the city was too heavily defended, he should go west and capture Jefferson City, the capital. This would strike a psychological blow and provide justification for the inclusion in the Confederate flag of a star for Missouri. Price would then cross into Kansas and turn south through the Indian Territory, "sweeping that country of its mules, horses, cattle, and military supplies".[2]
Opposing forces

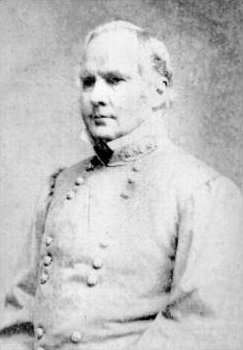
Price assembled a force he named the Army of Missouri, consisting of 12,000 men and fourteen artillery pieces.[3] His army was divided into three divisions, under Maj. Gen. James F. Fagan, Maj. Gen. John S. Marmaduke, and Brig. Gen. Joseph O. "Jo" Shelby. However, the infantry units originally assigned to Price were ordered elsewhere, changing his mission from an invasion into a cavalry raid.[4] Price's men were a mixture of the best and the worst, a quarter of his force being deserters who had been returned to duty.[5] Hundreds of Price's men were barefoot, and most lacked basic equipment such as canteens or cartridge boxes. Many carried jugs for water and kept their ammunition in shirt and pants pockets.[5] Nevertheless, Price hoped the people of Missouri would rally to his side. In this he proved to be mistaken, as most Missourians did not wish to become involved in the conflict. Only Confederate guerrillas joined his army—perhaps as many as 6,000 altogether.
The Union fielded thousands of Missouri State Militia cavalry, who would play a key role in defeating Price's raid, together with the XVI Corps of Maj. Gen. Andrew J. Smith, augmented by Maj. Gen. Alfred Pleasonton's cavalry division, detached from William S. Rosecrans's Department of Missouri. As Price commenced his campaign, Smith's corps was on naval transports leaving Cairo, Illinois to join General William T. Sherman's army in Georgia; Rosecrans requested that these troops be assigned to Missouri to deal with the threat, and Army Chief of Staff Henry W. Halleck immediately complied. By mid-October, more troops had arrived from the Kansas border under Maj. Gen. Samuel R. Curtis, Price's old adversary at the Battle of Pea Ridge (although the overall Confederate commander at Pea Ridge had been General Earl Van Dorn); commander of the newly activated Army of the Border. Curtis had the divisions of Maj. Gen. James G. Blunt (cavalry), Maj. Gen. George W. Dietzler (Kansas Militia), Pleasonton's cavalry, and two infantry divisions from Smith's Corps under Colonels Joseph J. Woods and David C. Moore–about 35,000 men in all.[6]
Battles
Price departed on his horse, "Bucephalus", from Camden, Arkansas, on August 28, 1864. The following day he linked up with two divisions in Princeton, and a third in Pocahontas on September 13. His combined force entered Missouri on September 19; though Missouri militia skirmished with the invading force almost daily, Price's first full battle did not come until September 27, at Pilot Knob, southwest of St. Louis in Iron County.[3]
Price's raid included the following battles:
- Battle of Fort Davidson (September 27, 1864)
- Centralia Massacre (September 27, 1864)
- Fourth Battle of Boonville (October 11)
- Battle of Glasgow, Missouri (October 15)
- Battle of Sedalia (October 15)
- Second Battle of Lexington (October 19)
- Battle of Little Blue River (October 21)
- Second Battle of Independence (October 21–22)
- Battle of Byram's Ford (October 22–23)
- Battle of Westport (October 23)
- Battle of Marais des Cygnes (October 25)
- Battle of Mine Creek (October 25)
- Battle of Marmiton River (October 25)
- Second Battle of Newtonia (October 28)
- Battle of Fort Davidson (September 27, 1864)
- Union Brig. Gen. Thomas Ewing, Jr. moved with reinforcements down the railroad from St. Louis to Ironton to retard Price's advance. On the morning of September 27, Price attacked, driving the Federals back into their defenses anchored by Fort Davidson, near Pilot Knob. After maneuvering elements of his army onto the hills surrounding the fort, Price launched repeated assaults in the late afternoon hours, suffering horrific casualties. During the night, the Federals evacuated the structure and blew up its powder magazine. Price had paid a high price in lives and gave Union forces the necessary time to concentrate and oppose his raid, while gaining little of any lasting military value.[7][8]
- Centralia Massacre (September 27, 1864)
- That same day, west of St. Louis, a band of Confederate guerrillas led by Lieutenant William "Bloody Bill" Anderson sacked Centralia, murdering several unarmed Union soldiers in the infamous Centralia Massacre. Anderson, an associate of the notorious Col. William C. Quantrill, was accompanied by Frank and Jesse James.[9] In response to these events, XVI Corps was moved to St. Louis, reinforced by Pleasonton. Seeing that his primary target–St. Louis–was too strong to take, Price veered westward toward Jefferson City.[10] However, he discovered that the state capital was also too heavily fortified for him to take; he bypassed it and continue further west, toward Kansas City, Missouri and Fort Leavenworth, Kansas.[11]
- Fourth Battle of Boonville (October 11)
- Price's army arrived in Boonville, a small town on the Missouri River, on October 10. Though the town was largely sympathetic to the Confederacy and turned out to welcome him, Price's troops engaged in a two-day orgy of looting that caused a delay in their advance, which gave Federal commanders time to plan a strategy to defeat them, and also turned local opinion against them. Federal Brig. General John S. Sanborn, whose brigade formed a part of Rosecrans' force, had been pursuing Price from Jefferson City, and collided with his rear guard on the outskirts of town on October 11. He was repulsed by Marmaduke and Fagan, and withdrew south of Saline Creek. Price and his troops abandoned the town the next day.[12]
- On October 11, the same day as the skirmish between Sanborn and Price, Bloody Bill Anderson and his bushwackers arrived in Boonville with Union scalps dangling from their horses' bridles. Appalled by this atrocity, Price ordered Anderson to remove the scalps immediately and refused to speak to him until he did.[13] Once Anderson complied, Price ordered him and his command northward to break up the North Missouri Railroad. However, Anderson's activities earlier that summer (including the massacre at Centralia—see above), together with those of George Todd, had already brought rail traffic to a halt. Anderson's men accordingly attacked and looted small towns and depots north of the river, killing soldiers and civilians, but this had no positive effect on Price's operation. Todd's guerrilla unit was engaged by Price to be scouts and outriders for his main army, rather than being given missions of their own that might have used their mobility to harass and "spread out" Federal forces, retarding their ability to concentrate against him.[14]
- Battle of Glasgow, Missouri (October 15)
- Price sent a detachment under Generals Shelby and John Bullock Clark, Jr. to Glasgow to "liberate" weapons and supplies in an arms storehouse purported to be there. Before dawn on October 15, Confederate artillery opened up and Shelby's troops advanced on Glasgow, forcing the defenders to fall back toward their fortifications on nearby Hereford Hill, where they formed a defensive line in the face of the relentless Confederate advance. Convinced that he could not defend against another attack, Union Col. Chester Harding surrendered around 1:30 p.m. Although Harding was able to destroy some stores, Price's men were still able to locate rifles, overcoats, and horses. The Confederates remained in town for three days before rejoining the main column marching on Kansas City. The victory and captured materiel proved a boost to Price's army's morale, but Price's dalliance at Glasgow, together with his slow rate of movement along the Missouri River, gave his enemies valuable time to organize their forces and to close the gap between themselves and him.[15][16]
- Battle of Sedalia (October 15)
- While Shelby and Clark were engaged in Glasgow, Price sent Brig. General M. Jeff Thompson and elements of Shelby's Iron Brigade—around 1500 men in all—to attack the town of Sedalia, Missouri. This force defeated and captured Missouri militia units stationed in two fortified redoubts, and began to sack the town. Upon realizing what his men were doing Thompson ordered them to stop, keeping only weapons, equipment and horses he had already seized while paroling the captured defenders. Thompson and his force then abandoned Sedalia to rejoin Price's main force, leaving the town once more in Union hands, where it would remain for the rest of the war.[17]
- Second Battle of Lexington (October 19)
- As Price continued to crawl westward, Maj. Gen. William S. Rosecrans (commanding the Department of the Missouri) proposed a pincer movement to trap his army. However, he was unable to communicate with Maj. Gen. Samuel R. Curtis (commander of the Department of Kansas) to formalize his plan. Curtis was having problems of his own, because many of his troops were Kansas militia and they refused to enter Missouri. However, a force of 2,000 men under the command of Maj. Gen. James G. Blunt did finally set out for Lexington, Missouri, about 30 miles (48 km) east of Kansas City. On October 19, Price's army approached Lexington, collided with Union scouts and pickets about 2:00 p.m., drove them back, and engaged in a battle with the main force. The Federals resisted at first, but Price's army eventually pushed them through the town to the western outskirts and pursued them along the Independence Road until nightfall. Without Curtis's entire force, the Yankees could not stop Price's army, but they did further retard their slow march. Blunt also gained valuable information about the size and disposition of Price's army.[18]
- Battle of Little Blue River (October 21)
- On October 20, Blunt's retreating troops arrived on the Little Blue River, 8 miles (13 km) east of Independence. The Union force turned to engage the Confederates again, using a strong defensive position on the west bank. General Curtis, however, ordered Blunt to return to Independence while leaving a small force, under Col. Thomas Moonlight, on the Little Blue. The next day, Curtis ordered Blunt to take all of his volunteers and return to the river. As Blunt neared the stream, he discovered that Moonlight's brigade had engaged Price's advance guard just after sunup, burning the bridge as previously ordered. Price's main force had arrived by this time and was fiercely engaging Moonlight's unit, which was stubbornly guarding every available ford in the area. Blunt quickly entered the fray, attempting to drive Price back beyond the defensive positions he wished to reoccupy. A five-hour battle ensued, as Union troops forced the Confederates to fall back at first, entrenching themselves behind several rock walls as they awaited an inevitable Southern counterattack. Although witnesses reported that the outnumbered Federals compelled their enemy to fight for every inch of ground, Confederate numerical superiority slowly took its toll. Gradually, the Northerners were forced to retreat, and the focus of the battle shifted to Independence itself.[19][20]
- Second Battle of Independence (October 21–22)
- As Blunt's forces at the Little Blue retreated westward toward Kansas City, they passed through Independence, where Union rearguard units attempted to cover their retreat by engaging Price's oncoming troops in the city streets. Brisk fighting raged throughout the town all afternoon, with the Federals slowly being forced to give way. On the night of October 21, Price camped along an unfinished railroad cut just west of Independence, having taken the city itself. However, Price was by this time being pursued by 10,000 Union cavalry under Maj. Gen. Alfred Pleasonton, who caught up with Price in Independence at dawn the following day. Pleasonton crossed the Little Blue and attacked the city from the northeast, thus hitting Price in his rear as he undertook to continue his westward march. Two of Fagan's brigades were roughly handled by the attacking Federals, being pushed back through the city toward the west, where the main Union force lay. Yet another Confederate brigade attempted to stem the onslaught on the grounds of what is now the Community of Christ's Independence Temple, but was practically annihilated by Pleasonton's force, with only a few Rebels escaping. Nevertheless, victory would elude the Union. Marmaduke's division engaged Pleasonton about 2 miles (3.2 km) west of Independence, managing to push the Federals back and hold them until the morning of the 23rd. The focus of activity now shifted westward from Independence to Westport, in modern Kansas City.[21]
- Battle of Byram's Ford (October 22–23)
- The Battle of Byram's Ford comprised two separate skirmishes, one fought on the 22nd of October, and the other the next day.
- As Price neared Kansas City, he learned that General Curtis' Army of the Border had assembled in and around Westport, and was blocking his way west. Furthermore, Pleasonton's cavalry division was pressing Price's rear, and was heavily engaged with elements of his force in Independence on the 22nd (see above). Price had nearly 500 wagons with him, and he required a good ford over the Big Blue River to facilitate the passage of his supplies. Byram's Ford was the best in the area, and thus became a strategic point during the fighting that was about to ensue around Westport. On October 22, Blunt's Union division held a defensive position on the Big Blue River's west bank. Around 10:00 a.m., parts of Shelby's division conducted a frontal attack on Blunt's men. This attack was a ruse because the rest of Shelby's men flanked Blunt's hasty defenses, forcing the Federals to retire to Westport. Price's wagon train and about 5,000 head of cattle then crossed the Big Blue River at Byram's Ford, and headed southward toward Little Santa Fe and temporary safety.[22]
- The second skirmish at Byram's Ford took place on the 23rd, forming a part of the larger Battle of Westport, which was raging nearby. Having dislodged Blunt's division the day before, Confederates under Marmaduke now held the west bank of the Big Blue to prevent Pleasonton from attacking Price's rear. Pleasonton began his assault on Byram's Ford around 8 a.m. Initially the Confederates held their own. One of the Union brigade commanders, Brig. Gen. Egbert B. Brown, stalled his attack and was arrested by Pleasonton for disobeying orders. Another of Pleasonton's brigade commanders, Col. Edward F. Winslow, was wounded and succeeded by Lt. Col. Frederick Benteen, who later rode to fame at the Little Bighorn. Despite these setbacks, Federal troops gained the west bank by 11 a.m. and Marmaduke retired. Price now faced two Federal armies, one to his front, and one to his rear, each of which outnumbered his beleaguered force. The outcome of the Battle of Westport was sealed, although the fighting would continue until that evening.[23]

- Battle of Westport (October 23)
- Spurning the idea of any retreat southwards, Price decided that he would deal with Curtis and Pleasonton, to his front and rear respectively, by attacking them one at a time. Pleasonton was coming hard after the previous day's fighting in Independence (see above), so Price decided to strike Curtis' Army of the Border at Westport first, then turn to deal with Pleasonton. However, Curtis held strong defensive positions and despite numerous charges during the four-hour battle, Price was unable to break the Union line. Once Pleasonton had crossed the Big Blue River at Byram's Ford (see above; "second skirmish"), Price's fate was sealed. His army retreated south through Kansas, pursued by Pleasonton's cavalry; it would never recover. This battle, known afterwards as "the Gettysburg of the West", effectively ended Price's campaign.[24]
- Battle of Marais des Cygnes (October 25)
- Three battles occurred on October 25th, the first of which was the battle of Marais des Cygnes.
- Price withdrew south, and Pleasonton pursued him into Kansas. He caught up with Price's army as it camped on the banks of the Marais des Cygnes River, near Trading Post in Linn County, Kansas. After an artillery bombardment that began at 4:00 a.m., Pleasonton's men launched a furious assault. Price ordered his troops to cross the swollen river, leaving Fagan to hold off the Federals until he could get his wagon train across. Although the Union captured two cannon and several prisoners, they were unable to prevent the escape of Price's force. Pleasonton continued his pursuit of Price, catching up with him again later that morning at Mine Creek (see below).[25]
- Battle of Mine Creek (October 25)
- About 6 miles (9.7 km) south of Trading Post, the brigades of Col. Frederick W. Benteen and Col. John Philips, of Pleasonton's division, overtook Price's Confederates as they were crossing Mine Creek. The Southerners had been stalled as their wagons crossed the swollen ford, and they formed their line of battle on the north side of Mine Creek. Although outnumbered, the Federals commenced a mounted attack, led by the 4th Iowa Cavalry, which one participant described as bursting upon the Confederates "like a thunderbolt", causing Price's line to disintegrate "like a row of bricks".[26] Superior Union firepower and the ferocity of their attack made up for their inferior numbers, and Pleasonton's cavalry forced Price to retreat once more. Approximately 600 of Price's men and two of his generals, Marmaduke and Brig. Gen. William L. Cabell, were captured, together with six cannon.[27][28]
- Battle of Marmiton River (October 25)
- Price continued his cartage towards Fort Scott, Kansas. In the late afternoon of October 25, Price's supply train had difficulty crossing the Marmiton River ford and just as at Mine Creek earlier that afternoon, Price had to make another stand. Brig. Gen. John McNeil, commanding two brigades of Pleasonton's cavalry, engaged troops that Price and his officers had rallied from the earlier battles, including a sizable contingent of unarmed men. Observing the large Confederate force and not knowing that many were unarmed, McNeil refrained from an all-out assault. After about two hours of skirmishing Price recommenced his retreat, while McNeil could not mount an effective pursuit. Price's army was utterly broken by this time; now it was simply a question of whether he could escape, and how many men he could successfully evacuate to friendly territory.[29]
- Second Battle of Newtonia (October 28)
- The tattered remnants of Price's army stopped to rest about 2 miles (3.2 km) south of Newtonia, Missouri. Soon afterward, Blunt's Union cavalry surprised the Confederates and engaged them. With many of Price's troops in pell-mell retreat, Jo Shelby's division–including his Iron Brigade–rode to the front, dismounted, and engaged the Federals while the remaining Southerners retreated towards the Indian Territory. Brig. Gen. John Sanborn later appeared with Union reinforcements, convincing Shelby to retire. Union troops had once again forced the Confederates to retreat, but failed to destroy or capture them. This was the final battle in Price's Missouri campaign.[30]
Aftermath
Needing to avoid Fort Smith, Arkansas, Price swung west into Indian Territory and Texas before returning to Arkansas on December 2 with only 6,000 survivors from an original force of 12,000, including thousands of guerrillas who joined him later. He reported to Kirby Smith that he "marched 1,434 miles (2,308 km), fought 43 battles and skirmishes, captured and paroled over 3,000 Federal officers and men, captured 18 pieces of artillery ... and destroyed Missouri property ... of $10,000,000 in value."[31] Nevertheless, Price's mission had been a complete failure and contributed, along with Union successes in Virginia and Georgia, to the re-election of President Lincoln. Moreover, Price had wound up doing the Federals' job for them, in that he cleared Missouri of the Guerrillas: all those who joined him were either killed or left the state with him. Price's Raid proved to be the final Confederate offensive in the Trans-Mississippi region during the war.
A modern assessment
In his paper Assessing Compound Warfare During Price's Raid, written as a thesis for the U.S. Army Command and General Staff College, Major Dale E. Davis postulates that Price's Missouri Raid failed primarily due to his inability to properly employ the principles of "compound warfare", which requires an inferior power to effectively utilize regular and irregular forces in concert (such as was done by the North Vietnamese and Viet Cong against the French and Americans during the Vietnam War) to defeat a superior army. He also blamed Price's slow rate of movement during his campaign, and the close proximity of Confederate irregulars to his regular force, for this outcome.[32]
Davis observes that by wasting valuable time, ammunition and men in his relatively meaningless assaults on Fort Davidson, Glasgow, Sedalia and Boonville, Price offered Union General Rosecrans time he might not otherwise have had to organize an effective response. Furthermore, he says, Price's insistence on guarding an ever-expanding wagon train of looted military supplies and other items ultimately became "an albatross to [his] withdrawal".[33] Price, wrote Davis, ought to have used Confederate bushwackers to harass Federal formations, forcing the Unionists to disperse significant numbers of troops to pursue them over wide ranges of territory–which in turn would have reduced the number of effectives available to fight against Price's main force. Instead, Price kept many guerrillas close to his army, even incorporating some into his ranks, largely negating the value represented by their mobility and small, independent formations. This in turn allowed Union generals to ultimately concentrate a force large enough to trap and defeat Price at Westport, effectively ending his campaign.[34]
Notes
- ↑ Edmund Kirby Smith. Retrieved on 2009-11-29.
- ↑ Battle of Mine Creek: 1864. Retrieved on 2009-11-29.
- 1 2 Official Report of Maj. Gen. Sterling Price. Retrieved on 2009-11-27.
- ↑ Davis, Dale E. Assessing Compound Warfare During Price's Raid. Ft. Leavenworth: U.S. Army Command and General Staff College, 2004, pg. 52.
- 1 2 The Battle of Pilot Knob, Section "The Ragged Assembly". Publication of Missouri Department of Natural Resources. Retrieved on 2009-11-29.
- ↑ Monnett, Howard N. Action Before Westport: 1864 (Niwot, CO: University Press of Colorado), 1995 Revised Edition. See also The Western Theater and Price's Raid, from Wichita State University. Retrieved on 2009-11-30. A unit-by-unit breakdown of this force can be found in the Wikipedia article Westport Union order of battle.
- ↑ Battle of Pilot Knob. Missouri Department of Natural Resources. Retrieved on 2009-11-28.
- ↑ Ft. Davidson. National Park Service CWSAC Battle Summary. Retrieved on 2009-11-29.
- ↑ The Centralia Massacre and Battle. Mid-Missouri Civil War Roundtable. Retrieved on 2009-11-29. See also Davis, pp. 40-41.
- ↑ Davis, pg. 49.
- ↑ Davis, pp. 50-52.
- ↑ Davis, pg. 54, 57.
- ↑ Davis, pg. 54.
- ↑ Davis, pp. 54-55, 56, 59, 87.
- ↑ Glasgow. National Park Service CWSAC Battle Summary. Retrieved on 2009-11-29.
- ↑ Report of Cpt. George A. Hollaway, U.S. Army on the Battle at Glasgow. Retrieved on 2009-11-29.
- ↑ Davis, pg. 56. See also Mueller, D.L., M. Jeff Thompson: Missouri's Swamp Fox of the Confederacy, University of Missouri Press, (Columbia), 2007, pp. 85-86. ISBN 0-8262-1724-9
- ↑ Lexington. National Park Service CWSAC Battle Summary. Retrieved on 2009-11-29. See also Davis, pp. 61-62.
- ↑ Little Blue River (Westport). Retrieved on 2009-11-26. See also Little Blue River. National Park Service CWSAC Battle Summary. Retrieved on 2009-11-29.
- ↑ Davis, pp. 62-54.
- ↑ Independence. National Park Service CWSAC Battle Summary. Retrieved on 11 July 2008. See also Davis, pp. 64, 67-68.
- ↑ Davis, pp. 65-67. See also Byram's Ford. National Park Service CWSAC Battle Summary. Retrieved on 2009-11-29.
- ↑ Davis, pp. 69, 71-72. See also Byram's Ford. National Park Service CWSAC Battle Summary. Retrieved on 2009-11-29.
- ↑ Davis, pp. 69-73. See also Westport. National Park Service CWSAC Battle Summary. Retrieved on 2009-11-29.
- ↑ Marais des Cygnes. National Park Service CWSAC Battle Summary. Retrieved on 2009-11-29.
- ↑ Scott, William Forse. The Story of a Cavalry Regiment: The Career of the Fourth Iowa Veteran Volunteers from Kansas to Georgia (New York: G. P. Putnam's Sons), 1893, pp. 250-301.
- ↑ Davis, pg. 74. See also Mine Creek. National Park Service CWSAC Battle Summary. Retrieved on 2009-11-29.
- ↑ The Battle of Mine Creek. Retrieved on 2009-11-29.
- ↑ Marmiton River. National Park Service CWSAC Battle Summary. Retrieved on 2009-11-29.
- ↑ Newtonia. National Park Service CWSAC Battle Summary. Retrieved on 2009-11-29.
- ↑ Official Report of Maj. Gen. Sterling Price, Washington, Arkansas: December 28, 1864.
- ↑ Davis, pp. 85-86.
- ↑ Davis, pg. 55.
- ↑ Davis, pg. 87.
Further reading
- Lause, Mark A. Price's Lost Campaign: The 1864 Invasion of Missouri (2011) excerpt and text search
- Lause, Mark A. The Collapse of Price's Raid: The Beginning of the End in Civil War Missouri (Columbia: University of Missouri Press, 2014)
- Eicher, David J., The Longest Night: A Military History of the Civil War, Simon & Schuster, 2001, ISBN 0-684-84944-5.
- Foote, Shelby, The Civil War, A Narrative: Red River to Appomattox, Random House, 1974, ISBN 0-394-74913-8.
- Forsyth, Michael J. The Great Missouri Raid: Sterling Price and the Last Major Confederate Campaign in Northern Territory (McFarland, 2015) viii, 282 pp.
- Geiger, Mark W. (2010). Financial Fraud and Guerrilla Violence in Missouri's Civil War, 1861–1865. New Haven, CT: Yale University Press. ISBN 978-0-300-15151-0.
- Sinisi, Kyle S. The Last Hurrah: Sterling Price's Missouri Expedition of 1864 (Lanham: Rowman & Littlefield, 2015.) xviii, 432 pp.
- Smith, Ronald D., Thomas Ewing Jr., Frontier Lawyer and Civil War General. (Columbia: University of Missouri Press, 2008), ISBN 978-0-8262-1806-3.
External links
- Battle of Pilot Knob. From the Missouri Department of Natural Resources. Focuses on Ft. Davidson battle, but includes valuable details on the early portion of Price's Raid.
- Davis, Dale E. Assessing Compound Warfare During Price's Raid. Ft. Leavenworth: U.S. Army Command and General Staff College, 2004. Assessment of Price's Raid and its failure by a U.S. Army officer.
- National Park Service Battle Summaries
- Official Report of Maj. Gen. Sterling Price. Price's official account of his campaign.