Operation Perch
Coordinates: 49°05′N 0°39′W / 49.083°N 0.650°W
| ||||||||||||||||||||||||||||||
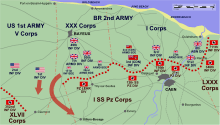
Operation Perch was a British offensive of the Second World War which took place from 7–14 June 1944, during the early stages of the Battle of Normandy. The operation was intended to encircle and seize the German occupied city of Caen, which was a D-Day objective for the British 3rd Infantry Division in the early phases of Operation Overlord. Operation Perch was to begin immediately after the British beach landings with an advance to the south-east of Caen by XXX Corps. Three days after the invasion the city was still in German hands and the operation was amended. The operation was expanded to include I Corps for a pincer attack on Caen.
Next day XXX Corps in the west, pushed south to Tilly-sur-Seulles but then encountered the Panzer-Lehr Division and the village changed hands several times. I Corps began the eastern thrust two days later from the Orne bridgehead, which had been secured in Operation Tonga by elements of the British 6th Airborne Division on D-Day. I Corps was also delayed by constant counter-attacks of the 21st Panzer Division. With mounting casualties and no sign of an imminent German collapse, the offensive east of Caen was suspended on 13 June.
Further west in the U.S. First Army area, American attacks forced a gap in the German defences. The British 7th Armoured Division was diverted from Tilly-sur-Seulles, to advance through the gap in a flanking manoeuvre and force the Panzer-Lehr Division to fall back, to avoid encirclement. On 14 June, after two days of battle including the Battle of Villers-Bocage, the 7th Armoured Division was ordered to withdraw towards Caumont. Plans were made to resume the offensive once the 7th Armoured Division had been reinforced but these were postponed, when a storm in the English Channel seriously delayed the Allied landing of supplies and reinforcements.
The battle is controversial because historians and writers generally agree that failures by British divisional and corps commanders squandered an opportunity to capture Caen. To resist the offensive, the Germans had committed their most powerful armoured reserves, which deprived them of the fighting power for a counter-offensive and forfeited the initiative to the Allies.
Background
Operation Overlord
The Norman town of Caen was a D-Day objective for the British 3rd Infantry Division, which landed on Sword Beach on 6 June 1944.[1] Caen's early capture, while "ambitious", has been described by historian L F Ellis as the most important D-Day objective assigned to Lieutenant-General John T. Crocker's I Corps.[nb 1] Operation Overlord called for Lieutenant-General Dempsey's Second Army to secure the city and then form a front line from Caumont-l'Éventé to the south-east of Caen, acquiring airfields and protecting the left flank of the U.S. First Army while it moved on Cherbourg.[5] Possession of Caen and its surroundings would give the Second Army a suitable staging area for a push south to capture Falaise, which could be used as the pivot for a swing left to advance on Argentan and then towards the Touques River.[6] The terrain between Caen and Vimont was especially promising, being open, dry and conducive to swift offensive operations—the Allies greatly outnumbered the Germans in tanks and mobile units, and transforming the battle into a more fluid engagement would be to their advantage.[7]
Operation Perch
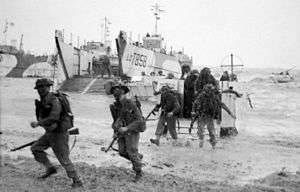
Operation Perch was intended to create the threat of a British breakout to the south-east of Caen by XXX Corps. The 50th (Northumbrian) Infantry Division landed on Gold Beach on 6 June and was rapidly to move inland and capture Bayeux and the road to Tilly-sur-Seulles.[4][8] The 7th Armoured Division and the 8th Armoured Brigade would then take over from the 50th Northumbrian Division and advance from Tilly-sur-Seulles to Mont Pinçon.[4][9] XXX Corps landed on Gold Beach at 07:30 on 6 June, cleared seven exits off the beach and advanced 5 miles (8.0 km) inland. German resistance at Le Hamel delayed the division and prevented the achievement of all of the D-Day objectives before dark.[10] Patrols had reached Bayeux and made contact with the 3rd Canadian Infantry Division, which had landed on Juno Beach to the east.[11][12] The 47 Royal Marine Commando advanced eastwards along the coast, to link up with the American forces moving inland from Omaha Beach but fell short of Port-en-Bessin-Huppain by 3 miles (4.8 km).[10]
During the afternoon, the German LXXXIV Corps ordered its reserve, Kampfgruppe Meyer to strike into the flank of the 50th Division north of Bayeux. While advancing to the attack, a battalion was ordered towards Omaha beach, weakening the counter-attack, which was a costly failure.[13] On 7 June, the bulk of the 7th Armoured Division landed on schedule and XXX Corps secured its remaining D-Day objectives, including Bayeux and Port-en-Bessin-Huppain.[8][14] The LXXXIV Corps sent its last reserve unit, Mobile Brigade 30, towards Gold Beach to repeat the counter-attack, which also failed, and the brigade was destroyed north of Bayeux. The survivors of the two counter-attacks were driven into a pocket north of the city by the Anglo-American advance, although the Americans did not discover that this had happened.[15] From Sword Beach, the 3rd Infantry Division of I Corps had advanced towards Caen but diverted units to capture German positions along the 9.3-mile (15.0 km) route, which reduced the strength of the infantry attack and the 27th Armoured Brigade was delayed by congestion in the beachhead. The division was stopped short of Caen by the 21st Panzer Division.[16]
Operation Wild Oats

On 9 June the Allied ground forces commander, General Bernard Montgomery (Monty), met Lieutenant-Generals Miles Dempsey and Omar Bradley, the British Second and First U.S. army commanders and it was decided that Caen would be taken by a pincer movement, Operation Wild Oats.[17] From the east the 51st (Highland) Infantry Division and the 4th Armoured Brigade of I Corps, would cross east into the 6th Airborne Division bridgehead over the Orne and attack towards Cagny, 6 miles (9.7 km) to the south-east of Caen. XXX Corps to the west would send the 7th Armoured Division across the Odon River to take Évrecy and Hill 112.[18][19] The 1st Airborne Division would then drop between the pincers but Air Chief Marshal Sir Trafford Leigh-Mallory, the Allied air commander rejected the airborne plan, which was dropped.[8][18]
Prelude
German defensive preparations
Late on 7 June, the I SS-Panzer Corps was transferred from the command of the Seventh Army to Panzer Group West.[20] Field Marshal Gerd von Rundstedt the supreme commander in the west (OB West), ordered Panzergruppe West under General Geyr von Schweppenburg to plan a counter-attack for 10 June but this was cancelled by Field Marshal Erwin Rommel the commander of Army Group B, due to lack of troops.[21] German units were rushed from staging areas to Normandy to contain the invasion. The I SS-Panzer Corps consisted of the Panzer-Lehr-Division which was one of the strongest divisions in the German army, the "fanatical teenagers" of the 12th SS-Panzer Division Hitlerjugend and the 21st Panzer Division.[22][nb 2]
The leading elements of the Panzer-Lehr Division arrived during the night of 9 June at the Tilly-sur-Seulles, having lost up to 200 vehicles to aerial attacks during its 90-mile (140 km) drive from Chartres, having been diverted from I Corps because of the success of the 50th Northumbrian Division.[24][25][26][nb 3] Parts of the 12th SS-Panzer Division, the 21st Panzer Division and the remains of the 716th Static Infantry Division were moved to Caen, facing I Corps.[23] Several attacks were launched against the Anglo-Canadian beachhead north of Caen.[23][30] In the early hours of 9 June the survivors of Kampfgruppe Meyer and Mobile Brigade 30 broke out of the pocket north of Bayeux.[15] Later in the day XXX Corps established a land link to the Americans while the 50th (Northumbrian) Infantry Division reached the northeast outskirts of Tilly-sur-Seulles and first encountered the tanks of the Panzer-Lehr Division.[31] During the evening Panzer-Lehr and the 12th SS-Panzer Division counter-attacked and overran a British infantry company before being repulsed the following morning.[32]
Battle
XXX Corps
On 10 June the 7th Armoured Division took over parts of 50th Northumbrian Division front and the 56th Infantry Brigade was detached to the 7th Armoured Division.[33] By nightfall the division had reached the north-western fringe of Tilly-sur-Seulles and next day elements entered the village and secured the central crossroads. The Panzer-Lehr Division made several counter-attacks, which forced a British withdrawal.[31] Further attacks by the 50th (Northumbrian) Division bogged down in the bocage, unable to overcome the resistance of the Panzer-Lehr Division.[34] Army Group B planned to begin a relief from 11 June of the armoured divisions facing the Second Army, with infantry divisions, to concentrate the tanks in the Carentan area and avert the danger to Cherbourg. Attacks by the Second Army and Adolf Hitler’s opposition forced Rommel to cancel the move; next day Rommel was ordered by Hitler not to retreat and instead roll up the Allied beachhead, from east to west starting with the Orne bridgehead.[35]
I Corps
While XXX Corps attacked Tilly-sur-Seulles, the 51st (Highland) Infantry Division and the 4th Armoured Brigade were delayed and their attack was postponed until 12 June.[18] On 10 June German tanks and infantry made several attacks on the 6th Airborne Division in the Orne bridgehead, forestalling the British attack. The German attacks were repulsed with the help of naval gunfire and counter-attacked. A captured German officer remarked that his "battalion had been virtually wiped out" during twelve hours of fighting.[36] In the evening German attack on Ranville was repulsed with many German casualties. The vanguard of the 51st Highland Division arrived during the evening and attacked Bréville at dawn, which was also a costly failure; other elements of the division quickly secured Touffreville.[36][37]
During the afternoon of the 11 June, The Queen's Own Rifles of Canada and 1st Hussars attacked Le Mesnil-Patry to assist the advance of the 69th Brigade of the 50th Northumbrian Division but the Battle of Le Mesnil-Patry was a costly failure.[38] On 12 June further German attacks were launched from the Bréville area against the Orne bridgehead. Fighting lasted all day and casualties were severe on both sides, but during the evening the Germans pulled back. To close the gap in the British perimeter the decision was made to secure Bréville. A successful attack was launched by the 12th Battalion the Parachute Regiment that by midnight had captured the village, but of the 160 men that began the attack 141 casualties were sustained.[21][39] However, 51st Highland was facing stiff resistance from the 21st Panzer Division in its efforts to push south to Saint Honorine and with the Highlanders unable to make progress, the offensive east of Caen was called off on 13 June.[37]
Caumont Gap
Although the attempt to envelop Caen had been repulsed, on the right flank of XXX Corps, at the junction of the British Second and First U.S. armies, the possibility for a flanking manoeuvre had developed. Since D-Day the British and Americans in the area had destroyed five German battle groups, including the reserves of LXXXIV Corps, leaving only remnants of the 352nd Infantry Division in the Trévières–Agy sector.[15][40] The 352nd Division had been in action since its defence of Omaha on 6 June and had received few replacements.[9] The 1st U.S. Infantry Division and the 2nd U.S. Infantry Division had forced the collapse of the left flank of the 352nd Division.[40] On the night of 9/10 June, the division received permission to retire to Saint-Lô. The withdrawal created a 7.5-mile (12.1 km) gap in the German lines near Caumont-l'Éventé.[15][41][42] Only the reconnaissance battalion of the 17th SS-Panzergrenadier Division, which had been detached when the division was moved west ready for a counter-offensive at Carentan, remained in the area.[43]
The Germans planned to use the 2nd Panzer Division to plug the gap but on 10 June, the bulk of the 2nd Panzer Division was strung out between Amiens and Alençon and not expected to arrive in strength for another three days.[nb 4] General Hans Freiherr von Funck of XLVII Panzer Corps rushed the divisional reconnaissance battalion to Caumont, with orders to hold the high ground.[43] The I SS-Panzer Corps commander Sepp Dietrich, ordered his only reserve Schwere SS-Panzer-Abteilung 101, to move behind the Panzer-Lehr and 12th SS-Panzer divisions, to cover the open left flank.[46] The 2nd Company, schwere SS-Panzer Battalion 101, under the command of Michael Wittmann and with five operational Tiger tanks, was ordered to a position south of Point 213 on the Villers-Bocage ridge and arrived on 12 June, after a five-day drive from Beauvais.[47][47][48][49]
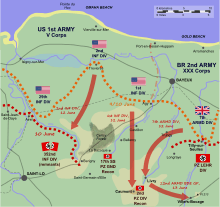
On 12 June, Dempsey met with Lieutenant-General Gerard Bucknall, commander of XXX Corps and Major-General George Erskine, commander of the 7th Armoured Division and ordered Erskine to disengage his armour from the fighting around Tilly-sur-Seulles.[50] The division was to exploit the gap to seize the Villers-Bocage and advance behind the left flank of the Panzer-Lehr Division to a ridge about 1.6 miles (2.6 km) east of the town.[51][52][53] It was believed that the appearance of British tanks behind the Panzer-Lehr Division on high ground astride the German supply-lines would compel the Panzer-Lehr Division to withdraw or be trapped.[54][55][56] To support of the 7th Armoured Division flanking move, the 50th (Northumbrian) Infantry Division was to continue the attack against the Panzer-Lehr Division around Tilly-sur-Seulles.[57] The V U.S. Corps would push forward at the same time, the 1st U.S. Infantry Division to capture Caumont and the high ground nearby and the 2nd U.S. Infantry Division towards Saint-Lô.[58]
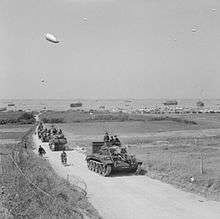
The 7th Armoured Division was slow to redeploy and spent the morning of 12 June continuing the attack on Tilly-sur-Seulles, according to its original orders. At 12:00 Erskine ordered Brigadier Hinde, commander of the 22nd Armoured Brigade to move through the gap at once.[56] With the 131st Infantry Brigade ready for action, the 56th Infantry Brigade was returned to the control of the 50th Northumbrian Division.[55][59] The 7th Armoured Division armoured reconnaissance regiment, the 8th King's Royal Irish Hussars began to reconnoitre the route and the rest of the division departed from Trungy at around 16:00.[59][60] Four hours later, the main body approached Livry after an unopposed advance of 12-mile (19 km), the last 6 miles (9.7 km) of which were though German-held territory.[52][61]
North of Livry, the leading 8th Hussar Cromwell tanks were knocked out by an anti-tank gun of the Panzer Lehr Division Escort Company; infantry and tanks were brought forward and cleared the position after two hours.[59][61][62][nb 5] On reaching the vicinity of La Mulotiere, Hinde halted for the night to disguise the objective as the 8th Hussar |Cromwells and 11th (Prince Albert's Own) Hussar armoured car regiment, reconnoitred the flanks.[60][64] The 11th Hussars found no resistance on the right and linked with the 1st U.S. Infantry Division near Caumont and on the left flank, the 8th Hussars located elements of the Panzer-Lehr Division just under 2 miles (3.2 km) away.[64][nb 6]
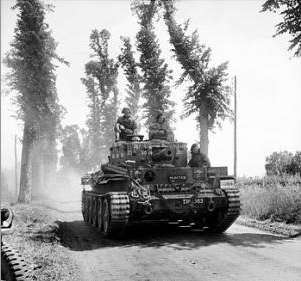
Battle of Villers-Bocage
The British advance resumed at 05:30 and at about 08:30, the vanguard of the 22nd Armoured Brigade group entered the west end of Villers-Bocage.[59][65][nb 7] A squadron of the 4th County of London Yeomanry (Sharpshooters), moved through the town and occupied Point 213, an area of high ground to the east on the Caen road. The regimental headquarters and a company of infantry occupied the eastern end of the town along the main road.[65]
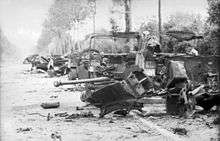
At about 09:00 the foremost British tanks were engaged by 3–5 Tiger tanks of the 2nd Company, schwere SS-Panzer Battalion 101.[67][68][69][70][nb 8] A Tiger under the command of Michael Wittmann, entered Villers-Bocage and destroyed several tanks of the 4th County of London Yeomanry regimental headquarters and reconnaissance troop, then attacked British tanks entering the town from the west, before attempting to withdraw.[71][72] The Tiger was immobilised by British return fire and was abandoned by the crew who fled towards Château Orbois, to report to the Panzer-Lehr Division.[73][74] In fewer than 15 minutes, 13–14 tanks, two anti-tank guns and 13–15 transport vehicles had been destroyed, many by Wittmann.[74][75]
During the rest of the morning, an infantry battalion from the 22nd Armoured Brigade group, took up defensive positions in the town; the troops at Point 213 had been off and a force was assembled to extricate them. The relief force was unable to advance on the ridge and when more German forces arrived between 11:00–13:00, the trapped squadron surrendered.[76][77][78][79] More German troops had arrived and engaged the 22nd Armoured Brigade group along the road back to Livry.[76]
.jpg)
Tanks of the Panzer-Lehr Division arrived to seal off the north and west exits from Villers-Bocage but were ambushed by British anti-tank guns and several were disabled, before the British position was silenced and schwere SS-Panzer Battalion 101 was ambushed in the town centre.[80][81] Several Tigers and a Panzer IV were knocked out by anti-tank guns, a Sherman Firefly and British infantry.[82] The disabled tanks were later set on fire and British and German infantry clashed throughout the afternoon. The British positions were bombarded by heavy artillery and several German attacks were repulsed by British field artillery firing over open sights.[83][84] A British company was overrun, a platoon taken prisoner and the battalion headquarters came under fire.[85] Hinde decided that the brigade group should withdraw until morning to Point 174, an area of high ground to the west of Villers-Bocage near Amayé-sur-Seulles.[85] At 20:00 the withdrawal began under cover of an artillery bombardment and was accomplished largely unmolested.[84]
14 June

On the morning of 14 June, Montgomery abandoned the pincer attack on Caen, because he lacked "sufficient strength to act offensively on both flanks" and ordered XXX Corps to continue in a "concentrated single blow" while in the I Corps area to the east, the 51st (Highland) Division was "piped down".[87] The 50th (Northumbrian) Division had continued the attack southwards, to pin down German forces and on 14 June, supported by its entire divisional artillery and the Royal Air Force, the division attacked with two brigades towards la Senaudière, la Belle Epine, Lingèvres and Verrières.[57][88][89][90] If the attack succeeded, it would be exploited to capture Hottot-les-Bagues.[88] A reconnaissance-in-force was conducted the evening before and the panzergrenadiers of the Panzer-Lehr Division, inflicted many casualties. Losses in the Panzer-Lehr Division are unknown, although one tank was destroyed.[91]
The attack began at 10:15 the next morning, when the 151st (Durham) Infantry Brigade and tanks of the 4th/7th Royal Dragoon Guards, advanced towards Lingèvres and Verrières.[92] The German defenders held their fire until the British were less than 150 yards (140 m) distant and the battle lasted for five hours, until the 6th Durham Light Infantry (6th DLI) with a huge amount of artillery support, captured the German positions. Two companies advanced to Verrières which was empty but further advances were checked by infantry and tanks.[93] The 9th DLI were also caught in German machine-gun fire and needed their reserve companies to break through the German front line.[94] At about 13:30, the battalion captured Lingèvres and moved anti-tank guns into the village, although most of these were put out of action by the first German counter-attack.[90][95][96]
Two Panthers were spotted approaching the village by Sergeant Wilfred Harris, commander of a Sherman Firefly and engaged at 400 yards (370 m), destroying the first and disabling the second Panther.[97][98] While Harris moved, a tank-hunting party led by Major John Mogg the acting battalion commander, finished off the damaged Panther.[97] Other tank-hunting parties drove off a Panther, a British M4 Sherman was destroyed and a third Panther was knocked out by a Sherman.[97][99] Three more Panthers moved towards the village and Harris destroyed the lead vehicle outside the village and the other two inside, one in the centre of Lingèvres.[100] The 231st Infantry Brigade reached its objectives by nightfall and linked with the 151st Infantry Brigade.[90] A 6th DLI officer, said that the attack was the best by the battalion during the campaign; nine German tanks were knocked out but the division had been unable to break through the Panzer-Lehr defences and the DLI had c. 353 casualties.[89][90][101]
Battle of the Island

On 14 June, with the withdrawal from Villers-Bocage complete, the brigade group formed a "brigade box" for all-round defence near Hill 174.[nb 9] The battle became known as "The Battle of the island", or "Island Position" as named in the 22nd Armoured Brigade after action report.[108][109][110] Other names given to the action are "The Battle of the Brigade Box" and "The Battle of Amayé-sur-Seulles".[111][112] Forty and Taylor wrote that the box was less than 2 square kilometres (0.77 sq mi) in area.[111][113]
The Panzer-Lehr Division had manoeuvred to defend against the 50th (Northumbrian) Infantry Division and to counter-attack the 7th Armoured Division penetration, with the support of the 1st Company, schwere SS-Panzer Battalion 101.[111][114] The 2nd Panzer Division reconnaissance battalion and other small infantry units also faced the brigade box but the divisional panzer regiment had not arrived.[115] The British 131st Infantry Brigade, an infantry battalion and an armoured regiment, had moved up to Livry.[111] During the morning, the 131st Brigade kept the road from the brigade box to the Livry–Briquessard area open and Typhoon fighter bombers attacked German positions near the box.[116]
German infantry were spotted advancing towards the brigade box and bombarded by heavy artillery, which repulsed the attack but around 09:00, more infantry attacked the box and came too close for artillery fire. Hand-to-hand fighting began and a British platoon was overrun, before a tank-infantry counter-attack repulsed the German infantry and restored the position. The Germans resorted to harassing fire, sniping, mortar bombardments and heavy artillery fire.[111] After a long artillery bombardment, simultaneous attacks by tanks and infantry were made at 19:00, from the north and south, which broke into the box and closed on the brigade headquarters, before being driven back around 22:30.[102][102][117][118]
The 7th Armoured Division command was confident that the box was secure but the failure of the 50th Northumbrian Division to break through the Panzer-Lehr Division and reach the 7th Armoured Division, led to orders for the brigade group to retire to straighten the front line and Operation Aniseed began just after midnight.[102][111][119] Decoy raids by Bomber Command on Aunay-sur-Odon and Evrecy, caused 29 casualties, destroyed a Tiger tank and damaged three more.[120][121] Artillery harassing fire was maintained north and south of the withdrawal route but the Germans did little to intervene.[120] The Germans had lost 700–800 casualties and 8–20 tanks, including several Tigers.[102][117][122] British casualties were light and only three tanks were lost.[102] Reynolds called the German casualty figures "exaggerated" and in his report, Hinde wrote "It is questionable whether the expenditure of artillery and small arms ammunition was justified by the scale of the enemy's efforts".[114]
Aftermath
Analysis
The failure of the operation led Dempsey to write that there was
no chance now of a snap operation with airborne troops either to seize Caen or to deepen the bridgehead on XXX Corps front. It is clear now that Caen can be taken only by set-piece assault and we do not have the men or ammunition for that at this time.[123]
After the war he wrote that the attack by the 7th Armoured Division should have succeeded and that his doubts about Bucknall and Erskine increased and that they might have to go. Dempsey called the handling of the battle a disgrace and said that the decision to withdraw [from Villers-Bocage] was made by the corps commander and Erskine."[124] D'Este called Dempsey's comments "excessively harsh" but historians generally support them, suggesting that a great opportunity to swiftly capture Caen had been squandered by Bucknall.[121][125][126][127] Buckley wrote that Bucknall was not ready to support the attack once problems developed and that Erskine was not capable of mastering the situation.[128] Ellis wrote that the result was "disappointing" but that the fighting power of the Panzer-Lehr Division and with the unexpected arrival of the 2nd Panzer Division, the 7th Armoured Division "could hardly have achieved full success".[129] Reynolds wrote that the 2nd Panzer Division tanks were nowhere near Villers-Bocage.[115]
Meyer wrote that Operation Perch failed because the 50th Northumbrian Division and its armoured brigade could not overcome the Panzer-Lehr-Division, the 51st (Highland) Infantry Division attack in the east of the bridgehead failed and because of the rapid counter-attack by advanced elements of the 2nd Panzer Division.[130] The allocation of insufficient infantry to the offensive has been criticised, Reynolds wrote that two infantry battalions and most of the 1st Battalion the Rifle Brigade of the 7th Armoured Division were available on 13 June, as were three infantry brigades and that Bucknall was at fault for failing to concentrate his forces.[131] D'Este wrote the same, although Bucknall had defended his decision claiming "49 [Division] ... [had] no recent battle experience and it was important to launch them nicely into their first fighting in a properly coordinated battle, and not bundle them helter-skelter into hot armoured scrapping like that around V[illers]-B[ocage] and Amaye."[132] Buckley wrote that the operation was a failure of command.[128] Copp wrote that Dempsey continued to underestimate the German defence of ground and Melvin wrote that Dempsey and the Second Army handled subordinate formations poorly, by not giving subordinates definite tasks, clear intentions and allowing discretion in the implementation of orders.[133]
Wilmot called Operation Perch a strategic success
By the premature commitment of his armour, Rommel had delayed the British advance, but in the process he had played into Montgomery's hands for, once the panzer divisions were locked into battle with Second Army, they could not be used for their proper offensive task."[123]
and Badsey wrote that Montgomery’s message to Bradley, "Caen is the key to Cherbourg" was true. The risk of a breakout past Caen, immobilised the German armoured divisions at the east end of front, unable mount a counter-offensive against the First U.S. Army. Hitler’s interference saved Rommel's military reputation because the unsuitability of the Cotentin for armoured operations, the difficulties involved in moving and supplying deployment in the area and the strength of the Anglo-Canadian force, would have led to a more rapid and complete defeat of the German army in Normandy. Hitler’s order of 12 June made the rest of the campaign a battle of attrition.[35]
Casualties
By the end of June the Panzer-Lehr Division had suffered 2,972 casualties and reported the loss of 51 tanks and assault guns, 82 halftracks and 294 other vehicles.[nb 10] By 16 June, the 12th SS-Panzer Division had reported 1,417 casualties and by 26 June the division had lost 41 tanks.[nb 11] By 16 June, the 21st Panzer Division suffered 1,864 casualties. Before the invasion the division had 112 tanks and by 16 June, the division reported 85 operational tanks.[135] During Operation Perch schwere SS-Panzer Abteiling 101 suffered 27 casualties and by 16 June the battalion had only 15 operational tanks, nine tanks having been destroyed and 21 damaged.[136][137] By the end of June the 7th Armoured Division had suffered 1,149 casualties and lost at least 38 tanks during Operation Perch.[107][138][139][140] By the end of the month 50th (Northumbrian) Infantry Division, which was nearly twice the size of a normal infantry division, had suffered 4,476 casualties.[138]
Battle honours
The British and Commonwealth system of battle honours recognised participation in the expansion of the bridgehead during the period of Operation Perch in 1956, 1957 and in 1958. One unit was awarded the honour Port En Bessin, one formation the honour Sully, four units the honour Breville, and 11 regiments the honour Villers-Bocage. Additionally for participating in the expansion of the bridgehead between 14–19 June ten units were awarded the honour Tilly Sur Seulles.[141]
Subsequent operations

The battle between 50th Northumbrian Division and Panzer-Lehr Division continued for several days and by 15 June, XXX Corps claimed to have destroyed at least 70 German tanks.[143][144] On 18 June the British entered Tilly-sur-Seulles again and consolidated the village next day against light opposition; it had changed hands 23 times.[143][145] An attack was launched by the British towards Hottot-les-Bagues against the Panzer-Lehr Division and gained a foothold in the village, until forced out by German counter-attacks by tanks and infantry. The British retook the village and then withdrew during the night.[146] The 7th Armoured Division was withdrawn to be reinforced by the 33rd Armoured Brigade which was landing in the beachhead.[89][147] The reinforced division was intended to attack again but on 19 June a storm descended upon the English Channel, which delayed the landing of supplies and further British attacks were postponed.[148]
Footnotes
- ↑ "The quick capture of that key city [Caen] and the neighbourhood of Carpiquet was the most ambitious, the most difficult and the most important task of Lieutenant-General J.T. Crocker's I Corps".[2] Wilmot states "The objectives given to Crocker's seaborne divisions were decidedly ambitious, since his troops were to land last, on the most exposed beaches, with the farthest to go, against what was potentially the greatest opposition."[3] However Lieutenant-General Miles C. Dempsey, British Second Army commander, always considered the possibility that the immediate seizure of Caen might fail.[4]
- ↑ The division contained 237 tanks and assault guns as well as 658 half-tracks, double the number of other panzer divisions.[23]
- ↑ Hastings, quoting a post-war interview of Bayerlein, the division's commander, gives losses of 130 trucks, five tanks, and 84 self-propelled guns and other vehicles, of an establishment of over 3,000 vehicles.[27] Zetterling called these losses exaggerated, the Panzer-Lehr records show the loss of only 92 vehicles during the whole of June 1944.[28] Steinhardt wrote that Bayerlein's numbers were "probably in excess of reality".[29]
- ↑ Reynolds wrote that the 3rd Parachute Division was sent to close the gap but Harrison wrote that the 2nd Parachute Corps was diverted to the Carentan sector.[44][45]
- ↑ Taylor wrote that the lead tank was destroyed and Forty wrote that two tanks were lost.[61][63]
- ↑ The town was occupied by two companies of the 2nd Panzer Division reconnaissance battalion. The 1st U.S. Infantry Division took part of the town on 12 June and the remainder the following day.[58]
- ↑ The Brigade group consisted of the 1st Battalion, The Rifle Brigade, 1/5th Battalion, Queen's Royal Regiment (West Surrey), 1/7th Battalion, Queen's Royal Regiment (West Surrey), 4th County of London Yeomanry (Sharpshooters), 5th Royal Tank Regiment, 8th King's Royal Irish Hussars, 11th Hussars (Prince Albert's Own) and the 260th Anti-Tank Battery[55][66][66]
- ↑ Taylor wrote that four Tigers engaged the British in the ambush, three tanks to the south of the road and one to the north.[67]
- ↑ D'Este wrote that the box was between Amayé-sur-Seulles and Tracy-Bocage, around Hill 174.[104] Taylor put the brigade tactical headquarters on Hill 174 and included a map showing the brigade mostly to the south of Amayé-sur-Seulles, as did Marie.[105][106] Forty put the box north of Tracy-Bocage, near St-Germain, based on a report by the 22nd Armoured Brigade Group commanding officer, which put the position east of Amayé-sur-Seulles, including St-Germain.[107]
- ↑ Panzerlehr casualties comprised 490 killed in action, 1,809 wounded and 673 missing. Tank and assault guns included the loss of 24 Panzer IVs; 23 Panthers had been knocked out.[28]
- ↑ 12th SS-Panzer Division casualties comprised 405 killed in action, 847 wounded and 165 missing. Tank losses consisted of 26 Panzer IVs and 15 Panthers.[134]
Citations
- ↑ Williams, p. 24
- ↑ Ellis, p. 171
- ↑ Wilmot, p. 273
- 1 2 3 Buckley (2004), p. 23
- ↑ Ellis, p. 78
- ↑ Ellis, p. 81
- ↑ Van-Der-Vat, p. 146
- 1 2 3 Forty, p. 36
- 1 2 Taylor, p. 9
- 1 2 Gill, p. 22
- ↑ Clay, p. 247
- ↑ Stacey, p. 114
- ↑ Buckley (2007), pp. 58–59
- ↑ Randell, p. 11
- 1 2 3 4 Buckley (2006), p. 59
- ↑ Wilmot, pp. 284–286
- ↑ Stacey, p. 142
- 1 2 3 Ellis, p. 247
- ↑ Trew, p. 22
- ↑ Reynolds, p. 71
- 1 2 Hastings, p. 154
- ↑ Forty, pp. 38–39
- 1 2 3 Forty, p. 29
- ↑ Forty, p. 39
- ↑ Reynolds, p. 73
- ↑ Buckley (2007), p.60
- ↑ Hastings, p. 151
- 1 2 Zetterling, Panzer-Lehr Division
- ↑ Steinhardt, p. 63
- ↑ Reynolds, pp. 63–71
- 1 2 Gill, p. 24
- ↑ Clay, p. 254
- ↑ Clay, p. 256
- ↑ Forty p. 37
- 1 2 Buckley (2007), p. 61
- 1 2 Ellis, p. 248
- 1 2 Ellis, p. 250
- ↑ Stacey, p. 140
- ↑ Ellis, p. 249
- 1 2 Harrison, p. 370
- ↑ Harrison, p. 369
- ↑ Weigley, pp. 109–110
- 1 2 Harrison, p. 373
- ↑ Reynolds (2001), p. 96
- ↑ Harrison, p. 371
- ↑ Reynold, pp. 99–100
- 1 2 Forty, p. 57
- ↑ Reynolds, p. 100
- ↑ Reynolds, pp. 80, 99
- ↑ Hart, p. 134
- ↑ Buckley (2004), p. 24
- 1 2 Wilmot, p. 308
- ↑ Forty, p. 47
- ↑ Clay, p. 257
- 1 2 3 Ellis, p. 254
- 1 2 Taylor, p. 10
- 1 2 Copp, p. 76
- 1 2 Harrison, p. 374
- 1 2 3 4 Forty, p. 50
- 1 2 Fortin, p. 13
- 1 2 3 Taylor, p. 11
- ↑ Marie, p. 53
- ↑ Forty, p. 126
- 1 2 Taylor, p. 12
- 1 2 Taylor, p. 16
- 1 2 Forty, p. 51
- 1 2 Taylor, p. 19
- ↑ Forty, pp. 57, 58, 66
- ↑ Buckley (2004), p. 25
- ↑ Reynolds, p. 103
- ↑ Taylor, pp. 23–33
- ↑ Forty, pp. 63–64
- ↑ Forty, p. 65
- 1 2 Taylor, p. 33
- ↑ Forty, p. 66
- 1 2 Taylor, p. 43
- ↑ Forty, pp. 73–74
- ↑ Taylor, p. 56
- ↑ Reynolds, p. 104
- ↑ Forty, p. 74
- ↑ Taylor, p. 59
- ↑ Taylor, pp. 65, 67
- ↑ Taylor, p. 69
- 1 2 Taylor, p. 76
- 1 2 Forty, p. 76
- ↑ Forty, pp. 169, 174–175
- ↑ Stacey, p. 143
- 1 2 Forty, p. 90
- 1 2 3 Ellis, p. 255
- 1 2 3 4 Clay, p. 262
- ↑ Forty, pp. 163–164
- ↑ Forty, pp. 91–92
- ↑ Clay, pp. 261–262
- ↑ Forty p. 91
- ↑ Forty, p. 92
- ↑ Forty, p. 168
- 1 2 3 Forty, p. 172
- ↑ Forty, p. 169
- ↑ Forty, pp. 172–173
- ↑ Forty, pp. 174–176
- ↑ Forty, p. 94
- 1 2 3 4 5 6 Taylor, p. 78
- ↑ Forty, p. 83
- ↑ D'Este, p. 184
- ↑ Taylor, pp. 76–77
- ↑ Marie, p. 121
- 1 2 Forty, p. 78
- ↑ Lindsay, p. 40
- ↑ Delaforce, p. 39
- ↑ Forty, p. 77
- 1 2 3 4 5 6 Taylor, p. 77
- ↑ Marie, p. 120
- ↑ Forty, p. 159
- 1 2 Reynolds, p. 110
- 1 2 Reynolds, p. 109
- ↑ Forty, p. 82
- 1 2 Forty, p. 85
- ↑ Forty, p. 84
- ↑ Forty, p. 160
- 1 2 Forty, pp. 86–87
- 1 2 Reynolds, p. 107
- ↑ Forty, p. 87
- 1 2 Wilmot, p. 311
- ↑ D'Este, p. 196
- ↑ D'Este, p. 197
- ↑ D'Este, pp. 197–198
- ↑ Wilmot, pp. 310–311
- 1 2 Buckley (2004), p. 27
- ↑ Ellis, p. 256
- ↑ Meyer, pp. 236–237
- ↑ Reynolds, p. 108
- ↑ D'Este, p. 191
- ↑ Buckley (2006), p. 29
- ↑ Zetterling, 12. SS-Panzer Division "Hitlerjugend"
- ↑ Zetterling, 21. Panzer Division
- ↑ Meyer, p. 237
- ↑ Zetterling, 101. SS-Pz.Abt.
- 1 2 Forty, p. 100
- ↑ Lindsay, pp. 32–34
- ↑ Marie,p. 53
- ↑ Rodger, pp. 241–242
- ↑ Clay, p. 263
- 1 2 Clay, pp. 262–263
- ↑ Gill, p. 27
- ↑ Forty, p. 182
- ↑ Clay, p. 264
- ↑ Fortin, p. 69
- ↑ Williams, p. 114
References
- Buckley, J. (2006) [2004]. British Armour in the Normandy Campaign 1944. Abingdon: Taylor & Francis. ISBN 0-415-40773-7. OCLC 154699922.
- Buckley, John, ed. (2007) [2006]. The Normandy Campaign 1944: Sixty Years On. Routledge. ISBN 978-0-415-44942-7.
- Clay, Major E. W. (1950). The path of the 50th: The story of the 50th (Northumbrian) Division in the Second World War. Aldershot: Gale and Polden. OCLC 12049041.
- Copp, T. (2004) [2003]. Fields of Fire: The Canadians in Normandy. Toronto: University of Toronto Press. ISBN 0-8020-3780-1. OCLC 56329119.
- Delaforce, P. (2003) [1999]. Churchill's Desert Rats: From Normandy to Berlin with the 7th Armoured Division. Sutton Publishing. ISBN 0-7509-3198-1.
- D'Este, C. (2004) [1983]. Decision in Normandy: The Real Story of Montgomery and the Allied Campaign. London: Penguin. ISBN 0-14-101761-9. OCLC 44772546.
- Ellis, Major L. F.; with Allen R.N., Captain G. R. G.; Warhurst, Lieutenant-Colonel A. E. & Robb, Air Chief-Marshal Sir James (2004) [1st. pub. HMSO, 1962]. Butler, J. R. M., ed. Victory in the West: The Battle of Normandy. History of the Second World War United Kingdom Military Series. I. Uckfield, East Sussex: Naval & Military Press. ISBN 1-84574-058-0. OCLC 276814706.
- Fortin, L. (2004). British Tanks In Normandy. Histoire & Collections. ISBN 2-915239-33-9.
- Forty, G. (2004). Villers Bocage. Battle Zone Normandy. Sutton Publishing. ISBN 0-7509-3012-8.
- Gill, R.; Groves, J. (2006) [1946]. Club Route in Europe: The History of 30 Corps from D-Day to May 1945. MLRS Books. ISBN 978-1-905696-24-6.
- Hart, S. A. (2007) [2000]. Colossal Cracks: Montgomery's 21st Army Group in Northwest Europe, 1944–45. Mechanicsburg: Stackpole Books. ISBN 0-8117-3383-1. OCLC 70698935.
- Harrison, G. A. (1951). Cross-Channel Attack (PDF). United States Army in World War II: The European Theater of Operations. Washington, DC: Office of the Chief of Military History, Department of the Army. OCLC 606012173. Retrieved 16 June 2014.
- Hastings, M. (1999) [1984]. Overlord: D-Day and the Battle for Normandy 1944. Pan Grand Strategy. Pan Books. ISBN 0-330-39012-0.
- Lindsay, Captain M.; Johnson, Captain M. E. (2005) [1945]. History of 7th Armoured Division: June 1943 – July 1945. MLRS Books. ISBN 978-1-84791-219-0.
- Marie, H. (2004) [1993]. Villers-Bocage: Normandy 1944. Bayeux: Editions Heimdal; Bilingual edition. ISBN 978-2-84048-173-7.
- Meyer, H. (2005) [1994]. The 12th SS: The History of the Hitler Youth Panzer Division. I. Mechanicsburg: Stackpole Books. ISBN 978-0-8117-3198-0.
- Randel, R. A., Major P. B. (2006) [1945]. A short history of 30 Corps in the European Campaign 1944–1945. Crawford, W. H. (illustrator); Wilson, Major D. B. (editor). MLRS Books. ISBN 978-1-905973-69-9.
- Reynolds, M. (2001) [1997]. Steel Inferno: I SS Panzer Corps in Normandy. Da Capo Press. ISBN 1-885119-44-5.
- Rodger, A. (2003). Battle Honours of the British Empire and Commonwealth Land Forces. Marlborough: The Crowood Press. ISBN 1-86126-637-5.
- Stacey, Colonel C. P.; Bond, Major C. C. J. (1960). The Victory Campaign: The operations in North-West Europe 1944–1945 (PDF). Official History of the Canadian Army in the Second World War. III. Ottawa: The Queen's Printer and Controller of Stationery. OCLC 606015967. Retrieved 2014-05-19.
- Steinhardt, F. P., ed. (2008). Panzer Lehr Division 1944–45. Helion WWII German Military Studies. I. Solihull, West Midlands: Helion. ISBN 978-1-874622-28-4. OCLC 60514050.
- Taylor, D. (1999). Villers-Bocage Through the Lens. Old Harlow: Battle of Britain International. ISBN 1-870067-07-X. OCLC 43719285.
- Trew, S.; Badsey, S. (2004). Battle for Caen. Battle Zone Normandy. Stroud: Sutton. ISBN 0-7509-3010-1. OCLC 56759608.
- Vat, D. van der (2003). D-Day; The Greatest Invasion, A People's History. Toronto: Madison Press. ISBN 1-55192-586-9. OCLC 51290297.
- Williams, A. (2004). D-Day to Berlin. London: Hodder & Stoughton. ISBN 0-340-83397-1. OCLC 60416729.
- Weigley, R. F. (1981). Eisenhower's Lieutenants: The Campaigns of France and Germany, 1944–1945. Sidgwick & Jackson. ISBN 0-283-98801-0.
- Wilmot, C.; C. D. McDevitt (1997) [1952]. The Struggle For Europe. Ware, Hertfordshire: Wordsworth Editions. ISBN 1-85326-677-9. OCLC 39697844.
- Zetterling, N. (2000). Normandy 1944: German Military Organization, Combat Power and Organizational Effectiveness. Winnipeg, Man.: Fedorowicz. ISBN 0-92199-156-8. Archived from the original on 17 February 2009. Retrieved 15 June 2014.
Further reading
- Journals
- Warren, J. C. (1956). "Airborne Operations in World War II, European Theater" (PDF). USAF Historical Studies (97). Maxwell AFB, Alabama: USAF Historical Division, Research Studies Institute Air University. ISBN 0-89126-015-3. Retrieved 15 June 2014.
- Websites
- (French) Corvé, Philippe. "Déluge de feu sur Tilly-sur-Seulles". Tilly-sur-Seulles, museum and the British cemetery
- Paterson, Ian A. "History of the British 7th Armoured Division". Archived from the original on 2007-06-21.
- Warlinks. "A Short History of the 8th Armoured Brigade: D-Day to 'The Island'". Retrieved 14 June 2014.
External links