No. 75 Wing RAAF
| No. 75 Wing RAAF | |
|---|---|
|
Beaufort crew of No. 7 Squadron, which operated under the control of No. 75 Wing in 1943–44 | |
| Active | 1943–44 |
| Country | Australia |
| Branch | Royal Australian Air Force |
| Role | Air defence; anti-shipping |
| Size | Two–three flying squadrons |
| Part of | North-Eastern Area Command |
| Engagements |
World War II |
| Aircraft flown | |
| Attack | A-31 Vengeance |
| Bomber | Bristol Beaufort |
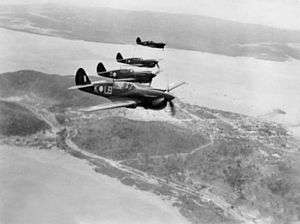
| Fighter | P-40 Kittyhawk |
.JPG)
No. 75 Wing was a Royal Australian Air Force (RAAF) wing that operated during World War II. It was formed in October 1943 at Townsville, Queensland, under North-Eastern Area Command. The wing soon deployed to Horn Island to take control of RAAF units based there and at Thursday Island and Cape York Peninsula. Responsible for air defence and maritime patrol in the Torres Strait, No. 75 Wing's flying units operated P-40 Kittyhawk fighters, Bristol Beaufort reconnaissance bombers, and A-31 Vengeance dive bombers. The wing was disbanded in August 1944.
History
No. 75 Wing was raised on 13 October 1943 at Garbutt in Townsville, Queensland, under the command of Wing Commander (later Group Captain) Edgar Bruce Courtney.[1][2] On formation it had a staff of ten, including three officers.[3] The wing was responsible for RAAF units at Horn Island, Thursday Island, and Higgins Field on Cape York Peninsula.[4][5] An advance party departed Garbutt for Horn Island on 21 October, and the wing headquarters was fully established there six days later.[2][3] The same month, No. 84 Squadron, based at Horn Island and recently converted from CAC Boomerangs to P-40 Kittyhawks, was transferred from the control of No. 72 Wing (headquartered at Merauke, New Guinea) to No. 75 Wing.[4]
Other units at Horn Island included No. 28 Operational Base Unit, which had been located there since being formed in May 1942;[6] No. 112 Mobile Fighter Sector Headquarters (formerly No. 12 Mobile Fighter Sector Headquarters);[3][7] and a detachment of No. 7 Squadron (headquartered at Townsville), operating Bristol Beaufort reconnaissance bombers.[8][9] No. 33 Operational Base Unit, formed at Townsville in April 1943, established itself at Higgins Field on 23 October.[10] No. 1 Repair and Salvage Unit was also headquartered at Higgins, but maintained a detachment on Thursday Island.[11] No. 23 Air Stores Park, based on Thursday Island, was responsible for logistical support of No. 75 Wing units.[12]
No. 84 Squadron had been responsible for air defence in the Torres Strait since arriving at Horn Island in April 1943, and No. 7 Squadron for anti-shipping duties.[4] A Beaufort of No. 7 Squadron was credited with shooting down a Japanese "Jake" seaplane during a patrol west of Horn Island on 11 November.[13] The Beauforts undertook their first bombing and strafing mission from Horn Island against targets in Dutch New Guinea on 27 November.[14][15] By the end of the year, No. 75 Wing headquarters had a strength of 144 staff, including twenty-three officers, and one de Havilland DH.84.[16] According to George Odgers, "Although the Merauke and Horn Island squadrons had relatively slight contact with the enemy in 1943 they fulfilled a very useful purpose in conjunction with the North-Western Area squadrons in securing the flank of MacArthur's forces".[17]
a.JPG)
In February 1944, No. 75 Wing headquarters moved from Horn Island to Higgins Field, where it was soon joined by No. 7 Squadron and another unit now under the wing's control, No. 23 Squadron.[18][19] The advance party from No. 75 Wing headquarters left Horn Island on 7 February, and the main party departed for Higgins by air and sea eleven days later.[20] No. 7 Squadron moved to Higgins between 3 and 26 March, and No. 23 Squadron between 13 and 31 March.[21] On 19 March, No. 112 Fighter Control Unit was re-formed at Horn Island as No. 32 Zone Filter Centre under No. 75 Wing.[7] By the end of the month, wing headquarters staff numbered 121, including twenty officers, and the DH.84 had been augmented by a Supermarine Walrus.[22]
On 11 March 1944, No. 84 Squadron was hurriedly redeployed to North-Western Area to replace the Supermarine Spitfires of No. 1 Wing, which had been despatched to Perth in response to a feared Japanese naval attack. No attack took place, and No. 84 Squadron returned to Horn Island less than two weeks later.[23][24] On 17 May, the squadron departed Horn Island for Townsville, and was subsequently reduced to cadre.[24] No. 7 Squadron continued operations in the Dutch East Indies from Higgins, generally in conjunction with other forces such as B-25 Mitchells from North-Western Area, before its tasking was reduced in August pending transfer to No. 71 Wing in New Guinea.[13] No. 23 Squadron was equipped with A-31 Vengeance dive bombers and undertook army-cooperation duties out of Higgins until being declared non-operational in June.[5][25] That month, a squadron leader from North-Eastern Area Command arrived at No. 75 Wing headquarters to investigate Vengeance accidents and unserviceability; on departure his Vengeance crash-landed on the beach at Princess Charlotte Bay and the crew had to be rescued by an aircraft of No. 9 Squadron.[26] No. 23 Squadron was subsequently re-equipped with B-24 Liberator heavy bombers and transferred to North-Western Area.[25][27]
By the end of July 1944, No. 75 Wing headquarters strength was sixty-three staff, including eighteen officers, and a DH.84.[28] The wing ceased operations on 21 August, still under Courtney's command, and was disbanded four days later.[29] Its remaining units then became the direct responsibility of North-Eastern Area headquarters.[30]
Notes
- ↑ Royal Australian Air Force, No. 75 Wing, pp. 3, 23
- 1 2 "Order of Battle – Air Force – Headquarters". Department of Veterans' Affairs. Retrieved 22 June 2016.
- 1 2 3 Royal Australian Air Force, No. 75 Wing, p. 3
- 1 2 3 Odgers, Air War Against Japan, pp. 113–116
- 1 2 RAAF Historical Section, Bomber Units, p. 71
- ↑ RAAF Historical Section, Introduction, Bases, Supporting Organisations, pp. 18–19
- 1 2 RAAF Historical Section, Radar Units, p. 148
- ↑ RAAF Historical Section, Bomber Units, pp. 23–24
- ↑ Odgers, Air War Against Japan, p. 141
- ↑ RAAF Historical Section, Introduction, Bases, Supporting Organisations, pp. 23–24
- ↑ RAAF Historical Section, Maintenance Units, pp. 81–82
- ↑ RAAF Historical Section, Logistics Units, p. 7
- 1 2 RAAF Historical Section, Bomber Units, p. 24
- ↑ Royal Australian Air Force, No. 75 Wing, p. 6
- ↑ Odgers, Air War Against Japan, p. 98
- ↑ Royal Australian Air Force, No. 75 Wing, p. 8
- ↑ Odgers, Air War Against Japan, pp. 117
- ↑ Royal Australian Air Force, No. 75 Wing Headquarters, p. 13
- ↑ Royal Australian Air Force, Northern Area and North-Eastern Area Headquarters, pp. 706, 709
- ↑ Royal Australian Air Force, No. 75 Wing, p. 11
- ↑ Royal Australian Air Force, No. 75 Wing, p. 13
- ↑ Royal Australian Air Force, No. 75 Wing, p. 14
- ↑ Odgers, Air War Against Japan, pp. 136–139
- 1 2 RAAF Historical Section, Fighter Units, p. 86
- 1 2 Royal Australian Air Force, Northern Area and North-Eastern Area Headquarters, p. 795
- ↑ Royal Australian Air Force, No. 75 Wing, p. 22
- ↑ Odgers, Air War Against Japan, p. 245
- ↑ Royal Australian Air Force, No. 75 Wing, p. 26
- ↑ Royal Australian Air Force, No. 75 Wing, p. 27
- ↑ Royal Australian Air Force, Northern Area and North-Eastern Area Headquarters, p. 830
References
- Odgers, George (1968) [1957]. Australia in the War of 1939–1945: Series Three (Air) Volume II – Air War Against Japan 1943–1945. Canberra: Australian War Memorial. OCLC 246580191.
- RAAF Historical Section (1995). Units of the Royal Australian Air Force: A Concise History. Volume 1 – Introduction, Bases, Supporting Organisations. Canberra: Australian Government Publishing Service. ISBN 0-644-42792-2.
- RAAF Historical Section (1995). Units of the Royal Australian Air Force: A Concise History. Volume 2 – Fighter Units. Canberra: Australian Government Publishing Service. ISBN 0-644-42794-9.
- RAAF Historical Section (1995). Units of the Royal Australian Air Force: A Concise History. Volume 3 – Bomber Units. Canberra: Australian Government Publishing Service. ISBN 0-644-42795-7.
- RAAF Historical Section (1995). Units of the Royal Australian Air Force: A Concise History. Volume 5 – Radar Units. Canberra: Australian Government Publishing Service. ISBN 0-644-42797-3.
- RAAF Historical Section (1995). Units of the Royal Australian Air Force: A Concise History. Volume 6 – Logistics Units. Canberra: Australian Government Publishing Service. ISBN 0-644-42798-1.
- Royal Australian Air Force (1941–45). Operations Record Book: Northern Area and North-Eastern Area Headquarters. RAAF Unit History Sheets. Canberra: National Archives of Australia .
- Royal Australian Air Force (1943–44). Operations Record Book: No. 75 Wing. RAAF Unit History Sheets. National Archives of Australia.