Kayung totem pole
|
Being installed in the Great Court | |
| Material | Cedar |
|---|---|
| Height | 12 metres (39 ft) |
| Created | c. 1850 in Canada |
| Present location | The Great Court of the British Museum |
| Identification | Am1903,0314.1 |

The Kayung totem pole is a 12-metre (39 ft) totem pole made by the Haida people. Carved and originally located in the village of Kayung on Graham Island in British Columbia, Canada, it dates from around 1850. In 1903 it was bought by the British Museum from Charles Frederick Newcombe, and is a prominent exhibit in the Great Court of the British Museum.
History

The totem pole was obtained by the Museum in 1903, when the pole was about fifty years old. The craft of making totem poles, built as heraldic signs but misinterpreted by missionaries, was at that point in decline.[1] It was purchased from Charles Frederick Newcombe,[2] who sold a large number of totem poles to museums in Europe. The provenance of the pole was certain as the Museum already had a model of it, provided by J.H.Keen, along with two photographs that showed the pole in its original location.[2]
Before being sold to collectors, the pole was located in a village called Kayung on Graham Island in British Columbia's Haida Gwaii archipelago. Kayung had been an important village for the Haida before European contact.[3] After the population was decimated by successive smallpox epidemics in the late 1800s, Henry Wiah, the town chief, encouraged the remaining population to move to nearby Masset.[4] The village was in the process of being abandoned in 1884, when Richard Maynard photographed it, identifying fourteen houses.[3]
Description
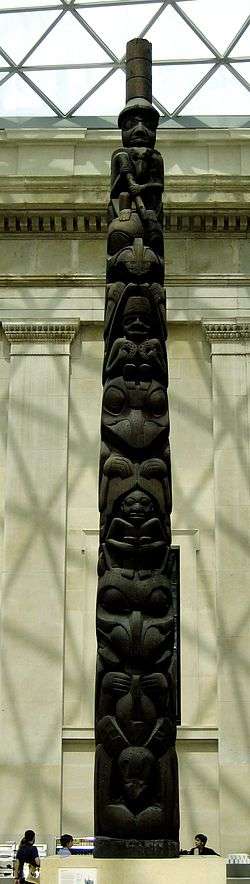
Due to its size, the 12-metre (39 ft) pole spent most of its time at the British Museum confined to a stairwell, as this was the only space of sufficient height available. After the roof of the Great Court was constructed, it became possible to install the pole there in 2007.[5]
Weathering on the pole means that there is no remaining paint on the surface,[1] but the explanation of what the carvings represented is available. Chief Wiah told the stories to Charles F. Newcombe, and they were recorded in the 1903 description. The stories themselves are corroborated by another of the Museum's totem poles, which was obtained with a model of a First Nations longhouse provided by Keen. The second pole was almost identical to the first one. The figure at the top represents Yetl,[6] and the design also incorporates Haida crests.[7]
Haida guests were present at the museum for the installation of the pole in the Great Court in 2007, and told the story carved into the pole, which involves a man who tricks his wicked mother-in-law.[7]
Stories
There are two stories associated with the Kayung pole.[6]
First story
The first story was that communicated to Newcombe by Chief Weah when Newcombe obtained the pole.[6]
There was a village where, every time they fished, they lost the hooks from their rods, and the fish with them. The hooks and fish were being taken by Yetl, who had originally created life and its diversity. Normally Yetl appeared as a raven, but on this occasion imitated a friend of his who could swim beneath the sea. Using this skill he was feeding his hunger with the villagers' fish. [6]
The villagers decided to change the hooks they were using to include a type made of wood and bone, with two barbs. Onto one of these hooks they put a piece of devil fish. The bait was taken, and after a long battle struggling with the catch, the fisherman and several of his friends were able to pull it to the surface. Pulling hard, they felt the line go slack, and when they pulled it in found only a small unidentifiable item on the end. Unbeknownst to them they had caught Yetl, and pulled off his raven's beak.[6]
To get back his beak and obtain food, Yetl took on human shape and was accepted by the villagers as a guest, disguising his wound by only showing the upper half of his face. Even though he could only speak gibberish, he was able to persuade the villagers to return his beak. He then returned to the village again, disguised as a chief, and was again accepted as a guest. The figure at the top of the pole shows Yetl when he appeared as a chief and sat down to eat with the villagers.[6]
Second story
A young man was addicted to a gambling game involving short sticks. He lost all of his money, but was able to marry the daughter of a wealthy man. He again lost all of his money. One night he was eating dried halibut, which made a sound as it was torn. His wife's mother derided him and said that his greed made it sound as if his own body and not that of the fish was being torn. The man was so annoyed that he slept hungry and the next morning he chewed so much of a plant that he took on Shaman powers. The young man summoned a whale, cut a hole in its side and went inside it.[6]
His mother dreamt with her shaman powers of the arrival of the whale and, dressed as a shaman, she persuaded the villagers to drink heated seawater and go with her to find the whale. She got some of the villagers to beat drums whilst she used her shaman's rattles to dance on the stranded whale. When the singing and dancing was complete they cut open the whale only to find the young man. His mother was repentant of her earlier treatment of the young man and this story was then told from generation to generation.[6]
References
| Wikimedia Commons has media related to Kayung totem pole. |
- 1 2 Kramer, Pat (2008). Christian Missionaries and the Totem Pole p.22. Heritage House Publishing Co. ISBN 9781894974448.
- 1 2 "Totem-pole". British Museum. Retrieved 8 November 2010.
- 1 2 Kayung, Museum of Canadian Civilization, Ottawa, ON, retrieved 10 December 2013
- ↑ Dalzell, Kathleen (1973). The Queen Charlotte Islands, book 2 : of places and names. Prince Rupert, B.C.: Cove Press. p. 180. ISBN 9780969052814.
- ↑ "Totem Pole Websites". Cathedral Grove. Retrieved 24 October 2010.
- 1 2 3 4 5 6 7 8 A Totem Pole in the British Museum, T. A. Joyce, The Journal of the Anthropological Institute of Great Britain and Ireland, Vol. 33, (Jan. – Jun. 1903), pp. 90–95, Published by: Royal Anthropological Institute of Great Britain and Ireland
- 1 2 Behind the Scenes at the British Museum, Neil MacGregor, British Museum, 15 September 2007, retrieved 30 November 2013
| Building | 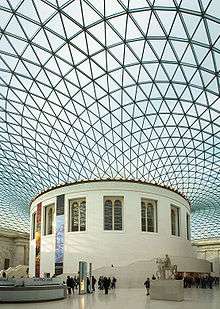 | ||||||||||||||||||||||||||||||
|---|---|---|---|---|---|---|---|---|---|---|---|---|---|---|---|---|---|---|---|---|---|---|---|---|---|---|---|---|---|---|---|
| Departments and objects |
| ||||||||||||||||||||||||||||||
| Other | |||||||||||||||||||||||||||||||
| |||||||||||||||||||||||||||||||