HMS Warspite (03)
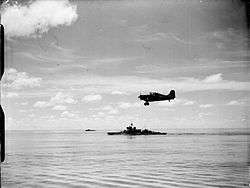
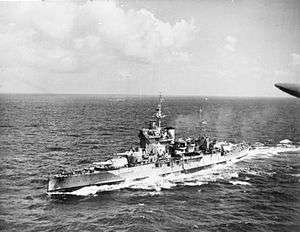 Warspite under way in the Indian Ocean, 16 July 1942 | |
| History | |
|---|---|
| Name: | Warspite |
| Ordered: | 1912 |
| Laid down: | 31 October 1912 |
| Launched: | 26 November 1913 |
| Commissioned: | 8 March 1915 |
| Decommissioned: | 1 February 1945 |
| Struck: | 1947 |
| Identification: | Pennant number: 03 |
| Motto: | Belli dura despicio ("I Despise the Hard Knocks of War") |
| Nickname(s): | Grand Old Lady |
| Honours and awards: |
|
| Fate: | Scrapped, 1950–57 |
| Badge: |
 |
| General characteristics (as built) | |
| Class and type: | Queen Elizabeth-class battleship |
| Displacement: |
|
| Length: | 643 ft 9 in (196.2 m) |
| Beam: | 90 ft 7 in (27.6 m) |
| Draught: | 33 ft (10.1 m) |
| Installed power: |
|
| Propulsion: |
|
| Speed: | 24 knots (44 km/h; 28 mph) |
| Range: | 5,000 nmi (9,260 km; 5,750 mi) at 12 knots (22 km/h; 14 mph) |
| Complement: |
|
| Armament: |
|
| Armour: |
|
| General characteristics (1937, where different) | |
| Displacement: |
|
| Beam: | 104 ft (31.7 m) |
| Draught: | 32 ft 4 in (9.9 m) |
| Installed power: |
|
| Speed: | 23 knots (43 km/h; 26 mph) |
| Range: | 7,579 nmi (14,036 km; 8,722 mi) at 12 knots |
| Armament: |
|
| Armour: |
|
| Aircraft carried: | 4 × amphibious aircraft |
| Aviation facilities: | 1 × aircraft catapult |
HMS Warspite was a Queen Elizabeth-class battleship built for the Royal Navy during the early 1910s. Her thirty-year career covered both world wars and took her across the Atlantic, Indian, Arctic and Pacific Oceans. She participated in the Battle of Jutland during the First World War as part of the Grand Fleet. Other than that battle, and the inconclusive Action of 19 August, her service during the war generally consisted of routine patrols and training in the North Sea.
She was involved in several major engagements, including battles in the North Sea and Mediterranean, earning her the most battle honours ever awarded to an individual ship in the Royal Navy and the most awarded for actions during the Second World War. For this and other reasons Warspite gained the nickname the "Grand Old Lady" after a comment made by Admiral Sir Andrew Cunningham in 1943 while she was his flagship.
When she was launched in 1913 the use of oil as fuel and untried 15-inch guns were revolutionary concepts in the naval arms race between Britain and Germany, a considerable risk for Winston Churchill, then First Lord of the Admiralty, and Admiral John Fisher who had advocated the design. However, the new "fast battleships" proved to be an outstanding success during the First World War. Warspite was refitted twice between the wars, but advances in technology and the cumulative effects of battle damage relegated her to the role of shore bombardment towards the end of the Second World War. Decommissioned in 1945, she ran aground under tow in 1947 on rocks near Prussia Cove, Cornwall, and was eventually broken up nearby.
Design and description
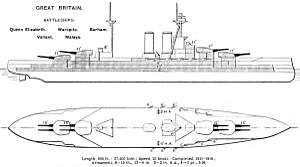
The Queen Elizabeth-class ships were designed to form a fast squadron for the fleet that was intended to operate against the leading ships of the opposing battleline. This required maximum offensive power and a speed several knots faster than any other battleship to allow them to defeat any type of ship.[1][2]
Warspite had a length overall of 643 feet 9 inches (196.2 m), a beam of 90 feet 7 inches (27.6 m) and a deep draught of 33 feet (10.1 m). She had a normal displacement of 32,590 long tons (33,110 t) and displaced 33,260 long tons (33,794 t) at deep load. She was powered by two sets of Brown-Curtis steam turbines, each driving two shafts, using steam from 24 Yarrow boilers. The turbines were rated at 75,000 shp (56,000 kW) and intended to reach a maximum speed of 24 knots (44.4 km/h; 27.6 mph). Warspite had a range of 5,000 nautical miles (9,260 km; 5,754 mi) at a cruising speed of 12 knots (22.2 km/h; 13.8 mph). Her crew numbered 1,025 officers and ratings in 1915 and 1,220 in 1920 while serving as a flagship.[3]
The Queen Elizabeth class was equipped with eight breech-loading (BL) 15-inch (381 mm) Mk I guns in four twin gun turrets, in two superfiring pairs fore and aft of the superstructure, designated 'A', 'B', 'X', and 'Y' from front to rear. Twelve of the fourteen BL 6-inch (152 mm) Mk XII guns were mounted in casemates along the broadside of the vessel amidships; the remaining pair were mounted on the forecastle deck near the aft funnel and were protected by gun shields. Their anti-aircraft (AA) armament consisted of two quick-firing (QF) 3-inch (76 mm) 20 cwt Mk I[Note 1] guns. The ships were fitted with four submerged 21-inch (533 mm) torpedo tubes, two on each broadside.[4]
Warspite was completed with two fire-control directors fitted with 15-foot (4.6 m) rangefinders. One was mounted above the conning tower, protected by an armoured hood, and the other was in the spotting top above the tripod foremast. Each turret was also fitted with a 15-foot rangefinder. The main armament could be controlled by 'B' turret as well. The secondary armament was primarily controlled by directors mounted on each side of the compass platform on the foremast once they were fitted in July 1917.[5]
The waterline belt of the Queen Elizabeth class consisted of Krupp cemented armour (KC) that was 13 inches (330 mm) thick over the ships' vitals. The gun turrets were protected by 11 to 13 inches (279 to 330 mm) of KC armour and were supported by barbettes 7–10 inches (178–254 mm) thick. The ships had multiple armoured decks that ranged from 1 to 3 inches (25 to 76 mm) in thickness. The main conning tower was protected by 13 inches of armour. After the Battle of Jutland, 1 inch of high-tensile steel was added to the main deck over the magazines and additional anti-flash equipment was added in the magazines.[6]
Construction and career
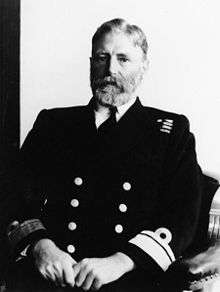
Warspite, the sixth warship of the Royal Navy to carry the name, was laid down on 21 October 1912 at Devonport Royal Dockyard, launched on 26 November 1913, and completed in April 1915[7] under the command of Captain Edward Phillpotts.[8] Warspite joined the 2nd Battle Squadron of the Grand Fleet following a number of acceptance trials,[9] including gunnery trials, which saw Churchill present when she fired her 15 inch (381 mm) guns. Churchill was suitably impressed with their accuracy and power.[10] In late 1915, Warspite was grounded in the River Forth causing some damage to her hull; she had been led by her escorting destroyers down the small ships channel.[8] After undergoing repairs for two months at Rosyth and Jarrow, she rejoined the Grand Fleet, this time as part of the newly formed 5th Battle Squadron which had been created for Queen Elizabeth-class ships.[8] In early December, Warspite was involved in another incident when, during an exercise, she collided with her sister-ship Barham, which caused considerable damage to Warspite's bow. She made it back to Scapa Flow and from there to Devonport for more repair work, rejoining the fleet on Christmas Eve 1915.[11]
First World War
Battle of Jutland (1916)
Following the German raid on Lowestoft in April 1916, Warspite and the 5th Battle Squadron were temporarily assigned to Vice-Admiral David Beatty's Battlecruiser Force.[12] On 31 May Warspite deployed with the squadron to fight in the Battle of Jutland, the largest naval encounter between Britain and Germany during the war. Following a signalling error, the battleships were left trailing Beatty's fast ships during the battlecruiser action, and the 5th Battle Squadron was exposed to heavy fire from the German High Seas Fleet as the force turned away to the north,[13] although Warspite was able to score her first hit on the battlecruiser Von der Tann.[14]
Having escaped the trap the 5th Battle Squadron headed north, exchanging fire with both Hipper's battlecruiser force and the leading elements of Scheer's battleships, damaging Markgraf.[15] When the squadron turned to join the Grand Fleet the damage from a shell hitting the port-wing engine room caused Warspite's steering to jam as she attempted to avoid her sister-ships Valiant and Malaya.[16] Captain Phillpotts decided to maintain course, in effect circling, rather than come to a halt and reverse. This decision exposed Warspite and made her a tempting target; she was hit 13 times, but inadvertently diverted attention from the armoured cruiser Warrior, which had been critically damaged whilst attacking the leading elements of the German fleet.[16] This action gained her the admiration of Warrior's surviving crew, who believed that Warspite's movement had been intentional.[17]
The crew regained control of Warspite after two full circles. Their efforts to end the circular motion placed her on a course which took her towards the German fleet.[18] The rangefinders and the transmission station were non-functional and only "A" turret could fire, albeit under local control with 12 salvos falling short of their target. Sub Lieutenant Herbert Annesley Packer was subsequently promoted for his command of "A" turret.[19] Rather than continue, Warspite was stopped for ten minutes so the crew could make repairs.[18] They succeeded in correcting the problem, but the ship would be plagued with steering irregularities for the rest of her naval career. As the light faded the Grand Fleet crossed ahead of the German battle line and opened fire, forcing the High Seas Fleet to retreat and allowing Warspite to slip away.[20]
Warspite was holed 150 times during the battle,[21] and had 14 killed and 16 wounded; among the latter warrant officer Walter Yeo, who became one of the first men to receive facial reconstruction via plastic surgery.[22] Although she had been extensively damaged, Warspite could still raise steam and was ordered back to Rosyth during the evening of 31 May by Rear-Admiral Hugh Evan-Thomas, commander of the 5th Battle Squadron.[23] Whilst travelling across the North Sea the ship came under attack from a German U-boat. The U-boat fired three torpedoes, all of which missed their target. Warspite later attempted to ram a surfaced U-boat.[24] She signalled ahead for escorts and a squadron of torpedo boats came out to meet her. They were too slow to screen her effectively, but there were no more encounters with German vessels and she reached Rosyth safely on the morning of 1 June, where it took two months to repair the damage.[25]
1916–18
Upon the completion of her repairs, Warspite rejoined the 5th Battle Squadron. Further misfortune struck soon afterwards, when she collided with Valiant after a night-shooting exercise, necessitating more repair work at Rosyth.[26] Captain Philpotts avoided reprimand on this occasion, but was moved to a shore-based job as Naval Assistant to the new First Sea Lord, Admiral Jellicoe.[27] He was replaced by Captain de Bartolome in December 1916.[28] In June 1917, Warspite collided with a destroyer, but did not require major repairs.[28] In the following month, Warspite was rocked at her moorings in Scapa Flow when Vanguard, a St. Vincent-class battleship, exploded with the loss of hundreds of her crew when an ammunition magazine detonated.[27] Early in April 1918 she joined the Grand Fleet in a fruitless pursuit of the German High Seas Fleet which had been hunting for a convoy near Norway.[29] In 1918, Warspite had to spend four months being repaired after a boiler room caught fire.[29] Captain Hubert Lynes relieved Captain de Bartolome and on 21 November he took Warspite out to escort the German High Seas Fleet into internment at Scapa Flow following the signing of the Armistice.[28]
Interbellum (1919–39)
In 1919, Warspite joined the 2nd Battle Squadron, part of the newly formed Atlantic Fleet, and undertook regular spring cruises to the Mediterranean.[30] In 1924, she attended a Royal Fleet Review at Spithead, presided over by King George V.[30] Later in the year, Warspite underwent a partial modernisation that altered her superstructure by trunking her two funnels into one, enhanced her armour protection with torpedo bulges, swapped the high-angle 3-inch guns with new 4-inch anti-aircraft guns, and removed half her torpedo tubes.[30] After the process finished in 1926, Warspite assumed the role of flagship of the Commander-in-Chief and Second-in-Command, Mediterranean Fleet.[31] In 1927, under the command of Captain James Somerville, she struck an uncharted rock in the Aegean and was ordered to return to Portsmouth for repairs.[32] In 1930, Warspite rejoined the Atlantic Fleet. She was at sea when the crews of a number of warships mutinied at Invergordon in September 1931, although three sailors were later dismissed from the ship.[33] In March 1933 she was rammed in fog by a Romanian passenger ship off Portugal, but did not require major repairs.[34]
Between March 1934 and March 1937 she underwent a major reconstruction in Portsmouth at a cost of £2,363,000. This refit gave the Admiralty a virtually new warship, replacing internal machinery and significantly changing the battleship's appearance and capabilities.[34]
- Propulsion: The reconstruction project replaced her propulsion machinery and installed six individual boiler rooms, with Admiralty three-drum boilers, in place of 24 Yarrow boilers; geared Parsons turbines were fitted in four new engine rooms and gearing rooms. This increased fuel efficiency, reducing fuel consumption from 41 tons per hour to 27 at almost 24 knots, and gave the warship 80,000 shp. The 1,500 ton weight saving on the lighter machinery was used to increase protection and armament.[35]
- Armour: 1,100 tons of armour were added, improving coverage forward of A turret and the boiler rooms, as well as an increase to 5 inches over the magazines and 3.5 inches over the machinery.[36] Better sub-division of the engineering rooms strengthened the hull and improved its integrity.[37]
- Armament: The last pair of torpedo tubes were removed and the 6 inch guns had their protection reduced; four guns were removed from the fore and aft ends of the batteries.[35] Eight 4 inch high-angle guns in four twin mountings and two octuple 2 pdr pom-poms were added to her anti-aircraft defences, as well as additional .50 calibre machine guns on two of the main turrets.[35] The original 15-inch turrets were upgraded to increase the elevation of the guns by ten degrees (from 20° to 30°), providing a further 9,000 yards of range to a maximum of 32,300 yd (29.5 km) with a 6crh shell.[38] The fire control was also modernised to include the HACS MkIII* AA fire control system and the Admiralty Fire Control Table Mk VII for surface fire control of the main armament.[35]
Additionally her superstructure was radically altered, allowing two cranes and an aircraft hangar to be fitted. This could carry four aircraft, but Warspite typically carried only two: from 1938 to 1941 these were Swordfish floatplanes and from 1942 to 1943 Walrus flying boats. Her tripod mast was removed and a distinctive armoured citadel built up to enclose the bridge and to provide space for her to operate as a flagship.[37]
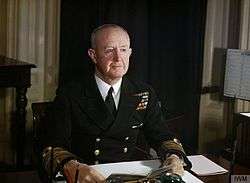
After completion of the refit Warspite was recommissioned under the command of Captain Victor Crutchley. The intention was for her to become the flagship of Admiral Dudley Pound's Mediterranean Fleet, but trials revealed problems with propulsion machinery and steering, a legacy of Jutland, which continued to beset Warspite and delayed her departure.[37] These delays and the work required to rectify them also affected the crew's leave arrangements and led to some sailors airing their views in national newspapers, angering Pound.[39] Warspite finally entered Grand Harbour, in Malta, on 14 January 1938 and continued gunnery practice and training.[40] At the end of one anti-aircraft exercise, a junior midshipman independently discharged his pom-pom gun after a towing aircraft flew low overhead to display its attached target to the crew. Warspite had turned towards Valletta on the exercise's conclusion and the shells hurtled towards the city. The shells landed harmlessly at a gunnery range where a platoon of the Green Howards was exercising.[41] For the remainder of the year she cruised the Aegean, Adriatic and Mediterranean seas, leading an intensive series of fleet exercises in August due to rising international tension.[42] She undertook another cruise of the western Mediterranean in the spring of 1939.[43] In June 1939, Vice Admiral Andrew Cunningham replaced Dudley Pound and took Warspite to Istanbul for talks with the Turkish government.[44] When war was declared in September the Mediterranean remained quiet and Warspite was recalled to join the Home Fleet following the loss of HMS Royal Oak.[45]
Second World War
Atlantic and Narvik (1939–40)

Warspite's first task was to escort convoy HX9 carrying fuel from Nova Scotia to the UK. She was diverted northwards in pursuit of the German battleships Scharnhorst and Gneisenau which had sunk the armed merchant cruiser Rawalpindi north of the Faroe Islands, but failed to make contact.[46]
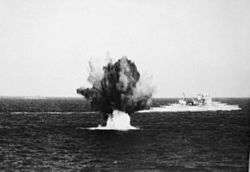
In April 1940, Warspite had started her voyage back to the Mediterranean when the Germans invaded Denmark and Norway; she rejoined the Home Fleet on 10 April and proceeded towards Narvik.[47] On 13 April, Vice-Admiral William Whitworth hoisted his flag in Warspite and led nine destroyers, three sweeping mines and six in an offensive role, into Ofotfjord to neutralise a force of eight German destroyers trapped near the port of Narvik.[48] Her Fairey Swordfish float-plane sank the German U-boat U-64 with 250 lb bombs, becoming the first aircraft to sink a U-boat in the war.[49] The Swordfish continued to provide accurate spotting reports during the early afternoon which were, arguably, more important to the course of the battle than the Warspite's guns.[50] The British destroyers soon opened fire on their counterparts, which had almost exhausted their fuel and ammunition following the First Naval Battle of Narvik. All were sunk during the action. Warspite destroyed the heavily-damaged Z13 Erich Koellner with broadsides, while damaging Z17 Diether von Roeder and Z12 Erich Giese. Diether von Roeder had to be scuttled while Erich Giese was sunk in conjunction with destroyers.[51] Although the Second Naval Battle of Narvik was considered a success, Warspite was lucky to escape unscathed given the number of submarines and other torpedo-armed enemy warships present in the narrow confines of the Norwegian fjords.[50] She remained in Norwegian waters, participating in several shore bombardments around Narvik on 24 April, but these proved ineffectual and she returned to Scapa Flow prior to being redeployed to the Mediterranean on 28 April.[52]
Mediterranean (1940–41)
Calabria
Warspite arrived safely in Alexandria before Italy entered the war on 10 June 1940. Admiral Cunningham took the fleet to sea on 7 July to meet two convoys travelling from Malta to Alexandria, knowing that part of the Italian fleet was escorting its own convoy to Tripoli. Cunningham hoped to draw the Regia Marina into battle by sailing towards the "toe" of Italy to cut them off from their base at Taranto.[53] The two fleets eventually met 30 miles from Punta Stilo at the Battle of Calabria on 9 July 1940. Initially the Allied cruisers, armed with 6-inch guns, were outranged by the 8-inch guns of their heavier Italian counterparts and disengaged. Seeing that they were under pressure, Cunningham took Warspite ahead to assist his cruisers. The Italian cruisers turned away under a smoke screen while the battleships Giulio Cesare and Conte di Cavour closed on Warspite before Malaya and Royal Sovereign could catch up. During the battle Warspite achieved one of the longest range gunnery hits from a moving ship to a moving target in history, hitting Giulio Cesare at a range of approximately 24 km (26,000 yd),[54] the other being a shot from Scharnhorst which hit Glorious at approximately the same distance in June 1940.[55] The damage caused by this shell temporarily slowed Giulio Cesare and her destroyers laid a smoke screen. The destroyers and cruisers on both sides continued shooting for half an hour, but with Malaya and Royal Sovereign coming into range the Italian fleet disengaged. Over 125 aircraft of the Regia Aeronautica attacked the ships over the next three hours, but caused no damage.[56] Warspite returned to Alexandria on 13 July.
Taranto
In mid-August she set out to bombard Bardia, and on 6 November she sailed from Alexandria to provide cover for the air strike on Taranto.[57] As a result of this attack Warspite and Valiant were able to attack the Italian supply base in the Adriatic port of Vlorë in mid-December.[58] On 10 January 1941 Warspite was lightly damaged by a single bomb while operating with Force A during Operation Excess.[59]
Matapan
In March 1941, to support the planned German invasion of the Balkans, Vice Admiral Angelo Iachino's Italian fleet, led by the battleship Vittorio Veneto, sailed to intercept Allied convoys between Egypt and Greece. Warned of the Italian intentions by intelligence from the Government Code and Cypher School at Bletchley Park,[60] Admiral Cunningham took his fleet to sea on 27 March 1941, flying his flag on Warspite.[61] On 28 March the British cruisers encountered the Italian fleet and were forced to turn away by the heavy guns of Vittorio Veneto. To save his cruisers Cunningham ordered an air strike, prompting Iachino to retreat. Subsequent air attacks damaged the battleship and the cruiser Pola, slowing the former and crippling the latter.[62] Vittorio Veneto escaped to the west as dusk fell, but the British pursued through the night, first detecting Pola on radar and then two of her sister ships.[63] Warspite, Valiant, and Barham closed on the unsuspecting Italian ships and, aided by searchlights, destroyed the heavy cruisers Fiume and Zara, and two destroyers at point blank range.[64] Pola was also sunk once her crew had been taken off.[65] Having established by aerial reconnaissance that the rest of the Italian fleet had escaped Warspite returned to Alexandria on 29 March, surviving air attacks without suffering any casualties.[66]
The Battle of Cape Matapan had a paralysing effect on the Regia Marina, providing the Royal Navy with an opportunity to tighten its grip on the Mediterranean, as evidenced by the unequal battle near the Kerkennah Islands on 16 April.[67] However, this was not enough and the continuing success of the Afrika Korps in North Africa induced Churchill to order a desperate attack on Tripoli to entirely block the Axis supply route by sinking one of the battleships in the harbour.[68] Cunningham rejected this plan, but on 21 April he sailed with Warspite to bombard the harbour in company with Barham and Valiant, the cruiser Gloucester and several destroyers.[69] The raid was ineffectual, partly because of poor visibility created by dust from an earlier RAF bombing raid,[70] but the fleet returned to Alexandria without suffering any damage. The futility of the mission and the exposure of his battleships led to a tense exchange of letters between Cunningham and Churchill.[71]
Crete
During the German invasion of Crete Warspite was used as a floating anti-aircraft battery and,[72] like many other ships, suffered severe damage from German air attacks on 22 May.[73] A 500 lb bomb damaged her starboard 4-inch and 6-inch batteries,[74] ripped open the ship's side and killed 38 men.[75] The attack was carried out by the Luftwaffe unit Jagdgeschwader 77 (JG 77—Fighter Wing 77). Oberleutnant Kurt Ubben, a future flying ace with 110 enemy aircraft shot down, claimed a hit on the warship.[76] She was able to make it back to port under her own steam, but the damage could not be repaired in Alexandria and it was decided that she would have to be sent to Bremerton on the west coast of the United States.[77]
Repair and refit
In June 1941, Warspite departed Alexandria for the Bremerton Naval Shipyard in the United States, arriving there on 11 August,[28] having travelled through the Suez Canal, across the Indian Ocean to Ceylon, stopping at Manila, then Pearl Harbor and finally Esquimalt along the way.[78] Repairs and modifications began in August, including the replacement of her deteriorated 15 in guns, the addition of more anti-aircraft weapons, improvements to the bridge, and new surface and anti-aircraft radar.[79] Warspite was still at the shipyard when the Japanese Navy attacked Pearl Harbor and went on alert as she would have been one of the few ships in the harbour which could have provided anti-aircraft defence should the Japanese have struck east.[80] She was recommissioned on 28 December and undertook sea trials near Vancouver before sailing down the west coast of the US and Mexico, crossing the equator and arriving in Sydney on 20 February 1942.[81] She joined the Eastern Fleet at Trincomalee in March 1942.[82]
Indian Ocean (1942–43)
Warspite joined the Eastern Fleet as flagship of Admiral Sir James Somerville, who had commanded her in 1927.[32] Initially Warspite was based in Ceylon, forming a fast group with the aircraft carriers Formidable and Indomitable, four cruisers and six destroyers.[83] In March Somerville received intelligence indicating the Japanese Fast Carrier Strike Force was heading towards the Indian Ocean and he relocated his base to Addu Atoll in the Maldives.[84] Vice Admiral Chuichi Nagumo used five carriers and four battleships in his naval sortie into the Indian Ocean in April, attacking Allied shipping and bases in the Indian Ocean and the Bay of Bengal.[84] Somerville's fleet was outnumbered and outclassed, but he hoped to get close enough to launch a night-time torpedo bomber attack.[84] Warspite's fast group set sail to intercept on 4 April, detecting the Japanese attack on the cruisers Cornwall and Dorsetshire and, later, a scouting aircraft from the cruiser Tone. The fleets did not meet and Warspite withdrew to Addu Atoll and then to Kilindini on the East African coast to protect the convoy routes.[85] The Japanese, however, believed that she was still in Sydney and ordered an attack.[85]
During May and June Warspite continued to act as Somerville's flagship, carrying out exercises with other elements of the fleet and shore-based aircraft in Ceylon.[86] In early June she was deployed to hunt down the Japanese auxiliary cruisers Aikoku Maru and Hōkoku-Maru near the Chagos Archipelago, but failed to find them.[86]
In August she was involved in Operation Stab, a simulated attack on the Andaman Islands to distract the Japanese from US preparations to attack Guadalcanal.[87] She covered the landings at Mahajanga and Tamatave during the Allied invasion of Madagascar in September.[86] Her surface radar was replaced in Durban in October and Captain Packer, her former Assistant Gunnery Officer at Jutland, took command in January 1943. The remainder of Warspite's deployment was uneventful. She underwent a short refit in Durban in April and returned to the UK in May 1943, having sailed approximately 160,000 miles since the war began.[88]
Mediterranean (1943–44)
She underwent a short refit in May in another attempt to fix her steering problem, then joined Force H at Scapa Flow, departing on 9 June for Gibraltar in company with five other battleships, two carriers and twelve destroyers.[89] Assigned to Division 2 with Valiant and Formidable, she returned to Alexandria on 5 July in preparation for Operation Husky, the Allied invasion of Sicily. Division One and Two rendezvoused in the Gulf of Sirte on 9 July and covered the assembling convoys.[86] Warspite detached to refuel at Malta on 12 July, the first visit by a British battleship since December 1940.[86] On 17 July she bombarded Catania in support of an unsuccessful attack by the 8th Army, although her steering problem temporarily delayed her taking up position.[90] She returned to Malta at high speed on 18 July, avoiding several air attacks during the night. On her return Admiral Cunningham inadvertently coined the nickname by which she would be known thereafter when he signalled: "Operation well carried out. There is no question when the old lady lifts her skirts she can run."[91]
Between 2 and 3 September Warspite and Valiant covered the assault across the Straits of Messina and bombarded the Italian coastal batteries near Reggio.[92] Between 8 and 9 September, Force H, covering the landings at Salerno, came under fierce German air-attack and narrowly avoided being torpedoed.[93] The resolve of the Italian Government had already been wavering by the time of the Allies victory in North Africa; the invasion of Sicily and aerial attacks on mainland Italy encouraged negotiations. They signed an armistice on 3 September, which took effect on 8 September. Anxious to ensure that the Germans did not acquire an additional 200 warships, the Allies insisted that the Regia Marina must sail for Allied ports. Three days later, Warspite met and led elements of the Italian Fleet, including Vittorio Veneto and Italia, into internment at Malta. She repeated this process on 12 September for her opponent from the Battle of Calabria, Giulio Cesare.[94]
On 14 September Force H was recalled to the UK to begin preparations for the invasion of France, but Warspite and Valiant were detached to provide support for Allied forces at Salerno.[86] Although the Italians had surrendered, the Germans had anticipated this and moved forces into position to block the Allied landings. The American forces near Battipaglia were in a precarious situation following German counter-attacks.[95] After arriving off Salerno on 15 September, Warspite bombarded an ammunition dump and other positions around Altavilla Silentina, demoralising the German forces and providing time for Allied reinforcements to arrive.[96] Overnight the fleet came under intense air attack, but she was able to continue bombardment duties the next day. However, early in the afternoon she was attacked by a Luftwaffe squadron of Focke-Wulf Fw 190 fighter bombers and then, from high altitude, by three Dornier Do 217 bombers from KG 100 armed with an early guided missile, the Fritz X.[97] She was hit directly once; a second near-miss ripped open the torpedo bulges while the third missed altogether. The missile that did hit her struck near the funnel, cutting through her decks and making a 20-foot hole in the bottom of her hull, crippling her as it did so.[98] Although the damage had been considerable, Warspite's casualties amounted to only nine killed and fourteen wounded.
She was soon on the journey to Malta, escorted by the anti-aircraft cruiser Delhi and four destroyers, while being towed by United States Navy tugs.[99] The practicalities of towing a ship of Warspite's dimensions proved difficult, and at one stage she broke all tow lines and drifted sideways through the Straits of Messina.[100] She reached Malta on 19 September and undertook emergency repairs before being towed to Gibraltar on 12 November.[86] Warspite returned to Britain in March 1944 to continue her repairs at Rosyth. Captain Packer was mentioned in despatches for his actions bringing the ship to Malta,[101] the second time he had limped into port on board a heavily damaged Warspite.
North-Western Europe (1944–45)
%2C_6_June_1944_A23916.jpg)
At Rosyth Warspite's 6-inch guns were removed and plated in, and a concrete caisson covered the hole left by the German missile. One of her boiler rooms and the X turret could not be repaired, remaining out of action for the remainder of her career.[102] She left Greenock on 2 June 1944 with six 15-inch guns, eight 4-inch anti-aircraft guns and forty pom poms, joining Bombardment Force D of the Eastern Task Force of the Normandy invasion fleet off Plymouth two days later.[86]
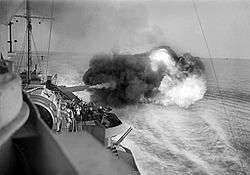
At 0500 on 6 June 1944 Warspite was the first ship to open fire,[103] bombarding the German battery at Villerville from a position 26,000 yards offshore, to support landings by the British 3rd Division on Sword Beach.[86] She continued bombardment duties on 7 June, but after firing over 300 shells she had to rearm and crossed the Channel to Portsmouth. She returned to Normandy on 9 June to support American forces at Utah Beach and then, on 11 June, she took up position off Gold Beach to support the British 69th Infantry Brigade near Cristot.[86] On 12 June she returned to Portsmouth to rearm, but her guns were worn out so she was ordered to sail to Rosyth via the Straits of Dover, the first British battleship to have done so since the war began.[103] She evaded German coastal batteries, partly due to effective radar jamming, but hit a mine 28 miles off Harwich early on 13 June.[86] Repairs to her propeller shafts and the replacement of the guns took until early August; she sailed to Scapa Flow to calibrate the new barrels with only three functional shafts, limiting her top speed to 15 knots,[86] although by now the Admiralty considered her main role was that of a bombardment vessel.
Warspite arrived off Ushant on 25 August 1944 and attacked the coastal batteries at Le Conquet and Pointe Saint-Mathieu during the Battle for Brest.[86] The U.S. VIII Corps eventually captured "Festung Brest" on 19 September, but by then Warspite had moved on to the next port. In company with the monitor Erebus she carried out a preparatory bombardment of targets around Le Havre prior to Operation Astonia on 10 September,[104] leading to the capture of the town two days later. Her final task was to support an Anglo-Canadian operation to open up the port of Antwerp, which had been captured in September, by clearing the Scheldt Estuary of German strongholds and gun emplacements. With the monitors Erebus and Roberts she bombarded targets on Walcheren Island on 1 November 1944, returning to Deal the next day, having fired her guns for the last time.[104]
Decommissioning
During her service career Warspite had lived up to her motto, enduring shellfire, bombing, ramming, mines and a guided missile. However, time had taken its toll and more modern ships were required to continue the war in the Far East. Although there were proposals to retain her as a museum ship, the Admiralty approved Warspite's scrapping in July 1946 and she sailed from Spithead into Portsmouth to have her guns removed.[105]
On 19 April 1947, Warspite departed Portsmouth for scrapping at Faslane, on the River Clyde. On the way, she encountered a severe storm and the hawser of the tug Bustler parted, whilst the other tug Melinda III slipped her tow. In storm force conditions Warspite dropped one of her anchors in Mount's Bay, which did not hold, and the storm drove her onto Mount Mopus Ledge near Cudden Point. Later refloating herself she went hard aground a few yards away in Prussia Cove.[106] Her skeleton crew of seven was saved by the Penlee Lifeboat W. & S. There were several attempts to refloat her but the hull was badly damaged.
In 1950 an attempt to refloat her, buoyed by 24 compressors pumping air into her tanks, and watched by a large crowd, the press and the BBC, failed. There was insufficient depth of water to float her clear of the reef in a rising south westerly gale. The salvage boat Barnet, standing guard overnight under the Warspite’s bows was holed in the engine room, towed off and eventually drifted ashore at Long Rock, a few miles to the west. However, by August the battleship was finally beached off St Michael’s Mount and after further salvage another attempt was made to refloat her in November. The Falmouth tug Masterman spent the night on the Hogus Rocks after failing to tow Warspite; and her sister tug Tradesman had 60 feet (18 m) of wire wrapped around her propeller when trying to haul Masterman off the rocks. Aided by her compressor and two jet engines from an experimental aircraft the hulk was finally moved 130 feet (40 m) closer to shore and by the summer of 1955 she disappeared from view.[107]According to the contractors, it remains the largest salvage operation ever carried out in British waters.[108]
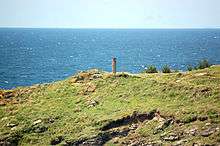
A memorial stone was placed near the sea wall at Marazion and later moved a short distance.[109] The stone was unveiled by Admiral Sir Charles Madden and prayers were read by a former crew member. The remains of the masts lie in the yard at Porthenalls House, Prussia Cove and one portion was erected on a headland, overlooking Prussia Cove. One of her 15-inch tompions is on display in the Royal Naval Museum in Portsmouth. Her nameplate is held by the pub, The Wink, in Lamorna, Cornwall. Her chapel door is exhibited at the National Museum of the Royal Navy's Jutland exhibition at Portsmouth Historic Dockyard. The door was rescued from a seamens' hostel in Falmouth and has been in the possession of the Royal Naval Association since 2012.
Battle honours
First World War
- Jutland 1916
Second World War
- Atlantic 1939
- Narvik 1940
- Norway 1940
- Calabria 1940
- Mediterranean 1940-41-43
- Malta Convoys 1941
- Matapan 1941
- Crete 1941
- Sicily 1943
- Salerno 1943
- English Channel 1944
- Normandy 1944
- Biscay 1944
- Walcheren 1944
Notes
- ↑ "Cwt" is the abbreviation for hundredweight, 20 cwt referring to the weight of the gun.
Citations
- ↑ Burt 1986, p. 251.
- ↑ Parkes 1990, pp. 560–61.
- ↑ Burt 1986, pp. 255, 257–58, 261.
- ↑ Burt 1986, pp. 252–53, 256–57.
- ↑ Raven & Roberts, 1976, p. 20–21, 30.
- ↑ Raven & Roberts, 1976, pp. 21, 26.
- ↑ Burt 1986, p. 256.
- 1 2 3 Ballantyne, 2013, p. 30.
- ↑ Sutherland and Canwell, 2010, p. 62.
- ↑ Ballantyne, 2013, p. 29.
- ↑ Watton, 1986, p. 8.
- ↑ Ballantyne, 2013, p. 32.
- ↑ Ballantyne, 2013, p. 42–43.
- ↑ Ballantyne, 2013, p. 41.
- ↑ Campbell, 1998, p. 134–145.
- 1 2 Ballantyne, 2013, p. 50.
- ↑ Marder, 1978, p. 97–98.
- 1 2 Ballantyne, 2013, p. 51.
- ↑ The London Gazette: (Supplement) no. 29751. p. 9079. 15 September 1916.
- ↑ Ballantyne, 2013, p. 52.
- ↑ Ballantyne, 2013, p. 57.
- ↑ "Walter Ernest O'Neil Yeo". Yeo Society. 2009. Retrieved 23 September 2009.
- ↑ Ballantyne, 2013, p. 53.
- ↑ Ballantyne, 2013, p. 54–56.
- ↑ Watton, 1986, p. 7–8.
- ↑ Ballantyne, 2013, p. 65.
- 1 2 Ballantyne, 2013, p. 66.
- 1 2 3 4 Watton, 1996, p. 8.
- 1 2 Ballantyne, 2013, p. 67.
- 1 2 3 Ballantyne, 2013, p. 71.
- ↑ Ballantyne, 2013, p. 72.
- 1 2 Ballantyne, 2013, p. 73.
- ↑ Ballantyne, 2013, p. 77.
- 1 2 Ballantyne, 2013, p. 79.
- 1 2 3 4 Ballantyne, 2013, p. 80.
- ↑ Raven & Roberts, 1976, p. 234.
- 1 2 3 Ballantyne, 2013, p. 81.
- ↑ Brown 2012, p. 151–152.
- ↑ Ballantyne, 2013, p. 84.
- ↑ Roskill, 1957, p. 187.
- ↑ Plevy, 2001, p. 105.
- ↑ Ballantyne, 2013, p. 85.
- ↑ Ballantyne, 2013, p. 89.
- ↑ Ballantyne, 2013, p. 91.
- ↑ Ballantyne, 2013, p. 92.
- ↑ Ballantyne, 2013, p. 93.
- ↑ Churchill, 1948, p. 543.
- ↑ O'Hara, 2013, p. 43.
- ↑ O'Hara, 2013, p. 45.
- 1 2 O'Hara, 2013, p. 54.
- ↑ Ballantyne, 2013, p. 98–100.
- ↑ Ballantyne, 2013, p. 104.
- ↑ Ballantyne, 2013, p. 107.
- ↑ Ballantyne, 2013, p. 110.
- ↑ Garzke & Dulin, 1985, p. 154.
- ↑ Ballantyne, 2013, p. 111.
- ↑ Ballantyne, 2013, p. 113–114.
- ↑ Ballantyne, 2013, p. 116.
- ↑ Ballantyne, 2013, p. 117.
- ↑ Andrew, 1987, p. 179.
- ↑ Ballantyne, 2013, p. 118.
- ↑ Ballantyne, 2013, p. 119.
- ↑ Ballantyne, 2013, p. 122.
- ↑ Ballantyne, 2013, p. 124–125.
- ↑ Ballantyne, 2013, p. 126.
- ↑ Ballantyne, 2013, p. 126–127.
- ↑ Miller, 1997, p. 132.
- ↑ Ballantyne, 2013, p. 128–129.
- ↑ Churchill, 1950, p. 214.
- ↑ Churchill, 1950, p. 215.
- ↑ Churchill, 1950, p. 213–215.
- ↑ Miller, 1997, p. 135.
- ↑ Ballantyne, 2013, p. 131.
- ↑ Churchill, 1950, p. 257.
- ↑ Ballantyne, 2013, p. 133.
- ↑ Angolia & Bender, 1981, p. 81.
- ↑ Ballantyne, 2013, p. 138.
- ↑ Ballantyne, 2013, p. 138–139.
- ↑ Ballantyne, 2013, p. 140.
- ↑ Ballantyne, 2013, p. 143.
- ↑ Ballantyne, 2013, p. 145.
- ↑ Ballantyne, 2013, p. 148.
- ↑ Ballantyne, 2013, p. 150.
- 1 2 3 Ballantyne, 2013, p. 153.
- 1 2 Ballantyne, 2013, p. 160.
- 1 2 3 4 5 6 7 8 9 10 11 12 13 Mason, Geoffrey B; Mike Simmonds. "Service Histories of Royal Navy Warships in World War 2". Retrieved 27 October 2013.
- ↑ Sandler, 2001, p. 728.
- ↑ Ballantyne, 2013, p. 164.
- ↑ Ballantyne, 2013, p. 165.
- ↑ Ballantyne, 2013, p. 167.
- ↑ Ballantyne, 2013, p. 168.
- ↑ Ballantyne, 2013, p. 173.
- ↑ Ballantyne, 2013, p. 174.
- ↑ Ballantyne, 2013, p. 174–6.
- ↑ Hoyt, 2006, p. 82–83.
- ↑ Hoyt, 2006, p. 83.
- ↑ Ballantyne, 2013, p. 180.
- ↑ Ballantyne, 2013, p. 181.
- ↑ Ballantyne, 2013, p. 182.
- ↑ Ballantyne, 2013, p. 183.
- ↑ The London Gazette: (Supplement) no. 36334. p. 356. 18 January 1944.
- ↑ Ballantyne, 2013, p. 186–187.
- 1 2 Ballantyne, 2013, p. 188.
- 1 2 Ballantyne, 2013, p. 195.
- ↑ Ballantyne, 2013, p. 197.
- ↑ Larn, R. & Larn, B. (1991) Shipwrecks around Mounts Bay. Penryn: Tor Mark Press.
- ↑ Carter, C. (1998). The Port of Penzance. Lydney: Black Dwarf Publications. ISBN 0-9533028-0-6.
- ↑ "The history of Macsalvors". www.macsalvors.com. Retrieved 21 November 2016.
- ↑ Ballantyne, 2013, p. 200.
Bibliography
| Library resources about HMS Warspite (03) |
- Admiralty Historical Section (2002). The Royal Navy and the Mediterranean. Whitehall histories., Naval Staff histories. Vol. 2, November 1940 – December 1941. London: Whitehall History in association with Frank Cass. ISBN 0-7146-5205-9.
- Andrew, Christopher M; Noakes, Jeremy Noakes (1987). Intelligence and International Relations, 1900–1945. Exeter: University of Exeter Press. ISBN 978-0-85989-243-8.
- Angolia, John; Bender, Roger (1981). On the field of honor: a history of the Knight's Cross bearers, Volume 2. San Jose: R James Bender Pub. ISBN 978-0-91213821-3.
- Ballantyne, Iain (2013). Warspite, From Jutland Hero to Cold War Warrior. Barnsley, UK: Pen & Sword Maritime. ISBN 978-1-84884-350-9.
- Brooks, John (2005). Dreadnought Gunnery and the Battle of Jutland. London: Routledge. ISBN 978-0-7146-5702-8.
- Brown, David K. (2012). Nelson to Vanguard: Warship Design and Development 1923–1945. Barnsley: Pen & Sword. ISBN 978-1-84832-149-6.
- Burt, R. A. (2012). British Battleships, 1919–1939 (2nd ed.). Annapolis, Maryland: Naval Institute Press. ISBN 978-1-59114-052-8.
- Burt, R. A. (1986). British Battleships of World War One. Annapolis, Maryland: Naval Institute Press. ISBN 0-87021-863-8.
- Campbell, John (1972). Queen Elizabeth Class. Warship Monographs. 2. London: Conway Maritime Press. ISBN 0-85177-052-5.
- Campbell, N. J. M. (1998). Jutland: An Analysis of the Fighting. Lyons Press. ISBN 1-55821-759-2.
- Churchill, Winston S. (1985). The Gathering Storm: The Second World War Volume I. Houghton Mifflin Harcourt. ISBN 978-0-39541-055-4.
- Chesneau, Roger, ed. (1980). Conway's All the World's Fighting Ships 1922–1946. Greenwich, UK: Conway Maritime Press. ISBN 0-85177-146-7.
- Churchill, Winston S. (2010). The Grand Alliance: The Second World War Volume III. New York: Rosetta Books. ISBN 978-0-79530-612-9.
- Director of Naval Construction (1952). H.M. Ships Damaged or Sunk by Enemy Action, 1939–1945 (PDF). Britain: Admiralty.
- Gardiner, Robert & Gray, Randal, eds. (1984). Conway's All the World's Fighting Ships: 1906–1921. Annapolis: Naval Institute Press. ISBN 0-87021-907-3.
- Garzke, William H. & Dulin, Robert O. (1985). Battleships: Axis and Neutral Battleships in World War II. Annapolis, Maryland: Naval Institute Press. ISBN 978-0-87021-101-0.
- Gordon, Andrew (2012). The Rules of the Game: Jutland and British Naval Command. Annapolis, Maryland: Naval Institute Press. ISBN 978-1-59114-336-9.
- Hoyt, Edwin Palmer (2006). Backwater War: The Allied Campaign in Italy, 1943–45. Stackpole Books. ISBN 978-0-81173-382-3.
- Jellicoe, John (1919). The Grand Fleet, 1914–1916: Its Creation, Development, and Work. New York: George H. Doran Company. OCLC 13614571.
- Konstam, Angus (2009). British Battleships, 1939–45 (I): Queen Elizabeth and Royal Sovereign Classes. Osprey Publishing. ISBN 978-1-84603-388-9.
- Marder, Arthur J. (1978). From the Dreadnought to Scapa Flow, The Royal Navy in the Fisher Era, 1904–1919. III: Jutland and After, May 1916 – December 1916 (Second ed.). London: Oxford University Press. ISBN 0-19-215841-4.
- Massie, Robert K. (2003). Castles of Steel: Britain, Germany, and the Winning of the Great War at Sea. New York: Random House. ISBN 0-679-45671-6.
- Miller, Nathan (1997). War at Sea: A Naval History of World War II. London: Oxford University Press. ISBN 978-0-19511-038-8.
- O'Hara, Vincent P. (2013). The German Fleet at War, 1939–1945. Naval Institute Press. ISBN 978-1-61251-397-3.
- Parkes, Oscar (1990). British Battleships (reprint of the 1957 ed.). Annapolis, Maryland: Naval Institute Press. ISBN 1-55750-075-4.
- Plevy, Harry (2001). Battleship Sailors: The Fighting Career of HMS Warspite Recalled by Her Men. Chatham Publishing. ISBN 978-1-86176-151-4.
- Raven, Alan & Roberts, John A. (1976). British Battleships of World War Two: The Development and Technical History of the Royal Navy's Battleship and Battlecruisers from 1911 to 1946. Naval Institute Press. ISBN 0-87021-817-4.
- Rohwer, Jürgen (2005). Chronology of the War at Sea 1939–1945: The Naval History of World War Two (Third Revised ed.). Annapolis, Maryland: Naval Institute Press. ISBN 1-59114-119-2.
- Roskill, Stephen W. (1997). HMS Warspite: The Story of a Famous Battleship. Naval Institute Press. ISBN 978-1-55750-719-8.
- Sandler, Stanley (2001). World War II in the Pacific: An Encyclopedia. Taylor & Francis. ISBN 978-0-81531-883-5.
- Shores, Christopher; Cull, Brian & Malizia, Nicola (1987). Air War for Yugoslavia, Greece, and Crete. London: Grub Street. ISBN 0-948817-07-0.
- Silverstone, Paul H. (1984). Directory of the World's Capital Ships. New York: Hippocrene Books. ISBN 0-88254-979-0.
- Sutherland, Johnathan; Canwell, Diane (2010). The Battle of Jutland. Pen & Sword Maritime. ISBN 978-1-84415-529-3.
- Tarrant, V. E. (1999). Jutland: The German Perspective: A New View of the Great Battle, 31 May 1916 (reprint of the 1995 ed.). London: Brockhampton Press. ISBN 1-86019-917-8.
- Watton, Ross (1986). The Battleship Warspite. London: Conway Maritime Press. ISBN 1-59114-039-0.
- Whitley, M. J. (1999). Battleships of World War Two: An International Encyclopedia. Annapolis, Maryland: Naval Institute Press. ISBN 1-55750-184-X.
External links
| Wikimedia Commons has media related to HMS Warspite. |
- Maritimequest HMS Warspite Photo Gallery
- Troels W. Hansen, design details and model reconstructions of HMS Warspite
| Shipwrecks |
|
|---|---|
| Other incidents |
|
1942 August 1943 | |
| Shipwrecks |
|
|---|---|
| Other incidents |
|
1946 | |