HMS G9
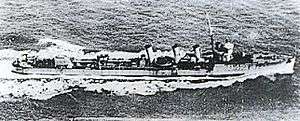
 G9 at Scapa Flow. Photo: R N Submarine Museum, Gosport. | |
| History | |
|---|---|
| Name: | HMS G9 |
| Builder: | Vickers, Barrow-in-Furness |
| Laid down: | 8 December 1914 |
| Launched: | 15 June 1916 |
| Commissioned: | 22 August 1916 |
| Fate: | Sunk 16 September 1917 |
| General characteristics | |
| Displacement: |
|
| Length: | 57.5 m (188 ft 8 in) |
| Beam: | 6.92 m (22 ft 8 in) |
| Draught: | 4.15 m (13 ft 7 in) |
| Propulsion: |
Twin-shaft, 2 × 800 bhp Vickers diesel, 2 × 840 shp electric motors |
| Speed: |
|
| Range: | 44.14 tons of fuel oil giving 3,160 nm surfaced at 10 knots (19 km/h). 95 nm submerged, at 3 knots (6 km/h). |
| Complement: | 31 |
| Armament: | Torpedoes: 2 × 18" bow tubes, 2 × 18" beam tubes, 1 × 21" stern tube. 10 torpedoes in total. Guns: 1 × 3" 10 cwt. Mk.1 Elswick Quick Fire High Angle {QFHA}, forward. 1 × 12 pdr. 8 cwt. Mk. 1 gun HA mounting, aft. |
HMS G9 was a British G class submarine, one of eight Royal Navy submarines lost to friendly fire in World War I.
Construction
The second of her class built by Vickers at Barrow-in-Furness,[1] G9 was laid down on 8 December 1914. She was launched on 15 June 1916, and commissioned on 22 August that year.
War service
The role of the G class was to patrol the North Sea and German Bight in search of U-boats.
Loss
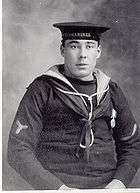
G9 was sunk by the destroyer HMS Pasley[2] in foul weather on the night of 16 September 1917. G9 had mistaken Pasley for a U-boat and fired two torpedoes at her. The first struck Pasley on her starboard quarter, but too acutely to detonate; the second passed astern. On seeing the submarine's wash, Pasley's officer of the watch, Midshipman Frank Wallis, RNR, turned the boat hard to starboard and rammed G9 just aft of amidships all but cutting her in two, and she sank less than one minute later with the loss of all but one of her crew, Stoker William Drake.

Commanded by Lieutenant Commander The Hon. Byron Plantagenet Cary, Bt.,[3] G9 had sailed Scapa Flow on 9 September to patrol an area between Shetland and Norway. On 15 September, she was ordered north to between latitudes 60.30 N and 61.30 N to keep her clear of the fleet on exercises en route from Rosyth to Scapa. Meanwhile, Pasley was attempting to locate merchantmen detached from the convoy she was escorting in appalling weather from Aspö Fjord in Norway to Lerwick, and had resorted to displaying a white light halfway up the mast by night. Weathering the heavy seas and blinding rain squalls, Cary sighted Pasley's light. Forewarned a U-boat was in the area, he gave the order to attack. Presumably realising the error soon afterwards, Cary ordered the connection of the cruiser arc lamp to signal the destroyer. The signal was recognised aboard Pasley; her captain, Commander Charles Ramsey, ordered 'Full Astern', but it was too late to prevent his ship ramming the submarine.
After the collision, the crew on G9 were ordered to assemble beneath the conning tower. Stoker William Drake saw one man climb the ladder above him, and followed. Although caught in the stomach by the lower conning tower door, which had probably been ordered shut in the hope of keeping the boat buoyant, Drake managed to struggle free and reach the bridge, only to be swept off as the boat sank beneath him. Of the five men in the water, Drake was the only one to reach Pasley, which had stopped to rescue survivors. Weakened by the effort and numbed by the cold water, Drake was unable to pull himself up on the lifeline lowered, and was only rescued after Able Seaman Henry Old clambered over the side of the destroyer to secure a running bowline around him; he was then hauled aboard and taken below. Still unconvinced of his attacker's identity, Commander Ramsey went to question the survivor. Finding Drake laid on his stomach to help rid his lungs of seawater, Ramsey kicked the soles of his feet and demanded to know his nationality. [4]
Aftermath
A Court of Inquiry was held aboard HMS Indomitable at Scapa, four days after the sinking. The court decided no blame could be attached to Pasley, concluding "that the process of reasoning which led the captain of HM Submarine G9 to mistake HMS Pasley for a U-boat is, and must remain, unexplained".
The findings were forwarded to the Commander in Chief, Grand Fleet, Admiral David Beatty, who remarked that the incident was "...one of those that are inseparable from war", but deplored the delay in introducing improved signalling facilities on submarines, particularly the substitution of the slow, unreliable and cumbersome cruiser arc lamp[5] with Aldis lamps.
Their Lords Commissioners of the Admiralty later directed Commander Ramsey to inform Midshipman Wallis that in the opinion of the Court of Inquiry the action taken by him "was the right action to take under the circumstances, and that its result, so deeply to be regretted, is evidence that it was taken with commendable promptness and precision....".
Wreck
The website 'Wrecksite' gives the final resting place of HMS G9 as approximately 70 miles north west of Bergen in position 61°00′N 3°20′E / 61.000°N 3.333°ECoordinates: 61°00′N 3°20′E / 61.000°N 3.333°E in 350 m of water. However, the wreck is not shown on the relevant UK hydrographic chart no. 299.
Epilogue
William Drake remained in the submarine service until the 1930s, and served aboard the frigate HMS Swale as Stoker Petty Officer in World War II; he died in 1974 aged 80. Commander Charles Gordon Ramsey rose to the rank of Admiral. After retiring in 1942, he was knighted, and served as aide-de-camp to King George VI; he died in 1966 aged 84. Photographic portraits of Ramsey by Bassano are held by the National Portrait Gallery, London.
List of casualties
|
|
|
See also
References
- Evans, A. S. (1986). Beneath the Waves – A history of British submarine losses. Kimber, London. ISBN 0-7183-0601-5
- Colledge, J. J.; Warlow, Ben (2006) [1969]. Ships of the Royal Navy: The Complete Record of all Fighting Ships of the Royal Navy (Rev. ed.). London: Chatham Publishing. ISBN 978-1-86176-281-8. OCLC 67375475.
Notes
- ↑ Barrow Submariners Association
- ↑ HMS Petard is often named in error as the destroyer involved; Petard was nowhere near the scene of the incident.
- ↑ Information on Cary, Byron Plantagenet, Lieut.-Cmdr
- ↑ Minutes of the Court of Inquiry held aboard HMS Indomitable, obtained from the Royal Navy Submarine Museum, Gosport.
- ↑ Grand Fleet Signalling Procedure, 1916
External links
| Shipwrecks |
|
|---|---|
| Other incidents |
|
1916 August 1917 | |