German attacks on Nauru
| German attacks on Nauru | |||||||
|---|---|---|---|---|---|---|---|
| Part of World War II | |||||||
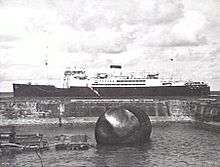
 Damaged phosphate cantilever loading equipment following the German bombardment of Nauru on 27 December 1940 | |||||||
| |||||||
| Belligerents | |||||||
|
|
| ||||||
| Commanders and leaders | |||||||
|
| |||||||
| Strength | |||||||
|
2 auxiliary cruisers 1 oiler | No military presence | ||||||
| Casualties and losses | |||||||
| None |
5 merchant ships sunk Damage to phosphate loading facilities | ||||||
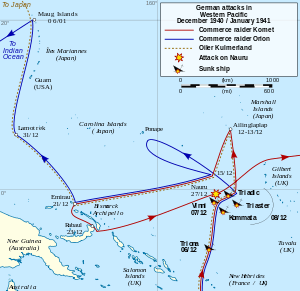
The German attacks on Nauru refers to the two attacks on Nauru in December 1940. These attacks were conducted by auxiliary cruisers between 6 and 8 December and on the 27th of the month. The raiders sank five Allied merchant ships and inflicted serious damage on Nauru's economically important phosphate-loading facilities. Despite the significance of the island to the Australian and New Zealand economies, Nauru was not defended and the German force did not suffer any losses.
The two attacks on Nauru were the most effective operations conducted by German raiders in the Pacific Ocean during World War II. They disrupted supplies of phosphate to Australia, New Zealand and Japan, which reduced agricultural production in these countries. In response, Allied naval vessels were deployed to protect Nauru and nearby Ocean Island and escort shipping in the South Pacific. Small garrisons were also established to protect the two islands.
Background
Nauru and nearby Ocean Island were important sources of phosphate for Australian and New Zealand fertilizer production and played an important role on both countries agriculture industries at the time of World War II. The Melbourne-based British Phosphate Commission (BPC) managed the extraction and export of phosphate from the islands and dominated all aspects of Nauruan life.[1] During the year ending 30 June 1940, the BPC shipped almost a million tons of phosphate from Nauru and about half that amount from Ocean Island using its fleet of four vessels (Triadic, Triaster, Triona and Trienza) and chartered merchant ships.[2]
As the islands have no harbours or anchorages, the phosphate ships were loaded by securing to deep moorings and embarking their cargo via cantilever jetties. During south-westerly wind periods—which are common from November to March—the ships had to stop loading and sail away from the island until conditions improved. It was common for these ships to be allowed to drift to save fuel, and there were often several vessels lying off Nauru.[3]
Despite their importance to the Australian and New Zealand economies, Nauru and Ocean islands had been allocated a low priority for the limited military assets which were available to protect the Australia Station and both islands were undefended in December 1940. Strategic stockpiles of phosphate had been built up in Australia, however, to lessen the impact of an attack on the islands.[4]


In late October 1940, the German raider Orion,[5] which was commanded by Captain Kurt Weyher met Komet,[6] which came under the command of Captain Robert Eyssen, and the supply ship Kulmerland at Lamotrek in the Caroline Islands. Eyssen was the more senior of the two captains, and assumed overall command of the force.[7] The three ships operated off New Zealand's east coast for 18 days during November and sank the small coaster Holmwood and large ocean liner Rangitane with gunfire without being detected by the weak New Zealand defences on 25 and 27 November respectively.[8] Following these attacks, the raiders proceeded to the Kermadec Islands where they transferred their women and children prisoners to Kulmerland on 29 November. The three ships then proceeded to Nauru to attack the island's phosphate industry and the concentration of shipping which the German captains knew was usually present.[7]
Attacks on Nauru
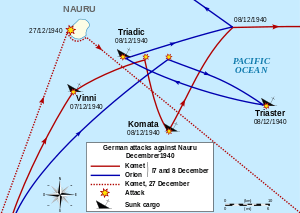
The German force encountered its first BPC ship while en route to Nauru. On 6 December, Triona (4,413 long tons (4,484 t)) was attacked north-east of the Solomon Islands and was sunk with torpedoes after a chase in which three of her crew were killed by the raiders' guns. All 68 survivors were captured.[7]
The raider captains intended to land a shore party and bombard Nauru's shore installations at dawn on 8 December, but bad weather forced them to concentrate on the ships which were off the island. On the evening of 7 December, Komet—which had gone ahead to reconnoitre and was disguised as the Japanese merchant ship Manyo Maru—sank the Norwegian merchant ship Vinni (5,181 long tons (5,264 t))[9] approximately 9 miles (14 km) south of Nauru. While the raider was spotted from the shore, her disguise was successful and she was assumed to be a merchant ship bound for Japan.[10]
Orion joined Komet off Nauru in the early hours of 8 December, and attacked and damaged Triadic (6,378 long tons (6,480 t)) and sank Triaster (6,032 long tons (6,129 t)). Komet then tried to sink Triadic with scuttling charges, but this was unsuccessful and Orion sank the merchant ship with gunfire. Komet later sank the British steamer Komata (3,900 long tons (4,000 t)). Following these attacks, the two raiders and Kulmerland withdrew and assembled 20 mi (17 nmi; 32 km) east of Nauru. As the weather precluded a landing on the island, it was decided that Komet and Kulmerland would go to Ailinglaplap in the Marshall Islands where Komet would refuel while Orion operated north-west of Nauru. Following this the ships would meet off the island and make another attempt to land a raiding party.[10]
When the German force reassembled off Nauru on 15 December, the weather continued to be too bad to permit a landing and the attack on Nauru was broken off. Further attacks on shipping were judged impractical as the raiders had intercepted radio messages ordering vessels bound for Nauru and Ocean Island to disperse. Instead, the three German ships proceeded to the Australian-administered island of Emirau to disembark the 675 prisoners they were carrying.[10] While Weyher refused to release any of the European ethnic prisoners on board Orion as he believed that "trained officers and crews are as much a problem for Britain as shipping itself", the ships landed 343 Europeans and 171 Chinese and South Pacific-ethnic people.[11]
Fortunately for the Germans, Emirau was one of the few islands in the region to not have a Royal Australian Navy-supplied radio to contact the Australian authorities.[12] The two European families on the island provided the released prisoners with supplies, and sent a canoe to Kavieng in New Ireland to notify the Australian colonial government. A schooner was dispatched to bring additional supplies to Emirau, and arrived there on 24 December. The colonial administrator of New Britain and further supplies was also flown to Emirau on board a flying boat. The released prisoners were embarked onto the steamer Nellore on 29 December to be transported to Townsville in Queensland, where they arrived on 1 January 1941. They provided useful intelligence on the German raiders' operations, and the German Naval Staff issued a directive on 19 February 1941 prohibiting raiders from releasing further prisoners.[13]
The three German ships parted company after leaving Emirau on 21 December. Orion proceeded to Lamutrik and then Maug in the Mariana Islands to overhaul her engines, Kulmerland went to Japan and only Komet continued operations in the South Pacific. She attempted to lay mines off Rabaul on 24 December using her motor boat, but this project was abandoned when the boat's engines failed.[10]
Komet returned to Nauru following the unsuccessful attempt to mine Rabaul, and arrived off the island at 05:45 on the morning of 27 December. After issuing a warning for those on shore to not use radio and signalling her intent to destroy the phosphate loading plant, she opened fire at 06:40. The bombardment lasted for about an hour, during which time the raider wrecked the loading plant, oil tanks, boats, buildings and mooring buoys. Following this attack she sailed to the south east and Nauru broadcast news of the attack to Australia.[10] This was the last visit of German ships to Nauru during the war, and Komet transferred her activities to the Indian Ocean.[14]
Aftermath
The German raids on Nauru affected the Australian and New Zealand economies and were the greatest success achieved by German raiders in the Pacific Ocean during World War II.[15] It took ten weeks to resume phosphate shipments from Nauru, and the loss of ships and damaged infrastructure led to a significant decline in output. The resulting phosphate shortages forced the introduction of fertilizer rationing in New Zealand from July 1941. Komet's bombardment of the island also interfered with phosphate consignments to Japan, which caused the Japanese government to threaten to reduce the aid it was providing to Germany.[15] The success of the attacks on Nauru led to rumours in Australia and New Zealand that the raiders had been aided by treachery in the islands. Several investigations were conducted into the rumours and proved them to be unfounded.[14]
Following the raids, the Commonwealth military forces in the Pacific took steps to prevent further attacks by raiders. The Royal Australian Air Force and Royal New Zealand Air Force flew an increased number of patrols in search of raiders operating near major ports.[16] In addition, the Australian Naval Board requested that the British Admiralty authorise the redeployment of Australian naval units to meet the threat posed by raiders. This was agreed to, and the light cruiser HMAS Sydney and armed merchant cruiser HMAS Kanimbla returned to Australia from other stations. This allowed naval protection to be provided to Nauru and Ocean islands, and the armed merchant cruiser HMAS Manoora arrived off Ocean Island on 4 January 1941 escorting Trienza. Several Australian and New Zealand warships maintained a continual presence off the islands during subsequent months, and two field guns were deployed to each island. The attacks also led to the introduction of convoys between Australia and New Zealand.[17] The naval authorities were able to use the intelligence they gained from the prisoners landed at Emirau to re-route merchant ships away from the areas in which the German raiders were operating; this greatly reduced the effectiveness of the raiders, and Komet and Orion only sank three ships in the period between the attack on Nauru and their return to Europe in late 1941.[16]
Ships sunk
- by Komet
- by Komet together with Orion
See also
- Japanese occupation of Nauru
- Frederick Royden Chalmers (Administrator of Nauru)
Notes
- ↑ Pretes (2003), pp. 24–25
- ↑ Gill (1957), pp. 276–277
- ↑ Gill (1957), p. 277
- ↑ Gill (1957), p. 283
- ↑ "Hilfskreuzer (Auxiliary Cruiser) Orion". Retrieved 5 December 2013.
- ↑ "Hilfskreuzer (Auxiliary Cruiser) Komet". Retrieved 5 December 2013.
- 1 2 3 Gill (1957), p. 280
- ↑ Jackson (1998), p. 94
- ↑ "MS Vinni's Story, Victim of Komet". Warsailors.com. Retrieved 2008-09-05.
- 1 2 3 4 5 Gill (1957), p. 281
- ↑ Waters (1956), p. 145
- ↑ Jackson (1998), p. 95
- ↑ Waters (1956), pp. 145–146
- 1 2 Gill (1957), p. 282
- 1 2 Waters (1956), pp. 147–148
- 1 2 Forczyk (2010), p. 62
- ↑ Gill (1957), p. 284
- ↑ "MV Vinni (+1940)". Wreaksite. Retrieved 5 December 2013.
- ↑ "SS Komata (+1940)". Wreaksite. Retrieved 5 December 2013.
- ↑ "MV Triadic (+1940)". Wreaksite. Retrieved 5 December 2013.
- ↑ "MV Triaster (+1940)". Wreaksite. Retrieved 5 December 2013.
References
| Wikimedia Commons has media related to World War II in Nauru. |
- Forczyk, Robert (2010). German Commerce Raider vs British Cruiser : The Atlantic & The Pacific, 1941. Oxford: Osprey. ISBN 978-1-84603-918-8.
- Gill, G. Hermon (1957). Royal Australian Navy 1939–1942. Australia in the War of 1939–1945. Series 2 – Navy. Volume 1. Canberra: Australian War Memorial. OCLC 848228.
- Jackson, Richard (1998). "Forcing Force Development: The Impact of the German raiders on New Zealand's Maritime Defences". In David Stevens. Maritime Power in the 20th Century: The Australian Experience. Sydney: Allen & Unwin. ISBN 1-86448-736-4.
- Pretes, Michael (2003). "The Nauru Connection". Wartime. Canberra: Australian War Memorial (23). ISSN 1328-2727.
- Waters, Sydney David (1956). The Royal New Zealand Navy. The Official History of New Zealand in the Second World War 1939–1945. Wellington: Historical Publications Branch.
Coordinates: 0°32′11.28″S 166°54′33.78″E / 0.5364667°S 166.9093833°E