Garland Trench Mortar
| Garland Trench Mortar | |
|---|---|
|
A Garland Trench Mortar recovered from Gallipoli in 1919 and now in the collection of the Australian War Memorial, Canberra. | |
| Type | Trench mortar |
| Place of origin | United Kingdom |
| Service history | |
| Used by | Australia |
| Wars | World War I |
| Production history | |
| Designer | Herbert Garland |
| Manufacturer | Cairo Citadel |
| Specifications | |
| Shell | Jam Tin Grenade |
| Caliber | 65mm |
| Elevation | Fixed at 45° |
| Traverse | None |
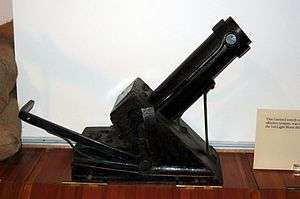
The Garland Trench Mortar was an improvised mortar used by Australian and British forces at Gallipoli during the Dardanelles Campaign of 1915–16. Developed early in the war by Herbert Garland, a pre-war metallurgist and superintendent of laboratories at the Cairo Citadel, it was the most numerous mortar of the Gallipoli campaign. A simple, improvised design the Garland mortar consisted of a smoothbore steel barrel fixed at 45 degrees to a solid wooden base. By means of a powder charge it propelled a variant of the Jam Tin Grenade. Its design meant that the whole weapon had to be turned to change its traverse and raised on a box to increase its range but despite these limitations it was reported to have done "good work" in the front line.
Design
The mortar was developed by Herbert Garland, superintendent of laboratories at the Cairo Citadel in Egypt.[1] The weapon was of straightforward construction, comprising a plain, smoothbore, tempered steel barrel of 65mm calibre fitted at a fixed 45-degree angle to a solid wooden base.[2][3] The bombs themselves were variants of the Jam Tin Grenade with a steel shaft affixed.[2][4] The shaft protruded down the barrel of the mortar to the charge (of 5 drams of smokeless powder), leaving the bomb itself outside the barrel.[5] A white calico tail was affixed to the bomb to improve the accuracy of its flight.[2] With the barrel affixed to the base the only means of traversing was to turn the entire unit. Since the barrel was fixed at a 45 degree angle, the mortar was already set up to fire the grenade the maximum theoretical distance for a ballistic projectile.[6][7] To change the range the entire mortar had to be raised vertically, typically by propping it up on a box.[3] Raising only the front of the mortar so the barrel was at an angle greater than 45 degrees would reduce the distance travelled by launching the grenade into a higher trajectory more typical of a mortar. Raising the back would also reduce the distance travelled by launching the grenade into a flatter trajectory more typical of a cannon. A spotter was able to track the progress of the bomb during daylight by watching for the shaft revolving in the air and at night the sparks from the bomb's fuse marked its progress.[4]
In service
General William Birdwood, commander of the Australian and New Zealand Army Corps, in correspondence with Garland agreed to trial the mortar during the Dardanelles Campaign.[1] The weapon was manufactured at the Citadel in Cairo and proved to be in great demand by units posted to Gallipoli.[8] Several Australian units had them in service as well as the Highland Light Infantry, Worcestershire Regiment and Suffolk Regiment.[9][10][11][12] Ammunition was in plentiful supply and the Garland soon became the most common mortar in use at Gallipoli, the Australian 1st Division having seven in service by October 1915.[2][13]
One report from the front line suggests that the bomb failed to detonate on all occasions, a problem blamed on the gelatine used in the charge. The same source suggests that the instructed quantity of propellant was not sufficient and had to be increased by 2 drams to throw the charge the required distance, but still noted that the mortar was reported to have done "good work" from the trenches.[5] There is an example of the weapon in the Australian War Memorial, Canberra that was recovered from Lone Pine, Gallipoli in January 1919.[9]
Gallery
 A Garland mortar in a trench with men of the 6th battalion
 A Garland mortar in firing position at Quinn's Post
References
- 1 2 "Private Papers Major H Garland MBE MC (Documents.12477)". Imperial War Museum. Retrieved 29 March 2014.
- 1 2 3 4 Summer, Ian. ANZAC Infantryman 1914-15: From New Guinea to Gallipoli. Osprey Publishing. p. 30.
- 1 2 Summer, Ian. ANZAC Infantryman 1914-15: From New Guinea to Gallipoli. Osprey Publishing. p. 28.
- 1 2 Bean, Charles (1935). The Official history of Australia in the War of 1914-1918. Angus and Robertson. p. 288.
- 1 2 "Regimental Sergeant Major Horace Gray field message book, Nov. 23-Dec. 13, 1915". State Library, New South Wales.
- ↑ Range of a projectile#Derivations
- ↑ File:Ideal projectile motion for different angles.svg
- ↑ Military Operations: Gallipoli, Volume 2. W. Heinemann. p. 13.
- 1 2 "Garland Trench Mortar : Lone Pine, Gallipoli". Australian War Memorial.
- ↑ Morrison, F.L. (1921). The Fifth Battalion Highland Light Infantry in the War 1914-1918. Glasgow: MacLehose, Jackson and Co. p. 19.
- ↑ Stacke, Harry. The Worcestershire Regiment in the Great War. G.T. Cheshire & Sons. p. 112.
- ↑ Fair, A.; Wolton, E.D. (1923). The Suffolk Regiment: the history of the 1/5th battalion. Eyre and Spottiswoode. p. 30.
- ↑ Robertson, John (1990). Anzac and empire: the tragedy and glory of Gallipoli. Cooper. p. 105.
External links
| Wikimedia Commons has media related to Garland Mortar. |