First Battle of Algeciras
| First Battle of Algeciras | |||||||
|---|---|---|---|---|---|---|---|
| Part of the French Revolutionary Wars | |||||||
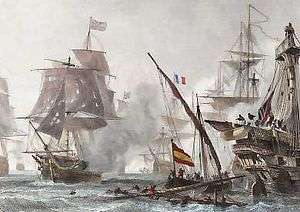 Algéciras, 6 Juillet 1801 by Alfred Morel-Fatio | |||||||
| |||||||
| Belligerents | |||||||
|
|
| ||||||
| Commanders and leaders | |||||||
|
|
| ||||||
| Strength | |||||||
| 6 ships of the line | 3 French ships of the line and 1 frigate. 14 Spanish gunboats and extensive shore defences | ||||||
| Casualties and losses | |||||||
| 121 killed, 240 wounded, 14 missing. HMS Hannibal captured. |
| ||||||
Coordinates: 36°08′00″N 05°25′45″W / 36.13333°N 5.42917°W
The First Battle of Algeciras was a naval battle fought on 6 July 1801 (17 messidor an IX of the French Republican Calendar) between a squadron of British Royal Navy ships of the line and a smaller French Navy squadron at anchor in the fortified Spanish port of Algeciras in the Strait of Gibraltar. The British outnumbered their opponents, but the French position was protected by Spanish gun batteries and the complicated shoals that obscured the entrance to Algeciras Bay. The French squadron, under Contre-Admiral Charles Linois, had stopped at Algeciras en route to the major Spanish naval base at Cadiz, where they were to form a combined French and Spanish fleet for operations against Britain and its allies in the French Revolutionary Wars. The British, under Rear-Admiral Sir James Saumarez, sought to eliminate the French squadron before it could reach Cadiz and form a force powerful enough to overwhelm Saumarez and launch attacks against British forces in the Mediterranean Sea.
Sailing directly from his blockade station off Cadiz, Saumarez's squadron consisted of six ships of the line, twice the number under Linois's command. Discovering the French at anchor in Algeciras on the morning of 6 July, Saumarez launched an immediate attack on the anchorage through the complicated shoals of Algeciras Bay. Although the initial attack caused severe damage to the French ships, light winds and shallow water led to the British ship HMS Hannibal grounding under heavy fire while the French vessels were driven on shore to prevent their capture. With his intentions frustrated, Saumarez ordered his squadron to withdraw, five of his ships limping out of the bay while the batted Hannibal remained trapped. Isolated and unable to manoeuvre, Captain Solomon Ferris on Hannibal endured the enemy fire for another half an hour before surrendering his ship.
Both sides had suffered severe damage and casualties, but both were also aware that the battle would inevitably be rejoined and so the aftermath of the British defeat was one of frenzied activity at Gibraltar, Algeciras and Cadiz. While the British and French squadrons conducted hasty repairs, the French and Spanish fleet at Cadiz was prepared for a rescue mission, a heavy squadron arriving at Algeciras on 12 July. As the squadron departed with Linois's squadron, it was attacked again by Saumarez's squadron at the Second Battle of Algeciras and caught at night by faster and more manoeuvrable ships, which resulted in the British inflicting heavy losses on the Spanish rearguard but failing to destroy the French squadron for a second time.
Background
On 1 August 1798, the French Mediterranean Fleet was almost completely destroyed at the Battle of the Nile in Aboukir Bay off Egypt. As a result, the British Royal Navy became dominant in the Mediterranean Sea and imposed blockades on French and Spanish ports in the region, including the important naval bases of Toulon and Cadiz.[1] By 1801, the British were planning a large scale operation to invade and recapture Egypt from the French, and First Consul Napoleon Bonaparte made plans to restore the Mediterranean Fleet and reinforce the garrison before the invasion took place. To this end, a squadron was despatched to Egypt from the French Atlantic ports and an agreement was reached with the Spanish Navy to supply the French Navy with six ships of the line from their reserve at Cadiz.[2] The squadron never reached Egypt, diverting to Toulon under British pressure and separating, the most seaworthy vessels making a vain attempt to Egypt later in the year while the remainder were left at Toulon.[3]
In June 1801, a squadron of three ships of the line that had been detached from the Egyptian squadron departed Toulon for Cadiz under the command of Contre-Admiral Charles Linois. The squadron's orders instructed Linois to join with the French and Spanish fleet at Cadiz and take possession of the promised vessels.[4] From there the combined fleet, bolstered by 1,500 French soldiers under General Pierre Devaux on Linois's ships,[5] could launch major operations against British forces or those of their allies: attacks on Egypt and Lisbon were both suggested, although no firm plan had been drawn up for either.[4] Able to leave Toulon without resistance in the absence of the British blockade squadron, Linois passed along the Spanish Mediterranean Coast without interception, passing the fortified British port of Gibraltar on 3 July. There Linois was informed by Captain Lord Cochrane, captured in his brig HMS Speedy on 4 July, that a powerful squadron of seven British ships of the line were stationed off Cadiz under Rear-Admiral Sir James Saumarez. On hearing this news, Linois postponed the plan to reach the Spanish naval base and instead anchored at Algeciras, a well-fortified coastal town in Algeciras Bay, within sight of Gibraltar.[6]
At Gibraltar, the only ship in harbour was the small sloop-of-war HMS Calpe under Captain George Dundas, who on sighting the French squadron immediately sent word to Saumarez off Cadiz. The message arrived on 5 July, delivered by Lieutenant Richard Janvrin in a small boat. The admiral, a veteran of the Battle of the Nile, immediately gathered his ships and sailed eastwards to investigate.[7] He had only six ships of the line as one, HMS Superb under Captain Richard Goodwin Keats, was on detached duty at the mouth of the Guadalquivir River with the brig HMS Pasley. Saumarez sent messages in the frigate HMS Thames recalling Keats, who followed Saumarez towards Algeciras, and was in sight of the admiral's ship on the horizon at dawn on 6 July. However, after hearing an inaccurate report from an American merchant ship that Linois had already sailed from Algeciras, Keats reasoned that the French would have turned eastwards for Toulon and thus he would be too late to catch them. He therefore resolved to return to his station observing the Spanish at Cadiz, retaining Pasley and Thames.[8]
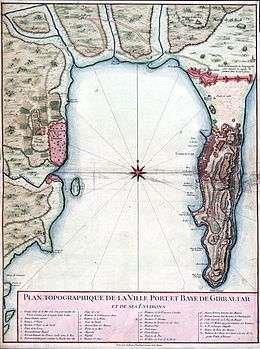
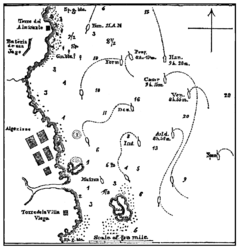
As Saumarez sailed eastwards towards Algeciras against the wind, the already strong defences at Algeciras were augmented to meet him: Linois drew his ships up in a line of battle across the harbour, with the flagship Formidable at the northern edge, followed by Desaix and with Indomptable to the south, the ships each 500 yards (460 m) apart. The frigate Muiron was stationed in shallower water to the south of Indomptable. The French position was strengthened by the presence of 11 large Spanish gunboats at the northern extremity of the harbour, which was also overlooked by fortifications at the Bateria de San Iago and the Torre de Almirante.[9] The southern approach to the harbour was covered by three gunboats and batteries at Fort Santa Garcia and Torre de la Vila Vega on the shore and the fortified island of Isla Verda, which mounted seven heavy cannon, lay between Indomptable and Muiron.[10] Further support was offered by more distant forts that could land shells in the anchorage and most importantly by the geography of the bay, which was scattered with complicated shoals and rocks that made navigation difficult for unfamiliar sailors.[11]
Battle
Saumarez's attack
Delayed during 5 July by contrary winds, Saumarez's squadron did not reach Algeciras until 07:00 on 6 July, the British admiral deciding to immediately descend on the French squadron and issuing orders for his ships to launch their small boats "in readiness to act when required."[9] Thousands of spectators lined both the Spanish and Gibraltan shoreline in anticipation of the battle to come.[12] Orders had been given for HMS Venerable under Captain Samuel Hood to lead the attack as the officer with most experience in these waters, and his vessel was the first to enter the bay around Cabrita Point.[13] Once in the bay however, the wind dropped and Hood was left becalmed. As a result, the first shots of the engagement were fired from a battery on Cabrita Point at HMS Pompee under Captain Charles Stirling, which entered the bay at 07:50, followed closely by HMS Audacious under Captain Shuldham Peard. On sighting the British squadron, Linois gave orders for the French ships to warp into the shallower waters along the shoreline, and many sailors and soldiers aboard were despatched to assist the Spanish gun batteries around the bay.[14] The French ships joined the fire as Pompee and Audacious came within range, first Murion and then the ships of the line attacking the approaching British vessels.[15]
Saumarez and remainder of the British squadron were 3 nautical miles (5.6 km) behind the leading ships but Stirling pressed ahead with the attack, passing close to the Isla Verda at 08:30 and engaging each of the French ships in turn until anchoring next to Formidable at 08:45 and opening fire from close range.[6] Venerable and Audacious suffered from light winds further out in the bay and it was not until 08:50 that they were able to enter the action, Venerable firing on Desaix and Formidable and Audacious on Indomptable although, contrary to Saumarez's orders, both were anchored at long range.[16] The French and Spanish responded with a heavy cannonade against the anchored ships, the engagement lasting half an hour until Formidable temporarily ceased firing and began to slowly warp further inshore. Suddenly, Pompee was caught by a fresh current, which swung the ship so that its bow was facing Formidable's broadside, although at some distance, allowing the French to rake the British ship which could only respond with a handful of the forward cannon.[17] Assistance was provided by Dundas in Calpe, who took his small vessel inshore to engage the Spanish batteries firing on the British squadron,[13] and also attacked Murion at close range, the undermanned frigate still powerful enough however to drive off its smaller opponent.[18]
At 09:15 the straggling rear of the British squadron began to arrive, led by the flagship HMS Caesar, which anchored ahead of Audacious and inshore of Venerable before opening fire on Desaix. At 09:20, HMS Hannibal under Captain Solomon Ferris joined the action, anchoring ahead of Caesar. This left only HMS Spencer under Captain Henry Darby unengaged: Spencer had been left becalmed to the south of Isla Verda and came under heavy fire from the batteries and towers, some of which were firing shells hot shot designed to start fires in the ship's timbers.[19] Captain Jahleel Brenton on Caesar suggested to Saumarez that if he negotiated with the Spanish they might permit him to seize the French ships in exchange for a cessation of the action, but Saumarez dismissed the idea as premature.[20] At 10:12, with Formidable pulling into shallower waters away from the attacking British ships, Saumarez sent orders to Captain Ferris on Hannibal instructing him to manoeuvre his ship closer inshore to attack Formidable more effectively: specifically he was told to "go and rake the French admiral". Ferris began by sailing slowly northwards, using the light winds to pull ahead of the combat before tacking back towards Formidable. The manoeuvre was initially successful, but at 11:00, as he passed the Torre de Almirante, Hannibal grounded. From this position, Ferris was able to direct part of his broadside onto Formidable and the rest against the Spanish shore defences, but his ship was left very vulnerable to fire from the shore.[21]
Hannibal was now isolated at the northern end of the British line, under heavy fire from Formidable as well as the Spanish shore batteries and gunboats and unable to manoeuvre or effectively respond. Ferris attempted to notify Saumarez of his ship's precarious position, but his signal halyards had been torn away by shot and it was sometime before assistance could be organised.[19] The rest of the squadron was ordered to provide ship's boats to attempt to tow Hannibal off the shoal but the attempt failed, Caesar's pinnace sinking in the process after being struck by a cannonball.[21] Ultimately, Hannibal was left stranded as the last of the seabreeze disappeared, preventing any of the other British ships from coming to Ferris' assistance. There was however a light land breeze from the northwest that initially favoured the outnumbered and battered French squadron, Linois immediately ordering his ships to sever their anchor cables and use the breeze to manoeuvre slowly into stronger defensive positions closer inshore. His flagship Formidable successfully completed the manoeuvre, but neither Indomptable nor Desaix could be brought back under control in time, and both grounded, Desaix directly in front of Algeciras and Indomptable northeast of Isla Verda with her bow facing out to sea.[22]
Saumarez responded by cutting his the cables on Caesar and wearing past the becalmed Audacious and Venerable, taking up station off Indomptable's vulnerable bows and repeatedly raking the stranded ship. Audacious followed the flagship at 12:00, taking up a new station between Caesar and Indomptable and also opening fire on the beleaguered Indomptable. Both Caesar and Audacious were now directly exposed however to the heavy fire from Isla Verda, the batteries there and all around the bay now manned by French sailors who had evacuated the grounded ships of the line. Audacious had been becalmed with Desaix off the bow and out of the ship's field of fire and it took considerable time and effort with the ship's boats to affect the turn needed to engage the French ship.[18] Spencer and Venerable, ordered to join the attack, were unable to take up their intended positions due to the absence of wind, Venerable losing its mizen-topmast to French shot as Hood attempted to wear his ship around.[22] Venerable's masts and rigging had been so badly torn by this stage of the battle that Hood was no longer able to effectively manoeuvre in the fitful breeze, although he did eventually pull his ship within range.[18]
Saumarez's withdrawal

To the north of this engagement, the trapped Pompée and Hannibal were under heavy fire from the anchored Formidable and an array of Spanish batteries and gunboats, both ships taking severe damage without being able to effectively reply as their main broadsides now faced away from the enemy.[19] On Hannibal the situation seemed hopeless: as casualties mounted, the main and mizen masts were shot away and the ship remained firmly and irretrievably grounded. Pompée was in a slightly better position: Sterling's rigging was in tatters, but his masts held and his ship was at least afloat, although totally becalmed. At one stage, Pompée's colours were shot away, leading to French claims that the ship had surrendered, although they were quickly replaced. At 11:30, no longer able to contribute to the battle with rigging torn and more than 70 casualties, Saumarez ordered the remainder of the squadron to send their remaining boats to tow Pompée out of danger,[18] the boats coming under heavy fire as they did so, with a number sunk.[17]
The diversion of the boats to Pompée prevented Saumarez from launching a planned amphibious assault against Isla Verda with the squadron's Marines, and in the fitful breeze, both Caesar and Audacious were beginning to drift dangerously close to the shoals around the island: if they grounded, then they would share Hannibal's fate directly in front of the island's batteries.[21] Observing the failure of his planned attack on the French squadron, Saumarez raised the signal at 13:35 for his ships to withdraw to Gibraltar.[22] Pompée was already well on the way thanks to the towing boats, and Caesar and Audacious were able to cut their remaining anchors and limp out of the bay with the assistance of a sudden land breeze that carried them rapidly out of reach of the French and Spanish guns. They were joined by Venerable and Spencer as they left, the battered squadron retiring to Gibraltar leaving the almost dismasted hulk of Hannibal grounded in Algeciras harbour.[17]
On Hannibal, more than sixty men had been killed and Captain Ferris ordered the survivors below decks to escape the worst of the fire as the combined guns of the French and Spanish forces turned on the last remaining target, starting several fires. By 14:00, seeing that continued resistance was futile, he had ordered the colours struck, and the Hannibal's ensign came down.[23] French and Spanish soldiers then stormed the ship, and Hannibal's surgeon later reported that a number of wounded men were trampled to death as the boarding parties sought to extinguish the fires.[24] It has not been established whether what followed was a misunderstanding aboard Hannibal or a deliberate ploy by the French, but Hannibal's ensign was then rehoisted upside down, a recognised international signal of distress.[25] Captain Dundas, who had watched the entire battle from Gibraltar, believed on seeing the flag that it meant that Ferris was still holding out on Hannibal and requesting either support to salvage his battered ship or for it to be evacuated before surrendering. Boats were sent from Gibraltar with carpenters from the dockyards there to effect repairs on Hannibal and Dundas took HMS Calpe back into the bay to provide assistance, coming under heavy fire before withdrawing when his error was realised, although not before several of the boats had been seized by the French as their crews boarded Hannibal.[23]
Aftermath
Both sides had suffered heavy casualties and damage, the British losing 121 killed, 240 wounded and 11 missing, the missing thought to have drowned when their boats were sunk. As well as the loss of Hannibal, both Pompée and Caesar were heavily damaged, although both Venerable and Spencer had only suffered relatively lightly during the battle. Casualties were heavy throughout the squadron, Hannibal suffering more than 140 men killed and wounded and the rest made prisoner, Pompée more than 80 casualties and none of the other ships less than 30.[23] The French had suffered higher casualties, with 161 killed, including Captains Moncousu and Lalonde and 324 wounded, including Devaux.[Note A] All three French ships of the line were damaged: Saumarez believed that the French ships "were unserviceable" following the battle, although he was soon proven incorrect. Indomptable and Desaix were particularly damaged, although the frigate Murion, which had remained in the shallow water of Algeciras harbour, was undamaged.[26] The Spanish reportedly had 11 men killed and an unspecified number wounded, the casualties occurring in the battered forts and on the gunboats, five of which had been destroyed in the battle.[27] The British crews had found during the engagement that their gunnery was affected by the lack of wind, much of their shot flying over the French ships and into the town of Algeciras, which was considerably damaged.[28] The Spanish authorities later accused Saumarez of deliberately targeting the town in his frustration at being unable to capture the French squadron.[29]
On 7 July, Saumarez sent Captain Brenton into Algeciras with a flag of truce and negotiations were held with a view to returning Captain Ferris and his officers to British control under terms of parole. After a brief correspondence between Linois and Saumarez this was agreed, and Ferris, his officers, his wounded men and the officers taken from HMS Speedy were sent to Gibraltar.[30] By August 1801, Ferris and his officers were back in Britain, where a court-martial, standard practice in the case of a ship lost to the enemy, was held. Rear-Admiral John Holloway presided and the court found that Ferris' conduct during the battle was exemplary and he was acquitted of any blame for the loss of his ship. On returning his sword, Holloway remarked that "I feel assured, if ever you have occasion to unsheathe it again, it will be used with the same gallantry which you so nobly displayed in defending his majesty's ship Hannibal."[31]
The immediate reaction in both Algeciras and Gibraltar was devoted to repairing and refitting the damaged warships: it was assumed by all involved that continuation of the action had merely been postponed rather than concluded. At Gibraltar, Saumarez decided to temporarily abandon Pompée and Caesar and reassign their crews to ensuring that the rest of the squadron was ready for battle. This decision was disputed by Captain Brenton of Caesar, and by working continuously for three days Caeasar's crew successfully readied their ship in time for Saumarez to sail again.[32] The haste was necessary because Linois, while strenuously repairing his own squadron and readying the captured Hannibal for sea with jury masts, had sent word to Cadiz urging Vice-Admiral Jose de Mazzaredo to send reinforcements before Saumarez was ready to attack again. Urged by French Contre-Admiral Pierre Dumanoir le Pelley, who was in Cadiz to take occupation of the promised six ships of the line, Mazzaredo ordered Vice-Admiral Juan Joaquin de Moreno to sail with a formidable force which arrived off Algeciras Bay on 9 July.[33] The Franco-Spanish squadron was shadowed by Superb, which then joined Saumarez at Gibraltar.[34] At Algeciras the Spanish squadron intended to collect Linois and convoy his battered squadron to Cadiz with five ships of the line, including two massive 112-gun first rate ships, as escorts. Hannibal proved too damaged for the journey and was anchored in Algeciras harbour, but the remainder of the French and Spanish squadrons sailed for Cadiz on 12 July and were caught that night by Saumarez's repaired squadron in the Second Battle of Algeciras.[35] The Spanish rearguard was overwhelmed, the 112-gun ships both sunk with more than 1,700 lives and another ship was captured, but Linois's force succeeded in reaching Cadiz the following morning. Hannibal was later removed from Algeciras by the French and commissioned as Annibal.[36]
In France, the victory was the cause of celebration, Le Moniteur Universel declaring that "the combat covers the French arms with glory and shows what they are capable of". Linois was proclaimed a national hero and presented with a Sabre d'honneur by Napoleon.[37] The French victory over a significantly stronger British force was an unusual event in the war during which the Royal Navy had dominated at sea. Saumarez publicly represented the battle as a victory, declaring that he had "compleatly [sic] succeeded in disabling the Enemy's ships", although in private he acknowledged the defeat.[38] Historian Richard Gardiner commented that "The well trained and led French had fought hard and skillfully and a combination of weather, luck and shore support had given them the victory against a superior force of which they had captured one. It is, however, also significant that this rare British setback occurred close inshore with all the difficulties and chanciness that implied."[39]
Notes
- ^ Note A: Reports of French casualties vary widely. James and Clowes quote French reports of 306 killed and 280 wounded in total and Spanish reports that the French suffered 500 wounded.[26][27] However in his breakdown of French casualties ship by ship, Musteen only records 161 killed and 324 wounded.[38]
References
- ↑ Gardiner, p. 58
- ↑ Woodman, p. 161
- ↑ James, p. 93
- 1 2 James, p. 112
- ↑ Woodman, p. 159
- 1 2 Gardiner, p. 88
- ↑ Clowes, p. 459
- ↑ Clowes, p. 460
- 1 2 Clowes, p. 461
- ↑ Musteen, p. 34
- ↑ James, p. 114
- ↑ Mostert, p. 407
- 1 2 The London Gazette: no. 15391. pp. 930–931. 28 July 1801. Retrieved 6 April 2012.
- ↑ Mostert, p. 404
- ↑ Musteen, p. 35
- ↑ Clowes, p. 462
- 1 2 3 Gardiner, p. 89
- 1 2 3 4 Musteen, p. 37
- 1 2 3 James, p. 116
- ↑ Musteen, p. 36
- 1 2 3 Clowes, p. 463
- 1 2 3 James, p. 117
- 1 2 3 Clowes, p. 464
- ↑ Mostert, p. 405
- ↑ James, p. 118
- 1 2 Clowes, p. 465
- 1 2 James, p. 119
- ↑ Musteen, p. 38
- ↑ Musteen, p. 40
- ↑ James, p. 122
- ↑ James, p. 123
- ↑ Mostert, p. 406
- ↑ Gardiner, p. 92
- ↑ James, p. 124
- ↑ Clowes, p. 467
- ↑ James, p. 355
- ↑ Musteen, p. 39
- 1 2 Musteen, p. 41
- ↑ Gardiner, p. 90
Bibliography
- Clowes, William Laird (1997) [1900]. The Royal Navy, A History from the Earliest Times to 1900, Volume IV. London: Chatham Publishing. ISBN 1-86176-013-2.
- Gardiner, Robert (editor) (2001) [1996]. Nelson Against Napoleon. Caxton Editions. ISBN 1-86176-026-4.
- James, William (2002) [1827]. The Naval History of Great Britain, Volume 3, 1800–1805. London: Conway Maritime Press. ISBN 0-85177-907-7.
- Mostert, Noel (2007). The Line upon a Wind: The Greatest War Fought at Sea Under Sail 1793–1815. Vintage Books. ISBN 978-0-7126-0927-2.
- Musteen, Jason R. (2011). Nelson's Refuge: Gibraltar in the Age of Napoleon. Naval Investiture Press. ISBN 978-1-59114-545-5.
- Woodman, Richard (2001). The Sea Warriors. Constable Publishers. ISBN 1-84119-183-3.