Charge at Haritan
| ||||||||||||||||||||||||||||
The Charge at Haritan occurred on 26 October 1918 at the end of the Pursuit to Haritan during the final stages of the Sinai and Palestine Campaign of the First World War. Two regiments of the 15th (Imperial Service) Cavalry Brigade, 5th Cavalry Division, charged into retreating remnand column of the Ottoman Turkish Army's Yildirim Army Group. Subsequently six squadrons of the same brigade charged into a Turkish rearguard position but were counterattacked and forced to retreat.
After the British Empire's victory at the Battle of Megiddo the remnants of the Ottoman Turkish Empire's Yildirim Army Group from Amman was pursued by Prince Faisal's Sherifial Force which captured Deraa on 27 September, on the right flank of the 4th Cavalry Division. Meanwhile, the pursuit by the Australian Mounted Division followed by the 5th Cavalry Division of Yildirim Army Group remnants retreating from the Judean Hills, captured Damascus on 1 October 1918, many thousands of German and Turkish prisoners and many miles of Ottoman Empire territory. A remnant force of Yildirim Army Group managed to escape Damascus, to concentrate at Rayak before retreating back through Homs and Hama towards Aleppo. Huge losses in Desert Mounted Corps from sickness, delayed and depleted their pursuit from Damascus which was continued by twenty-four cars in three batteries of armoured cars, and three light car patrols armed with machine guns. They were supported by the 15th (Imperial Service) Cavalry Brigade with the remainder of the division following with the Australian Mounted Division moving north to reinforce them. Prince Faisal's Sherifial Force successfully attacked Aleppo during the night of 25 October.
Background
Following the comprehensive success of the Battle of Megiddo, Sir Henry Wilson, Chief of the Imperial General Staff at the War Office encouraged General Allenby, commanding the Egyptian Expeditionary Force (EEF) with the idea that the EEF could do anything and asked him to consider a cavalry raid to Aleppo.[1] Wilson added that the War Cabinet was prepared to take full responsibility for any unsuccessful outcomes.[2]
About nineteen thousand Turkish soldiers had retreated northwards by 1 October, no more than four thousand of whom were equipped and able to fight.[3] Otto Liman von Sanders transferred his headquarters to Baalbek and ordered the remnants of Yildirim Army Group from Haifa and Deraa to concentrate at Rayak. The 146th Regiment was the last formation to leave Damascus on 30 September. After hearing the Barada Gorge was closed von Hammerstein left Damascus by the Homs road, following the III Corps, the 24th Division and the 3rd Cavalry Division to Rayak where even remnants of the 43rd Division of the Second Army which had not been involved in fighting, were "infected with panic." Only the remnants of von Oppen's Asia Corps and the 146th Regiment marching to Homs remained "disciplined formations" by 2 October.[4]
Lieutenant-General Harry Chauvel's Desert Mounted Corps at Damascus was already 150 miles (240 km) away from its main supply base while Aleppo was a further two hundred miles (320 km) away. Allenby was prepared to advance only in stages as supply and geography dictated.[5] He estimated on 25 September that there were twenty-five thousand Turkish troops in the Aleppo and Alexandretta area.[6]
Prelude
Yildirim Army Group
Remnants of the Seventh Army commanded by Mustafa Kemal (Atatürk) which had escaped Megiddo, Damascus and Aleppo, were now deployed to the north and north-west of that city. The Second Army of about sixteen thousand armed troops commanded by Nihat Pasha (Anılmış) was located to the west in Cilicia and the Sixth Army with another sixteen thousand armed troops commanded by Ali İhsan (Sâbis) which had withdrawn from Mesopotamia was to the north-east around Nusaybin. These Turkish forces grossly outnumbered the 5th Cavalry Division and attached armoured cars.[7][8]
British Empire and allied force
This force which conducted the pursuit was made up of Prince Faisal's Sherifial Force; one column of fifteen hundred commanded by Colonel Nuri Bey and a second column of fifteen hundred commanded by Sherif Nasir,[9] the 2nd, 11th and 12th Light Armoured Motor Batteries and the 1st (Australian), 2nd and 7th Light Car Patrols consisting of 24 armoured cars,[10] and the 5th Cavalry Division's 15th (Imperial Service) Cavalry Brigade which accompanied the armoured cars to Hamma on 21 October,[11] while the 13th and 14th Cavalry Brigades followed in support.[12]
The 5th Cavalry Division and the armoured cars were organised into two columns. Column "A" consisted of the Major-General Henry Macandrew's division headquarters, all the armoured cars and the 15th (Imperial Service) Cavalry Brigade.[11] The 13th and 14th Cavalry Brigades formed Column "B."[13]
Macandrew planned to attack Aleppo from three sides on 26 October. The armoured cars were to attack along the road from the south, Faisal's Sherifial forces were to attack from the east while the 15th (Imperial Service) Cavalry Brigade moving round to the west of Aleppo was to cut the Alexandretta road.[14][15] However, during the night of 25 October, Nuri Bey's Arab Sherifial Force attacked the city from the east,[16] and the Arab Sherifial Force commanded by Sherif Nazir advanced round the entrenched Turkish defences, entered the city to make contact with supporters.[13][17]
Aleppo was captured by these Sherifial Forces after a night of hand–to–hand fighting through the streets on 26 October, having suffering sixty killed. Macandrew arrived in Aleppo shortly after 10:00 with the armoured cars.[13][18][19]
Battle

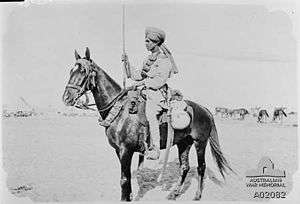
On 21 October the 15th (Imperial Service) Cavalry Brigade were issued orders to continue the advance to Aleppo. The brigade was preceded by seven light armoured cars, but the remainder of the division was following a day behind. On 24 October the armoured cars advance was stopped by Turkish defences near Khan Tuman. The Turks held a strong defensive line, on a ridge line to the south and west of Aleppo. The brigade was ordered to occupy a position on the Aleppo-Alexandretta road and to clear Turkish trenches on the ridge to the west of Aleppo. However, when they reached the ridge line on 26 October the position had been evacuated.[20] Intelligence from locals suggested that a force of one thousand men with two small artillery guns were heading north out of Aleppo, so the brigade set off in pursuit. At 11:00 the leading two Jodhpur Lancers squadron and a machine-gun section reached a position overlooking Haritan to the north of Aleppo, when they came under Turkish small arms fire. Brigadier Harbord in command ordered an immediate brigade attack, the Mysore Lancers would move around to the east of the ridge and charge the village followed up by the other two Jodhpur Lancer squadrons. While the remainder of the Brigade Machine-Gun Squadron would move onto the ridge to provide covering fire, with the two other Jodhpur squadrons. The armoured cars of No. 12 Light Armoured Motor Battery arrived at 11:30 and were ordered along the main road to support the attack. As the attack started the leading armoured car developed a fault and returned to their start position, a misunderstanding resulted in the rest of the battery following them, taking them out of the attack. The Mysore Lancers had also started their advance but discovered the Turkish line was longer than expected and had to move further east, out of range of their supporting machine-guns, to get into a position to charge. At 12:00 the lancers charged the Turkish position, killing fifty men and capturing another twenty prisoners. But without any fire support from their machine-gun squadron they were unable to penetrate into the Turkish defences and were forced to withdraw to the rear, dismount and keep the Turkish position under observation.[21] The extent of which had not until then been fully appreciated and was now estimated to be held by a force of three thousand infantry, four hundred cavalry, up to twelve artillery guns and between thirty and forty machine-guns. One group of Turkish soldiers started towards the Mysore Lancers position, but halted about eight hundred yards (730 m) short and started to dig new defensive trenches. Unable to progress against the larger force the brigade kept the position under observation and at 21:00 the Turks were observed to be withdrawing and had completely evacuated their positions by midnight. Just prior to that at 23:15 the 14th Cavalry Brigade arrived, setting up their own observation lines, until daylight when they took over the 15th Brigades positions. In the days battle Turkish casualties were estimated to be around 100 men, while the brigade had four British officers killed including Lieutenant-Colonel Holden, the senior Special Service Officer, attached to the Jodhpur Lancers, one Indian Officer and sixteen other ranks were also killed. Twelve officers, six of them British, and forty-four other ranks were wounded, another three other ranks were reported missing.[22][23] That night the Turkish forces withdrew twenty miles (32 km) to Deir el Jemel to the north-west of Aleppo. The 5th Cavalry Division was not strong enough by itself to continue the advance and halted waiting for the Australian Mounted Division to catch up with them.[24] However the day after their unsuccessful charge, 27 October the brigade became the division reserve and was ordered back to Aleppo.[22][25]
Aftermath

While the 15th (Imperial Service) Cavalry Brigade withdrew to the Aleppo area where grain and meat was requisitioned, the 14th Cavalry Brigade and the 13th Cavalry Brigade conducted a reconnaissance on 27 October when a rearguard position was found three point five miles (5.6 km) north of Haritan which withdrew to Deir el Jemal the next day.[26]
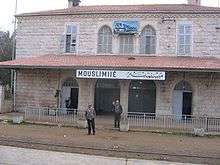
A Sherifial Force of Arab soldiers occupied the strategically important railway junction of the Palestine and the Mesopotamian railway systems at Mouslimie Junction on 29 October, cutting Ottoman communications between Constantinople and Mesopotamia.[27]
The Ottoman rearguard position which had been reported by armoured cars at Deir el Jemal on 28 October had, by 30 October been reinforced four miles (6.4 km) beyond it, by a twenty-five miles (40 km) long defensive line stretching across the Alexandretta road. These positions were defended by a force six times greater than Macandrew's 5th Cavalry Division which could only keep the line under observation while waiting the arrival of the Australian Mounted Division which was on its way north from Damascus.[27][28]
The Armistice which ended fighting between the EEF and the Yildirim Army Group was negotiated at Mudros and "signed on the deck of the battleship Agamemnon on October 30, 1918."[29]
Notes
Citations
- ↑ Wilson to Allenby 24 September 1918 in Hughes 2004 p. 186
- ↑ Wilson to Allenby received 24 September 1918 in Woodward 2006 p. 203
- ↑ Bruce 2002 p. 248
- ↑ Falls 1930 Vol. 2 p. 594–5
- ↑ Bruce 2002 pp. 248–9
- ↑ Allenby to Wilson 25 September 1918 in Hughes 2004 p. 188
- ↑ Hill 1978 p. 191
- ↑ Falls 1930 Vol. 2 p. 613 note
- ↑ Falls 1930 Vol. 2 pp. 611, 613
- ↑ Falls 1930 Vol. 2 p. 610
- 1 2 Falls 1930 Vol. 2 p. 612
- ↑ Falls 1930 Vol. 2 pp. 615, 617
- 1 2 3 Preston 1921 pp. 288–91
- ↑ Wavell 1968 pp. 231–2
- ↑ Bruce 2002 p. 255
- ↑ Falls 1930 Vol. 2 p. 613
- ↑ Hill 1978 p. 189
- ↑ Keogh 1955 pp. 254–5
- ↑ Wavell 1968 p. 232
- ↑ H.M.S.O. 1920, p.29
- ↑ H.M.S.O. 1920, p.30
- 1 2 H.M.S.O. 1920, p.31
- ↑ "Hyla Napier Holden". Commonwealth War Graves Commission. Retrieved 25 November 2012.
- ↑ The London Gazette: (Supplement) no. 31087. p. 15190. 27 December 1918. Retrieved 20 November 2012.
- ↑ Bruce 2002, p256
- ↑ Falls 1930 Vol. 2 p. 617
- 1 2 Falls 1930 Vol. 2 p. 617 and note
- ↑ Bruce 2002 p. 257
- ↑ Erickson 2001 p. 204
References
- Anon (1920). History of the 15th (Imperial Service) Cavalry Brigade during the Great War 1914–1918. His Majesty's Stationery Office (H.M.S.O.).
- Bruce, Anthony (2002). The Last Crusade: The Palestine Campaign in the First World War. London: John Murray. ISBN 978-0-7195-5432-2.
- Falls, Cyril (1930). Military Operations Egypt & Palestine from June 1917 to the End of the War. Official History of the Great War Based on Official Documents by Direction of the Historical Section of the Committee of Imperial Defence. Volume 2 Part II. A. F. Becke (maps). London: HM Stationery Office. OCLC 256950972.
- Hill, Alec Jeffrey (1978). Chauvel of the Light Horse: A Biography of General Sir Harry Chauvel, GCMG, KCB. Melbourne: Melbourne University Press. OCLC 5003626.
- Hughes, Matthew, ed. (2004). Allenby in Palestine: The Middle East Correspondence of Field Marshal Viscount Allenby June 1917 – October 1919. Army Records Society. 22. Phoenix Mill, Thrupp, Stroud, Gloucestershire: Sutton Publishing. ISBN 978-0-7509-3841-9.
- Keogh, E. G.; Joan Graham (1955). Suez to Aleppo. Melbourne: Directorate of Military Training by Wilkie & Co. OCLC 220029983.
- Preston, R. M. P. (1921). The Desert Mounted Corps: An Account of the Cavalry Operations in Palestine and Syria 1917–1918. London: Constable & Co. OCLC 3900439.
- Wavell, Field Marshal Earl (1968) [1933]. "The Palestine Campaigns". In Sheppard, Eric William. A Short History of the British Army (4th ed.). London: Constable & Co. OCLC 35621223.
- Woodward, David R. (2006). Hell in the Holy Land: World War I in the Middle East. Lexington: The University Press of Kentucky. ISBN 978-0-8131-2383-7.
Coordinates: 36°17′13″N 37°05′00″E / 36.287032°N 37.08332°E