Battle of the Heligoland Bight (1939)
| ||||||||||||||||||||||||||||||||||
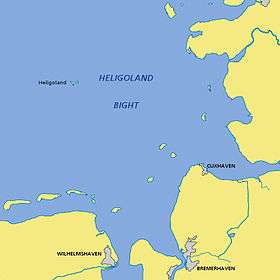
The Battle of the Heligoland Bight[7][8] was the first "named" air battle of the Second World War, which began the longest air campaign of the war, the Defence of the Reich.[9] On 3 September 1939, the United Kingdom declared war on Nazi Germany after the German invasion of Poland, which started the European War. The British did not assist Poland by land or sea, but over the ensuing weeks, RAF Bomber Command flew several missions against German targets. A number of these air raids were directed at Kriegsmarine (German Navy) warships in German ports to prevent their use in the Battle of the Atlantic. With the front lines static between September 1939 and May 1940, a period known as the "Phoney War" set in, with little fighting on land or in the air. However, at sea, German U-boat (submarine) forces were taking a considerable toll on Allied shipping. The Air Ministry decided to launch an attack on German surface ships to prevent them supporting the U-boats in the North Atlantic. On 18 December 1939, a force of three RAF bomber squadrons were sent to engage German ships in the Heligoland Bight and sink or damage as many as possible. Originally 24 Vickers Wellingtons took off. Two turned back owing to engine trouble before reaching German airspace. The German reaction was slow. Eventually they scrambled strong fighter aircraft forces to intercept. Just over 120 aircraft, 80–100 German and 22 British, were involved but only 44 German fighters made contact with the British bombers.[5]
The Germans inflicted more damage on the RAF than the Luftwaffe received, but its influence on both sides' future strategy was profound. The battle forced the RAF to abandon daylight missions in favour of night bombing as casualties were too high. In the build-up to the war, the RAF had adopted the mantra that "the bomber will always get through"; but in daylight the Heligoland battle had shown this was not the case and it forced a reappraisal of future bombing operations.[10] The failure of the raid led the Luftwaffe to believe its base in Germany proper was invulnerable to enemy attack. This belief was reinforced with the Wehrmacht's success in 1939–41, which meant that opposing air forces were then too far away for effective bombing attacks on the German homeland. Neglecting their day fighter force had serious strategic consequences in later years. By the time the Oberkommando der Luftwaffe (OKL; Luftwaffe High Command) had begun organising an air defence to combat the United States Army Air Forces (USAAF) strategic bombing campaign, they were already engaged in a war of attrition for which they were not prepared. This oversight was one of the contributing factors in the defeat of the Luftwaffe in the Defence of the Reich campaign. The German official history called the battle "amongst the most important actions of the entire war".[9]
Background
RAF strategy
Before the outbreak of war, RAF Bomber Command firmly believed that air power could win wars without the need for naval and land fighting. It was thought the bomber would always get through.[11] Tightly flown bomber formations with heavy defensive armament were thought capable of warding off enemy fighters even without fighter escort. However, the RAF lacked a four-engine bomber with adequate defensive protection which could carry heavy bomb loads to German targets. The only possible targets that were within range of British bombers were the industrial regions of the Ruhr.[11]
The Netherlands and Belgium wished to remain neutral and refused to allow the RAF to establish bases, to fly deeper into Germany. They also forbade overflying by British bombers to and from Germany. After the outbreak of war, the French refused to allow RAF bombers to bomb German cities from French airfields. The French felt secure behind the Maginot Line, but their air force did not possess the modern bombers to deliver a pre-emptive strike against the Luftwaffe. French fighter forces were not yet ready for an all out defensive campaign against the Germans either. A fear of retaliation was the main French reason. The only recourse was to fly missions directly from Britain and only ports or coastal cities in northern Germany were within easy reach. This state of affairs suited the British, in particular, the Admiralty.[11]
The most immediate threat to the Allies during the Phoney War period was the U-Boat. Some German submarines had been sent to sea before the British declaration of war and began operations against British shipping, bringing in vital supplies from North America and other areas of the British Empire, as soon as war was declared. In one notable action, German submarine U-47 sank the battleship HMS Royal Oak at Scapa Flow in October 1939, with the loss of 786 crew. As a consequence the Admiralty pressed for the RAF's efforts to concentrate on RAF Coastal Command rather than a strategic striking force. This was heavily debated within the British establishment well into 1941. In keeping with a request from the United States of America to avoid the bombing of civilian targets, the British formulated the Western Air Plan 7B (WAP 7B), which planned for attacks on German warships. The Germans also complied with the American request, albeit only after the 18 September 1939, when victory in Poland was assured. German ships were legitimate targets, and at sea or in port, were far enough away from civilian areas to avoid unnecessary casualties. The Plan revolved around their elimination to prevent their possible use as supplements to the U-Boat fleet.[11][12][13]
Prior operations

To fit in with this strategy, the RAF's initial plans involved launching raids against German shipping on receipt of the results of aerial reconnaissance. This was attempted on 3 September, when a Bristol Blenheim (flown by Flying Officer Andrew McPherson of No. 139 Squadron RAF)—on a reconnaissance flight over the North Sea—spotted a large naval force in the Schillig Roads off Wilhelmshaven. The Blenheim's radio failed, however, so an attack could not be launched until McPherson returned to base, when 15 Handley Page Hampdens and nine Vickers Wellington bombers were launched against the German ships. The weather was poor, however, and the bombers failed to find any targets.[14]
A similar attempt was made on 4 September, when McPherson again spotted warships off Brunsbüttel, Wilhelmshaven and in the Schillig Roads. The Blenheim's radio failed again and no attack could be launched, until after McPherson's return. A force of 10 Blenheims from No. 110 Squadron RAF and No. 107 Squadron RAF along with five more from 139 Squadron and eight Wellingtons of No. 149 Squadron RAF took off to locate the German warships Gneisenau, Scharnhorst and Admiral Scheer, which some did manage to locate.[15] No. 149 Squadron was not prepared for war. At least one of the crews—Flying Officer (F/O) Bill McRae—nearly took off without a bomb load. Looking in, he noticed the bomb bay empty. On the way to the target, Squadron Leader Paul Harris ordered his gunners to test their weapons. They all failed and he was heading into German territory defenceless. Not wanting to turn back on his first raid, he pressed ahead.[16] No. 9 Squadron RAF also bombed the same targets later in the day, attacking targets in and around Brunsbüttel.[17] Results were poor, however, with five Blenheims and two Wellingtons being lost and only minimal damage caused to the German warships.[18][19] Admiral Scheer was hit by three bombs that failed to explode, while the light cruiser Emden—while not one of the priority targets—was present, and also damaged by a Blenheim that crashed into the forecastle of the ship.[20] The crash killed 11 sailors and injured 30.[21]
The II./Jagdgeschwader 77 (JG 77; II Group Fighter Wing 77)—under the command of Oberstleutnant Carl-August Schumacher—took off from Nordholz Airbase and intercepted No. 9 Squadron. Feldwebels Hans Troitsch and Alfred Held each claimed a victory and Leutnant Metz another.[22] These aircraft from No. 9 Squadron were the first RAF aircraft to have been shot down by enemy fighters during the war and Troitsch was most likely to have been the first enemy pilot to shoot one down. Another four Blenheims of No. 107 Squadron were shot down by anti-aircraft artillery fire.[17] The Germans believed their air defences had established an effective defence from Allied attack. Use of the early Freya radar had given the German fighters eight minutes warning of their approach.[23][24]
It was felt that too long had elapsed in both cases between the German warships being spotted and the arrival of the strike force, and to rectify matters, it was decided to carry out reconnaissance in force, with formations of bombers being sent out over the North Sea to find and attack German warships. Their orders forbade them from attacking ships in port, infringing neutral airspace or even attacking German warships escorting merchant ships.[25] A patrol on 29 September resulted in five Hampdens being shot down by Messerschmitt Bf 109s, of II./JG 77, but an attack by 24 Wellingtons of No. 149, No. 38 Squadron RAF and No. 115 Squadron RAF on 3 December was more successful, claiming a German minesweeper sunk (confirmed by German archives), while defensive fire from the Wellington gun turrets repelled attacks by German fighters, shooting one down without loss to the bombers.[26] The German pilot shot down was future German ace Günther Specht. He was shot down by Corporal Copley of No. 38 Squadron RAF.[27] The German ships were the Brummer and the minesweeper M1407 both sunk by unexploded bombs passing through the ship. A German report stated the attack was cleverly executed from out of the sun and delivered to avoid the nearby civilian areas.[28]
An armed reconnaissance by twelve Wellingtons on 14 December resulted in five being lost as the formation, at very low level because of the low cloud base, was heavily engaged by both fighter aircraft and anti-aircraft artillery. The RAF believed that none of the lost Wellingtons had been shot down by fighters, however, and so maintained faith in their defensive capabilities when flown in tight formations.[29] This summation was odd considering the evidence available. The Luftwaffe claimed five bombers for the loss of one fighter while none of the German FlaK units claimed a victory. Several of the returning RAF bombers clearly had small arms damage from machine gun rounds, making the summation of the RAF that FlaK did the damage highly suspect.[30]
German defences
The Luftwaffe's air defence organisation went through a number of changes in the first months of the war. The defence of the northern German ports and vital strategic targets was given to the local or nearest Luftverteidigungskommando (Air Defence Command). In this case the unit responsible for the protection of German warships of the Kriegsmarine was the Luftverteidigungskommando Hamburg (Air Defence Command Hamburg).[9]
The system was impractical. The Hamburg air defence district controlled both air and ground defences, but each was geographically in no position to help the other. There was no combined arms synthesis, meaning that the FlaK arm did not directly support the German defences thereby forming one mass defence. Instead, fighter units protecting the coast were held there, with Kriegsmarine FlaK units, while the Hamburg air defence artillery was held too far inland. The Luftwaffe fighters and FlaK units were located too far apart to coordinate.[31]
The defence coordination was not helped by the poor relations between the Luftwaffe and Kriegsmarine Commanders-in-Chief, Reichsmarschall Hermann Göring and Großadmiral (Grand Admiral) Erich Raeder. The system required both services to work together, but it produced co-operation difficulties.[31] A solution to the problem was twofold. Fighter units defending the North Sea coast were subordinated to Luftgaukommando XI (Air District Command 9) in Hannover. These fighter units would function as an autonomous fighter command, or Jagdfliegerführer (Fighter Flyer Leaders). The command of Fighter Command unit was given to Oberstleutnant Carl-August Schumacher, a former commander of II./Jagdgeschwader 77. Schumacher had served in the Kaiserliche Marine (Imperial German Navy) during the First World War and as an officer cadet had seen combat at the Battle of Jutland.[31] It was hoped with his naval background and easy personality it would ease any difficulties with naval service cooperation.[31] Nevertheless, Schumacher and his counterpart in the Navy were of the same rank, so each lacked authority over the other, an arrangement that lacked the needed unity of command.[31]
Forces involved
Luftwaffe
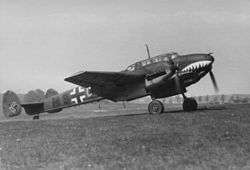
Schumacher was given a new command which was designated Stab./Jagdgeschwader 1 (Command./Fighter Wing 1, or JG 1), sometimes referred to as JG Nord (Fighter Wing North) or JG Schumacher. In addition to the Bf 109D and E variants, the force was also equipped with the Messerschmitt Bf 110. The lack of action during the Phoney War period meant that these aircraft, usually in demand by offensive air fleets (Luftflotte), were available for defensive roles.[31]
Stab./JG 1 controlled all the following Gruppen (groups) which had a combined strength of 80–100 aircraft:
- II./Jagdgeschwader 77 (JG 77) commanded by Hilmer von Bülow-Bothkamp
- II./Trägergruppe 186 (Carrier Air Group 186; TrGr 186) which was officially attached to Zerstörergeschwader 1 (Destroyer Wing 1; ZG 1) but placed under Stab./JG 1 for defensive duties under Major Heinrich Seeliger
- 10. (Nacht)./Jagdgeschwader 26 (JG 26) under Staffelkapitän (Squadron Leader) Johannes Steinhoff
- I./Zerstörergeschwader 76 (ZG 76) under the command of Hauptmann Günther Reinecke, and 2 Staffel
- I./Zerstörergeschwader 26 (ZG 26) under the command of Geschwaderkommodore (Wing Commander) Wolfgang Falck.
- JGr. 101 was attached to ZG 1 and eventually became II./ZG 1. It was commanded by Major Hellmuth Reichardt.[31]
RAF
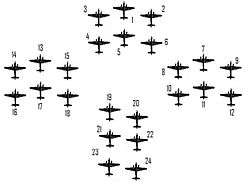
Section 1: 1 Richard Kellett 2 Turner 3 Speirs
Section 2: 4 Kelly 5 Duguid 6 Riddlesworth
Formation 2
Section 1: 7 Harris 8 Briden 9 Bolloch
Section 2: 10 Ramshaw 11 Grant 12 Purdy
Formation 3
Section 1: 13 Guthrie 14 Petts 15 McRae
Section 2: 16 Challes 17 Allison 18 Lines
Formation 4
19 Hue-Williams 20 Lemon 21 Wimberley 22 Lewis 23 Thompson 24 Ruse[33]
The RAF committed No. 3 Group RAF to the attack. Usually the group consisted of 9 Squadron, 37 Squadron, 38 Squadron, 99 Squadron, 115 Squadron, 149 Squadron together with 214 Squadron and 21 Squadron in reserve. However, the Group was hastily set up for daylight missions, having been intended for night bombing attacks. The quality of the training was dubious, many of the crews had not been given proper tuition for formation flying. Only 9 and 214 squadrons were able to fly in perfect formations.[34] In an effort to improve formation flying and give crews experience of combat conditions, No. 3 Group's No. 37 Squadron practised mock combats with RAF Fighter Command Supermarine Spitfires from RAF Tangmere. Warnings were given by the Spitfire pilots that they could have decimated the squadron within ten minutes because of their poor formation flying and lack of fighter escort, but were ignored.[35]
Squadron Leader Harris of 149 Squadron and Wing Commander Kellett were the only experienced combat leaders. However, Kellett had not flown with No. 9 or 37 Squadrons as a group and had never had a chance to practice formation flying or bombing with these squadrons. He had not been given the time or opportunity to discuss or formulate a plan for bombing naval targets, whether as a group, squadron, or even as flight sections. Nor had he even been able to discuss or pass on any tactical advice about what the formation should do in the event of fighter attack. He was given command of an incoherent group of squadrons which were highly inexperienced.[36] For the 18 December mission, 24 Wellington Bombers from No. 9, 37 and 149 Squadrons were given to Kellet.[31] The British bombers flew in a diamond shape formation.[37]
Battle
Target
On the morning of 18 December 1939, The Times of London published the story of the Battle of the River Plate and the demise of Admiral Graf Spee, and a few hours later RAF Bomber Command attempted to sink another major warship. In accordance with Operational Order B. 60, dated 17 December, the targets were German warships either in port or at sea. The RAF bombers were ordered to overfly the Heligoland Bight and the port of Wilhelmshaven, attacking ships but avoiding civilian living quarters, merchant shipping or land itself.[38]
Bombers on route
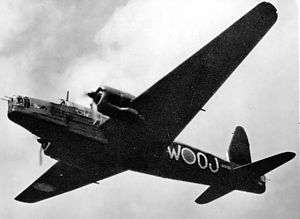
The first Wellington N2960 took off from RAF Mildenhall in Suffolk at 09:27 with Wing Commander Richard Kellett at the controls. No. 9 Squadron took off from the nearby RAF Honington and formed up over King's Lynn and started out over the North Sea. Feltwell's No. 37 Squadron took off but missed the rendezvous and caught up with the main formation an hour later over the North Sea. Once over the Wash they set a course of 040° true, as far as latitude 55° north. The plan was to avoid heavy anti-aircraft artillery concentrations on the Frisian Islands. However, as they left England the cloud broke and they found themselves without cover in a bright crystal clear sky. Two bombers, N2984 and N2894, piloted by Duguid and Kelly turned back; the first due to engine trouble, the other escorting the troubled bomber back to base. The remaining bombers flew north past the Frisian Islands then turned due south, continuing their mission in perfect visibility which made it easy to be spotted by German aircraft.[39]
Reaching the German—Danish border at 55°N 05°E, they turned south. The formation headed towards Schleswig-Holstein and then planned to turn due west to Wilhelmshaven. The move was designed to initiate the attack from the east, through the "back door". The plan worked, as the bombers arrived without being intercepted, but the southward journey had given the Germans a one-hour warning, as the Freya radar had picked up the bombers 30 mi (48 km) off the coast. As the bombers passed down the coast, anti-aircraft artillery fire from ships and harbour defences was noted. Once in the target area they also came under heavy anti-aircraft artillery fire from Bremerhaven and Wilhelmshaven. Ships near Schillig Roads also opened fire. The bombers replied with their machine guns to throw the gunners off.[40] German fire was at the correct height but exploded behind the bombers. Soon after, the formation was over Wilhelmshaven harbour, with Gneisenau and Scharnhorst at anchor beneath them. However, the ships were too close to shore and Kellett chose not to risk dropping bombs to avoid civilian casualties.[41] Kellett—commanding the formation—had been ordered to attack at minimum altitude (about 10,000 ft (3,000 m)). The belief that the greatest danger would come from anti-aircraft fire, not German fighters, had by then become part of RAF operational doctrine.[40]
Poor Luftwaffe administration meant the German defence took time to get the information from their radar sites. Major Harry von Bülow-Bothkamp—commanding II./JG 77—stated that it was the naval Freya, rather than Luftwaffe early warning sites that gave the alert. Owing to this, the RAF made landfall without interception. The first air-to-air shots were not traded until one hour after the Luftwaffe Freya made the initial report.[40]
As Wing Commander Kellett was taking off, Schumacher was dismissing any idea that the British would attempt a bombing raid in clear weather. On the island of Wangerooge, Leutnant Hermann Diehl of Regiment 3, battery LN-Vers was demonstrating the Freya set to a visiting naval officer. Diehl was using Falck's 2./ZG 76 to test the set. After some demonstration, he swung the set north, pointing to the Heliogoland Bight. As soon as he did so he picked up an echo. He telephoned Schumacher's geschwader at Jever. They were told that the naval radar reported nothing, and that it was ridiculous to think the British would attack in such clear skies. Diehl spoke to von Bülow-Bothkamp. No one wanted to know. Some 20 minutes later, naval Freyas also picked up the formation, but still no fighters were scrambled. German radar was just as efficient as its British counterpart.[6][42] The problem lay in communication. The British married their radar to an efficient fighter control system. The Luftwaffe and Kriegsmarine had poor communication and their areas of responsibility overlapped, creating confusion over who was responsible. Added to this was the German disbelief that RAF Bomber Command would expose itself on a day when conditions favoured the fighter. Only when observers on the ground confirmed that the formation existed were fighters scrambled. The observers described a formation of 44 British aircraft, twice its actual strength.[43]
Aerial engagement
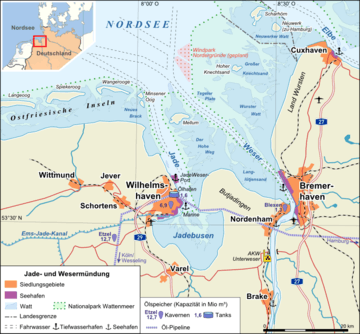
At 13:10, the RAF formation flew over the mud flats to the west of Cuxhaven and Wesermünde and came under heavy ground fire from the German flak positions, 214, 244 and 264. As Kellett turned west towards the Jade Estuary and over Wilhelmshaven anti-aircraft units 212, 222, 252, 262 and 272 opened fire. Scharnhorst, Gneisenau and all the other naval ships in the dock opened fire in support. In the distance, at Schillig Point, the bombers could see German fighters taking off from a camouflaged airstrip. In a quick briefing, JG 1's commander had told his pilots to make a beam attack as it was a blind spot for the Wellington. A stern attack was dangerous, as the gunners could then target an attacking fighter with a coordinated and concentrated cone of fire. One weakness also noted was that early types of Wellingtons lacked self-sealing fuel tanks. This meant if the German fighters hit the wings, the bomber was liable to burn.[44]
Unworried by the Luftwaffe, Squadron Leader, No. 149 Squadron Harris's section was the only section to drop bombs on the ships in Wilhelmshaven harbour. Six 500 lb (230 kg) bombs fell and the results were unknown. It was all the RAF had to show for its first major raid on a German target. As the bombers emerged from the anti-aircraft barrage, the RAF formation was disorganised. Kellett's and Harris's formations were intact, but Squadron Leader Guthrie was ahead of his No. 9 Squadron and No. 37 Squadron at the rear was straggling. Its commander, Squadron Leader Hue-Williams, was struggling to catch up with the main formation and was forging ahead of his formation without keeping it together. Other members of Hue-Williams's squadron increased their speed to keep up with their leader.[45]
Oberleutnant Johannes Steinhoff flying with Bf 109Ds of 10.(Nacht)./JG 26 took off escorted by a Rotte from II./JG 77. At 13:30, they attacked one group after the anti-aircraft fire lifted. The Bf 109s claimed seven bombers, with Steinhoff claiming two.[40] The first kill was credited to Unteroffizier Heolmayr.[46] At 13:40, a Rotte of Bf 110s from ZG 26, led by Hauptmann Wolfgang Falck, claimed four bombers.[40] Falck's aircraft was severely damaged, forcing him to disengage. Falck managed to glide back to base and make a "dead-stick" landing without power. Unteroffizier Fresia also made two claims. Fresia's second victim was Flying Officer Allison.[47] No. 149 Squadron Leader Harris came under attack from a Bf 109 piloted by Oberleutnant Johann Fuhrmann. Fuhrmann failed to hit the bomber in beam attacks. He then tried a stern attack, against earlier advice, only to get shot down. Fuhrmann managed to land in the sea a few hundred yards from the island of Spiekeroog. Witnesses on the beach saw him attempt to swim to shore only for Fuhrmann to drown.[48] It is likely he was shot down by Aircraftman Second Class Gouldson from Riddlesworth's Wellington.[49] During the battle a Bf 110 piloted by Oberleutnant Gordon Gollob shot down and killed Squadron Leader Archibald Guthrie, of No. 9 Squadron. Hue-Williams, Squadron Leader of No. 37 Squadron was also shot down, possibly by Hauptmann Reinecke. Soon afterward, the Germans suffered a casualty when Leutnant Roman Stiegler crashed into the sea in pursuit of Flying Officer Lemon. Stiegler was killed.[50] At the same time, Jagdgruppe 101 claimed two more bombers. Bf 110s from ZG 76 had also attacked the bombers claiming five more.[40]
Among the German claimants was Helmut Lent who was credited with two victories.[51] After landing at Jever from a patrol, Lent took off to intercept. He engaged Herbie Ruse's Wellington, killing most of the crew. The Wellington was pouring black smoke, and Lent broke off believing it about to crash. Lent then pursued Officer Thompson's Wellington, which crashed just off the coast of Borkum. Lent's third claim was not granted: he attacked and downed Flying Officer Wimberley's aircraft, but because the aircraft was already badly damaged and judged to be about to crash, Lent was refused the victory. Instead, Stab./JG 1's Geschwaderkommodore Schumacher was given the credit. Schumacher also shot down Pilot Officer Lewis's aircraft, close to Borkum. At 13:45, the German fighters—at the limit of their endurance—returned to base.[52][53] By 14:05, the other bomber formation was beyond interception range and the last shots were fired.[40]
Aftermath
Overclaiming by both sides
The German fighter units heavily overclaimed RAF losses, with German pilots claiming 38 aircraft shot down, but actual RAF losses were 12 aircraft. RAF gunners claimed 12 German fighters, as well as another 12 severely damaged. Actual German losses were three destroyed plus four severely damaged.[54][55]
To back up their claims, the Luftwaffe insisted that 44 bombers were in the air, which was later increased by the OKL to 52. Some hours later these claims were reduced to 34, but months later the report was analysed and reduced to 27 "confirmed" victories. This was still over twice the number that was actually shot down and five more than the true number of the formation. German historians have claimed that official British figures were lessened to hide losses, but careful examination of the records reveals no deception. Obituaries from the Commonwealth War Graves Commission record the identity of all service personnel who died during the war and have no known grave; as would be the case for airmen downed over the sea. No other airmen were reported missing that day other than those from No. 9, 37 and 149 Squadron.[56]
German casualties amounted to three Bf 109s destroyed, two severely damaged, and two Bf 110s severely damaged. Seven Bf 110s and one Bf 109 suffered light damage. Johann Fuhrmann and Roman Stiegler were the only pilots to die in this action. A third—Dietrich Robitzsch from Jagdgruppe 101—wrote-off a Bf 109 but was uninjured. Two pilots were wounded: Feldwebel Hans Troitzsch (Bf 109) and Leutnant Gustav Uellenbeck (Bf 110).[5]
British assessment
The tactical assessment of both sides was radically different. Bomber Command believed the attack was a failure as a result of poor formation flying and leadership. It was also maintained that better beam defensive armament and self-sealing fuel tanks were needed. These tactical considerations might, they believed, still salvage the day-bomber concept. On 22 December, an unsigned 3 Group report stated:
There is every reason to believe that a very close formation of six Wellington aircraft will emerge from a long and heavy attack by enemy fighters with very few if any casualties to its own aircraft. A loose formation is however liable to suffer very heavy casualties under the same conditions.[57]
On 19 December 1939, Air Vice-Marshal Jackie Baldwin reported that Squadron Leaders Guthrie and Hue-Williams were to blame for racing ahead of their formations and breaking up a cohesive defence pattern. Baldwin sent his report to RAF Bomber Command's Commander-in-Chief, Edgar Ludlow-Hewitt. Hewitt replied on 23 December and joined Baldwin in condemning the leaders of No. 9 and 37 Squadrons for abandoning their flight. Hewitt called this action an "unforgivable crime", although Leader of No. 149 Squadron, Harris, later stated that this was unfair, as Guthrie and Hue-Williams were untrained and had never faced the enemy before. Harris also blamed No. 3 Group Headquarters, stating that there had been no prior planning or liaison between the squadrons. Harris also noted the Group Operations Staff had not provided any formation lessons.[58]
In the Operations notes, Formation Flying, orders specifically stated that the formation, as a whole, was not to stay together, saying each six aircraft section was to be a self-contained defensive unit, flying at different heights, stating that more than 12 aircraft per formation made it unwieldy and unmanageable by one leader. Even so, the notes also pointed to the importance of holding a formation within one's own section. If a section leader endeavoured to follow the formation leader (Wing Commander Kellet) to the detriment of their section, the formation would break apart. Bomber formations were built on the idea of mutual protection; if the formation came apart, each bomber would have to fend for itself, which would enable an enemy to pick off the bombers one by one. Squadron Leaders Guthrie and Hue-Williams did not heed this advice during the battle. Wing Commander Kellett had followed the notes, and he lost only one aircraft. Harris had also kept his formation together, and lost none of his Wellingtons.[59] Within a few weeks, a debate began on shifting air attacks to the cover of darkness, with Hewitt favouring this alternative.[57]
German assessment
Tactically, the Germans noted lessons and weaknesses they were already aware of, particularly the poor beam defences of Wellington bombers, but admitted that the bombers' rigid formation flying had worked in their favour, allowing them to choose the position and angle of attack. The German report also regarded the attempt by the RAF to attack in clear conditions at altitudes of 10,000–16,000 ft (3,000–4,900 m) as "criminal folly".[57] The post-battle analysis of anti-aircraft fire was also noted. Schumacher stated that it proved effective at breaking up formations and damaging bombers which provided better opportunities for the fighter pilots.[57]
After the recent Polish Campaign, the German Army staff analysis had been rigorous in its analysis of that battle. The Army's General Staff had assessed the problems of leadership, tactics, command and control to improve effectiveness. It appears that Schumacher's fighter units did not do the same and were too busy congratulating themselves on their success. There is little evidence that the Luftwaffe took anything like the Army's approach in Poland, following their own victory at Heligoland Bight. The historian for the Luftwaffe's General Staff noted it was only exploited for propaganda, despite the operational problems and warnings the battle had flagged for attacker and defender.[1]
The progress of the war from September 1939 to the summer of 1941, with a few exceptions, seemed to validate the Luftwaffe's pre-war focus on the offensive use of its fighter arm. The success of the Luftwaffe in the Norwegian Campaign and the battles of the Netherlands, Belgium, France, Yugoslavia, and Greece had vindicated this method. The Luftwaffe had defended German airspace by driving away enemy air power from Germany's borders and defeating their enemies in their own skies. The occupation of its opponent's territory denied Germany's enemies the bases to effectively strike at German targets by air. German daylight defences were rarely tested during this time.[1] This run of events, and the knowledge that the RAF was only capable of short penetrations over France in daylight, led the Luftwaffe to believe Germany was invulnerable to attack. To maintain the offensive on the front line, bomber production dominated the air industry while the production of fighters was given less priority.[60]
However, in late 1941 the United States entered the war after Adolf Hitler's declaration of war on 11 December 1941. The failure of Operation Barbarossa by that time had meant the Luftwaffe's method of concentrating all its resources on the front line was coming unstuck. The RAF began its campaign of night bombing in early 1942 and later that same year United States Army Air Force (USAAF) would enter the air war in force.[61] Even so, the OKL continued to resist sending its forces to defend Germany and weakening the front lines. It was only in May 1942—when the Luftwaffe faced the USAAF for the first time in daylight engagements—that the danger of Allied strategic bombing by day gave the OKL cause for concern.[62] Nevertheless, even by the end of 1942 the measures taken to strengthen daylight anti-aircraft defences remained piecemeal and counter productive. Hans Jeschonnek summed up the attitude of the OKL when he stated that the Luftwaffe could deal with the Western Allies' daylight raids with "one" fighter wing.[63] The events of 1943—1944 would prove this assumption wrong. Adolf Galland—General der Jagdflieger (General of the Fighter Force), 1941—1945—gave lack of organisation and of planning for air defence as one of the greatest mistakes made by the Luftwaffe during the war.[64]
References
Citations
- 1 2 3 Caldwell and Muller 2007, p. 42.
- ↑ Holmes 2010, p. 6.
- ↑ Weal 1999, p. 8.
- ↑ "R Kellett_P". Rafweb.org. Retrieved 2012-12-18.
- 1 2 3 4 5 6 7 8 9 10 Holmes 2010, p. 86.
- 1 2 Holmes 2010, p. 69.
- ↑ Holmes 2010, p. 3.
- ↑ Hooton 1994, p. 190.
- 1 2 3 Caldwell and Muller 2007, p. 37.
- ↑ Chorley 2007, p. 17.
- 1 2 3 4 Holmes 2010, pp. 9–18.
- ↑ Richards 1995, p. 13.
- ↑ Caldwell and Muller 2007, pp. 34–35.
- ↑ Richards 1995, pp. 1–2.
- ↑ Holmes 2010, p. 20.
- ↑ Holmes 2010, p. 21.
- 1 2 Holmes 2010, p. 25.
- ↑ Richards 1953, pp. 38–40.
- ↑ Richards 1995, pp. 26–28.
- ↑ Richards 1995, p.28.
- ↑ Holmes 2010, p. 26.
- ↑ Holmes 2010, p. 23.
- ↑ Homles 2010, pp. 27–38.
- ↑ Caldwell and Muller 2007, p. 31.
- ↑ Richards 1953, p. 42.
- ↑ Richards 1995, pp. 35–36.
- ↑ Holmes 2010, p. 32.
- ↑ Holmes 2010, pp. 35–36.
- ↑ Richards 1953, pp. 44–45.
- ↑ Holmes 2010, p. 43.
- 1 2 3 4 5 6 7 8 Caldwell and Muller 2007, p. 38.
- ↑ Breffort and Jouineau 2009, p. 48.
- ↑ Holmes 2010, p. 60.
- ↑ Holmes 2010, p. 48.
- ↑ Holmes 2010, p. 78.
- ↑ Holmes 2010, p. 54.
- ↑ Holmes 2010, p. 61.
- ↑ Holmes 2010, pp. 56–57.
- ↑ Holmes 2010, pp. 56–59.
- 1 2 3 4 5 6 7 Caldwell and Muller 2007, p. 39.
- ↑ Holmes 2010, pp. 62–64.
- ↑ Hooton 2007, p. 79.
- ↑ Holmes 2010, pp. 67–70.
- ↑ Holmes 2010, pp. 70–71.
- ↑ Holmes 2010, p. 65.
- ↑ Holmes 2010, p. 71.
- ↑ Holmes 2010, p. 72.
- ↑ Holmes 2010, p. 75.
- ↑ Holmes 2010, p. 163.
- ↑ Holmes 2010, pp. 76–77.
- ↑ Held and Nauroth 1982, p. 15.
- ↑ Holmes 2010, pp. 78–81.
- ↑ Weal 1999, pp. 21–22.
- ↑ Caldwell and Muller 2007, p. 40.
- ↑ Treadwell 2003, pp. 29–31.
- ↑ Holmes 2010, p. 83.
- 1 2 3 4 Caldwell and Muller 2007, p. 41.
- ↑ Holmes 2010, pp. 98–99.
- ↑ Holmes 2010, p. 100.
- ↑ Caldwell and Muller 2007, pp. 45–46.
- ↑ Caldwell and Muller 2007, pp. 46–47.
- ↑ Caldwell and Muller 2007, p. 49.
- ↑ Caldwell and Muller 2007, p. 67.
- ↑ Caldwell and Muller 2007, pp. 286–287.
Bibliography
- Breffort, Dominique and Jouineau, Andre. Messerschmitt Me 110: From 1939 to 1945, Messerschmitt's twin-engined fighters Bf 110, Me 210 and 410. Histoire and Collections, Paris. 2009. ISBN 978-2-35250-144-2
- Caldwell, Donald; Muller Richard. The Luftwaffe Over Germany: Defense of the Reich. Greenhill books. Russell Gardens London, 2007. ISBN 978-1-85367-712-0.
- Chorley, W.R. Royal Air Force Bomber Command Losses of the Second World War. Volume 9. Roll of Honour, 1939–1940. Ian Allan. London. 2007. ISBN 978-1-85780-195-8
- Held, Werner and Nauroth, Holger. The Defence of the Reich: Hitler's Nightfighter Planes and Pilots. Arms and Armour. London, 1982. ISBN 0-85368-414-6
- Holmes, Robin. The Battle of the Heligoland Bight, 1939: The Royal Air Force and the Luftwaffe's Baptism of Fire. Grub Street. London. 2010. ISBN 978-1-906502-56-0
- Hooton, E.R.. Luftwaffe at War: Gathering Storm 1933–1939, Classic Publications. London, 2007. ISBN 1-903223-71-7.
- Hooton, E.R.. Phoenix Triumphant: The Rise and Rise of the Luftwaffe. Arms and Armour Press. London, 1994. ISBN 1-86019-964-X
- Richards, Denis (1974) [1953]. Royal Air Force 1939–1945: The Fight At Odds. I (pbk. ed.). London: HMSO. ISBN 978-0-11-771592-9. Retrieved 16 September 2015.
- Richards, Denis. The Hardest Victory: Bomber Command in the Second World War. London: Coronet, 1995. ISBN 0-340-61720-9.
- Treadwell, Terry. Messerschmitt Bf 110. Cerberus, Bristol. 2003. ISBN 1-84145-107-X
- Weal, John. Messerschmitt Bf 110 Zerstörer Aces World War Two. Oxford: Osprey, 1999. ISBN 1-85532-753-8.
Royal Air Force portal | ||
| Formations and units |  | |
| Branches and components | ||
| Reserve forces | ||
| Associated civil organizations | ||
| Equipment | ||
| Personnel | ||
| Appointments | ||
| Symbols and uniform | ||
Coordinates: 53°33′56″N 8°05′05″E / 53.5656°N 8.0846°E