Battle of the Scheldt (1574)
| ||||||||||||||||||||||||||||||
The Battle of the Scheldt also known as the Battle off Walcharen (known in Dutch as Slag bij Reimerswaal) was a naval battle that took place on 29 January 1574 during the Eighty Years' War and the Anglo–Spanish War.[10][11][12] The battle was fought between a Dutch rebel Sea Beggar fleet (which included English and Scottish troops) under Lodewijk van Boisot and a Spanish fleet under Julián Romero.[13] The Spanish fleet was attempting to relieve the Spanish held town of Middelburg which was under siege but the fleet under Boisot intercepted them and were victorious with the destruction or capture of nearly fifteen ships.[14][15][16] Middelburg as a result then surrendered only nine days later along with Arnemuiden.[12][17]
Background
In April 1572 the cities of Flushing, Veere and Arnemuiden, located on the island of Walcheren, had sworn allegiance to the Dutch prince. However, another city on the island, Middelburg, remained loyal to the king Philip II of Spain, and as a result was besieged.[7] After more than six months' worth of food, ammunition and other materials began to run out the Spanish commander Sancho d'Avila made a second attempt to resupply the city by sea (his first attempt failed. See Battle of Borsele). A third was turned back after Fort Rammekens was captured in August 1573 by an Dutch and English force.[18]
The Dutch under the Flemming Louis Boisot, Admiral of Zealand wanted to take on the Spanish fleet, and met up with another fleet under Vice Admiral Joos de Moor.[19] At the same time a request was made to reinforce the besiegers around Middelburg.[7] Having picked up sufficient troops which included a number of companies of English and Scots led by Colonel Thomas Morgan, they set out to find the Spanish fleet.[6]
Don Luis de Requesens y Zúñiga the second Spanish commender during the Dutch revolt decided to send out a naval force to destroy the Dutch rebels once and for all.[6] In addition once this was achieved he hoped he could relieve the Spanish garrison at Middelburg.[7] He ordered Don Julian di Romero and a Flemish admiral Gerard de Glymes to sail to Walcharen in the Scheldt estuary where the beggars operated.[2]
Don Julian di Romero an able captain on land but had little experience in maritime affairs a fact he reminded Zúñiga many times but his words went unheeded.[6] The fleet with the greatest part of the transports had already set sail but had not advanced farther than Bergen op Zoom.[7] Zúñiga anxious for its fate had accompanied it as far as the Scheldt estuary.[12]
Battle
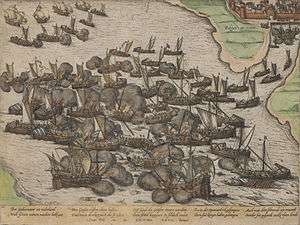
On the 29 January they cast anchor, waited for the rising tide and then sailed from Bergen.[17] A general salute was fired in honour of the Grand Commander but a discharge from one the ships set fire to its own magazine - the resulting catastrophic explosion not only destroyed the ship but killed everyone on board.[19] The fleet with low morale because of the occurrence then sailed slowly on, when off Walcheren near Reimerswaal they spotted a large fleet.[8] The Spanish thought the ships were friendly and went up to meet them but they soon discovered that the fleet was in fact the fleet of Louis Boisot Admiral of Zealand.[5] They attempted to turn away and with the weather turning for the worst however it was too late and thus formed line of battle.[15] Boisot ordered an attack and both fleets lined up for battle in the estuary of the Scheldt.[8]
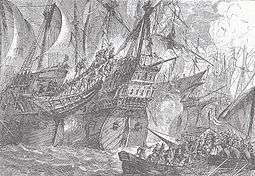

The first division of Romero came nearer and delivered its first broadside when Schot and Klaafzoon both fell mortally wounded.[9] Admiral Boisot lost an eye and many officers and sailors in the other vessels were killed or wounded.[8] The soldiers destined for the siege were used heavily in the fight and thus surprised the Spanish.[17] The Dutch ships were able to come alongside and the soldiers were able to board the Spanish ships one by one.[6] As many of Romero's vessels as could be were grappled within the narrow estuary and soon found themselves locked in close combat with each other. A murderous hand to hand conflict then took place.[19]
The fight went for two hours but finally the Anglo Dutch got the upper hand.[8] De Glymes's own ship ran foul of a sand bank from which she could not be disengaged.[7] The Dutch rebels perceiving her distress attacked her on every side and after taking a heavy pounding eventually set her on fire.[9] Captain Rowland Yorke with his band of English troops went from Vice Admirals Joos de Moor's flagship and along with Colonel Thomas Morgan's company of English from another Flemish ship boarded a number of Spanish ships.[13] Romero hastened to de Glimes assistance but all his attempts to extinguish the flames proved ineffectual and sank within a few minutes taking the Admiral with her but not before a flaming mast then set fire to Romero's ship.[9][19] Morgan’s men which included the famed soldier Roger Williams were able to take advantage and boarded while Dutch soldiers did so on the other side taking the ship by taking the flag.[20] In the fight they nearly captured Julien Romero but he was able to escape through his porthole as his ship began to burn.[4][17]
A captain of a Scots company by the name of Robinson led his men and then took the Rear Admiral’s ship.[13] The Spanish in complete disorder managed to extricate themselves in the poor weather but lost another five more ships in the pursuit which was halted because of nightfall, and by which time the battle had ended.[7]
Aftermath
.jpg)
The events of which unfurled was all in view of Don Louis Zúñiga to see, who was standing on the top of a dyke to watch the combat in the pouring rain.[5] Romero waded ashore, soon found Zúñiga and coolly said;
I told your excellency that I was a land fighter, not a sailor - give me a hundred fleets and I would fare no better.
The Spanish retreated in disorder to Bergen and by that time had lost fifteen ships captured and sunk with as many as 1,200 killed wounded or captured and the Spanish were completely routed.[6][9] The Dutch fleet with the Anglo Dutch soldiers had suffered around 300 casualties with the loss two ships sunk; some had run aground but were later salvaged.[7] The remainder of the Spanish fleet which had already sailed to Flushing on the news of this disaster retreated with all speed to Antwerp.[19] According to Don Zúñiga the fighting he witnessed was as savage as the battle of Lepanto that he had fought in only three years earlier.[17]
Middelburg as a result then surrendered only nine days later and with it that of Arnemuiden.[11][13] The two victories combined ensured the Dutch rebels were in possession of the principal islands of Zealand and in addition rendered them masters of the local seas.[5]
In September the victorious Anglo Dutch bought some of the victorious ships and sailors welcome relief to Leiden which had been under siege by the Spanish since 1572.[4][19]
Philip II so angered by the defeats that year decided to send a major force to the North Sea to destroy the English and Sea Beggar fleets but within a year plague, inefficiency and the death of their commander Pedro Menéndez de Avilés destroyed it as an effective force.[21][22]
See also
- Siege of Leiden
- Siege of Middelburg (1572–1574)
- States-General of the Netherlands
- List of Governors of the Spanish Netherlands
References
- Citations
- ↑ Watson, Robert (1839). The History of the Reign of Philip the Second, King of Spain. Lyon Public Library: Tegg. p. 251.Quote: The victory was decisive.
- 1 2 Eggenberger p 487
- ↑ Pratt p 162 this led to the surrender of Middelburg
- 1 2 3 4 Stevens p 110
- 1 2 3 4 Davies, Charles Maurice (1851). The History of Holland and the Dutch Nation: From the Beginning of the Tenth Century to the End of the Eighteenth. University of California: G. Willis. p. 337.
- 1 2 3 4 5 6 Nederlands Historisch Genootschap (1978). Bijdragen en mededelingen betreffende de geschiedenis der Nederlanden, Volume 93 (Dutch). Nijhoff. pp. 460–61.
- 1 2 3 4 5 6 7 8 Sigmond pp 169-72
- 1 2 3 4 5 Motley,John Lothrop (1856). The Rise of the Dutch Republic. pp. 527–28.
- 1 2 3 4 5 Robert (1839) p 251
- ↑ Bruce & Cogar pp.47-48
- 1 2 Rodger p.145
- 1 2 3 Jaques p.1091
- 1 2 3 4 Knight, Charles Raleigh: Historical records of The Buffs, East Kent Regiment (3rd Foot) formerly designated the Holland Regiment and Prince George of Denmark's Regiment. Vol I. London, Gale & Polden, 1905, p. 11-12
- ↑ Nolan p.245
- 1 2 Fissel p 152
- ↑ Wylie, J. A (2015). History of Protestantism in the Netherlands (The History of Protestantism - Book Eighteen ed.). Delmarva Publications, Inc. p. 2509.
- 1 2 3 4 5 Wegg, Jervis (1924). The Decline of Antwerp Under Philip of Spain. Methuen & Company, Limited. pp. 170–71.
- 1 2 Laughton, Anderson & Perrin, Leonard, Roger & William (1968). The Mariner's Mirror, Volume 54. Society for Nautical Research (London, England). p. 8.
- 1 2 3 4 5 6 Macgregor pp.251-52
- 1 2 Evans, John X (1972). The works of Sir Roger Williams. Clarendon Press. p. 247.
- ↑ Parker p.49
- ↑ Braudel p.482
Bibliography
- Bruce & Cogar, Anthony & William (2014). Encyclopedia of Naval History. Routledge. ISBN 9781135935344.
- Braudel, Fernand (1995). The Mediterranean and the Mediterranean World in the Age of Philip II, Volume 1. University of California Press. ISBN 9780520203082.
- Eggenberger, David (2012). An Encyclopedia of Battles: Accounts of Over 1,560 Battles from 1479 B.C. to the Present. Courier Corporation. ISBN 9780486142012.
- Fissel, Mark Charles (2001). English warfare, 1511–1642; Warfare and history. London: Routledge. ISBN 978-0-415-21481-0.
- Frye, Susan (1993). Elizabeth I: The Competition for Representation. Oxford University Press. ISBN 9780199923625.
- Jaques, Tony (2006). Dictionary of Battles and Sieges: A Guide to 8500 Battles from Antiquity Through the Twenty-first Century. Greenwood Press. ISBN 978-0313335365.
- Macgregor, Mary (2007). The Netherlands. Yesterday's Classics. ISBN 9781599151847.
- Parker, Geoffrey (2004). The Army of Flanders and the Spanish Road, 1567-1659: The Logistics of Spanish Victory and Defeat in the Low Countries' Wars. Cambridge Studies in Early Modern History. Cambridge University Press. ISBN 9780521543927.
- Pratt, Fletcher (2013). The Battles that Changed History. Courier Corporation. ISBN 9780486318943.
- Rodger, N A M (2004). The Safeguard of the Sea: A Naval History of Britain 660-1649 Volume 1 of A naval history of the sea. Penguin UK. ISBN 9780140297249.
- Sigmond, J.P (2013). Zeemacht in Holland en Zeeland in de zestiende eeuw (Dutch). Uitgeverij Verloren. ISBN 9789087043490.
- Stevens, William (2009). History of Sea Power. BoD – Books on Demand. ISBN 9783861950998.
Coordinates: 51°28′N 4°8′E / 51.467°N 4.133°E