Battle of North Borneo
| ||||||||||||||||||||||||||||||||||
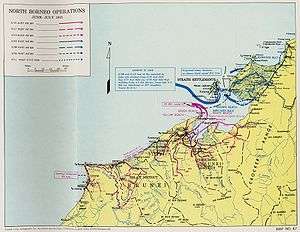

The Battle of North Borneo took place during the Second World War between Allied and Japanese forces. Part of the wider Borneo campaign of the Pacific War, it was fought between 10 June and 15 August 1945 in North Borneo (later known as Sabah). The battle involved a series of amphibious landings by Australian forces on various points on the mainland around Brunei Bay and upon islands situated around the bay. Japanese opposition to the landings was sporadic initially, although as the campaign progressed a number of considerable clashes occurred and both sides suffered relatively significant casualties. Ultimately, however, the Australians were successful in seizing control of the region, although to a large extent the strategic gains that possession of North Borneo provided the Allies with were ultimately negated by the sudden conclusion of the war in August 1945.
Background
Codenamed Operation Oboe Six,[1] the battle was part of the second phase of the Allied operations to capture the island of Borneo. Previously in May a brigade-sized force had been put ashore on Tarakan.[2] A total of 29,000–30,000 men were committed to the operation by the Allies,[Note 1] with the majority of the ground forces being provided by the Australian 9th Division, under the command of Major General George Wootten and consisting of the 20th and 24th Brigades,[Note 2] along with naval support from the United States Navy and Royal Australian Navy and aerial support from the United States Army Air Forces, the United States Marine Corps and elements of the Royal Australian Air Force's 1st Tactical Air Force.[3][4] Two United States Army units, the 727th Amphibian Tractor Battalion who manned the LVTs and the 593rd Engineer Boat and Shore Regiment's Boat Battalion, were also attached to the Australians.[5]
Having been planned by General Douglas MacArthur, Supreme Commander of the South West Pacific Area, to take place in three stages—preparatory bombardment, forced landings, advance—the objective of the operation was to enable the Allies to establish "an advanced fleet base" in order to enable subsequent naval operations, to capture the vast oil and rubber supplies available in the area and to re-establish British civil administration.[5] Meanwhile, Allied intelligence estimated that there were approximately 31,000 Japanese troops on Borneo,[6] with about 8,800 of these in North Borneo.[7] The main Japanese units in the vicinity included units of the 56th Independent Mixed Brigade, consisting of six battalions (the 366th to the 371st), along with another independent battalion.[6]
Battle
Two main landings were undertaken by the Australians in North Borneo. The first one came on 10 June when troops from two battalions[Note 3] of the 24th Brigade—the 2/28th and 2/43rd Battalions—landed on Labuan Island with a squadron of Matilda tanks from the 2/9th Armoured Regiment, while two battalions[Note 4] of the 20th Brigade—2/15th and 2/17th Battalions—went ashore on Muara Island and on the mainland peninsula north of Brooketon, supported by a second squadron of Matildas from the 2/9th Armoured Regiment.[2] Amidst heavy naval and aerial bombardments, these landings were largely unopposed as the Japanese defenders had withdrawn from the beaches on the peninsula and Muara Island had been abandoned completely. The troops that had landed near Brooketon on the mainland advanced on Brunei, which was captured on 13 June. The two 20th Brigade battalions were now joined by the 2/13th Battalion, which had conducted an unopposed landing at Lutong on 20 June, before continuing their advance down the south-western coast, passing through Miri and Seria on their way towards Kuching.[9] At Seria they found the 37 oil wells ablaze, having been deliberately lit by the Japanese defenders, and engineers from the 2/3rd Field Company were called up to put out the fires, a task which took over three months to complete.[10] Having secured its objectives, the 20th Brigade then began patrolling operations, using landing craft to move quickly along the various rivers and streams that punctuated the coastline.[11] During the course of their involvement in the campaign, the brigade's casualties were relatively light, suffering only 40 casualties.[12]
.jpg)
Despite the progress that had been made on the southern mainland, however, the fighting on Labuan intensified during this time as the Japanese defenders retreated inland to a heavily fortified position known as "the Pocket" and attempted to hold the Australians along the dense jungle ridges and thick swamps. Despite considerable artillery support, a company-level attack by 2/28th Battalion was turned back on 14 June, and as a result further preparatory fires were called upon to soften up the Japanese defences.[13] For the next five days an intense naval and aerial bombardment was laid down in an effort to reduce the Japanese defences before a renewed attack was put in on 21 June.[2]
While the 2/12th Commando Squadron was given the task of clearing the outlying areas of resistance that had been bypassed during the initial advance on the island,[13] two companies of infantry from the 2/28th Battalion assaulted the Japanese position and, supported by indirect fire support from sea and air, and direct fire support from armour and flamethrowers, the Australians overwhelmed the Japanese defenders and cleared the remaining resistance from Labuan. After the battle 180 Japanese dead were counted, bringing the total killed during the fighting on Labuan to 389. Against this the Australians suffered 34 killed and 93 wounded.[14][15]
The second main landing came on 16 June on the mainland at Weston, in the north-eastern part of Brunei Bay.[2] The 2/32nd Battalion, which had previously been held back as the divisional reserve, forced its way ashore near Padas Bay. After taking Weston, patrols were sent out Beaufort, which was 23 km (14 mi) inland.[2] Due to the lack of roads and the indefensible nature of the railway track that led to the town, it was decided to advance along the Klias River, while a secondary force moved along the Padas River.[11] As a part of this phase of the operation, minor landings were made at Mempakul on 19 June and at Sabang on 23 June by elements of the 2/43rd Battalion and the 2/11th Commando Squadron.[16] Kibidang was captured the same day by the 2/43rd, while the 2/32nd advanced further along the Padas River and the two battalions married up.[17] Following this, reinforcements in the form of two companies from the 2/28th Battalion were transferred from Labuan to take over rear area security while plans were made for the main attack on Beaufort.[17]
Beaufort was believed to be held by between 800 and 1,000 Japanese troops and on 27 June, the Australians attacked the town.[18] The 2/43rd Battalion was assigned the task of the main assault, while the 2/32nd Battalion was tasked with flank protection. Despite being hamstrung by torrential downpour and unforgiving terrain, the 2/32nd Battalion secured the south bank of the Padas River, while one company from the 2/43rd was sent to take the town and another marched to the flanks, to take up ambush positions along the route that the Japanese were expected to withdraw along. The 2/28th Battalion secured the lines of communication north of the river.[17] The resistance from the Japanese defenders was not co-ordinated and as a result the Australians had secured their objectives by nightfall. Throughout the night, however, the Japanese launched six counterattacks which eventually broke down into hand-to-hand combat. During the course of these actions, one company became isolated and the next morning, 28 June, another was sent to its aid to attack the Japanese force from the rear. Fighting its way through numerous Japanese positions throughout the afternoon, the company reached their objective in the early evening and launched its assault, killing at least 100 Japanese defenders.[14] It was during the course of this action that Private Tom Starcevich, of the 2/43rd Battalion, performed the deeds for which he was later awarded the Victoria Cross.[19]
By 29 June, the Japanese began to withdraw from Beaufort in small groups.[20] A brief pause followed while reinforcements arrived. The 2/3rd Anti-tank Regiment, being used as infantry rather than the anti-tank role for which they were intended, arrived at Weston on 3 July, where it relieved the 2/28th Battalion, which then moved on to Beaufort.[21] On 6 July the Australian advance was resumed. Due to the strategic situation, it was decided to undertake a slow and cautious advance using indirect fire to limit casualties. By 12 July the 2/32nd Battalion occupied Papar,[22] and from there patrols were dispatched to the north and along the banks of the river as offensive operations came to an end.[20]
Aftermath
Following the capture of Papar, the Australians ceased offensive actions on Borneo and the situation remained largely static until a ceasefire came into effect in mid August.[20] In early August 1945, two atomic bombs were dropped on Hiroshima and Nagasaki, and on 15 August the Japanese Emperor, Hirohito, effectively announced an end to hostilities, with the formal surrender being signed on 2 September 1945.[23] As a result of the ceasefire, the planned Allied invasion of Japan was no longer required and as a result, the strategic gains provided by the capture of North Borneo were arguably negated. To some extent, this has led to claims in Australia that the Oboe operations—as well as the campaigns in the Aitape–Wewak region of New Guinea and on Bougainville and New Britain—had been "unnecessary" and had therefore resulted in needless casualties.[24] Throughout the course of the fighting on North Borneo, the Australians lost 114 men killed or died of wounds while another 221 men were wounded. Against this, the Japanese lost at least 1,234 men, while 130 had been captured.[18][25] On top of this, a further 1,800 Japanese were estimated to have been killed by guerrilla forces operating as part of the clandestine Services Reconnaissance Department.[26]
After the fighting was over, the Australians began the task for establishing British civil administration, rebuilding the infrastructure that had been damaged and providing for the civilians that had been displaced in the fighting.[1][27] Following the ceasefire, there were still a large number of Japanese troops in North Borneo—by October 1945 it was estimated that there were over 21,000 Japanese soldiers and civilians still in North Borneo—and the 9th Division was made responsible for organising the surrender, provisioning and protection of these personnel.[28] They were also tasked with liberating the Allied civilian internees and prisoners of war that were being held at Batu Lintang camp in Kuching, Sarawak.[29]
As civil administration was slowly restored, in October 1945, the Australian demobilisation process began.[30] Initially this process was slow as there were few troops able to relieve the Australian forces in Borneo and as such only long service personnel were released for return to Australia.[26] The 9th Division remained in North Borneo performing garrison duties until January 1946, when it was relieved by the 32nd Indian Brigade, and subsequently disbanded.[31] For the majority of the 9th Division's personnel a return to civilian life followed, however, as part of Australia's contribution to the occupation of Japan, a number of men from the 9th Division were transferred to the 67th Battalion which was being formed as part of the 34th Brigade.[32] Such was the relationship formed between the 9th Division and the civilian population of North Borneo, that the division's Unit Colour Patch was incorporated into the coat of arms of the Colony of British Borneo following the war, remaining as such until 1963, when the region was subsumed by the Malaysian state of Sabah.[1]
See also
Notes
- Footnotes
- ↑ Odgers 1988, p. 183 provides the figure of 30,000 men, while Coulthard-Clark 1998, p. 252 provides the figure of 29,000. Long (1963), p. 459 provides the figure of 29, 361 and breaks this down as: 14,079 men from the 9th Division; 3,726 corps support troops; 4,730 base sub-area troops, 5,729 Royal Australian Air Force personnel and 1,097 American and British personnel.
- ↑ The 9th Division consisted of three brigades—the 20th, 24th and 26th Brigades—however, at the time of the North Borneo operations, the 26th was engaged at Tarakan having been detached from the division in May 1945.[2]
- ↑ The 24th Brigade's third battalion, 2/32nd Battalion, was placed in divisional reserve.[8]
- ↑ The 20th Brigade's third battalion, the 2/13th was held back in brigade reserve.[8]
- Citations
- 1 2 3 "Battle of North Borneo". Australian War Memorial. Retrieved 4 September 2010.
- 1 2 3 4 5 6 Coulthard-Clark 1998, p. 252
- ↑ Odgers 1988, p. 183
- ↑ Long 1963, p. 458
- 1 2 Keogh 1965, p. 444
- 1 2 Long 1963, p. 456
- ↑ Keogh 1965, p. 447
- 1 2 Keogh 1965, p. 448
- ↑ Coulthard-Clark 1998, pp. 252–253
- ↑ Long 1963, p. 485
- 1 2 Keogh 1965, p. 453
- ↑ Johnston 2002, p. 228
- 1 2 Long 1963, p. 472
- 1 2 Odgers 1988, p. 184
- ↑ Long 1963, p. 475
- ↑ Keogh 1965, pp. 453–454
- 1 2 3 Keogh 1965, p. 454
- 1 2 Coulthard-Clark 1998, p. 253
- ↑ Johnston 2002, pp. 235–236
- 1 2 3 Keogh 1965, p. 455
- ↑ Long 1963, p. 495
- ↑ Johnston 2002, p. 237
- ↑ Grey 2008, p. 191
- ↑ Grey 2008, p. 190
- ↑ Johnston 2002, p. 238
- 1 2 Long 1963, p. 501
- ↑ Long 1963, p. 496
- ↑ Long 1963, p. 561
- ↑ Long 1963, p. 563
- ↑ Long 1963, p. 581
- ↑ Long 1963, p. 565
- ↑ Long 1963, p. 577
References
- Coulthard-Clark, Chris (1998). Where Australians Fought: The Encyclopaedia of Australia's Battles. St Leonards, New South Wales: Allen & Unwin. ISBN 1-86448-611-2.
- Grey, Jeffrey (2008). A Military History of Australia (3rd ed.). Melbourne, Victoria: Cambridge University Press. ISBN 978-0-521-69791-0.
- Johnston, Mark (2002). That Magnificent 9th: An Illustrated History of the 9th Australian Division 1940–46. Sydney, New South Wales: Allen & Unwin. ISBN 1-86508-654-1.
- Keogh, Eustace (1965). The South West Pacific 1941–45. Melbourne, Victoria: Grayflower Productions. OCLC 7185705.
- Long, Gavin (1963). The Final Campaigns. Australia in the War of 1939–1945, Series 1 – Army, Volume VII. Canberra, Australian Capital Territory: Australian War Memorial. OCLC 1297619.
- Odgers, George (1988). Army Australia: An Illustrated History. Frenchs Forest, New South Wales: Child & Associates. ISBN 0-86777-061-9.
External links
- Ooi, Keat Gin (October 2002). "Prelude to Invasion: Covert Operations Before the Re-Occupation of Northwest Borneo, 1944-45". Journal of the Australian War Memorial. Australian War Memorial. ISSN 1327-0141. Retrieved 14 February 2014.
| Main history1 |  | |
|---|---|---|
| History of Sabah |
| |
| History of Sarawak | ||
| History of Labuan | ||
1: Covers the three territories. | ||