Battle of Mount Harriet
| ||||||||||||||||||||||||||||||||
The Battle of Mount Harriet was an engagement of the Falklands War, which took place on the night of 11/12 June 1982 between British and Argentine forces. It was one of three battles in a brigade-size operation on the same night.
Background
The British force consisted of 42 Commando (42 CDO), Royal Marines under the command of Lieutenant Colonel Nick Vaux's Royal Marines (he later became a general) with artillery support from a battery of 29 Commando Regiment, Royal Artillery. The 1st Battalion, Welsh Guards (1WG) and two companies from 40 Commando (40 CDO) were in reserve. HMS Yarmouth provided naval-gunfire support for the British forces. The Argentine defenders consisted of Lieutenant Colonel Diego Soria's 4th Infantry Regiment (RI 4).
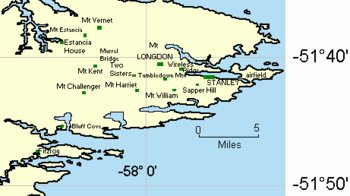
On the night of 30 May, K Company of 42 CDO boarded three Sea King helicopters and moved forward of San Carlos to secure the commanding heights of Mount Kent—at 1,504 feet, the tallest of the peaks surrounding Stanley—where the D Squadron SAS Troops had already established a strong presence. However, when they arrived at their landing zone, some 3 kilometres (2 miles) behind the ridge of the mountain, the Marines were surprised to see the flashes and lines of tracer ammunition lighting up the night.
After a fierce fight at close quarters, the Argentine patrol (Captain Tomas Fernandez' 2nd Assault Section, 602 Commando Company) melted away from the boulders and snow-soaked scrub and grass. By the end of May, Major Cedric Delves' D Squadron had gained Mount Kent, and Tactical HQ commenced patrolling Bluff Cove Peak, which they took with the loss of two wounded.[2]
The attack was preceded by many days of observation and nights of patrolling. Some night-fighting patrols were part of a deception plan to convince the Argentinians that the attack would come from a westerly direction. Other, more covert, patrols were to find a route through a minefield around the south of Mount Harriet. Sniping and naval artillery were used to harass the defenders and deny them sleep.
On 3 June, Lieutenant Chris Marwood's Reconnaissance Troop of 42 CDO, accompanying the 3 Commando Brigade Forward Air Control team commanded by Flight Lieutenant Dennis Marshall-Hasdell, encountered an RI 4 fighting patrol (Second Lieutenant Lautaro Jiménez Corbalán's 3rd Platoon of B Company from Mount Harriet).[3] The Recce Troop opened fire and two conscripts (Privates Celso Paez and Roberto Ledesma) were instantly killed, and an NCO (Corporal Nicolas Odorcic) went down, concussed when shot in the helmet by one of the Marine snipers.[4]
This action drew attention to their exposed forward position, and Argentine reinforcements in the form of Second Lieutenant Marcelo Llambías Pravaz's 3rd Platoon from Two Sisters joined the action with a general counterattack.[5] The Primary Forward Air Controller, commando-trained Flight Lieutenant Dennis Marshal-Hasdell, remembers:
We were separated from our heavy bergens with the radios and all our gear. The patrol was spread over quite a large area, with lots of shouting, noise and firing going on. The Marines abandoned all their equipment, and although no one told us, it became clear that we were to withdraw. With no information, and the likelihood of having to fight our way out, Dave Greedus and I decided to abandon our equipment, destroying as much as we could. The two radio sets (HF and UHF) were tough enough, but the HAZE unit of the laser target marker was designed to withstand the weight of a tank![6]
The laser target designator retrieved in the contact showed that the Royal Marines were seeking to destroy the Argentine bunkers on Mount Harriet with 1,000-pound GBU-16 Paveway II dropped by RAF Harriers. The next day, 10 (Defence) Troop re-occupied the Mount Wall observation post against no opposition.[7]
Prelude
On 8 June crack reinforcements arrived in the form of machine-gunners and mortarmen from the 1st 'Patricios' Infantry Regiment and Regiment of Mounted Grenadiers to support the 4th Infantry Regiment.[8]On the night of 8–9 June, action on the outer defence zone flared when Lieutenant Mark Townsend's 1 Troop (K Company, 42 CDO) probed Mount Harriet, killing two Argentines (Corporal Hipolito Gonzalez and Private Martiniano Gomez) from Second Lieutenant Jiménez Corbalán's 3rd Platoon.[9]At the same time, two platoon-size fighting patrols from 45 Commando attempted the same on Two Sisters Mountain, but the Argentine RASIT ground surveillance radar on Mount Longdon was able to detect the 45 Commando platoons, and artillery fire dispersed the force.
Around dusk on 9 June, the Soria's men detected the presence of British troops that had taken up positions in a house on the southern approaches to Mount Harriet. The 4th Regiment's Reconnaissance Platoon under Sub-Lieutenant Jorge Pasolli received instructions to move forward and clear the British from Port Harriet House and the Scots Guards Reconnaissance Platoon that had moved into the area was forced to vacate the building when the Argentines radioed in mortar fire from 120-mm Mortar Platoon on Mount Harriet. The Scots Guards were forced to disengage and retreated to North Basin under heavy small arms and mortar fire that wounded three men including Sergeant Ian Allum.
Over a period of a week, the 4th Regiment defended the Harriet-Two Sisters sector from five Royal Marine platoon-size attacks. Every time the Royal Marine Commandos got into the forward platoon positions, the officers, NCOs and conscripts, in general, counterattacked with rifles and cleared them out.
On the morning of 11 June, the orders for the attack were given to 42 CDO by Vaux; K Company was ordered to attack the eastern end of the mountain, while L Company would attack the southern side an hour later, where it—if the mountain was secured—would then move north of Mount Harriet to Goat Ridge. J Company would launch a diversionary attack (code named Vesuvius) on the western end of Mount Harriet.
In the closing hours of 11 June, K and L Companies moved from their assembly area on Mount Challenger (which lay to the west of Mount Harriet) and made their way south, around their objective, across the minefield, to their respective start lines. As they moved around the feature in the dark, J company launched their very loud diversionary "attack" from the west.
Battle

The battle for Mount Harriet began on the evening of 11 June with a blistering naval bombardment that killed two Argentines and wounded twenty-five.[10] John Witheroe, one of the British war correspondents, later recalled the softening up fire:
We were involved with one night attack on Mount Harriet, when the Welsh Guards were coming up as a back-up. This involved marching for several hours on a very dark night, through a minefield. Sporadic shellfire slowed our progress tremendously. Eventually we made the base of Mount Harriet, which was coming under incredible fire from a frigate off shore. The whole mountain seemed to erupt in flame. It seemed impossible that anybody could survive an attack like that. This went on for well over an hour, shell after shell whistling over our heads and hitting the mountain. Eventually this was lifted and the Marines went in. To our amazement, there seemed to be an incredible amount of fighting going on. There was a lot of tracer fire. The whole night was being lit up by flares, which cast a dead, unrealistic, pall over the whole scene.
The Argentines retaliated and the Artillery Observation Officer on Mount Kent, Captain Tomás Fox, directed 155mm artillery rounds that fell among the men of 'B' Company, 7th Duke of Edinburgh's Own Gurkha Rifles in the area of Bluff Cove, seriously wounding three Gurkhas, including Lance Corporal Gyanendra Rai who nearly bled to death. Describing the moment he was injured, Rai, who was awarded the South Atlantic Medal, said: "I was absolutely convinced I would die. I was in severe pain. It was like someone had driven a four-pound sledge hammer through the side of my back."[12]
Captain Peter Babbington's K Company crossed their start line first and proceeded up the mountain undetected, knifing two sentries on the way. They remained undetected until they approached Sub-Lieutenant Mario Juarez' 120-mm Mortar Platoon positions and decided to engage them. They were assisted in the advance by HMS Yarmouth, artillery, and mortars. During the engagement, Corporal Laurence G Watts was killed. The supporting British artillery batteries and mortar crews fired over 1,000 rounds to keep the Argentines pinned down, and helped stop the defenders getting a proper aim at the Royal Marines.[13]
About 150 metres from Soria's HQ, Corporal Steve Newland circled behind a group of Argentines (under First Lieutenant Jorge Alejandro Echeverria, the 4th Regiment's intelligence officer) who were setting up an ambush. Although half a dozen Argentines and a MAG were placed to engage anyone who broke cover, Newland darted out from under cover to charge the enemy machine gun. He grenaded two of the crew, but reaching the rear of the machine gun position, he was shot through both legs.
With the enemy machine gun out of action, Corporals Mick Eccles and Sharky Ward were able to clear the position with some help from Marine Barnett. The three corporals were awarded the Military Medal and Barnett the MID. Increasing numbers of Argentine soldiers, mainly conscripts from RI 4's Recce Platoon, began to surrender, but the Commanding Officer and Intelligence Officer and several senior NCOs still fought on, according to their orders. The heavy machine gun teams, in general, stood in their positions continuing the fight.[14]
L Company crossed their start line shortly after K Company and were almost immediately engaged by effective machine gun fire from Sub-Lieutenant Pablo Oliva's platoon defending the lower southern slopes. These weapons would not be silenced until being hit by several MILAN anti-tank missiles and six 105mm artillery guns from Mount Challenger.[15][16]The L Company Marines took 5 hours to advance 600 metres in the face of stiff resistance[17][18]and contend they took fire from at least seven machine guns that wounded five men, including the company's second-in-command and a signaller. Hugh Bicheno contends that the 4th Regiment's passive night goggles were all with B Company.[19]
Before first light, Lieutenant Jerry Burnell's 5 Troop of L Company proceeded to an outcrop of rocks towards Goat Ridge. As they advanced, the Royal Marine platoon came under heavy fire from Second Lieutenant Jiménez Corbalán 3rd Platoon, covering the Argentinean retreat and were forced to withdraw under cover of machine guns pre-positioned behind them and further up the hill.[20]The Troop took one casualty in this action. L Company requested mortar fire onto the Argentines; a mixture of HE and WP; then 5 Troop moved forward again. They took 3 prisoners although most of Jiménez-Corbalán men had withdrawn after losing two killed in the night fighting (Privates Juan José Acuña and Carlos Epifanio Casco). The platoon of Oscar Augusto Silva continued to resist from Goat Ridge throughout the morning of 12 June, and a determined conscript, in a position just below the summit of Mount Harriet held up L Company with accurate shooting until killed by an 84mm anti-tank rocket fired at short range.[21] At some time in the early morning darkness, as Sub-Lieutenant Jiménez Corbalán's 3rd platoon was making its way to new positions on Mount William, the officer was temporarily blinded when he set off a booby-trap while leading his men through a minefield.
Aftermath
The battle was a textbook example of good planning and use of deception and surprise, and a further step towards the main objective of Stanley. Two Royal Marines: Corporal Laurence G Watts and Acting Corporal Jeremy Smith were killed, and thirty were wounded, including fourteen wounded in L Company.[22]Another six Scots Guards and Gurkhas were wounded by Argentine artillery and mortar fire controllers on Mount Harriet. Eighteen Argentines were killed defending Mount Harriet, including those killed in the earlier patrol battles and softening up bombardments. Lance Corporal Koleszar had the surprising experience of finding that two 'dead' Argentine soldiers, whose boots he was trying to remove, were very much alive and jumped up to surrender. Some British reporters were thus misled into depicting the Argentineans as hapless teenage conscripts who caved in after the first shots were fired, but Royal Marine Warrant Officer 2 John Cartledge, who served with L Company during the battle, corrected them, saying the Argentines were good soldiers who had fought properly:
They used the tactics which they had been taught along the way very well, they were quite prepared for an attack. They put up a strong fight from start to finish. They were also better equipped than we were. We had first generation night sights, which were large cumbersome pieces of equipment, while the Argentines had second-generation American night sights that were compact and so much better than what we had. The one deficiency which we exposed was that they had planned for a western end of the mountain attack and therefore had not bothered to extend their defensive positions to the eastern end, where we ultimately attacked.[23]
One British general put their success down to his Marines' skill and professionalism:
What was needed was speed but not being bloody stupid. The Israelis would have done it much faster, but with many more casualties.[24]
42 Commando captured 300 prisoners on Mount Harriet, and for the bravery shown in the attack, the unit was awarded one DSO, one Military Cross, four Military Medals, and eight men were mentioned in dispatches.[25]
References
- ↑ "2 COYS OF 42 CDO HAD TAKEN A REGIMENTAL POSITION FOR 2 KILLED AND 30 WOUNDED ... WE HAD BEEN ORDERED TO BE PREPARED TO PRESS FORWARD THE ATTACK ONTO MOUNT TUMBLEDOWN AND MOUNT WILLIAM IF THE ENEMY FLED OUR INITIAL ATTACK, AND TIME ALLOWED. BY DAWN IT WAS OBVIOUS THAT WE WERE IN NO POSITION TO ATTACK. WE WERE EXHAUSTED, OUT OF AMMO AND SUFFERING SIGNIFICANT CASUALTIES. MY 21C, A RADIO OPERATOR, MY TAC HQ MACHINE GUNNER AND ONE OF MY TROOP COMMANDERS HAD ALL BEEN SHOT, AND A FURTHER 10 ALSO WOUNDED. ANOTHER TROOP COMMANDER I DISCOVERED WAS SUFFERING FROM SHELLSHOCK". A Rifle Company Commander's Perspective, Major David G. Wheen, Royal Marines
- ↑ Nine battles to Stanley, Nicholas Van der Bijl, p. 148, Leo Cooper, 30/09/1999
- ↑ 5th Infantry Brigade in the Falklands 1982. Nicholas Van der Bijl, David Aldea. p. 166. Leo Cooper, 2003
- ↑ Volveremos!, Jorge R. Farinella, p. 110, Editorial Rosario, 1984
- ↑ 5th Infantry Brigade in the Falklands 1982. Nicholas Van der Bijl, David Aldea. p. 166. Leo Cooper, 2003
- ↑ The Scars of War, Hugh McManners, p. 238, HarperCollins, 21/01/1993
- ↑ 5th Infantry Brigade in the Falklands 1982. Nicholas Van der Bijl, David Aldea. p. 167. Leo Cooper, 2003
- ↑ "In the second week of June we received a platoon of the 12th Infantry Regiment, which had been unable to link up with the bulk of its unit and we recovered two rifle platoons from A Company, which were added to the supporting Two Sisters defences. We also got reinforcements in the form of MAG machineguns from the Horsed Grenadiers Regiment along with their crews." (EL RI 4 EN MALVINAS, Diego Alejandro Soria, www.aveguema.org.ar/
- ↑ 5th Infantry Brigade in the Falklands 1982. Nicholas Van der Bijl, David Aldea. p. 174. Leo Cooper, 2003
- ↑ Nine battles to Stanley, Nicholas Van der Bijl, p.183, Leo Cooper, 30/09/1999
- ↑ Speaking Out: Untold Stories from the Falklands War, p. 271, Andre Deutsch, 1989
- ↑ Gurkha who needs war wound treated is barred from UK, By DANIEL BATES, MailOnline, 18 June 2007
- ↑ "Over 1,000 shells or bombs would fall on 'Zoya' alone that night, all of them instantly, precisely laid to cover movement, suppress defensive fire, break up resistance. They gave us an overwhelming advantage." Nick Vaux, March to the South Atlantic: 42 Commando, Royal Marines in the Falklands War, p. 177, Buchan & Enright, 1986
- ↑ Operation Corporate: The Falklands War, 1982, Martin Middlebrook, p.349, Viking, 1985
- ↑ Nine battles to Stanley, Nicholas Van der Bijl, p.186, Leo Cooper, 30/09/1999
- ↑ "L COMPANY'S TASK WAS TO CLEAR AND SECURE THE WESTERN END OF THE MOUNT HARRIET FEATURE. STARTING AFTER K COMPANY ACROSS THE SAME START LINE, SURPRISE HAD BEEN LOST AND SO L COMPANY CAME UNDER EFFECTIVE FIRE FROM HEAVY MACHINE GUNS WITHIN 200 METRES OF THE START LINE TAKING THREE CASUALTIES ALMOST AT ONCE. CAPTAIN WHEEN, COMMANDING L COMPANY, CALLED FOR MILAN TO FIRE AT THE MACHINE-GUN POSITIONS". A Rifle Company Commander's Perspective, Major David G. Wheen, Royal Marines
- ↑ Nine battles to Stanley, Nicholas Van der Bijl, p. 186, Leo Cooper, 30/09/1999
- ↑ "THIS INVOLVED A FIGHTING ADVANCE OF ABOUT 600 METRES AND, AS EACH POSITION TOOK A SEPARATE TROOP OR SECTION ATTACK TO DEAL WITH IT, IT TOOK ABOUT FIVE HOURS TO COVER THE DISTANCE FROM THE START LINE. THE COMPANY FOUND THAT IT WAS BEST TO KEEP SKIRMISHING FORWARD THROUGHOUT THIS ADVANCE, BECAUSE GOING TO GROUND FOR ANY LENGTH OF TIME MEANT SITTING IN THE MIDDLE OF THE ENEMY ARTILLERY FIRE TASKS; HERE ARTILLERY AND SMALL ARMS CAUSED A FURTHER 4 GUNSHOT AND 7 SHRAPNEL CASUALTIES.". A Rifle Company Commander's Perspective, Major David G. Wheen, Royal Marines
- ↑ Razor's Edge (Weidenfeld & Nicolson, 2006)
- ↑ "WHEN REORGANIZED HIS COMPANY, SENT THE PRISONERS TO THE REAR AND THEN ORDERED 5 TROOP TO MOVE FORWARD TO THE COMPANY'S NEXT OBJECTIVE, AN ENEMY POSITION IN THE ROCKY OUTCROP ABOUT 500 METRES DUE NORTH OF THE WESTERN END OF HARRIET. BEFORE THEY MOVED, HOWEVER, WHEEN CONCENTRATED ALL HIS MACHINE GUNS, LESS THOSE OF 5 TROOP, FIFTEEN GUNS IN ALL, ON THE RIDGE. AS 5 TROOP MOVED FORWARD DOWN THE SLOPE TO THE ROCKY OUTCROP, THEY CAME UNDER HEAVY FIRE FROM THEIR OBJECTIVE. WHEEN PULLED THEM BACK AND THEN HIT THE ENEMY WITH MORTAR, ARTILLERY AND MACHINE-GUN FIRE BEFORE ORDERING 5 TROOP FORWARD AGAIN. THEY DASHED FORWARD WITH GREAT DETERMINATION AND WINKLED OR KILLED OUT THE ENEMY." A Rifle Company Commander's Perspective, Major David G. Wheen, Royal Marines
- ↑ "One determined Argentinian sniper just below the highest part of the mountain held out long after other resistance in that area had ended. He hit 6 Troop's commander, Lieutenant Pusey, and the troop sergeant took over ... The sniper was eventually silenced by an 84-mm Carl Gustav rocket round fired at fifteen yards range." Operation Corporate: The Falklands War, 1982, Martin Middlebrook, p.349, Viking, 1985
- ↑ "2 COYS OF 42 CDO HAD TAKEN A REGIMENTAL POSITION FOR 2 KILLED AND 30 WOUNDED ... WE HAD BEEN ORDERED TO BE PREPARED TO PRESS FORWARD THE ATTACK ONTO MOUNT TUMBLEDOWN AND MOUNT WILLIAM IF THE ENEMY FLED OUR INITIAL ATTACK, AND TIME ALLOWED. BY DAWN IT WAS OBVIOUS THAT WE WERE IN NO POSITION TO ATTACK. WE WERE EXHAUSTED, OUT OF AMMO AND SUFFERING SIGNIFICANT CASUALTIES. MY 21C, A RADIO OPERATOR, MY TAC HQ MACHINE GUNNER AND ONE OF MY TROOP COMMANDERS HAD ALL BEEN SHOT, AND A FURTHER 10 ALSO WOUNDED. ANOTHER TROOP COMMANDER I DISCOVERED WAS SUFFERING FROM SHELLSHOCK". A Rifle Company Commander's Perspective, Major David G. Wheen, Royal Marines
- ↑ British Royal Marine returns to Battlefield, Merco Press, South Atlantic News Agency, Monday, April 15th 2002
- ↑ Robert Fox, Eyewitness Falklands, p. 296
- ↑ Naval History.net
External links
- An article written by the CO of the 4th Infantry Regiment
- A 42 Commando Company Commander's perspective
- See Naval-History.Net for 42 Commando's approach to and battle for Mount Harriet
- A Brilliant Success: The Battle for Mount Harriet
- Mount Harriet: The Argentinean Story
- A British officer goes in search of 4th Regiment veterans
Coordinates: 51°42′31.8″S 58°0′56.2″W / 51.708833°S 58.015611°W