Battle of Eora Creek – Templeton's Crossing
| ||||||||||||||||||||||||||
.jpg)
The Battle of Eora Creek – Templeton's Crossing consisted of two engagements fought in August – September 1942 and late October 1942. Forming part of the Kokoda Track campaign of the Second World War, the battle involved military forces from Australia, supported by the United States, fighting against Japanese troops from Major General Tomitaro Horii's South Seas Detachment who had landed in Papua in mid-1942, with the intent of capturing Port Moresby.
The first part of the was one of three defensive actions fought by the Australians along the Kokoda Track, while the second formed part of the Australian pursuit of the Japanese towards the beachheads around Buna and Gona, following the abandonment of plans to capture Port Moresby. The fighting around Eora Creek in August – September resulted in the delay of the Japanese advance south, which allowed the Australians to withdraw to Efogi. Later, after the tide of the campaign turned towards the Australians, the area was once again the scene of heavy fighting in late October as the Australians took heavy casualties as part of efforts to advance north to re-take Kokoda and then push on towards Oivi and Gorari in November.
Background
.jpg)
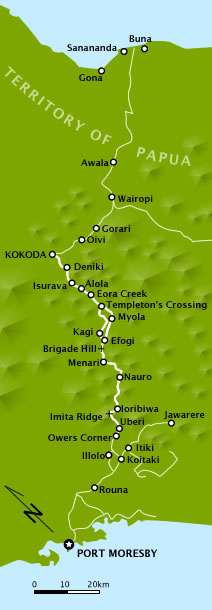
On 21 July 1942, Japanese forces landed on the northern Papuan coast around Buna and Gona, as part of a plan to capture the strategically important town of Port Moresby via an overland advance along the Kokoda Track following the failure of a seaborne attempt at the Battle of the Coral Sea in May.[1] After minor skirmishes with small groups of Australian and Papuan forces around Awala, Australian resistance along the track grew and throughout July and August a number of battles were fought along the Kokoda Track as the Japanese advanced force, Colonel Yosuke Yokoyama's 15th Independent Engineer Regiment, advanced steadily south towards their objective on the southern coast.[2]
Following a confusing see-saw encounter Kokoda fell to the Japanese in early August,[3] and this was followed by heavy fighting around Deniki. After the main body of Japanese troops, Major General Tomitaro Horii's South Seas Detachment, began to arrive from Rabaul the first major battle of the campaign took place around Isurava later in the month as the veteran Australian 21st Brigade, under Brigadier Arnold Potts, reinforced the Militia troops of Maroubra Force who had been holding the line to that point.[4][5] At the end of the month, in an effort to slow the Japanese advance, the Australians had established a blocking force around Eora Creek, to the south of the village of Eora, on the high ground overlooking Templeton's Crossing.[6] Following their efforts around Isurava, the Japanese 144th Infantry Regiment was rested, and the 41st Infantry Regiment was assigned the task of following up the Australians as they withdrew south and attempt to destroy them.[7]
Battle
First engagement
Coming in the aftermath of the fighting around Isurava,[7] during the first engagement around Eora, fought between 31 August and 5 September, the heavily depleted Australian 2/14th and 2/16th Infantry Battalions successfully delayed two battalions from Colonel Kiyomi Yazawa's 41st Infantry Regiment. This subsequently allowed the Australians to fall back further towards Efogi.[5] The battle developed in several phases. Initially, after the fighting around Isurava, Maroubra Force had begun a withdrawal south, leaving a rearguard from the 2/14th and 2/16th Infantry Battalions to slow the Japanese pursuit. This rearguard, commanded by the commanding officer of the 2/16th, Lieutenant Colonel Albert Caro, initially established a defensive position south of Alola. Seeing that the Australians were positioned there in strength, the Japanese commander, Yazawa, sent a battalion to outflank them, but the unit became lost in the jungle to the west, allowing the Australians to withdraw on the night of 30/31 August.[8]
The Australians then established a series of entrenchments on the high ground overlooking Eora Village from the south with the 2/16th forward, and the 2/14th in reserve. This was heavily bombarded and then attacked throughout 1–2 September, and as the Japanese began penetrating the defensive perimeter and sent a detachment west across Eora Creek to flank the Australians, Caro began to withdraw his troops to Templeton's Crossing. The 2/14th withdrew down the Kokoda Track, while the 2/16th fell back along a side track further to the east. As the Japanese pursued them, they withdrew across Eora Creek where a further defensive line was established around Myola Ridge.[9] Here, on 3/4 September, they held up the Japanese for a time on 4 September before the Japanese put in another flanking attack to the west, while a smaller force cut the track to the south of Caro's position. Concerned about complete envelopment, Caro decided to withdraw further south.[8]
Casualties during the first engagement amounted to 43 killed and 58 wounded for the Japanese out of a force of around 1,300, and 21 killed and 54 wounded for the Australians from around 710 personnel.[10] Author Peter Williams later described the first engagement as "the least-examined engagement of the campaign"; occurring so soon after the fighting around Isurava, Williams argues that the battle has been "obscured by it", highlighting that Japanese accounts in fact refer to it as the "Second Battle of Isurava", while contemporary Australian press reports were largely silent in their coverage of it. Nevertheless, it was arguably one of the main clashes during the Australian withdrawal and it was the last time during the campaign that the Japanese outnumbered the Australians. The Japanese force was supported by four artillery pieces and an engineer platoon, while Australians had only a single 3-inch mortar for indirect fire support.[11]
Interlude
Following the first engagement around Eora Creek, the Australians were able to successfully fight through the Japanese who had cut the Kokoda Track to their south, after which they were able to elude the pursuing Japanese, successfully breaking contact and then establishing another defensive position around Efogi.[12] Although the withdrawal resulted in the loss of their supply dump around the dry lake at Myola, the action was a successful rearguard action for the Australians,[8] with the slowness of the Japanese pursuit contributing to this. The foodstuffs captured at Myola by the Japanese were later found to have been contaminated by the withdrawing Australians, rendering them useless.[13] Following the fighting around Eora Creek, the Japanese 41st Regiment was criticised, particularly by members of its sister regiment, the 144th, and by Horii, for its slow rate of advance towards Efogi and its inability to destroy the Australian force, thus allowing it to regroup. The 144th subsequently took over the pursuit, catching up with them around Efogi.[14] Along Mission Ridge and around Brigade Hill, the Australians attempted to hold the Japanese, but were defeated and forced to break track and withdraw through the scrub when the 144th Infantry Regiment managed to fix the forward Australian troops along Mission Ridge, and nearly outflank the second line of defence further back on Brigade Hill. Potts was subsequently relieved of his command, being replaced by Brigadier Selwyn Porter as commander of Maroubra Force as the Australian withdrawal south along the track continued.[15]
Further fighting took place around Ioribaiwa where the Australians finally managed fought the Japanese to a standstill before withdrawing further to Imita Ridge, where they established a final defensive line for a last stand. Before this climactic battle could take place, though, the Japanese reached the limit of their supply line and the strategic situation elsewhere in the Pacific – specifically the defeats around Milne Bay and on Guadacanal[16] – resulted in the tide shifting towards the Australians, as the Japanese commander, Horii, received orders to assume a defensive posture rather than continuing the drive on Port Moresby.[16] After the Japanese withdrew from Ioribaiwa in late September, troops from the Australian 25th Brigade, under Brigadier Kenneth Eather, later reinforced by Brigader John Lloyd's 16th Brigade, under Major General Arthur Allen, commander of the Australian 7th Division, began advancing north from Imita Ridge along the Kokoda Track. On 28 September, the Australians retook the abandoned trenches on Ioribaiwa and for the next two weeks, the Japanese were able to avoid contact as they fell back towards northwards towards a new defensive line.[17]
Second engagement
Amidst pressure from the upper echelons of the Allied high command to increase the pace of their advance northwards in pursuit of the withdrawing Japanese, in mid-October, the Australians reached Eora Creek and Templeton's Crossing,[18] which was held by the "Stanley Detachment" of the 144th Infantry Regiment. A second battle was subsequently fought there between 11 and 28 October.[19][20] In the second battle, the Australians outnumbered the Japanese roughly 2 to 1, with 1,882 Australians pitted against 986, essentially mirroring the situation during the first battle.[21]
As part of the Japanese withdrawal plans, Horri had been ordered to establish a blocking position around Isurava, in order to maintain the Japanese base in the region to allow them to resume the offensive at a later date. He was also ordered to reinforce the beachheads around Buna and Gona on the northern New Guinea coast. Concerned about the possibility of the Australians outflanking his position around Isurava and falling upon his rear around Oivi, Horii decided to establish several defensive lines along the Eora Creek: near Myola Ridge, at Templeton's Crossing II near Mount Bellamy to the west of the creek, and around Eora Village itself.[22] Over the course of a fortnight, the Australians launched three successive attacks, reducing the Japanese positions along Eora Creek. Amidst torrential rain and fierce fighting, the Australians eventually gained the vital ridge overlooking the creek at heavy cost against stiff opposition from the remnants of Colonel Masao Kusunose's 144th Infantry Regiment who were determined to buy time for the remainder of their comrades to make good their escape.[23]
.jpg)
By 10 October, the Australians had occupied Myola, after which work parties were sent forward re-establish the Australian supply base around the dry lake.[24] The initial Australian assault saw the 2/33rd Infantry Battalion advance against the Japanese position around Myola Ridge on 11 October, while the 2/25th Infantry Battalion advanced to Mount Bellamy, where they came up against the Japanese on the eastern approaches around Templeton's Crossing II. The following day, the Militia 3rd Infantry Battalion provided a supporting effort to the 2/33rd around Myola Ridge, which resulted in limited gains for the Australians.[25] Between 15 and 17 October, as the Australian 16th Brigade came up to support those of the 25th, the Japanese detachments withdrew north concentrating on the western side of the creek near Templeton's Crossing II. Japanese artillery then began to engage the lead elements of Maroubra Force in order to slow their advance.[25]
Over the course of the next few days, the Australians made limited gains, pushing the Japanese north along the eastern side of the creekline, until a flanking attack by the 2/2nd Infantry Battalion was put in on 20 October, seizing the initiative for the Australians. In response, the Japanese undertook a hasty retreat to Eora Village and over the course of 21 to 24 October Maroubra Force advanced north in pursuit. On 24– 25 October, the Japanese hastily reinforced their position around the village, bringing forward reserves that had been resting around Kokoda and Oivi. They managed to stabilise their front briefly until a flanking attack from the west by the 2/3rd Infantry Battalion on 27 October forced the Japanese to withdraw from the village towards Isurava the following day. Heavy casualties were inflicted amongst the retreating Japanese. Many abandoned their weapons as they fled, but the artillery, which had been withdrawn at the start of the withdrawal, was saved for later use.[26][25]
Described by Sunday Telegraph journalist Barclay Crawford as the "bloodiest and most significant battle of the Australian Army's campaign to retake the Kokoda Track", at least 79 Australians were killed during the fighting in the second engagement, as well as 69 Japanese.[23]
Aftermath
The second engagement around Eora Creek–Templeton's Crossing was the first victory of the Kokoda Campaign for the Australians, but as Williams argues it was only a partial victory in so much as while the Australians had secured an exit from the mountainous Owen Stanleys, the Japanese force had not been destroyed and was therefore able to withdraw further north and continue to delay the Australian pursuit. In the aftermath of the fighting, the Australian high command relieved the 7th Division commander, Allen, of his command, citing the slow progress of his troops against a Japanese force half their size.[27]
Under the command of Major General George Vasey, the Australians subsequently resumed their northwards advance with the 2/3rd Infantry Battalion completing the clearance of the Japanese positions around Eora Creek, before linking up with the rest of the 16th Brigade on the track. On 30 October, Alola was taken without a shot fired and aerial resupply operations began the following day. While the 16th advanced along the Abuari ridgeline, the 25th moved to the west of Eora Creek, as the Australians advanced towards Kokoda, where they expected the Japanese to mount a stubborn defence.[28] Nevertheless, a patrol from the 2/31st Infantry Battalion entered Kokoda on 2 November, finding it abandoned.[29] In the process, they re-gained access to the village's vital airstrip which helped relieve the pressure on their supply chain which had largely relied upon Papuan carriers. They then fought the final battle of the campaign around Oivi and Gorari between 4 and 11 November 1942. After this, the Japanese abandoned most of their artillery and completed their withdrawal across the Kumusi River, falling back to Buna and Gona, where heavy fighting followed in December 1942 and January 1943.[30][31]
After the war, according to Crawford, the location of the battle was kept secret by the local villagers "out of respect for the dead". In 2010, the location of the battlefield was announced by Brian Freeman, a former Australian commando and tour guide.[23] Two battle honours were awarded to Australian units after the war for involvement in the two engagements. These were "Eora Creek – Templeton's Crossing I" and "Eora Creek – Templeton's Crossing II".[32] The 39th, 2/14th and 2/16th Infantry Battalions received the first battle honour, while the 3rd, 2/1st, 2/2nd, 2/3rd, 2/25th, 2/31st and 2/33rd received the second.[33]
References
- Citations
- ↑ Keogh 1965, p. 168.
- ↑ Coulthard-Clark 1998, pp. 222–233.
- ↑ Keogh 1965, pp. 174–180.
- ↑ James 2013, p. 208.
- 1 2 Coulthard-Clark 1998, p. 222.
- ↑ Williams 2012, pp. 112–113.
- 1 2 Williams 2012, p. 109.
- 1 2 3 "Into the Mountains: From Eora to Templeton's Crossing: 31 August to 5 September 1942". The Kokoda Track: Exploring the Site of the Battle Fought by Australians in World War II. Commonwealth of Australia. Retrieved 13 June 2016.
- ↑ Williams 2012, p. 116.
- ↑ Williams 2012, pp. 111–122 & 119.
- ↑ Williams 2012, pp. 109–112.
- ↑ Williams 2012, p. 119.
- ↑ Harries & Harries 1991, p. 404.
- ↑ Williams 2012, pp. 118–119.
- ↑ Williams 2012, pp. 134–135.
- 1 2 Williams 2012, p. 185.
- ↑ Coulthard-Clark 1998, pp. 222–223.
- ↑ Keogh 1965, pp. 236–237.
- ↑ Anderson 2014, p. 18.
- ↑ Williams 2012, p. 186.
- ↑ Williams 2012, pp. 192–193.
- ↑ Williams 2012, pp. 186 & 189.
- 1 2 3 Crawford 2010, p. 11.
- ↑ Anderson 2014, p. 132.
- 1 2 3 "The Tide Turns: Australian advance to Eora: 13–27 October 1942". The Kokoda Track: Exploring the Site of the Battle Fought by Australians in World War II. Commonwealth of Australia. Retrieved 27 August 2016.
- ↑ Keogh 1965, p. 238.
- ↑ Williams 2012, p. 200.
- ↑ Anderson 2014, p. 193.
- ↑ Coulthard-Clark 1998, p. 223.
- ↑ Collie & Marutani 2009, pp. 172–191.
- ↑ Keogh 1965, pp. 230–285.
- ↑ "Battle Honours of the Australian Army: World War Two: South West Pacific" (PDF). Australian Army. Retrieved 30 December 2012.
- ↑ Maitland 1999, p. 142.
- Bibliography
- Anderson, Nicholas (2014). To Kokoda. Australian Army Campaigns Series – 14. Sydney, New South Wales: Big Sky Publishing. ISBN 978-1-922132-95-6.
- Collie, Craig; Marutani, Hajime (2009). The Path of Infinite Sorrow: The Japanese on the Kokoda Track. Crows Nest, New South Wales: Allen & Unwin. ISBN 978-1-74175-839-9.
- Coulthard-Clark, Chris (1998). The Encyclopaedia of Australia's Battles. Sydney, New South Wales: Allen & Unwin. ISBN 1-86448-611-2.
- Crawford, Barclay (6 June 2010). "Sacred site of Diggers found". Sunday Telegraph. Sydney, New South Wales: Consolidated Press (via ProQuest). p. 11. ISSN 1038-8753.
- Harries, Meirion; Harries, Susie (1991). Soldiers of the Sun: The Rise and Fall of the Imperial Japanese Army. New York: Random House. ISBN 0-679-75303-6.
- James, Karl (2013). "On Australia's Doorstep: Kokoda and Milne Bay". In Dean, Peter. Australia 1942: In the Shadow of War. Port Melbourne, Victoria: Cambridge University Press. pp. 199–215. ISBN 978-1-10703-227-9.
- Keogh, Eustace (1965). South West Pacific 1941–45. Melbourne, Victoria: Grayflower Publications. OCLC 7185705.
- Maitland, Gordon (1999). The Second World War and its Australian Army Battle Honours. East Roseville, New South Wales: Kangaroo Press. ISBN 0-86417-975-8.
- Williams, Peter (2012). The Kokoda Campaign 1942: Myth and Reality. Melbourne, Victoria: Cambridge University Press. ISBN 978-1-10701-594-4.
Further reading
- Brune, Peter (2004). A Bastard of a Place. Crows Nest, New South Wales: Allen & Unwin. ISBN 1-74114-403-5.
- McAulay, Lex (1991). Blood and Iron: The Battle for Kokoda 1942. Sydney, New South Wales: Arrow Books. ISBN 0091826284.
- McCarthy, Dudley (1959). South-West Pacific Area – First Year. Australia in the War of 1939–1945. Series 1 – Army. Volume 5. Canberra: Australian War Memorial. OCLC 3134247.
- Tanaka, Kengoro (1980). Operations of the Imperial Japanese Armed Forces in the Papua New Guinea Theater During World War II. Tokyo, Japan: Japan Papua New Guinea Goodwill Society. OCLC 9206229.