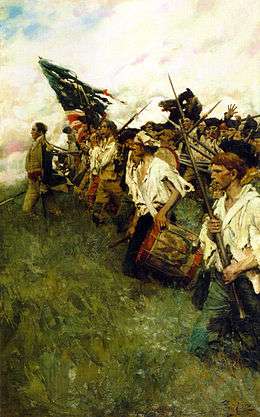
Battle of Brandywine
| ||||||||||||||||||||||||||||||||||||
The Battle of Brandywine, also known as the Battle of Brandywine Creek, was fought between the American army of General George Washington and the British army of General Sir William Howe on September 11, 1777. The British Army defeated the American Army and forced them to withdraw toward the American capital of Philadelphia. The engagement occurred near Chadds Ford, Pennsylvania during Howe's campaign to take Philadelphia, part of the American Revolutionary War. More troops fought at Brandywine than any other battle of the American Revolution.[5] It was also the longest single-day battle of the war, with continuous fighting for 11 hours.[5]
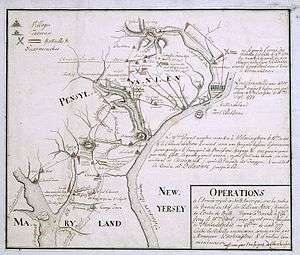
Howe's army departed from Sandy Hook, New Jersey on July 23, 1777 and landed near Elkton, Maryland in northern Chesapeake Bay.[6] Marching north, the British Army brushed aside American light forces in a few skirmishes. Washington offered battle with his army posted behind Brandywine Creek. While part of his army demonstrated in front of Chadds Ford, Howe took the bulk of his troops on a long march that crossed the Brandywine beyond Washington's right flank. Due to poor scouting, the Americans did not detect Howe's column until it reached a position in rear of their right flank. Belatedly, three divisions were shifted to block the British flanking force near a Quaker meeting house.
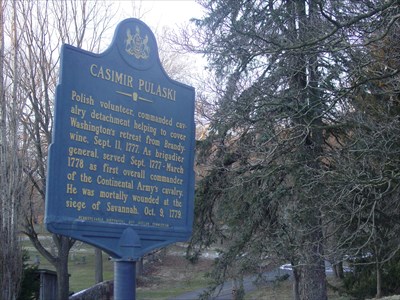
After a stiff fight, Howe's wing broke through the newly formed American right wing which was deployed on several hills. At this point Lieutenant General Wilhelm von Knyphausen attacked Chadds Ford and crumpled the American left wing. As Washington's army streamed away in retreat, he brought up elements of Nathanael Greene's division which held off Howe's column long enough for his army to escape to the northeast. Polish General Casimir Pulaski defended Washington's rear assisting in his escape.[7] The defeat and subsequent maneuvers left Philadelphia vulnerable. The British captured the city on September 26, beginning an occupation that would last until June 1778.
Background
In late August 1777, after a distressing 34-day journey from Sandy Hook on the coast of New Jersey, a Royal Navy fleet of more than 260 ships carrying some 17,000 British troops under the command of British General Sir William Howe landed at the head of the Elk River, on the northern end of the Chesapeake Bay near present-day Elkton, Maryland (then known as Head of Elk), approximately 40–50 miles (60–80 km) southwest of Philadelphia. Unloading the ships proved to be a logistical problem because the narrow river neck was shallow and muddy.
General George Washington had situated the American forces, about 20,300-strong, between Head of Elk and Philadelphia. His forces were able to reconnoiter the British landing from Iron Hill near Newark, Delaware, about nine miles (14 km) to the northeast. Because of the delay disembarking from the ships, Howe did not set up a typical camp but quickly moved forward with the troops. As a result, Washington was not able to accurately gauge the strength of the opposing forces.
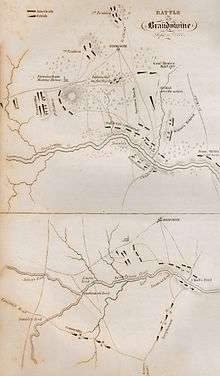
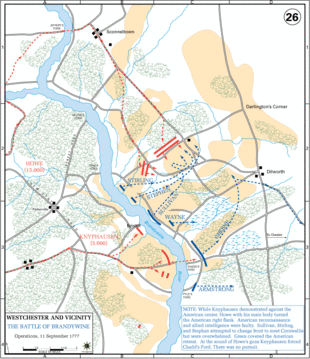
After a skirmish at Cooch's Bridge south of Newark, the British troops moved north and Washington abandoned a defensive encampment along the Red Clay Creek near Newport, Delaware to deploy against the British at Chadds Ford. This site was important as it was the most direct passage across the Brandywine River on the road from Baltimore to Philadelphia. On September 9, Washington positioned detachments to guard other fords above and below Chadds Ford, hoping to force the battle there. Washington employed General John Armstrong, commanding about 1,000 Pennsylvania militia, to cover Pyle's Ford, a few hundred yards south of Chadds Ford, which was covered by Major Generals Anthony Wayne's and Nathanael Greene's divisions. Major General John Sullivan's division extended northward along the Brandywine's east banks, covering the high ground north of Chadds Ford along with Major General Adam Stephen's division and Major General Lord Stirling's divisions. Further upstream was a brigade under Colonel Moses Hazen covering Buffington's Ford and Wistar's Ford. Washington was confident that the area was secure.
The British grouped forces at nearby Kennett Square.[8] Howe, who had better information about the area than Washington, had no intention of mounting a full-scale frontal attack against the prepared American defenses. He instead employed a flanking maneuver, similar to that used in the Battle of Long Island. About 6,800 men under the command of Wilhelm von Knyphausen advanced to meet Washington's troops at Chadds Ford. The remainder of Howe's troops, about 9,000 men, under the command of Charles, Lord Cornwallis, marched north to Trimble's Ford across the West Branch of the Brandywine Creek, then east to Jefferies Ford across the East Branch (two fords that Washington had overlooked), and then south to flank the American forces.[9]
Battle
British advance
September 11 began with a heavy fog, which provided cover for the British troops. Washington received contradictory reports about the British troop movements and continued to believe that the main force was moving to attack at Chadds Ford.
Knyphausen's Column
At 5:30 a.m. the British and Hessian troops began marching east along the "Great Road" (now Route 1) from Kennett Square, advancing on the American troops positioned where the road crossed Brandywine Creek. The first shots of the battle took place about 4 miles west of Chadds Ford, at Welch's Tavern. Element's of Maxwell's continental light infantry skirmished with the British vanguard (primarily the Queen's Rangers – a battalion of loyalists). The British continued to advance and encountered a greater force of continentals behind the stone walls on the Old Kennett Meetinghouse grounds. The battle was fought at mid-morning around the meeting house while the pacifist Quakers continued to hold their midweek service. One of the Quakers later wrote, "While there was much noise and confusion without, all was quiet and peaceful within."[10]
From the Meetinghouse grounds, the battle continued for three miles to the Brandywine Creek, at Chadds Ford. Eventually the British pushed the Americans back but not before suffering heavy losses.
Cornwallis's Column
The main British column under General Cornwallis (and accompanied by General Howe) set out from Kennett Square at 5:00 a.m.. Local loyalist sources had provided Howe with knowledge of two unguarded fords, above the forks of the Brandywine. The 17 mile flank march took approximately 9 hours to complete. The British appeared on the Americans' right flank at around 2 p.m. and took a much needed rest on Osbourne's Hill, a commanding position North of the Continental army. Having received intelligence from Colonel Bland's scouts, Washington ordered Sullivan to take overall command of Stirling and Stephen's divisions (in addition to his own) and quickly march North to meet the British flank attack. As they were forming their lines north of Dilworth, Howe launched his attack. Having taken overall command of the right-wing of the army, Sullivan left his division to confer with the other generals. His own division he left under the command of Preudhomme de Borre, with orders to shift to the right in order to link up with Stirling and Stephen's divisions (from left to right the divisions were arranged as Sullivan, Stirling, Stephen). As the British lines advanced the Hessian Jaegers threatened to flank the American right forcing Stephen and Stirling to shift right. Howe was slow to attack, which bought time for the Americans to position some of their men on high ground near Birmingham Meetinghouse, about a mile (1.6 km) north of Chadds Ford.[11] By 4 p.m., the British attacked. The British Brigade of Guards caught de Borre by surprise on the American left, before de Borre had time to fully form, and immediately sent them in to disarray, causing the entire division to rout. Initially, Stephen's and Stirling's divisions held firm, aided by a battery of artillery on a knoll between their divisions. However, the British light infantry battalions, aided by the Jaegers, eventually caused Stephen's division to fall back. A bayonet charge by the British grenadier battalions, in the center, similarly forced Stirling to retreat. Lafayette had only just arrived, joining Stirling's division, when he received a wound while trying to rally the retreating troops.
Washington & Greene arrive near Dilworth
Around 6 p.m., Washington and Greene arrived with reinforcements to try to hold off the British, who now occupied Meeting House Hill. Washington conferred with Greene and Knox (head of artillery) in the yard of the William Brinton house. The 2nd Battalion of Grenadiers was nearing their position, and was joined by a fresh reserve brigade (the 4th British Brigade). It was determined that Knox would deploy artillery to slow the British advance. Greene's reinforcements, combined with the remnants of Sullivan's, Stephen's, and Stirling's divisions, formed south of Dilworth and stopped the pursuing British for nearly an hour, letting the rest of the army retreat. When darkness fell, Greene's division finally began the march to Chester along with the rest of the army. The British army was not able to pursue due to the onset of night. The Americans were also forced to leave behind many of their cannons on Meeting House Hill because almost all of their artillery horses were killed.
Knyphausen's Final Attack
Upon hearing the attack of Cornwallis's column, Knyphausen launched an attack against the weakened American center across Chadds Ford, breaking through the divisions commanded by Wayne and William Maxwell and forcing them to retreat and leave behind most of their cannon. Armstrong's militia, never engaged in the fighting, also decided to retreat from their positions. Further north, Greene sent Brigadier General George Weedon's troops to cover the road just outside the town of Dilworth to hold off the British long enough for the rest of the Continental Army to retreat. Darkness brought the British pursuit to a standstill, which then allowed Weedon's force to retreat. The defeated Americans retreated to Chester where most of them arrived at midnight, with stragglers arriving until morning. The American retreat was well-organized, largely due to the efforts of Gilbert du Motier, Marquis de Lafayette, who, although wounded, created a rally point that allowed for a more orderly retreat before being treated for his wound.[12]
Losses
The official British casualty list detailed 587 casualties: 93 killed (eight officers, seven sergeants and 78 rank and file); 488 wounded (49 officers, 40 sergeants, four drummers and 395 rank and file); and six rank and file missing unaccounted for.[3] Only 40 of the British Army's casualties were Hessians.[13] Historian Thomas J. McGuire writes that, "American estimates of British losses run as high as 2,000, based on distant observation and sketchy, unreliable reports".[3]

Most accounts of the American loss were from the British. One initial report by a British officer recorded American casualties at over 200 killed, around 750 wounded, and 400 prisoners taken, many of them wounded. A member of General Howe's staff claimed that 400 rebels were buried on the field by the victors.[14] Another British officer wrote that, "The Enemy had 502 dead in the field".[3] General Howe's report to the British colonial secretary, Lord George Germain, said that the Americans, "had about 300 men killed, 600 wounded, and near 400 made prisoners".[3]
No casualty return for the American army at Brandywine survives and no figures, official or otherwise, were ever released. The nearest thing to a hard figure from the American side was by Major General Nathanael Greene, who estimated that Washington's army had lost between 1,200 and 1,300 men.[15] On September 14, 350 wounded Americans were taken from the British camp at Dilworth to a newly established hospital at Wilmington, Delaware.[16] This would suggest that of the "near 400" prisoners reported by Howe, only about 50 had surrendered unwounded. If General Greene's estimate of the total American loss was accurate, then they had between 1,160 and 1,260 killed, wounded or deserted during the battle. The British also captured 11 out of 14 of the American artillery pieces. Among the American wounded was the Marquis de Lafayette.
In addition to losses in battle, 315 men were posted as deserters from Washington's camp during this stage of the campaign.[17]
Aftermath
Although Howe had defeated the American army, his lack of cavalry prevented its total destruction. Washington had committed a serious error in leaving his right flank wide open and nearly brought about his army's annihilation had it not been for Sullivan, Stirling and Stephen's divisions, which fought for time. Evening was approaching and, in spite of the early start Cornwallis had made in the flanking maneuver, most of the American army was able to escape. In his report to the Continental Congress detailing the battle, Washington stated: "despite the day's misfortune, I am pleased to announce that most of my men are in good spirits and still have the courage to fight the enemy another day".
British and American forces maneuvered around each other for the next several days with only a few encounters such as the Battle of Paoli on the night of September 20–21.
The Continental Congress abandoned Philadelphia, moving first to Lancaster, Pennsylvania for one day and then to York, Pennsylvania. Military supplies were moved out of the city to Reading, Pennsylvania. On 26 September 1777, British forces marched into Philadelphia unopposed.
Eight Army National Guard units (103rd Eng Bn,[18] A/1-104th Cav,[19] 109th FA,[20] 111th Inf,[21] 113th Inf,[22] 116th Inf,[23] 1-175th Inf[24] and 198th Sig Bn[25]) and one active Regular Army Field Artillery battalion (1–5th FA[26]) are derived from American units that participated in the Battle of Brandywine. There are only thirty currently existing units in the U.S. Army with lineages that go back to the colonial era.
-

Birmingham Meetinghouse in 1974
-
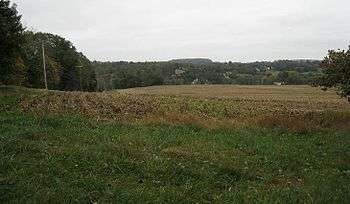
The battlefield today, south of Meeting House Hill
-
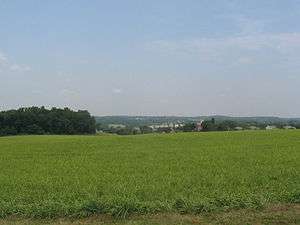
View from the top of Osborne's Hill looking southeast toward the American positions
-
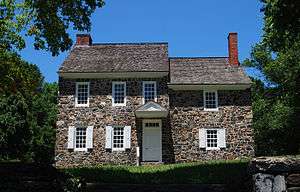
George Washington's headquarters
-
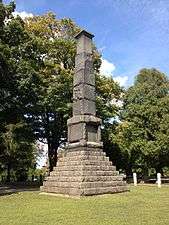
Monument to Lafayette and Pulaski at Birmingham Cemetery
-
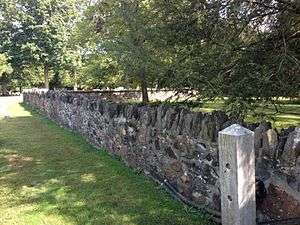
Stone Wall at Birmingham Meetinghouse. Forward defenses of the American right-wing.
-
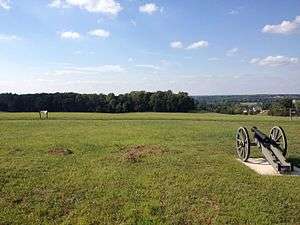
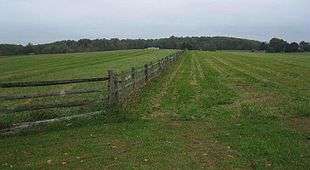
Hill overlooking Sandy Hollow, where Gen. Stephen's Division deployed on the far right flank of the Continental Army. The Jagers attacked from the right side of the photograph, while the light infantry attacked from the current-day tree line, at the left and center.
-
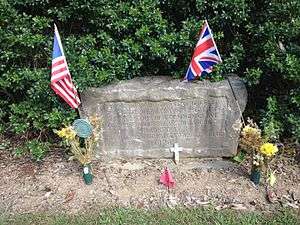
Mass grave containing the remains of soldiers from both armies at Birmingham Meetinghouse.
See also
References
- ↑ Robert Middlekauff (5 January 2005). The Glorious Cause: The American Revolution, 1763–1789. Oxford University Press. p. 566. ISBN 978-0-19-974092-5. Retrieved 19 March 2013.
- 1 2 Philadelphia 1777: Taking the Capital, Clement, p. 23
- 1 2 3 4 5 6 McGuire, Thomas J.; The Philadelphia Campaign: Volume 1: Brandywine and the Fall of Philadelphia; Stackpole Books; Mechanicsburg, Pennsylvania; 2006; ISBN 978-0-8117-0178-5; ISBN 0-8117-0178-6, p. 269
- ↑ "PHMC Historical Markers Search" (Searchable database). Pennsylvania Historical and Museum Commission. Commonwealth of Pennsylvania. Retrieved 2014-01-25.
- 1 2 Harris, Michael (2014). Brandywine. El Dorado Hills, CA: Savas Beatie. p. x. ISBN 978-1-61121-162-7.
- ↑ Harris, Michael (2014). Brandywine: A Military History of the Battle that Lost Philadelphia but Saved America, September 11, 1777. El Dorado Hills, CA: Savas Beatie. p. 55. ISBN 978-1-61121-162-7.
- ↑ "Historical Marker Battle of Brandywine".
- ↑ 39°50′39″N 75°42′38″W / 39.84417°N 75.71056°W
- ↑ "Cornwallis's March: Driving Tour of the Brandywine Battlefield Region". Brandywine Battlefield Historic Site. Archived from the original on October 21, 2009. Retrieved September 4, 2009. Trimble's Ford is located at 39°55′23″N 75°41′13″W / 39.923°N 75.687°W. Jefferis Ford is located at 39°56′20″N 75°38′10″W / 39.939°N 75.636°W
- ↑ Harris, Michael (2014). Brandywine. El Dorado Hills, CA: Savas Beatie. p. 226. ISBN 978-1-61121-162-7.
- ↑ Birmingham Meetinghouse is located at 39°54′20″N 75°35′42″W / 39.90556°N 75.59500°W
- ↑ Gaines, James (September 2007). "Washington & Lafayette". Smithsonian Magazine Online. Smithsonian. Retrieved October 21, 2008.
- ↑ Martin, David G.; The Philadelphia Campaign June 1777 – July 1778; Combined Books; Conshohocken, Pennsylvania; 1993; ISBN 0-938289-19-5, p. 76
- ↑ Martin, p. 76
- ↑ Boatner, Mark Mayo, Cassell's Biographical Dictionary of the American War of Independence 1763–1783, Cassell, London, 1966, ISBN 0-304-29296-6, p. 109
- ↑ McGuire, p. 278
- ↑ Martin, p. 76. Edgar, Philadelphia Campaign, p. 39, incorrectly states that these 315 men deserted during the battle of September 11.
- ↑ Department of the Army, Lineage and Honors, 103rd Engineer Battalion.
- ↑ Department of the Army, Lineage and Honors, Troop A/1st Squadron/104th Cavalry.
- ↑ Department of the Army, Lineage and Honors, 109th Field Artillery.
- ↑ Department of the Army, Lineage and Honors, 111th Infantry. Reproduced in Sawicki 1981. pp. 217–219.
- ↑ Department of the Army, Lineage and Honors, 113th Infantry. Reproduced in Sawicki 1981, pp. 221–223.
- ↑ Department of the Army, Lineage and Honors, 116th Infantry. Reproduced in Sawicki 1981, pp. 227–229.
- ↑ Department of the Army, Lineage and Honors, 175th Infantry. Reproduced in Sawicki 1982, pp. 343–345.
- ↑ Department of the Army, Lineage and Honors, 198th Signal Battalion.
- ↑ "1st Battalion, 5th Field Artillery Regiment". US Army Center of Military History. February 17, 2012. Retrieved July 5, 2012.
Further reading
- Harris, Michael. Brandywine. El Dorado Hills, CA: Savas Beatie, 2014. ISBN 978-1-61121-162-7
- Edgar, Gregory T. (1966). The Philadelphia Campaign, 1777–1778. Westminster, MD: Heritage Books. ISBN 0-7884-0921-2.
- Fortescue, John. History of the British Army.
- McGuire, Thomas J. Brandywine Battlefield Park: Pennsylvania Trail of History Guide. Mechanicsburg, PA: Stackpole Books, 2001. ISBN 0811726053.
- McGuire, Thomas J. The Philadelphia Campaign, Vol. I: Brandywine and the Fall of Philadelphia. Mechanicsburg, PA: Stackpole Books, 2006. ISBN 0811701786.
- Martin, David G., The Philadelphia Campaign: June 1777 – July 1778. Conshohocken, Pennsylvania: Combined Books, 1993. ISBN 0-938289-19-5. 2003 Da Capo reprint, ISBN 0-306-81258-4.
- Mowday, Bruce. September 11, 1777: Washington's Defeat at Brandywine Dooms Philadelphia. Shippensburg, PA: White Mane Publishers, 2002. ISBN 1572493283.
- Ward, Christopher. The War of the Revolution. New York, NY: Skyhorse Publishing, 2011. ISBN 1616080809.
- Sawicki, James A. Infantry Regiments of the US Army. Dumfries, VA: Wyvern Publications, 1981. ISBN 978-0-9602404-3-2.
External links
| Wikimedia Commons has media related to Battle of Brandywine. |
- Brandywine Battlefield Main Site
- Brandywine Battlefield Park
- The Philadelphia Campaign
- Battle of Brandywine
- Battle of Brandywine at BritishBattles.com
- Animated History of the Battle of Brandywine
- The Battle of the Brandywine in Pennsbury Township
- Animated Map of Battle of Brandywine Pennsylvania during the American Revolutionary War
1774 
1775 1776 1777 1778 1781 1783