Battle of Arkansas Post
| ||||||||||||||||||||||||||||||
_Plan_of_the_Fortification_(Fort_Hindman)_at_Post%2C_Arkansas%2C_Surrendered_to_the_U.S._Forces..._-_NARA_-_305724.jpg)
The Battle of Arkansas Post, or the Battle of Fort Hindman, was fought January 9–11, 1863, near the mouth of the Arkansas River at Arkansas Post, Arkansas, as part of the Vicksburg Campaign of the American Civil War. Although it was a decisive Union victory, it did not move their army any closer to Vicksburg.
Background
The Confederate Army constructed a large, four-sided earthwork fortification near Arkansas Post, on a bluff 25 feet above the north side of the river, forty-five miles downriver from Pine Bluff, to protect the Arkansas River and prevent Union Army passage to Little Rock. The fort commanded a mile view up and downriver. It was a base for disrupting shipping on the Mississippi River. The fort was named Fort Hindman in honor of General Thomas C. Hindman of Arkansas. It was manned by approximately 5,000 men, primarily Texas cavalry, dismounted and redeployed as infantry, and Arkansas infantry, in three brigades under Brig. Gen. Thomas J. Churchill. By the winter of 1862–63, disease and their life at the end of a tenuous supply chain had left the garrison at Fort Hindman in a poor state.
Union Maj. Gen. John A. McClernand was an ambitious politician and had permission from President Abraham Lincoln to launch a corps-sized offensive against Vicksburg from Memphis, Tennessee, hoping for military glory (and subsequent political gain). This plan was at odds with those of Army of the Tennessee commander, Maj. Gen. Ulysses S. Grant. McClernand ordered Grant's subordinate, Maj. Gen. William T. Sherman, to join the troops of his corps with McClernand's, calling the two corps the Army of the Mississippi, approximately 33,000 men. On January 4, he launched a combined army-navy movement on Arkansas Post, rather than Vicksburg, as he had told Lincoln (and did not bother to inform Grant or the general in chief, Maj. Gen. Henry W. Halleck).
Opposing forces
Union
Confederate
Battle

January 9
Union boats began landing troops near at Notrebe's Plantation, 3 miles below Arkansas Post in the evening of January 9. The troops started up river towards Fort Hindman and Sherman's corps overran the Confederate trenches. The enemy retreated to the protection of the fort,[1] anchored on the east by the Arkansas River, and adjacent rifle-pits running west across the neck of land. By 11:00 am the following morning the remainder of the Union army had gone ashore. Churchill was stunned by the overwhelming size of the Union force and immediately requested reinforcements from his superior, Theophilus H. Holmes. Holmes advised Churchill to “... hold out till help arrived or until all dead.”[2]
January 10

On January 10 the Union army moved upriver to fully invest the Confederate garrison. Two brigades from Peter J. Osterhaus' division of George W. Morgan's corps were detached from the main movement of the army. Colonel Daniel W. Lindsey's brigade was put ashore on the riverbank opposite the fort and Colonel John F. De Courcey's brigade was held in reserve near the initial landing site.[3] Morgan advanced Osterhaus (accompanying his remaining brigade) along the levee of the river following by his remaining division under Andrew J. Smith. Sherman followed with David Stuart's division along the river and sent his other division under Frederick Steele inland to find a flanking route but failed due to swampy land and impassable roads.[3] The advance of Morgan's column overran the first line of Confederate trenches manned largely by dismounted Texas cavalry.
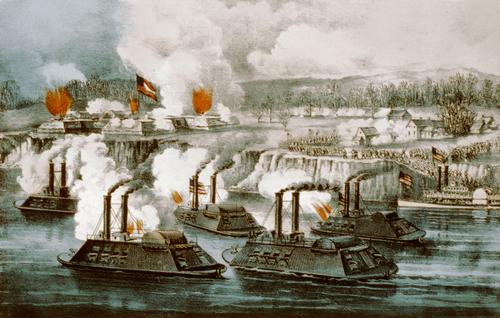
As McClernand's soldiers moved against the fort, Porter's gunboats; Baron DeKalb, Louisville and Cincinnati, moved against the fort. The Navy pounded the fort at a range of 400 yards. The Union tinclad Rattler moved in too close, ran aground and took heavy fire at point blank range from the fort. After several hours the Naval bombardment had inflicted heavy losses to the Confederate artillery.[4] Meanwhile, McClernand sent an army lieutenant up a tree to observe if Morgan and Sherman's troops were in place. The lieutenant reported they were in place and ready to assault, but Sherman's troops were still moving into position through muddy swamps. By the time the Navy's attack concluded it was too dark for the infantry to assault although some skirmishing had taken place.
January 11

On the morning of January 11 McClernand's forces were deployed in an arc facing Fort Hindman and its rifle-pits. Running West to East were the divisions of Steele, Stuart, Smith with Osterhaus achored on the Arkansas River. Churchill's defenses were manned by Colonel James Deshler's brigade on the left and Colonel Robert Garland's brigade on the right. McClernand's infantry attacked around 1:00pm and made little progress at first. At the same time Porter's gunboats moved in to attack aided by Colonel Lindsey's brigade across the river. Within an hour the fort's east face was reduced to rubble and its artillery silenced.[5] Steele's attack on the west was led by the brigades of Brig. Gens. Charles E. Hovey and John M. Thayer with Francis P. Blair, Jr. in reserve. To the east Stuart supported with the brigades of Colonels Giles Smith and Thomas Kilby Smith against the rifle pits of Deshler's Arkansas and Texas soldiers. In the center A.J. Smith spearheaded his attack with Brig. Gen. Stephen G. Burbridge's brigade supported by Colonel William J. Landram. Burbridge's men became embroiled in small arms fight which caused more than 1/3 of all Union casualties.[4] Osterhaus advanced against the fort with Colonel Lionel A. Sheldon's single brigade.
.jpg)
At 4:30pm McClernand was planning to order one massive assault against the defenders when white flags of surrender began to appear. The battle ended with some confusion.[4] Porter's gunboats picked up infantry from Lindsey's brigade and ferried them across the river who climbed into the crumbling remains of Fort Hindman. Porter personally accepted the surrender of Colonel John Dunnington who was in charge of the fort's artillery. General Steele entered the rifle-pits under a flag of truce to discuss surrender with Colonel Deshler. As the two conferred, Deshler noticed Steele's men continually moving closer and demanded they be ordered to stop or he'd open fire again. General Sherman arrived on the scene to personally seek out Churchill. However, Sherman stood by as Churchill and Colonel Garland became involved in an argument over surrendering. Garland claimed he had been ordered to surrender while Churchill denied giving such an order. Colonel Deshler rode up from his front and declared to the group he had not surrendered at all and insisted on renewing the fight. Sherman ended the argument by pointing out the Union forces had all but occupied the Confederate's works. Some Union soldiers had even began disarming the Confederates.[6] One final scene took place as a Union staff officer rode into the fort and demanded the Navy vacate, so A.J. Smith's infantry could take possession. However, the fort had already been surrendered to Porter. Colonel Dunnington, who had a background in the Navy, conceded a small satisfaction at being able to surrender to a fellow Naval officer instead of the infantry.[7]
Aftermath
"Glorious! Glorious! My star is ever in the ascendant. Now, on to Little Rock."
The defeat at Arkansas Post cost the Confederacy fully one-fourth of its deployed force in Arkansas, the largest surrender of Rebel troops west of the Mississippi River prior to the final capitulation of the Confederates in 1865.[4]
Union forces suffered 1,047 casualties, with 134 killed; Confederate about 5,500, almost all by surrender. Although Union losses were high and the victory did not contribute to the capture of Vicksburg, it did eliminate one more impediment to Union shipping on the Mississippi. Grant was furious at McClernand's diversion from his overall campaign strategy, ordered him back to the Mississippi, disbanded the Army of the Mississippi, and assumed personal command of the Vicksburg Campaign.
That Grant removed McClernand for this reason is a contested point. In his Memoirs (Loc 5013), Gen. W.T. Sherman said that no word was received from Grant until after the battle. On the 13th - when the army rendezvoused at the mouth of the Arkansas River after destroying the fort - McClernand showed Sherman the letter in which Grant disapproved of the plan. Sherman notes that Grant's letter was written before the outcome of the battle was known: "When informed of this, and of the promptness with which it had been executed, he could not but approve."
See also
Notes
^ The Confederate commander reported 60 killed and 80 wounded, but since he also reported fewer men in the battle than actually surrendered, these figures are considered underestimates. The NPS battle description (Civil War Sites Advisory Commission), cites 1,047 Union, "about 5,500" Confederate.
- ↑ Huffstot, 1969, p. 7 & 8
- ↑ "In Missouri, Yankees and Rebels Barely Miss Each Other,January 10, 1863". Civil War Daily Gazette. Retrieved February 2013. Check date values in:
|access-date=(help) - 1 2 Huffstot, 1969, p. 8
- 1 2 3 4 Christ, 2010
- ↑ Huffstot, 1969, p. 9
- 1 2 Smith, 2013
- ↑ Huffstot, 1969, p. 9 & 10
- ↑ Huffstot, 1969, p. 10
Bibliography
- "McClernand Arrives, Ousts Sherman and Makes His Very Own Army, January 5, 1863". Civil War Daily Gazette. Retrieved February 2013. Check date values in:
|access-date=(help) - "Battle Summary:Arkansas Post". National Park Service. Retrieved January 2013. Check date values in:
|access-date=(help) - "Harper's Weekly". February 7, 1863. Retrieved January 2013. Check date values in:
|access-date=(help) - Christ, Mark K. (December 31, 2010). "Battle of Arkansas Post". Encyclopedia of Arkansas History & Culture. Retrieved January 2013. Check date values in:
|access-date=(help) - Eicher, David J. (2001). The Longest Night: A Military History of the Civil War. New York: Simon & Schuster. ISBN 0-684-84944-5.
- Heartsill, W. W. (1953). Fourteen hundred and 91 days in the Confederate Army,. Jackson, Tenn: McCowat-Mercer Press.
- Huffstot, Robert S. (1969). The Battle of Arkansas Post (PDF). National Park Service.
- Kennedy, Frances, ed. (1998). The Civil War Battlefield Guide (2 ed.). Boston: Houghton Mifflin Co. ISBN 0-395-74012-6.
- Kiper, Richard L. (1999). Major General John Alexander McClernand:Politician in Uniform. Kent State University Press. ISBN 9780873386364.
- Meyers, Christopher C. (2010). Union General John A. McClernand and the Politics of Command. McFarland. ISBN 9780786459605.
- Miller, Charles Dana (2004). The struggle for the life of the republic : a Civil War narrative by Brevet Major Charles Dana Miller, 76th Ohio Volunteer Infantry. Kent State University Press. ISBN 0873387856. OCLC 53477492.
- Smith, Sam (2013). "The Battle of Arkansas Post". Civil War Trust. Retrieved January 2013. Check date values in:
|access-date=(help) - William Williston Heartsill journal, 1861-1866, MS 035. Woodson Research Center, Fondren Library, Rice University. p. 125. Retrieved December 2013. Check date values in:
|access-date=(help) - Memoirs of General W.T. Sherman.
External links
- Fourteen hundred and 91 days in the Confederate Army From the Collections at the Library of Congress
| 1861 | ||
|---|---|---|
| 1862 | ||
| 1863 | ||
| 1864 | ||
| 1865 |
| |
| Units | ||
| Topics | |
|---|---|
| Lists by states |
|
| Lists by insular areas | |
| Lists by associated states | |
| Other areas | |
| |
Coordinates: 34°01′16″N 91°20′56″W / 34.021°N 91.349°W