Bailey bridge
|
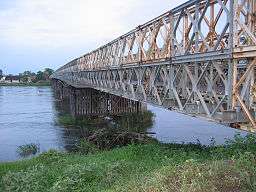
Bailey bridge over the Meurthe River, France | |
| Ancestor | Truss bridge |
|---|---|
| Related | Callender-Hamilton bridge |
| Descendant | Mabey Logistic Support Bridge, Medium Girder Bridge |
| Carries | Pedestrians, Road vehicles, Rail Vehicles |
| Span range | Short |
| Material | Timber, steel |
| Movable | No |
| Design effort | Low |
| Falsework required | None |

The Bailey bridge is a type of portable, pre-fabricated, truss bridge. It was developed by the British during World War II for military use and saw extensive use by British, Canadian and the American military engineering units.
A Bailey bridge had the advantages of requiring no special tools or heavy equipment to assemble. The wood and steel bridge elements were small and light enough to be carried in trucks and lifted into place by hand, without requiring the use of a crane. The bridges were strong enough to carry tanks. Bailey bridges continue to be extensively used in civil engineering construction projects and to provide temporary crossings for foot and vehicle traffic.
History


Donald Bailey was a civil servant in the British War Office who tinkered with model bridges as a hobby.[1][2] He presented one such model to his chiefs, who saw some merit in the design. A team of Royal Engineer (RE) officers was assembled at the Military Engineering Experimental Establishment (MEXE), in Barrack Road Christchurch, Dorset, in 1941 and 1942. In the course of development, the bridge was tested in several formats, e.g., as a suspension bridge, and as a "stepped arch" bridge, as well as the flat truss bridge which became the standard. The prototype of this was used to span Mother Siller's Channel which cuts through the nearby Stanpit Marshes, an area of marshland at the confluence of the River Avon (Hampshire) and the River Stour, Dorset. It remains there (50°43′31″N 1°45′44″W / 50.7252806°N 1.762155°W) as a functioning bridge.[3] Bridges in the other formats were built, temporarily, to cross the Avon and Stour in the meadows nearby. After successful development and testing, the bridge was taken into service by the Corps of Royal Engineers and first used in North Africa in 1942. A number of bridges were available by 1944 for D-Day, when production was accelerated. The US also licensed the design and started rapid construction for their own use. Bailey was later knighted for his invention, which continues to be widely produced and used today.[1]
The original design however, violated a patent on the Callender-Hamilton bridge. The designer of that bridge, A. M. Hamilton successfully applied to the Royal Commission on Awards to Inventors.[4] The Bailey Bridge however had several advantages over Hamilton's design. For example, damaged parts could not be replaced quickly on the Callender-Hamilton bridge, an essential requirement for military use. The Callender-Hamilton bridge was modified by the London County Council engineers' department in the design of three emergency bridges which were erected across the River Thames in 1940. Damaged parts of these could be quickly replaced. Experience gained in this work contributed to the development of the Bailey Bridge.
Hamilton was awarded £4,000 in 1936 by the War Office for the use of his early bridges and the Royal Commission on Awards to Inventors awarded him £10,000 in 1954 for the use, mainly in Asia, of his later bridges. Lieutenant General Sir Giffard Le Quesne Martel was awarded £500 for infringement on the design of his box girder bridge, the Martel bridge.
Design

The success of the Bailey bridge was due to the simplicity of the fabrication and assembly of its modular components, combined with the ability to erect and deploy sections with a minimum of assistance from heavy equipment. Most, if not all, previous designs for military bridges required cranes to lift the pre-assembled bridge and lower it into place. The Bailey parts were made of standard steel alloys, and were simple enough that parts made at a number of different factories could be completely interchangeable. Each individual part could be carried by a small number of men, enabling army engineers to move more easily and more quickly than before, in preparing the way for troops and matériel advancing behind them. Finally, the modular design allowed engineers to build each bridge to be as long and as strong as needed, doubling or tripling up on the supportive side panels, or on the roadbed sections.[5]
The basic bridge consists of three main parts. The bridge's strength is provided by the panels on the sides. The panels are 10-foot-long (3.0 m), 5-foot-high (1.5 m), cross-braced rectangles that each weigh 570 pounds (260 kg), and can be lifted by six men. The panel was constructed of welded steel. The top and bottom chord of each panel had interlocking male and female lugs into which engineers could inset panel connecting pins.[6]
The floor of the bridge consists of a number of 19-foot-wide (5.8 m) transoms that run across the bridge, with 10-foot-long (3.0 m) stringers running between them on the bottom, forming a square.[7] Transoms rest on the lower chord of the panels, and clamps hold them together. Stringers are placed on top of the completed structural frame, and wood planking is placed on top of the stringers to provide a roadbed. Ribands bolt the planking to the stringers. Later in the war, the wooden planking was covered by steel plates, which were more resistant to the damage caused by tank tracks.
Each unit constructed in this fashion creates a single 10-foot-long (3.0 m) section of bridge, with a 12-foot-wide (3.7 m) roadbed. After one section is complete it is typically pushed forward over rollers on the bridgehead, and another section built behind it. The two are then connected together with pins pounded into holes in the corners of the panels.
For added strength several panels (and transoms) can be bolted on either side of the bridge, up to three. Another solution is to stack the panels vertically. With three panels across and two high, the Bailey Bridge can support tanks over a 200-foot span (61 m). Footways can be installed on the outside of the side-panels, the side-panels form an effective barrier between foot and vehicle traffic and allow pedestrians to safely use the bridge.[8]
A useful feature of the Bailey bridge is its ability to be launched from one side of a gap.[9] In this system the front-most portion of the bridge is angled up with wedges into a "launching nose" and most of the bridge is left without the roadbed and ribands. The bridge is placed on rollers and simply pushed across the gap, using manpower or a truck or tracked vehicle, at which point the roller is removed (with the help of jacks) and the ribands and roadbed installed, along with any additional panels and transoms that might be needed.
During World War II, Bailey bridge parts were made by companies with little previous experience of this kind of engineering. Although the parts were simple, they had to be precisely manufactured if they were fit each other correctly, so they were assembled into a test bridge at the factory to make sure of this. To do this efficiently, newly manufactured parts would be continuously added to the test bridge, while at the same time the far end of the test bridge was continuously dismantled and the parts dispatched to the end-users.[8]
Gallery
-

US troops launching a Bailey bridge across a gap by hand
-
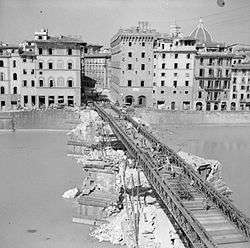
Bailey bridge over the River Arno, Florence, built on the piers of the original Ponte Santa Trinità (August 1944)
-
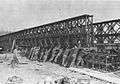
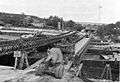
U.S. combat engineers slide stacked doubled sections of Bailey bridging into place at Wesel on the Rhine in Germany (c. 1945)
-
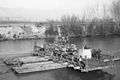
A Sherman tank and a Jeep ferried across the river Garigliano, central Italy, using a raft constructed from pontoons and a section of Bailey bridge (January 1944)
-

Bailey bridge built over bombed out bridge at base of Marienberg Fortress in Würzburg by the 119th Armored Engineer Battalion of the U.S. 12th Armored Division, April 1945
-
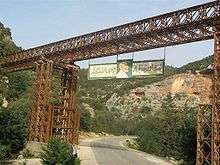
Bailey bridge over the Wadi el Kuf, Libya, with bridge sections used to construct the supports (2007)
-
Bailey bridge over the White Nile, Juba, South Sudan (2006)
-

Bailey bridge at Whitefish Falls, Ontario, Canada (2006)
-
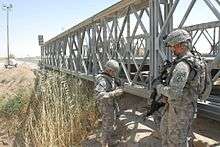
Combat engineers inspect a bridge on Route Arnhem in Iraq (2009)
Use in the Second World War
The first operational Bailey Bridge during Second World War was built by 237 Field Company R.E. over Medjerda River near Medjez el Bab in Tunisia on the night of 26 November 1942.[10] The very first instance of a Bailey being erected under fire was at Leonforte by members of the 3rd Field Company, Royal Canadian Engineers.[11] In one instance a bridge was pushed over the Saar River while under artillery and tank fire. When the enemy was finally cleared out, the panels had holes in them and would not carry the weight of a tank. Replacing the panels would require the bridge to be "broken" in the middle. Instead they simply bolted an entirely new set of panels onto the bridge on top of the original set, a technique that later became a standard feature.
The Bailey provided an excellent solution to the problem of German and Italian armies destroying bridges as they retreated. By the end of the war, the US Fifth Army and British 8th Army had built over 3,000 Bailey bridges in Sicily and Italy alone, totaling over 55 miles (89 km) of bridge, at an average length of 100 feet (30 m). One Bailey, built to replace the Sangro River bridge in Italy, spanned 1,126 feet (343 m). Another on the Chindwin River in Burma, spanned 1,154 feet (352 m).[12] Such long bridges required support from either piers or pontoons.[8]
Field Marshal Bernard Montgomery wrote in 1947:
Bailey Bridging made an immense contribution towards ending World War II. As far as my own operations were concerned, with the eighth Army in Italy and with the 21 Army Group in North West Europe, I could never have maintained the speed and tempo of forward movement without large supplies of Bailey Bridging.[13][14]
Modern
Bailey bridges are in regular use throughout the world in the 21st century. Some exceptional examples include:
- The longest Bailey bridge was put into service in October 1975. This 788 metres (2,585 ft), two-lane bridge crossed the Derwent River at Hobart, Australia. It was opened around a year after the Tasman Bridge disaster destroyed the only river crossing and effectively divided the city in two. The Bailey bridge was in use until the reconstruction of the Tasman Bridge was completed on 8 October 1977.
- A Bailey bridge between the Suru River and Dras River in Ladakh, India is the highest bridge in the world at an altitude of 5,602 metres (18,379 ft) above sea level. It was built in 1982 by the Border Roads Organization.[15]
- In the mid-1950s auto racing circuit Lime Rock Park in Lakeville, Connecticut purchased a war-surplus Bailey Bridge so vehicles could enter/exit the infield and paddock sections of the track while races were taking place. The bridge has been in continuous service since, and was relocated to new, raised pilings in the spring of 2008. The track believes this may be the sole-remaining WWII-era Bailey Bridge in regular daily public service in the US.
- An under-construction footbridge at Jawaharlal Nehru Stadium (Delhi), one of the main venues for 2010 Commonwealth Games, collapsed a few weeks before the opening ceremony, injuring 27 people. The Delhi Government requested the Indian Army to construct a Bailey bridge to replace it. The 3 Engineer Regiment of the Indian Army Corps of Engineers finished the job in four days flat and at a fraction of the original cost.
- Medley Bridge (Oxford, England) is a Bailey bridge which was erected in 1946 and spans the River Thames backwater in Port Meadow and is still in use today (2014).[16][17]
Other uses
The Skylark launch tower at Woomera was built up of Bailey bridge components.
In the years immediately following WWII, the Ontario Hydro-Electric Power Commission purchased huge amounts of war-surplus Bailey bridging, and established a small design group to promote its use in novel applications; for example, the trestles required for an extensive gravel-classification set-up for the power plants then being built on the Ottawa River. After Hurricane Hazel in 1954, some of the bridging was used to construct replacement bridges in the Toronto area. The Old Finch Avenue Bailey Bridge is the last still in use. In Eindhoven, Netherlands, the post-war Eindhoven Station is built with Bailey segments and is still in use.

Depiction in the media
The 1977 epic war film A Bridge Too Far, depicting the events of Operation Market Garden in September 1944, has a lengthy scene showing the construction of a Bailey bridge at Son in the Netherlands by units of both the American 101st Airborne Division and the British XXX Corps.
A song about the Allenby Bridge between Israel and Jordan, mentions the bridge type at every Refrain. The song was written by Yaron London, and sung by Yehoram Gaon. It refers to the bridge that was built after the Six-Day War at that site instead of the bridge that was ruined during the war.
See also
- AM 50
- Armoured vehicle-launched bridge
- Callender-Hamilton bridge
- Medium Girder Bridge a modern bridge of analogous use
- Military engineer
- Pontoon bridge for another bridge type with mobile military application
References
- 1 2 Caney, Steven (2006). Steven Caney's Ultimate Building Book. Running Press. p. 188. ISBN 978-0-7624-0409-4. Retrieved 2011-09-11.
- ↑ Day, Lance; McNeil, Ian, eds. (1996). Biographical Dictionary of the History of Technology. Routledge. ISBN 978-0-415-19399-3.
- ↑ "Stanpit Marsh and Nature Reserve". Hengistbury Head. Retrieved 2011-09-27.
- ↑ "Bridge Claim By General 'Used As Basis For Bailey Design'". The Times. 26 July 1955. p. 4 col E.
- ↑ "The Story of the Bailey Bridge". Mabey Bridge Ltd. Retrieved October 3, 2015.
- ↑ "UK Military Bridging – Equipment (The Bailey Bridge)". ThinkDefence. January 8, 2012. Retrieved 28 March 2015.
- ↑ "Launching the Bailey Bridge from Tactical and Technical Trends, No. 35, October 7, 1943". lonesentry.com. Retrieved 2011-09-11.
- 1 2 3 "How the Army's Amazing Bailey Bridge is Built from The War Illustrated, Volume 8, No. 198, Page 564, January 19, 1945". thewarillustrated.info. Retrieved 2011-09-11.
- ↑ "Launching the Bailey Bridge from Tactical and Technical Trends, No. 35, October 7, 1943". Lonesentry.com. Retrieved 2011-09-11.
- ↑ Harpur, Brian (1991). A bridge to victory: the untold story of the Bailey Bridge. HMSO, London. p. 69.
- ↑ "Bailey Bridge". Canadiansoldiers.com. 2010-11-27. Retrieved 2011-09-11.
- ↑ Slim, William (1956). Defeat Into Victory. Cassell. p. 359. ISBN 978-0-304-29114-4.
- ↑ "Bailey Bridge". Mabey Bridge and Shore,. Archived from the original on 200-06-15. Retrieved 2011-09-11. Check date values in:
|archive-date=(help) - ↑ "Other Equipment Used By The 7th Armoured Division". Btinternet.com. Archived from the original on August 13, 2010. Retrieved 2011-09-11.
- ↑ mabbo (2009-05-08). "Incredible India: Bailey bridge - World's highest bridge". Incredblindia.blogspot.com. Retrieved 2011-09-11.
- ↑ "Medley Bailey Bridge, River Thames, Oxford". Flickr.
- ↑ Barry Dodman-Edwards MBA BSc C.Eng MICE
External links
| Wikimedia Commons has media related to Bailey bridge. |
- "Push Over Bridges...", October 1944, Popular Science detailed article about the WW2 Baily Bridge
- Homepage about Bailey bridges (many photos, information, links, ...)
- Bailey Bridges in New Zealand
- Animated build of a modern Mabey Compact 200 Bridge (similar to the original Bailey Bridge)
- US Army Field Manual FM5-277 Dated 9 May 1986.