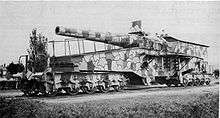
Amiens Gun

The Amiens Gun is a German 28-centimetre (11 in) railway gun (originally mounted in the battleship SMS Hessen)[1] that was captured by the Australian Imperial Force during World War I and returned to Australia as a war trophy. The 28 cm SK L/40 "Bruno" (SK – Schnelladekanone (quick-loading cannon) L – Länge (with a 40-calibre barrel)) gun was placed on public display on 26 March 1920 adjacent to the Central railway station, Sydney.[2] While the gun's carriage was scrapped during the 1960s, the gun barrel remains on display at the Australian War Memorial in Canberra.
Unveiling Ceremony
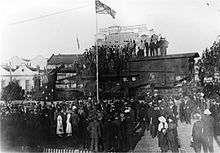
The ceremony of unveiling was performed before cheering thousands by Major-General Lee, State Commandant. Also present were Major-General Sir Charles Rosenthal, Brigadier-General Cox, C.B., Colonel Kingdon, Colonel Brughe, Q.M.G., Captain Soane, A.D.C, Mr. R. T. Ball, Minister for Works, Mr. James Fraser, C.M.G., Chief Railway Commissioner, and many Railway officers. Major-General Lee, in addressing the gathering, complimented all concerned in the unloading and reassembling of the gun.
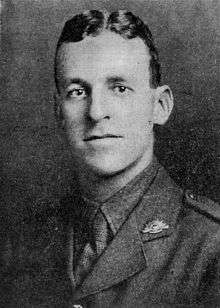
General Sir C. Rosenthal, speaking of the capture of the gun by the 31st Battalion of the eighth Brigade of the fifth Division, jocularly remarked that as it was a Victorian Brigade, they would no doubt have kept the great trophy for Victoria, but for the fact that they did not have the proper railway gauge there for it, and General. C. Cox added: "Thanks to our 4ft. 8½in. gauge we have this trophy permanently." The Chief Commissioner of Railways (Mr. James Fraser) remarked that he had been authoritatively informed that Great Britain had built the biggest gun on earth as an answer to the German "Big Bertha." It never fired a shot – there was no occasion for it – but it had a length of 83 ft. (25.3m), being 11 ft. (3.35m) longer than the gun at Central, and a range of 87 miles (140 km). It was intended as our answer to Krupp's if the war had lasted any longer. Lieutenant George Burrows, M.C. (and Bar) was decorated for his gallantry in connection with the capture of the gun.[2]
The capture
The following account of the capture was given by Lieutenant Burrows. On the morning of 8 August 1918, the Australian Corps, with two Divisions of Canadians on their left, attacked the German position in front of Villiers-Bretonneux, the Australian portion of the line extending from the Somme River to a point some hundreds of yards south of Villers-Bretonneux. Preparations for the attack were carried out secretly along the front for several weeks before the attack. A heavy concentration of artillery was brought on to the front, and every wood for some distance behind the line concealed tanks, ready to move forward into position, during the night prior to the attack. The infantry and tanks got into position under cover of the noise created by aeroplanes flying overhead for that purpose. A dense fog came over at about 2 am, and did not clear until about 9 am Following a terrific bombardment, the infantry supported by tanks, attacked at 5 am, and after passing the German front and support lines very little opposition was met with until reaching the final objective, which was the old Amiens defence line in front of Harbonnieres. The attack was well organised, and came as a complete surprise to the enemy.
Referring to the particular part of the front where the gun was captured, in the fifth Division sector, a section of sappers from the eighth Field Company Engineers was detailed to go over with the 31st Battalion. Their work on arrival at final objective was to put out wire entanglements in front of the front line, and dig a series of strong points about 200 yards (180m) behind the front line for the reserve companies. On arrival at final objective, east of Harbonnieres, about 200 yards in front of the front line, there was a train consisting of an 11.5in. naval gun on railway mounting, a locomotive, two ammunition trucks, and about twenty other trucks. The rear portion of the train was on fire. An Engineer officer went forward, examined the train, and found it to be in working order, and with the assistance of two sappers raised steam. Whilst this was being done the water feed-pipe from the injector to the tank was perforated by a machine-gun bullet. This was bound round with tracing tape. The burning portion of the train was detached, shunted into a siding, and the engine, gun, and ammunition trucks were brought back about 600 yards (550m) behind the lines, to where the rails had been blown out by shell-fire. A message was sent back to the Field Company Headquarters for a party to repair the track. This was done during the night. The message also asked for more water to be sent forward.
Steam was again raised the following morning and, in trying to move the gun back, the gun slipped the rear bogie wheels off the rails. There were nine lifting jacks on the train. With the aid of these the gun was got on to the track again and brought back to Bayonvillers the following morning at 2 o'clock, and a receipt obtained from the officer sent up from Army Headquarters to take over the gun. The gun was complete in every detail, ready for firing, with 37 rounds of ammunition in the trucks. Each shell weighed over 320 kg (704 lbs).
Firing sequence

The sequence of firing a round was as follows:-
Load – the gun was run back on its mountings with the breech in under the shelter. In here was the ready-for-use ammunition – shell and cartridge case (German guns had the Krupp breech and used brass cartridge cases for all calibres) and the hydraulic rammer which rammed the shell and cartridge into the gun.
Loaded – ready – the loaded gun was run back on its mounting with the breech end over the well between the two side frames of the carriage.
Aim – the piece was raised to the required elevation which, for the heavy siege guns, was a relatively high angle.
Fire – the gun fired and the recoiling barrel went down into the well between the frames with the thrust of the recoil being transmitted to the ground via the recoil pad. The barrel then dropped to the "load" position and the sequence repeated.[3]
Subsequent events
The Capture paragraph is a first-hand account by the man who captured the gun. This account is of subsequent events.
An Engineer and two sappers were on the train. The Engineer obtained a receipt for the gun from an Artillery Major sent up from the Australian Corps Headquarters. This receipt in the ordinary course of events was filed with the Field Company records.
When he returned to the Field Company's headquarters two days later, he was paraded before the Divisional General, Sir Talbot Hobbs, and was asked what had happened and how the gun was captured. He told the General, and also put in a full report.
From the time he handed over the gun he did not see it again, but later on heard it had been exhibited in Paris.
There was one amusing incident. He was an officer of the 14th Field Company (fifth Division), Engineers, and was on loan to the eighth Field Company only for the attack and was on loan to them when the gun was captured. After the gun had been taken behind Australian lines the O.C. of the eighth Field Company sent a man up with a pot of white paint, and he painted on the side of the gun in large letters:—
Naturally the seizure of such a 'big gun' — with the bogies it weighed 185 tons (168t) — excited some interest. Besides, it was the gun that the Germans had brought up specially to shell Amiens. Well, when the announcement of the eighth Field Company appeared on it the C.O. of the 31st Battalion was not satisfied. As soon as he spotted it he sent along a man with another pot of paint, and the first announcement was painted out, and the new words painted on:—
It was interesting, as well as amusing; but the fact is it was not under the orders of the C.O. of the 31st Battalion, but was under the orders of the O.C. of the eighth Field Company, although really an officer of the 14th Field Company.
He added that the train consisted of engine, gun, two ammunition trucks containing 37 rounds of ammunition, two officers' carriages, and about 25 other vehicles loaded with cordite charges, ammunition, and other war paraphernalia. The fire at the rear part of the train was caused by shellfire from a British tank, and a number of Germans were burnt to death. Cavalry rounded up about 800 of the enemy in the vicinity.
It was a bit exciting while they were trying to get the gun away. He was all prepared to destroy her if they failed; but all's well that ends well.[2]
General Birdwood's congratulations
|
|
|---|
| Headquarters, Australian Imperial Force, B.E.F., France, Dear Burrows, With good wishes, yours sincerely, |
After capture
After capture, the gun was exhibited in Paris before being removed to England, via a Channel ferry. It was later taken by rail to Woolwich Arsenal for examination and finally to Chatham Dockyard for transport to Australia.

Transport of this weapon was a formidable task. Finally, arrangements were made to load the trophy on board the vessel "Dongara" at Chatham dockyard which was achieved without mishap. The vessel "Dongara" on which the gun was shipped to Sydney was itself a war prize, being the former German liner "Stetsenfels".
Mr. G.D. Delprat, the then general manager of the Broken Hill Proprietary Company, who happened to be in London at the time, offered to place the company's facilities and skilled personnel at Newcastle at the Government's disposal, but on the advice of Mr. Shellshear, consulting engineer for the N.S.W.G.R. in London, that the gun's axle loading would exceed the safe load on the original Hawkesbury River Railway Bridge, unless the gun's barrel was removed. This was agreed to.

However, it was subsequently decided that, as the naval floating crane Titan was available in Sydney and was capable of lifting weights up to 200 tons, the problem was solved. So the bogies, central pivot, undercarriage and gun were unloaded in the Port of Sydney direct on the rails, at Jones Bay, Darling Harbour. From there, the gun was hauled to the N.S.W.G.R. Eveleigh Workshops, where with the assistance of Lieut. George Norman Pockett, Australian Army Engineer Ordnance Corps, all fittings and parts were reassembled.
From Eveleigh the gun was hauled to Station East Box by a superheated T-class locomotive and from there pushed forward to a specially prepared track at Eddy Avenue, via a ramp, the rails of which sank under the weight (approximately 18½ tons per axle). After strengthening, another attempt was more successful, although one bogie ran off the end and remained suspended in mid-air until powerful jacks were used to re-rail the trophy, which was floodlit at night by special arrangement with the Australian General Electric Co. for some weeks during the 1920 visit of H.R.H. the Prince of Wales (later King Edward VIII) who inspected it. Thousands of Sydneysiders passing the site saw the gun until its eventual movement to Canberra in 1923.[4]
Move to Canberra
Details of this movement by rail are unknown, but must have involved partial dismantlement, if only to negotiate the various tunnels en route, especially those on the Pine Range Bank between Bungendore and Queanbeyan.
In 1927, prior to the visit to Canberra of Their Royal Highnesses, the Duke and Duchess of York (later King George VI and Queen Elizabeth) to open the Federal Parliament, which had sat hitherto in Victoria, the Amiens gun was moved from a siding near the former power station at Kingston and set in position on a set of rails embedded in a concrete base, near the railway station.
This task was carried out under the direction of the then District Superintendent (Mr. Reid) and involved building a spur line 100 yards long employing 40 men who were engaged by the Federal Capital Commission. The cost of the removal was said to be £500.
From 1923 until 1942, one of the first things seen by the train traveller arriving at the terminus of the Australian Capital Territory Railway in Canberra, was the enormous railway gun captured by Australian troops, the so-called Amiens Gun.[4]

Use during World War II
The gun remained outside the station, resplendent in its camouflage paint and target for the climbing ambitions of numerous small boys until the outbreak of the 1939–45 war, when in 1942 the Australian Army began to express interest in the gun. The Inspector-General of Munitions, in a request for the transfer to the Department of Munitions 'for the duration' pointed out that a mounting of this type in which heavy British guns and ammunition could be test-fired was badly needed, as the stresses involved in such firings made our own coastal defence gun mountings unsuitable.
It was planned to install the mounting at the Artillery Proof Range at Port Wakefield, South Australia. The Army gave an undertaking to restore the gun and its mounting to its former condition and to meet all expenditure involved, and claimed that because the mounting was indispensable to the war effort, the Chairman of the Australian War Memorial Board of Management had given approval for its removal.
A party of engineer troops from Kapooka Camp, Wagga Wagga, under command of Lieut. Colonel Warren McDonald were given the task of dismantling the gun under supervision of Mr. Rettinger of the Department of the Interior. Thus, the mounting was sent to Port Wakefield, presumably by rail and the bogies were sent to No. 1 Central Ordnance Depot, at Bandiana, Victoria, for storage. They remained there until after the war. The gun barrel remained in Canberra.[4]
Final resting place
After the conclusion of hostilities in 1945, the Australian War Memorial made inquiries with a view to having the mountings and bogies returned. The Inspector-General of Munitions in 1948 requested approval for the retention of the mounting, on loan, for an indefinite period, to which the Board acceded.
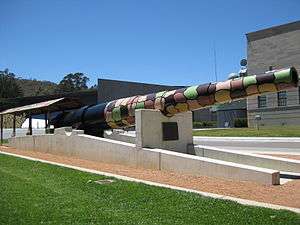
In 1954. the Memorial was advised by the Department of Supply and Development that the mounting was no longer required at Port Wakefield and discussions began as to the ultimate fate of the gun barrel, mountings and bogies. These extended over some years and involved both the Tourist Bureau and the Returned Servicemen's League. At one stage, consideration was given to assembling the complete gun on Mount Pleasant, overlooking the Royal Military College, Duntroon. In 1964, the Director of the Memorial advised that the Board of Management had decided to exhibit only the barrel. This is on the lawn adjacent to the Memorial building.[5]
In reaching this decision the Board had taken into consideration the anticipated enormous cost involved in the removal of the component parts of the gun, while there was some doubt, because of its immense size and weight, as to the suitability of the gun as a whole as an exhibit in the grounds of the Australian War Memorial. Thus it was that in 1961 the bogies were sold for scrap, while the gun mountings were similarly disposed of two years later.[4]
Two guns
Mr. Bill Crooks, M.B.E., E.D.. of Bribie Island, Queensland is clear that there were, in fact, not one, but two 'Amiens Guns' captured by Australian forces operating in France in August 1918.[6]
1. The 28 cm railway gun, the subject of these pages, which weighed 149 tons and was subsequently shipped to Australia; and
2. A concrete-emplaced siege gun with a 38 cm (14.96") calibre 72' long barrel, one of a number disposed by the German forces for the bombardment of Paris and other targets. This latter was presented to the City of Amiens by General John Monash.
Both guns were products of the Krupp works which specialised in super-heavy artillery for land use.
See also
- 28 cm SK L/40 "Bruno" main article for this type of railway gun
References
- ↑ François, Guy (2006). Eisenbahnartillerie: Histoire de l'artillerie lourd sur voie ferrée allemande des origines à 1945 (in French). Histoire et Fortifications. ISBN 978-2-915767-08-7.
- 1 2 3 4 New South Wales Railway and Tramway Magazine May 1920, pp 351–354
- ↑ Australian Railway Historical Society Bulletin, June 1979 pp141-142
- 1 2 3 4 The Amiens Railway Gun Story Buckland, J.L. Australian Railway Historical Society Bulletin, July 1978 pp137-142
- ↑ "1918: The Amiens Gun". Australian War Memorial. Archived from the original on 5 December 2008. Retrieved 2009-01-10.
- ↑ Despatch New South Wales Military History Society March 1978
External links
| Wikimedia Commons has media related to Amiens Gun. |