15th Battalion (Australia)
| 15th Battalion | |
|---|---|
|
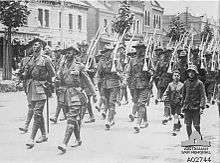
15th Battalion veterans march through Brisbane City on Anzac Day during 1954. | |
| Active |
1914–19 1921–30 1939–46 |
| Country | Australia |
| Branch | Australian Army |
| Type | Infantry |
| Size | ~800–1,000 all ranks |
| Part of |
4th Brigade, New Zealand and Australian Division (later 4th Australian Division) 7th Brigade 29th Brigade |
| Nickname(s) | The Oxley Regiment |
| Motto(s) | Caveant Hostes |
| Colours | Brown over Blue |
| Engagements |
First World War Second World War |
| Commanders | |
| Notable commanders | James Cannan |
| Insignia | |
| Unit Colour Patch |
 |

The 15th Battalion was an infantry battalion of the Australian Army. Formed in 1914 as part of the all-volunteer Australian Imperial Force from Queensland and Tasmanian recruits, the battalion fought during the Gallipoli Campaign and on the Western Front during the First World War. It was disbanded after the war in 1919, but later re-raised as a part-time Citizens Forces unit based in Queensland in 1921, consisting of a mixture of volunteers and conscripts. Economic pressures and limited manpower resulted in the battalion being amalgamated with other battalions a couple of times during the inter-war years. In mid-1939, as rising tensions in Europe led to an expansion of the Australian military, the battalion was re-formed in its own right. During the Second World War the 15th Battalion was mobilised for wartime service and initially undertook defensive duties in Australia before taking part in the fighting against the Japanese in New Guinea and Bougainville in 1943–45. The battalion was disbanded in 1946 and never re-raised.
History
First World War
Formation and service at Gallipoli
The 15th Battalion was originally raised as part of the all-volunteer Australian Imperial Force (AIF) in September 1914. Drawing personnel from volunteers from Queensland and Tasmania, it formed part of the 4th Brigade, along with the 13th, 14th, and 16th Battalions.[1] With an authorised strength of 1,023 men,[2] the battalion initially consisted of eight companies, of which six came from Queensland and two from Tasmania. The Queensland companies concentrated at Enoggera in September and began initial training, while the Tasmanians formed at Claremont in October. In late November, the battalion concentrated at Broadmeadows, Victoria, under the command of Lieutenant Colonel James Cannan, who later rose to become Quartermaster General during World War II.[3] Many of the battalion's officers and non-commissioned officers had previously served in the Citizens Forces and a few had fought in South Africa during the Boer War or in India with the British Army.[4] Following a short period of training, the battalion embarked for overseas on the transport ship SS Ceramic in late December 1914, after marching through the streets of Melbourne.[5] Initially it had been planned to send the Australians to fight against the Germans on the Western Front, but overcrowding and poor conditions in the training camps in the United Kingdom had resulted in the first Australian contingent, the 1st Division, being sent to Egypt instead.[6] There they commenced training and briefly undertook defensive duties around Kantara, when Ottoman forces raided the Suez Canal.[7]
Travelling via Albany, Western Australia,[1] and then through the Suez Canal, the 4th Brigade disembarked at Alexandria on 3 February 1915 and moved into camp at Heliopolis, where it was assigned to Major General Alexander Godley's New Zealand and Australian Division. Upon arrival, the battalion was reorganised by merging the eight companies into four larger companies, designated 'A' through to 'D'. Shortly afterwards, the battalion's first draft of reinforcements arrived and an extensive period of training in the desert followed throughout February and March. Finally, on 10 April, the 15th Battalion was moved by train to Alexandria, where it embarked upon the troopships Seeang Bee and Australind, bound for Gallipoli.[8] After leaving Alexandria, the 15th Battalion sailed to Mudros, where the Allied force assembled prior to the assault.[9] Assigned to the follow-up waves, the 15th Battalion landed at Anzac Cove on the afternoon of 25 April 1915.[1] As the Ottoman defenders checked the Allied advance inland, on arrival the 15th Battalion was rushed into the line on the left flank of the beachhead.[10] As the advance inland stalled, the battalion became isolated and threatened with destruction until Cannan withdrew his force to a more tenable position.[11] Later, they helped shore up the line before occupying positions around "Pope's Hill" and "Russell's Top", where they joined an attack on 1 May. After that, they occupied "Quinn's Post", and defended it against a strong Ottoman counterattack on 19 May.[12] Further fighting occurred around the battalion's position as the Ottoman troops began tunnelling under the "no man's land" that divided the two lines. Counter-mining actions were undertaken, but on 29 May a significant attack was put in against the 15th Battalion's position and they were briefly forced back before restoring the situation with a strong counterattack.[13]
After this a period of stalemate fell across the peninsula. In early June, the 15th Battalion, its strength having fallen to below 600 men, was withdrawn from Quinn's Post to recuperate in a quiet sector known as "Rest Gully". Over the next two months, due to illness, the battalion's personnel were almost completely replaced. It received several drafts of reinforcements, amounting to over 500 men, including its transport element, and by early August it had reached a strength of 720 men.[14] On 6 August, the Allies launched an offensive in an effort to try to break the deadlock, during which the 15th Battalion attacked the Abdel Rahman Bair heights, which was known to the Australians as "Hill 971",[15] before later supporting the 14th Battalion's attack on "Hill 60".[1] Casualties were heavy, and on 13 September the battalion was withdrawn for a brief rest on Lemnos, its strength having fallen to just 11 officers and 136 other ranks.[16] They returned to Gallipoli early in November, occupying a position in Hay Valley, as winter began. They remained there until being evacuated on 13 December on the transport Carron, as part of the main Allied withdrawal.[17] The battalion's casualties during the campaign amounted to 10 officers and 380 other ranks killed, and one officer and 17 other ranks captured.[18]
Fighting on the Western Front
Following the evacuation from Gallipoli, the AIF was re-organised in Egypt. This saw the splitting of the veteran battalions to provide cadres for new battalions as the AIF's infantry divisions in Egypt were doubled. As a part of this process, the 15th Battalion provided personnel to the 47th Battalion,[19] and the 4th Brigade became part of the Australian 4th Division.[1] After a further period of training, in June 1916 the battalion sailed for France aboard the transport Transylvania.[20] After landing at Marseilles, the 15th Battalion moved to northern France via rail to Beilleul, moving into the line around Bois Grenier for a brief period on 15 June.[21] Amidst the carnage of the Battle of the Somme which was launched in July, the following month, the 15th Battalion was committed to fighting on the Western Front for the first time, entering the line around Pozières on 5 August, as the 4th Division relieved the shattered 2nd.[22]
During the relief, the battalion suffered heavy shelling, which, after it had moved into trenches in front of the village along the sunken road to Courcellette,[23] was followed by a brief German attack that was repulsed and resulted in the battalion capturing 20 Germans. In the days that followed, the battalion worked to improve their defensive line, digging saps towards the German trenches while patrols were sent out into no man's land. Late on 8 August, the 15th put in an attack alongside a British battalion from the Suffolk Regiment, on their left. Amidst heavy shelling and machine-gun crossfire, the attack stalled following the loss of almost all of the officers in the assaulting companies; nevertheless, despite progress on their left, they succeeded in capturing part of the German line, but were ordered to withdraw the following day.[24] On the night of 9 August, a second attack was put in, in concert with the 16th Battalion, which succeeded in securing part of the German line, despite heavy shelling. At noon the following day, the 15th was relieved as the 4th Brigade was withdrawn from the line and replaced by the 13th. Casualties during the battalion's first battle on the Western Front were high: 90 killed and 370 wounded.[25]
Following this, the 15th Battalion moved to Mouquet Farm, where they supported an attack by the 14th Battalion and carried out defensive duties. They remained there until early September, when they were withdrawn back to Warloy and then to Reingheist, via Doulens. Before this occurred, on 30 August, the 15th experienced a change in command, as Cannan, who had been promoted to brigadier-general, was replaced by Lieutenant Colonel Terence McSharry.[26] The remainder of the year was spent in the Ypres salient, around St Eloi and Boorlartbeek, before winter fell on the Western Front.[27] It was the worst winter in Europe in 40 years,[28] and the men suffered heavily from sickness and the cold as they rotated through the line, conducting defensive duties and labouring before moving to Gueudecourt, and then later Lagnicourt, in the new year.[29]
As winter passed, in an effort to shorten their lines and move into prepared positions, the Germans fell back towards the Hindenburg Line.[30] After the Allies advanced to follow up the withdrawal, the battalion fought its first major battle of 1917 in early April, around Bullecourt, where the 4th Brigade attacked as a complete formation for the first time since Gallipoli.[31] Committed without the protection of an artillery barrage, expecting tank support to win the day, the 4th Brigade suffered heavy casualties; on the first night, the tanks broke down and on the second, they had proven unable to breach the enemy defences, leaving the infantry to force their way through. After less than 10 hours of fighting, 2,339 soldiers from the 4th lay dead or wounded, out of 3,000 committed,[32] including 400 from the 15th; by the end of the attack, only 52 men from the battalion's assault force remained uninjured.[33] They were subsequently withdrawn from the line back to farmland around the village of Doulien where the battalion was rebuilt, eventually reaching a strength of 719 personnel of all ranks.[34]
In mid-1917, the Australians were moved to Belgium as the focus of British operations shifted to the Ypres sector in an effort to draw German attention away from the French.[35] The first effort came around Messines, on the southern flank, where a series of tunnels were dug under the German lines. On 7 June, 19 mines were detonated and in the ensuing fighting, the British captured Messines Ridge.[36] Assigned a support role, the 15th Battalion was held in reserve and did not take part in the attack. The following day, it was committed to hold the gains that had been made during the attack, relieving the New Zealanders around Gooseberry Farm.[37] The 15th remained in the Ypres sector and subsequently took part in the fighting around Polygon Wood during the Third Battle of Ypres in September.[38] In November 1917, the battalion was withdrawn from the line for a three-month rest, spending the winter around Templeux-la-Fosse and Hollebeke.[39]
In early 1918, the collapse of Tsarist Russia enabled the Germans to transfer a significant number of troops to the Western Front and in March, having amassed 192 divisions, they launched an offensive against the British forces in the Somme.[40] Heavily outnumbered, the British and Dominion troops were pushed back by the initial onslaught and the Australian Corps was thrown into the line in an effort to stem the tide.[41][42] The 15th Battalion was moved initially to Bavincourt before securing Hebuterne late in the month, where they experienced a heavy artillery bombardment before turning back a German attack. Later, after being relieved by a battalion of the Royal Fusiliers, they moved to Rossignol Farm.[43] Throughout April, while the 13th and 15th Brigades fought significant actions around Villers-Bretonneux, the battalion received several drafts of reinforcements, bringing it up to a total of 57 officers and 955 other ranks as it prepared to move up to replace the 15th Brigade in late April. Following their arrival, they undertook a support role, constructing defences before moving on to Freschencourt on 22 May, remaining there until they marched at the end of the month to Hamelet near Corbie, where they conducted several patrol actions.[44]
As the German advance in the Amiens sector exhausted itself, in June the Allies began to prepare for their own offensive, conducting a series of small-scale advances which became known as "peaceful penetrations".[45] That month, a number of American troops were assigned to the battalion to gain experience, as the United States began building up its forces on the Western Front.[46] Lieutenant General John Monash, having taken over as commander of the Australian Corps from William Birdwood, decided to launch a combined arms attack to reduce the salient that had developed in front of Amiens around Hamel and straighten the line.[47][48]
On 4 July, Australian and American forces attacked Hamel. Assigned the task of attacking a German strong point designated the "Pear Trench",[49][50] the 15th, with an attached company of Americans, suffered the highest losses of any Australian battalion committed to the battle, losing nine officers and 231 other ranks out of the 636 men committed.[51] The losses began even before the assault, when some of the preparatory barrage dropped short on their forming-up point. In the darkness the three tanks that had been assigned to support their attack temporarily became lost, and as a consequence, the 15th's initial attack went in without armoured support. Coming up against strong resistance from well-sited machine-gun posts, the advance was held up until they were overcome by Lewis gun teams and section-level fire and movement, which allowed the battalion to gain the Pear Trench. The 15th Battalion's sole Victoria Cross recipient, Private Henry Dalziel, received his award for his actions during this time while serving as a "number two" within a Lewis-gun team, rushing a German machine-gun post with a revolver.[52] After taking the Pear Trench, the battalion exploited the position moving into the Vaire Trench and Hamel Wood in concert with the tanks that had finally arrived. Following the capture of the village, the battalion defended the captured ground before being relieved by the 49th Battalion late on 5 July.[53]
After Hamel, the battalion moved to Hangaard Wood,[54] and on 8 August the Allies launched the Hundred Days Offensive around Amiens.[55] Two days before the advance, the battalion suffered a heavy setback when their commanding officer, McSharry, was mortally wounded in a bombardment around Vaire, while trying to rescue a wounded soldier. In his stead, Major Burford Sampson temporarily took command.[56] Advancing from around Hamel, the battalion attacked the village of Cerisy, and despite enduring a gas attack they succeeded in capturing around 350 Germans.[57] As further advances followed,[41] more actions followed around Lihu Farm and Jeancourt as the 15th Battalion continued to fight around the "Hindenburg Outpost Line" until late September, by which time it had taken heavy casualties, with a strength of just over 300 men.[58] On the eve of the battalion's final battle, Sampson handed over command to Lieutenant Colonel Charles Johnston.[59] The battles of 1918 had depleted the Australians, inflicting heavy casualties that they had been unable to replace as recruitment in Australia had fallen. In October, at the request of the Australian prime minister, Billy Hughes, they were withdrawn from the line for rest and reorganisation. They did not return to action before the armistice was signed in November 1918,[60] after which the battalion's strength was slowly reduced as men were individually repatriated back to Australia as part of the demobilisation process.[1] The battalion ceased to exist on 27 March 1919, having been reduced to company strength.[61]
During the war, the battalion lost 1,194 men killed and 2,187 wounded.[1] Members of the battalion received the following decorations: one Victoria Cross, one Companion of the Order of the Bath, two Companions of the Order of St Michael and St George, 13 Distinguished Service Orders (DSOs), two Members of the Order of the British Empire, 30 Military Crosses (MCs), 28 Distinguished Conduct Medals (DCMs), 180 Military Medals (MMs), nine Meritorious Service Medals (MSMs), 64 Mentions in Despatches (MIDs) and eight foreign awards.[62]
Inter-war years
In 1921, following the conclusion of the demobilisation process, the government undertook a review of Australia's military requirements and decided to re-organise its part-time military forces to perpetuate the numerical designations of the AIF units.[63][64] As a result, the 15th Battalion was re-raised in Brisbane, Queensland, within the 1st Military District. Personnel were drawn from the 2nd Battalion, 15th Infantry Regiment, which traced its lineage to the 8th Infantry (Oxley Battalion) that had been raised in 1912 from part of the 1/9th Australian Infantry Regiment.[65] In 1927, the battalion received its battle honours from the First World War. Territorial designations were introduced at this time,[66] and the battalion became known as the "Oxley Regiment" in recognition of its connection to the Oxley region. It was also granted the motto Caveant Hostes and, the following year, the battalion became allied with the East Yorkshire Regiment.[67]
Initially the strength of the Citizens Forces units was maintained through a mixture of voluntary and compulsory service;[68] in 1929–1930, however, the newly elected Scullin Labor government terminated compulsory service and replaced the Citizens Forces with an all-volunteer "Militia".[69] Funding was cut heavily, and training opportunities were also reduced.[70] This, combined with economic pressure caused by the Great Depression, which made it difficult for part-time soldiers to maintain their livelihoods while continuing their training commitments, meant that the number of volunteers fell sharply. Consequently, a number of infantry battalions were disbanded or amalgamated.[69] As a result of this decision, the 15th Battalion was merged with the 9th to form the 9th/15th Battalion.[1] A memorial plaque to the battalion was unveiled in ANZAC Square, in Brisbane, in 1932.[71] In 1934, the 9th/15th was split and the 15th merged with the 26th Battalion to form the 15th/26th Battalion.[67] This formation was split in July 1939,[72] as part of a hasty expansion of Australia's military force as tensions in Europe raised concerns about the country's preparedness in the event of a future war.[73] Upon re-forming, the 15th Battalion established its drill hall near the Brisbane Cricket Ground.[74]
Second World War
Garrison duty in Australia and service in New Guinea
After the outbreak of the Second World War in September 1939, due to the provisions of the Defence Act, which precluded the Militia from being sent outside Australian territory to fight, the decision was made to raise an all-volunteer force for overseas service known as the "Second Australian Imperial Force" (2nd AIF).[75] This force was dispatched to the Middle East to fight against the Germans and Italians, while in Australia the compulsory service scheme was re-established in January 1940 and the Militia was called up for short periods of continuous service – up to 90 days – on a rotational basis to improve the overall readiness of Australia's military forces.[75][76] The 15th Battalion was partially mobilised for continuous service in mid-1940 and, in August that year, the battalion sent a detachment of 200 men to undertake garrison duty in Territory of Papua.[74] As part of the 7th Brigade, the detachment was stationed at "Three Mile Camp" near Port Moresby.[64] Later in the year, the detachment was transferred to the 49th Battalion, which remained in Papua.[74]
Meanwhile, the rest of the 15th Battalion remained in Brisbane, serving in a part-time capacity.[74] In November and December 1941, the battalion received three large drafts of conscripts – consisting of several hundred individuals[77] – who were attached to the battalion to receive three months of compulsory full-time training as war loomed in the Pacific.[78] Many of the conscripts received at this time were university students and most had no previous military experience, although some had served as volunteers in the Militia prior to their call up. Initially, these personnel were formed into separate training companies, receiving three months of continuous training at Chermside, with the university students completing a shorter period of just 60–70 days, to fit in with their semester break. Later, in February 1942, once they had completed their period of mandatory training, the conscripts were either released from service, or moved into the battalion's four rifle companies where they served alongside volunteers on full-time service.[79]
Following Japanese victories in Malaya, Singapore and elsewhere in the Pacific in late 1941 and early 1942, the whole 15th Battalion was mobilised for wartime service and tasked with undertaking defensive duties along the coast of south-east Queensland, based at Caloundra, due to concerns of a potential invasion.[74] The invasion did not occur and, in mid-1942, the 15th Battalion was transferred to the 29th Brigade.[64] Consisting of the 42nd and 47th Battalions, the 29th was part of the 5th Division, and was moved north to Townsville, where the battalion served as a garrison force.[64]

In January 1943, the 29th Brigade was deployed to New Guinea to serve as garrison troops in areas that had been recently secured by Allied forces. The 15th Battalion was initially sent to Milne Bay, remaining there for six months. It moved to Buna in July, but did not remain there long, transferring to Morobe a few weeks later.[64] While there, the battalion's commanding officer, Lieutenant Colonel Jack Amies, appealed to the battalion to volunteer for service as part of the AIF. While some already had, the majority of the men were still classified as Militia personnel, which meant that the battalion was restricted in where it could serve and was liable to be broken up.[80] To be classified as an AIF battalion, under the provisions of the newly passed Defence (Citizen Military Forces) Act 1943, 65 per cent or more of the personnel had to volunteer for service outside Australian territory.[81] The response was considerable and, by August, the battalion was gazetted as an AIF battalion.[80] Later that month, as the Australians fought to secure Komiatum, the battalion moved on barges to Nassau Bay,[82] and was committed to combat for the first time, occupying a position around Mount Tambu, known as "Davidson's Ridge", before marching to Tambu Bay.[83] Arriving on 23 August, the battalion was initially placed into divisional reserve,[84] as the 29th Brigade was committed to the drive on Salamaua.[64]
The campaign was to proceed in conjunction with the effort to capture Lae. As the Japanese garrison there was pressed by the 7th Division advancing from the Markham Valley and the 9th Division advancing along the coast from beaches east of the town, the Japanese hurriedly sought to reinforce Lae, moving about 6,000 troops from Salamaua to the south. Sensing an opportunity, in early September the 3rd Division began a drive north on Salamaua from Wau.[85] On 31 August, the battalion joined the fighting, advancing around the right flank of the US 162nd Infantry Regiment and attacking the junction between the Lokanu and Scout Ridges. Over the course of 10 days of heavy fighting and hard going up the steep slopes, it gained the position, securing it by 9 September. The battalion had lost 10 men killed and 47 wounded in the process, but had killed 107 Japanese.[86] The following day, the 15th advanced towards Nuk Nuk as Japanese resistance crumbled. Hard-pressed, the Japanese garrison had begun to withdraw from Salamaua, completing the process just before the Allies entered the town on 11 September.[87] The battalion's total casualties in the fighting around Salamaua between April and September numbered 11 killed and 50 wounded.[88]
Following the fall of the town, as the remainder of the 5th Division was rested, the 15th Battalion, which had seen less action due to being held in reserve, was committed to pursuing the withdrawing Japanese.[89] The battalion advanced north towards the Markham River, and on 14 September two companies were transported by barge in an effort to get behind the fugitives and cut them off, but they arrived about an hour too late.[90] On 17 September, the battalion established a large ambush site along the coast south of the river to prevent the fleeing Japanese from evacuating by the sea. The following day, the ambush was sprung as a platoon-sized group attempted to get away. After being beaten back into the jungle, they launched an attack on one of the Australian positions that was blocking their escape. In the ensuing hand-to-hand fighting, 13 Japanese were killed and one prisoner taken.[91] Further minor clashes followed as the 15th patrolled north and, by late October, it entered Lae.[92] The battalion subsequently took up defensive duties around the town as the 29th Brigade was assigned the task of holding Lae to free up troops from the 7th Division for operations in the Finisterre Range further to the west.[93]
Fighting on Bougainville
The battalion remained in the vicinity of Lae until June 1944, when it was withdrawn to Australia. It established itself at Strathpine, before moving to Samford,[64] in the greater Brisbane area. After a period of leave, the battalion was re-organised in preparation for employment in the Bougainville campaign, remaining with the 29th Brigade, which was transferred to the 3rd Division.[94] The 3rd had adopted the "jungle divisional" establishment, and the battalion's authorised strength fell from 910 to 803.[95]
To free up US troops for service in the Philippines,[96] the Australians took over from the US garrison on Bougainville, and the 3rd Division arrived around Torokina, on Bougainville, in November 1944.[97][98] Prior to their arrival, the US garrison had maintained a defensive posture, but the Australians launched a limited-scale offensive on the island which evolved into three main drives in the north, south and in the centre of the island.[99] The 15th Battalion embarked on the transport Cape Victory at Pinkenba on 23 November, and arrived on Bougainville on four days later. Along with the rest of the 29th Brigade, it relieved the US 182 Infantry Regiment,[100] and was assigned to the southern drive towards Buin, where the main Japanese force was based. Its first involvement with the campaign came in December, when the 15th Battalion departed the Jaba River and led the 29th Brigade's advance along the western coast towards the Tavera River.[64] Upon reaching the river, in order to skirt around the thick jungle, a company was sent up the Adele River on a barge, while the rest of the battalion advanced inland along the Mendai Road. By January 1945, the 15th was joined by the 29th Brigade's other two battalions and together they fought through to Mawaraka, before being relieved by the 15th Battalion's old formation, the 7th Brigade. They were subsequently sent back to Torokina for rest, remaining there until early July 1945.[64]
At that point, the 29th Brigade was committed to the fighting again, moving to the Mivo River, where it took over the advance from the 15th Brigade.[101] As the 15th Battalion advanced to relieve the 57th/60th Battalion, it clashed with Japanese units and, on 3 July, as a company from the 47th Battalion came under heavy attack, one the 15th Battalion's platoons was dispatched with two tanks in support to provide assistance. Heavy fighting continued throughout the afternoon following their arrival, during which at least 20 Japanese were killed.[102] The 15th Battalion occupied a position around Sisikatekori and along Killen's Track, in the southern sector of the brigade's area, while the Australians made preparations to resume the advance towards the Buin stronghold. The most-forward battalion, on 6 July it was subjected to heavy attacks as the Japanese sought to infiltrate the Australian forward positions and cut their lines of communication.[103] As a result of these attacks, the plan to advance was cancelled temporarily.[64]
Patrols from the 15th were sent out daily to wrest the initiative and frequent actions followed, sometimes involving contacts with Japanese forces up to 70 strong.[64] These small-scale actions culminated in a large-scale attack on 'D' Company on 9 July, in which 34 Japanese were killed and two captured for the loss of two Australians killed and four wounded.[102] After this, patrols were sent out across the Mivo, but strong Japanese resistance, and heavy rain,[104] frustrated the 15th's efforts to carry out a detailed reconnaissance of the opposite bank, effectively halting the Australian advance and ending significant combat in the island's south.[64] The battalion was able to send patrols across the Mivo in early August, although at least one man was swept downstream in the swollen waters, and a number of clashes occurred between 3 and 5 August. On 3 August, a small patrol killed six Japanese after surprising a platoon to the east of the Mivo River, and the following day a further 19 Japanese were killed in clashes with the 15th Battalion, while one soldier from the battalion was killed and another wounded when the Japanese exploded a mine by remote control next to the Buin Road. On 5 August, a patrol from the 15th was able to penetrate as far as the Wapiai River and preparations began for the battalion to resume the advance on 17 August.[105] The advance was cancelled a week later in anticipation of a Japanese surrender, following news of the atomic bombing of Hiroshima and Nagasaki, and the battalion's involvement in the fighting on Bougainville came to an end.[106] Its battle casualties during the campaign are listed by Gavin Long, the Australian official historian, as five officers and 102 other ranks killed or wounded.[107]
Disbandment and legacy
The battalion concentrated around Torokina in October, in preparation for post-war demobilisation. As its personnel were repatriated back to Australia or transferred to other units for further service, its strength dwindled. In mid-December, the battalion's remaining personnel embarked upon the transport River Loddon and sailed for Brisbane, arriving there on Christmas Eve.[108] The demobilisation process continued at Chermside and the battalion was finally disbanded on 28 March 1946.[64] The Australian War Memorial lists the battalion's casualties during the Second World War as 42 men killed and 105 wounded. Its personnel received the following decorations: two Officers of the Order of the British Empire, four MCs, two DCMs, 11 MMs and 35 MIDs.[64]
Following its disbandment in 1946, although other Militia battalions were re-raised when the Citizens Military Force was established in 1948,[109] the 15th Battalion has remained off the Australian Army's order of battle.[110] In 1961, the battalion was finally awarded its battle honours for the Second World War. At the same time, it was entrusted with those earned by its corresponding 2nd AIF battalion, the 2/15th Battalion.[67] In May 2002, Alec Campbell, the last surviving Australian veteran of Gallipoli, died at the age of 103. A member of the 15th Battalion, Campbell had enlisted from Tasmania at the age of 16 and arrived on the peninsula as a reinforcement in the final stages of the campaign. He was later wounded, and evacuated due to illness prior to the final evacuation of all Allied forces in December 1915.[111]
Alliances
The 15th Battalion held the following alliance:
- United Kingdom – East Yorkshire Regiment (1928–46).[67]
Battle honours
The 15th Battalion was awarded the following battle honours:
- First World War: Somme 1916–18, Pozières, Bullecourt, Messines 1917, Ypres 1917, Menin Road, Polygon Wood, Passchendaele, Arras 1918, Ancre 1918, Hamel, Amiens, Albert 1918, Hindenburg Line, Epéhy, France and Flanders 1916–18, Anzac, Landing at Anzac, Defence of Anzac, Suvla, Sari Bair, Gallipoli 1915, and Egypt 1915–16.[1]
- Second World War: South-West Pacific 1943–45, Liberation of Australian New Guinea, Tambu Bay, Sio, Adele River, Mawaraka, Mivo Ford, and Lae–Nadzab.[64]
In 1961, the battalion – although no longer on the Australian Army's order of battle – was entrusted with the battle honours awarded to the 2/15th Battalion for its service with the 2nd AIF during World War II. The honours it inherited at this time were: North Africa 1941–42; El Adem Road; Alam el Halfa; West Point 23; Finschhafen; Scarlet Beach; Bumi River; Defence of Scarlet Beach; Nongora; Borneo; Brunei; Miri; Defence of Tobruk; The Salient 1941; El Alamein; South-West Pacific 1943–45; Lae–Nadzab; Liberation of Australian New Guinea; and Sio.[67]
Commanding officers
The following officers commanded the 15th Battalion:[1][64][59]
- First World War
- Lieutenant Colonel James Cannan;
- Lieutenant Colonel Terrence McSharry;
- Major Burford Sampson;
- Lieutenant Colonel Charles Johnston; and
- Lieutenant Colonel John Corrigan.
- Second World War
- Lieutenant Colonel Jack Amies;
- Lieutenant Colonel Fredrick Edmunds;
- Lieutenant Colonel Herbert McDonald; and
- Lieutenant Colonel William Oliver.
Notes
- 1 2 3 4 5 6 7 8 9 10 15th Battalion.
- ↑ Kuring 2004, p. 47.
- ↑ Chataway 1948, pp. i–x.
- ↑ Chataway 1948, p. i.
- ↑ Chataway 1948, p. xi.
- ↑ Stevenson 2007, p. 189.
- ↑ Chataway 1948, p. xii.
- ↑ Chataway 1948, p. xiii.
- ↑ Chataway 1948, p. 1.
- ↑ Chataway 1948, p. 5.
- ↑ Chataway 1948, p. 135.
- ↑ Chataway 1948, p. 51.
- ↑ Broadbent 2005, pp. 169–170.
- ↑ Chataway 1948, pp. 51–67.
- ↑ Chataway 1948, p. 67.
- ↑ Chataway 1948, p. 95.
- ↑ Chataway 1948, p. 99.
- ↑ Chataway 1948, p. 174.
- ↑ Bean 1941, p. 42.
- ↑ Chataway 1948, p. 109.
- ↑ Chataway 1948, p. 110.
- ↑ Chataway 1948, p. 116.
- ↑ Chataway 1948, p. 121.
- ↑ Chataway 1948, pp. 122–129.
- ↑ Chataway 1948, pp. 130–132.
- ↑ Chataway 1948, pp. 132–136.
- ↑ Chataway 1948, p. 142.
- ↑ Stevenson 2007, p. 191.
- ↑ Chataway 1948, pp. 142–146.
- ↑ Chataway 1948, p. 164.
- ↑ Chataway 1948, p. 165.
- ↑ Laffin 1999, pp. 48 & 60.
- ↑ Chataway 1948, pp. 173–174.
- ↑ Chataway 1948, p. 176.
- ↑ Grey 2008, p. 105.
- ↑ Baldwin 1963, p. 102.
- ↑ Chataway 1948, p. 178.
- ↑ Chataway 1948, p. 190.
- ↑ Chataway 1948, pp. 195–201.
- ↑ Baldwin 1963, pp. 126 & 140.
- 1 2 Grey 2008, p. 108.
- ↑ Chataway 1948, p. 202.
- ↑ Chataway 1948, pp. 202–205.
- ↑ Chataway 1948, pp. 205–210.
- ↑ Richardson 2011, p. 32.
- ↑ Chataway 1948, p. 209.
- ↑ Chataway 1948, p. 211.
- ↑ Nunan 2000, p. 26.
- ↑ Laffin 1999, p. 77.
- ↑ Chataway 1948, p. 216.
- ↑ Laffin 1999, p. 72.
- ↑ Richardson 2011, p. 34.
- ↑ Chataway 1948, pp. 215–216.
- ↑ Chataway 1948, p. 218.
- ↑ Baldwin 1963, p. 147.
- ↑ Chataway 1948, pp. 218 & 231.
- ↑ Chataway 1948, p. 224.
- ↑ Chataway 1948, p. 230.
- 1 2 Chataway 1948, p. 231.
- ↑ Grey 2008, p. 109.
- ↑ 15th Battalion War Diary March 1919.
- ↑ Chataway 1948, p. 301.
- ↑ Grey 2008, p. 125.
- 1 2 3 4 5 6 7 8 9 10 11 12 13 14 15 16 15th Battalion, Oxley Regiment.
- ↑ Festberg 1972.
- ↑ Stanley 2001, p. 2.
- 1 2 3 4 5 Festberg 1972, p. 76.
- ↑ Grey 2008, pp. 125 & 138.
- 1 2 Keogh 1965, p. 44.
- ↑ Grey 2008, p. 138.
- ↑ Chataway 1948, p. 240.
- ↑ 26th Battalion, Logan and Albert Regiment.
- ↑ Keogh 1965, pp. 48–49.
- 1 2 3 4 5 Park 2010, p. 35.
- 1 2 Grey 2008, p. 146.
- ↑ Park 2010, p. 15.
- ↑ Park 2010, p. 17.
- ↑ Park 2010, p. 6–8.
- ↑ Park 2010, pp. 8–9; 15–17.
- 1 2 Park 2010, p. 72.
- ↑ Grey 2008, p. Grey183.
- ↑ Dexter 1961, p. 180.
- ↑ Dexter 1961, pp. 181 & 211.
- ↑ Dexter 1961, pp. 285 & 291.
- ↑ Coulthard-Clark 1998, p. 241.
- ↑ Dexter 1961, pp. 304, 308 & 316.
- ↑ Keogh 1965, pp. 309–310.
- ↑ Dexter 1961, p. 324.
- ↑ Dexter 1961, p. 323.
- ↑ Dexter 1961, p. 393.
- ↑ Dexter 1961, p. 395.
- ↑ Dexter 1961, p. 396.
- ↑ Dexter 1961, p. 403.
- ↑ Park 2010, p. 36.
- ↑ Palazzo 2004, pp. 91 & 94.
- ↑ Keogh 1965, p. 396.
- ↑ Keogh 1965, p. 416.
- ↑ Medcalf 2000, p. 5.
- ↑ Keogh 1965, pp. 417–422.
- ↑ Park 2010, p. 95.
- ↑ Medcalf 2000, p. 65.
- 1 2 Long 1963, p. 221.
- ↑ Medcalf 2000, p. 66.
- ↑ Keogh 1965, p. 420.
- ↑ Long 1963, p. 224.
- ↑ Long 1963, p. 226.
- ↑ Long 1963, p. 237.
- ↑ Park 2010, p. 103.
- ↑ Grey 2008, p. 200.
- ↑ Park 2010, p. 106.
- ↑ Meyers & Dolan 2002, pp. 39–41.
References
- "15th Battalion". First World War, 1914–1918 units. Australian War Memorial. Retrieved 10 January 2012.
- "15th Infantry Battalion War Diary: March 1919" (PDF). Australian War Memorial. Retrieved 24 August 2013.
- "15th Battalion (Oxley Regiment)". Second World War, 1939–1945 units. Australian War Memorial. Retrieved 10 January 2012.
- "26th Battalion (Logan and Albert Regiment)". Second World War, 1939–1945 units. Australian War Memorial. Retrieved 10 January 2012.
- Baldwin, Hanson (1963). World War I: An Outline History. London: Hutchinson. OCLC 793915761.
- Bean, Charles (1941). The Australian Imperial Force in France, 1916. Official History of Australia in the War of 1914–1918. Volume III (12th ed.). Canberra, Australian Capital Territory: Australian War Memorial. OCLC 220623454.
- Broadbent, Harvey (2005). Gallipoli: The Fatal Shore. Camberwell, Victoria: Viking/Penguin. ISBN 0-670-04085-1.
- Chataway, Thomas (1948). Goldenstedt, Paul, ed. History of the 15th Battalion 1914–1918. Fortitude Valley, Queensland: William Brooks & Co. OCLC 35124181.
- Coulthard-Clark, Chris (1998). Where Australians Fought: The Encyclopaedia of Australia's Battles (1st ed.). St Leonards, New South Wales: Allen and Unwin. ISBN 1-86448-611-2.
- Dexter, David (1961). The New Guinea Offensives. Australia in the War of 1939–1945. Series 1—Army. Volume VII (1st ed.). Canberra, Australian Capital Territory: Australian War Memorial. OCLC 2028994.
- Festberg, Alfred (1972). The Lineage of the Australian Army. Melbourne, Victoria: Allara Publishing. ISBN 978-0-85887-024-6.
- Grey, Jeffrey (2008). A Military History of Australia (3rd ed.). Melbourne, Victoria: Cambridge University Press. ISBN 978-0-521-69791-0.
- Keogh, Eustace (1965). South West Pacific 1941–45. Melbourne, Victoria: Grayflower Publications. OCLC 7185705.
- Kuring, Ian (2004). Redcoats to Cams: A History of Australian Infantry 1788–2001. Loftus, New South Wales: Australian Military History Publications. ISBN 1-876439-99-8.
- Laffin, John (1999). The Battle of Hamel: The Australians' Finest Victory. East Roseville, New South Wales: Kangaroo Press. ISBN 0-86417-970-7.
- Long, Gavin (1963). The Final Campaigns. Australia in the War of 1939–1945. Series 1—Army. Volume VII (1st ed.). Canberra: Australian War Memorial. OCLC 1297619.
- Medcalf, Peter (2000) [1986]. War in the Shadows: An Australian Soldier's Story of War in the Jungle, Bougainville 1944–45. St Lucia, Queensland: University of Queensland Press. ISBN 0-7022-3144-4.
- Meyers, John; Dolan, Bryn (2002). "Alec William Campbell: 'The Last Sentinel of Gallipoli'". Sabretache. Military Historical Society of Australia. XLIII (December): 39–41. ISSN 0048-8933.
- Nunan, Peter (2000). "Diggers' Fourth of July". Military History. 17 (3): 26–32 & 80. ISSN 0889-7328.
- Palazzo, Albert (2004). "Organising for Jungle Warfare". In Dennis, Peter; Grey, Jeffrey. The 2003 Chief of Army's Military History Conference: The Foundations of Victory: The Pacific War 1943–1944 (PDF). Canberra: Army History Unit. pp. 86–101. ISBN 978-0-646-43590-9.
- Park, William (2010). Beyond Adversity: 'U' Company, 15th Battalion 1941–1942. Newport, New South Wales: Big Sky Publishing. ISBN 978-0-9806582-7-9.
- Richardson, Andrew (2011). "Hamel, 1918". Despatches Magazine: The Newsletter of the Australian Army History Unit. Newport, New South Wales: Big Sky Publishing (1: March 2011): 32–37. OCLC 771957938.
- Stanley, Peter (2001). "Broken Lineage: The Australian Army's Heritage of Discontinuity" (PDF). A Century of Service: 100 Years of the Australian Army. Army History Unit. Archived from the original (PDF) on 21 March 2011. Retrieved 21 November 2011.
- Stevenson, Robert (2007). "The Forgotten First: The 1st Australian Division in the Great War and its Legacy". Australian Army Journal. IV (1): 185–199. OCLC 30798241.